Introducing TwinCAT Project Variants! Variants are available from build 4024 onward and allow you to modify hardware configuration and even run different code based on different versions of the same project. You can quickly toggle between these versions using a dropdown in TCXAE.
This article discusses the basics of configuration/capabilities of project variants and some example uses for them.
Table of Contents:
- Why Use Variants?
- Setup
- Using Variants to Run Different Code
- Simulating Axes with Variants
- Using Variants for Multiple Similar Machines
- Gotchas
- Further Reference
Why Use Variants?
Back to Table of Contents
Why might I want to use variants, you ask?
1. Facilitating Simulation
While you might want to prepare for deploying your code by mapping PLC inputs/outputs to the correct hardware, you also might want to disable hardware or even change mappings so you can simulate your software locally. Project variants allow you to enable and disable hardware components in your TwinCAT project and adjust variable mapping. By using them, you can easily switch between a deployment configuration and a simulation configuration.
2. Parallel Online/Offline Development
Sometimes at DMC we run into situations where, in order to meet a project’s deadlines, we must begin commissioning a machine while offline development of the software is still occurring. Our engineers might need to make changes to the hardware configuration or code so that they can simulate the PLC software on their own machines. However, merging updates back into branches that may be deployed to live machines can subsequently get messy. Engineers might forget to remove those changes made for simulation, leading to unnecessary effort reverting those changes for the live system. Using variants for simulation or different testing configurations can make this a breeze.
3. Maintaining Multiple Similar Machines
Often different machines might use the same codebase but vary slightly, with extra options included or slightly different hardware configurations. Project variants can be used to manage the different types of a certain machine without having to create separate projects for different hardware configurations.
Setup
Back to Table of Contents
To use variants, enable the toolbar with View > Toolbars > TwinCAT XAE Project Variants.
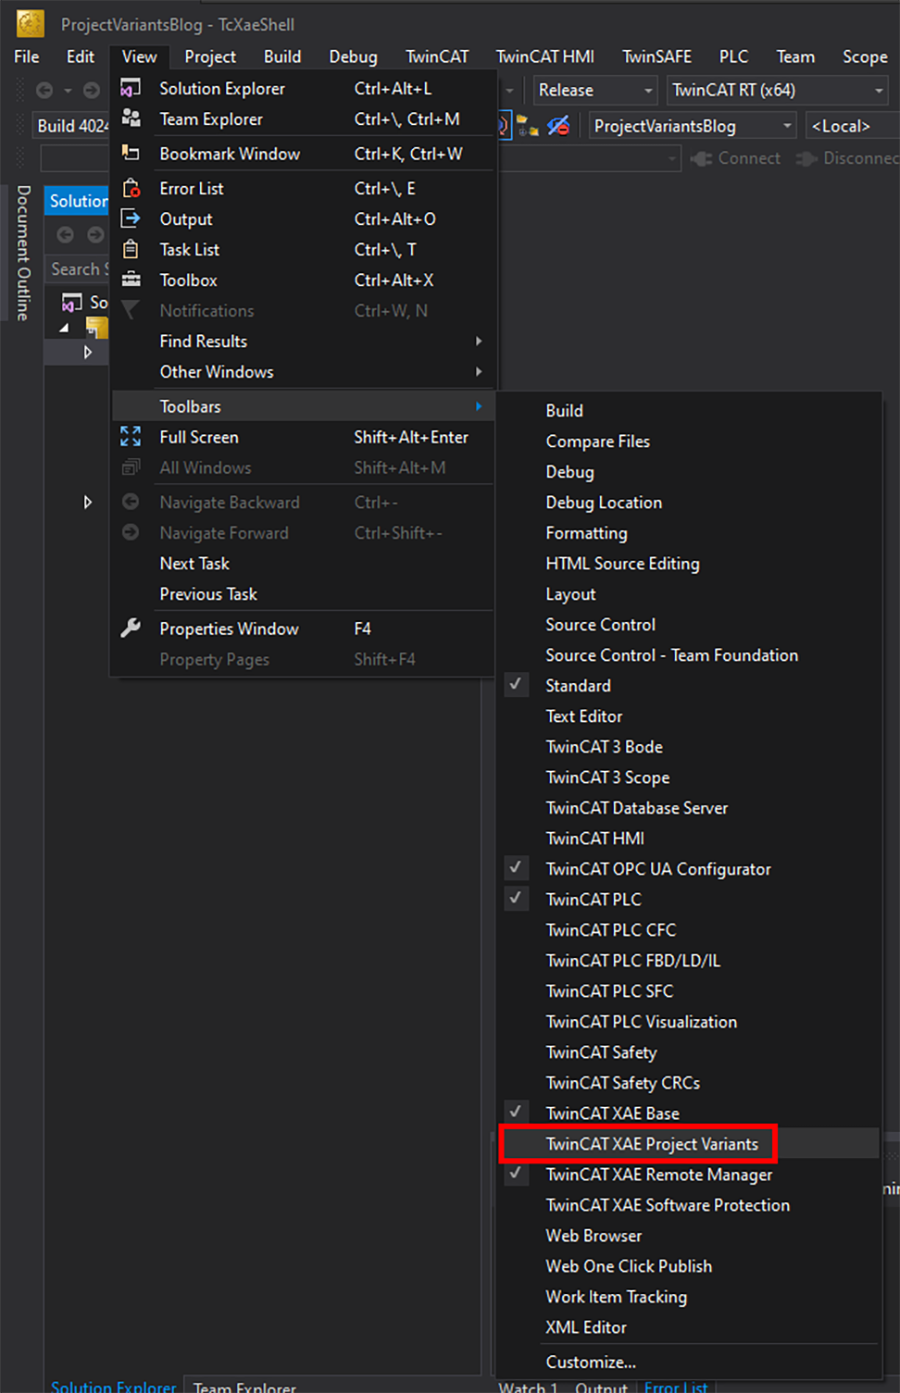
This tool bar consists of the Project Variant Manager icon and the dropdown to select the active variant. To add new variants/groups, click on the Project Variant Manager icon.

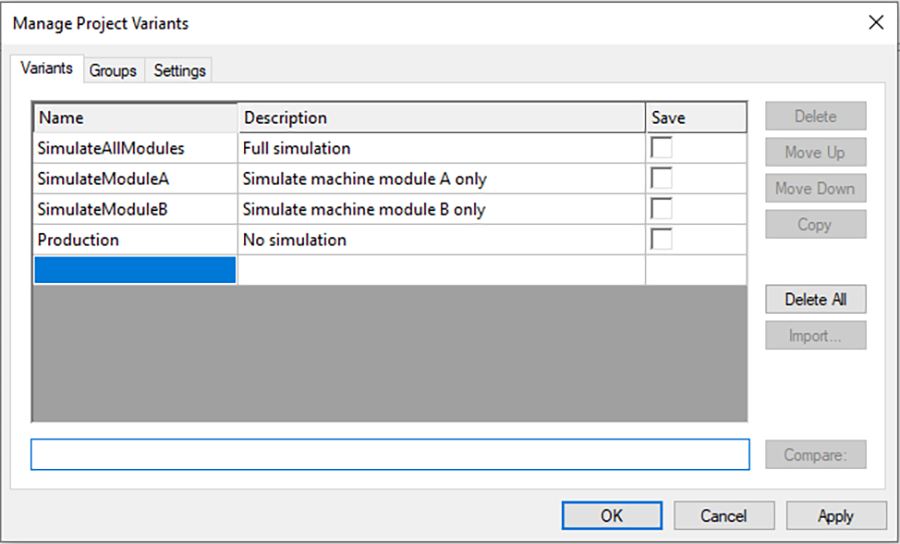
Simply type a name in the popup to add a new variant.
There is also a group feature, which allows you to place variants into groups. Define groups in the same way and select which variants should be included in which groups.
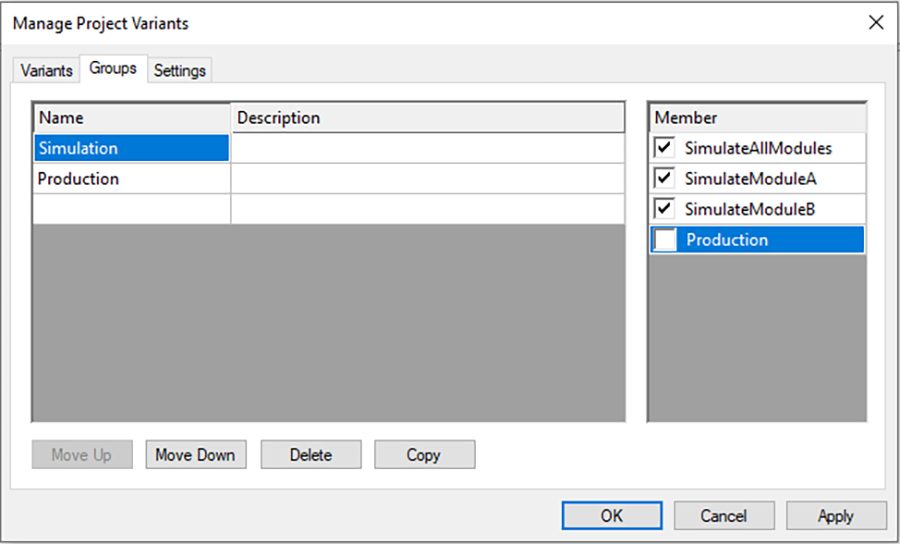
This grouping feature can be very powerful, as it allows you to make edits that will propagate to all the variants in a group, instead of having to make those edits across several variants individually. Variants can also belong to multiple groups.
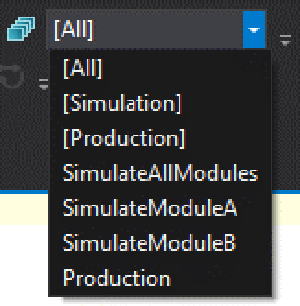
The dropdown list should now be populated with variants to choose from. There is also the [All] option, which will allow you to make edits that will propagate to all variants in the project.
Making variants alone will not necessarily make them useful within the project. You must also define what aspects of your project you wish to be modified by the variants.
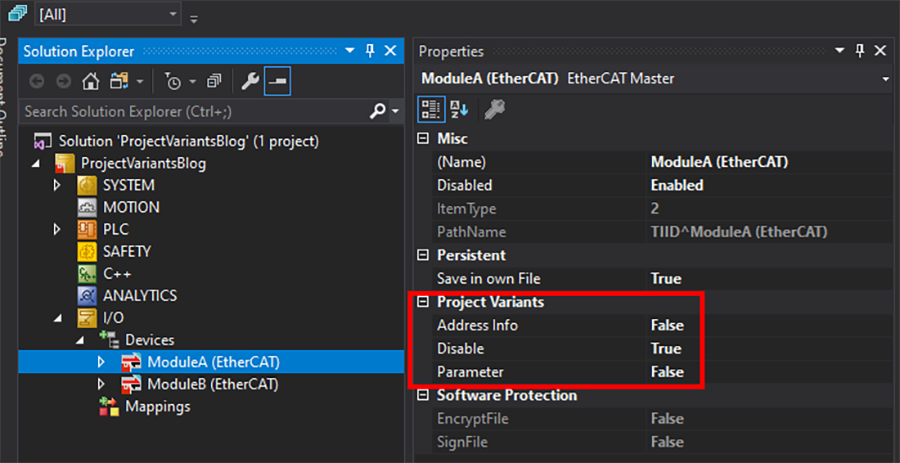
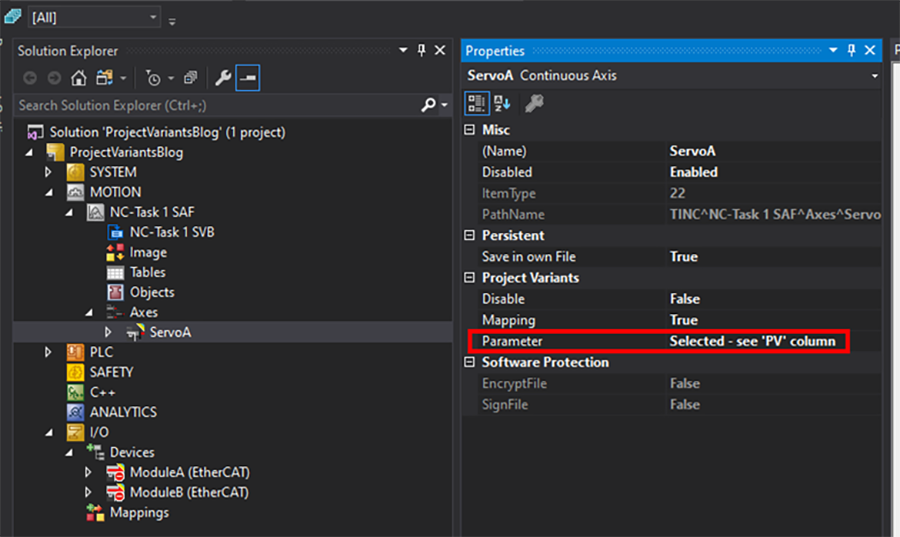
If you click on an item in the Solution Explorer, you should see a Project Variants section in the Properties window (View > Properties Window if it’s not already open). Each item in the solution tree may have different options for what can change based on the currently active project variant.
For example, here I have two EtherCAT masters for the different modules of my machine. I have the option of setting the Address Info, Disable, and Parameter to be dependent on project variants. Here I’ve chosen to control whether these components are disabled based on the active project variant by setting the Disable option to True. I’ve prevented the other available aspects of the components from changing based on the active variant by setting them to False.
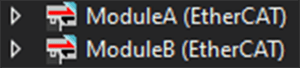
Once an item in the solution explorer tree has been configured to change based on variants, a little blue triangle will appear in the upper right corner of the icon . This can be a helpful way to tell what has been configured for variants in your project.
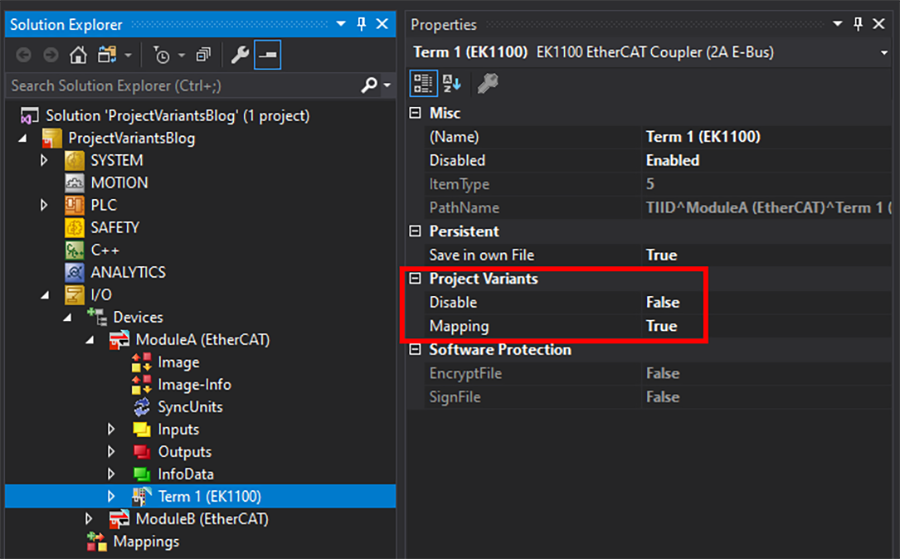
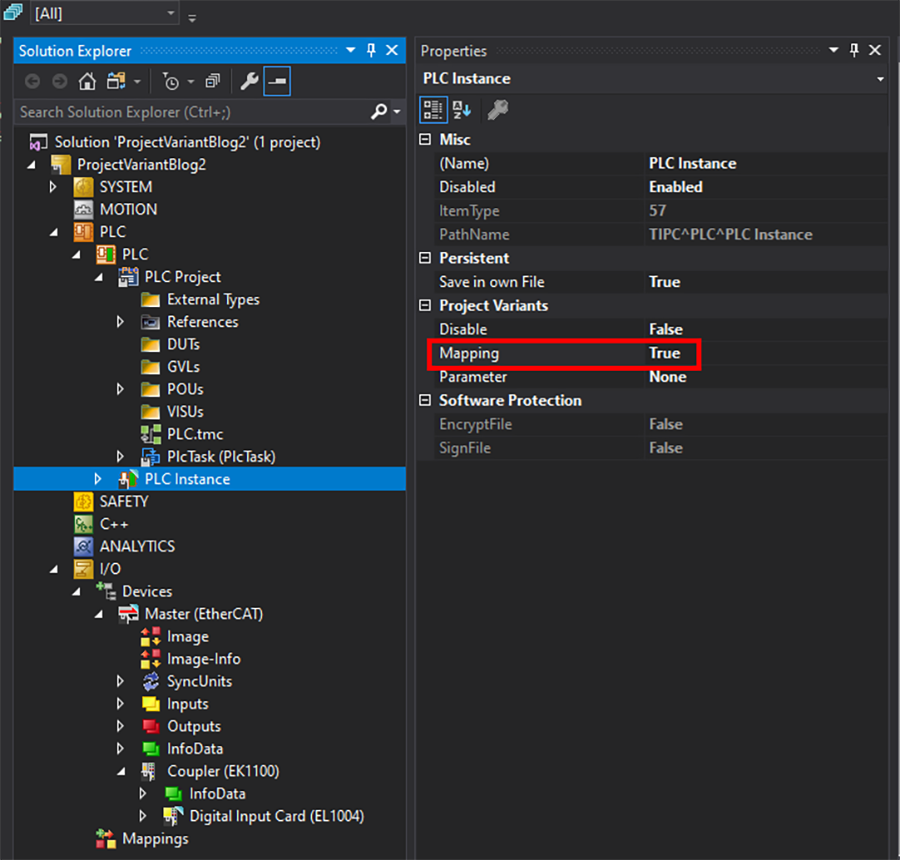
As another example, I can choose if Disable and Mapping will be variant specific for an EK1100 on the module. Disabling is already variant specific in the parent component (EtherCAT Master “ModuleA”), so I don’t need to do that here. But allowing mappings to change based on variant might be useful, as it gives me the ability map different PLC variables to different hardware based on the currently active variant.
Now that we’ve set up these items, we simply need to make the changes we want for each variant while that variant is selected. This is important – make sure you have the correct variant selected! If not, you could be inadvertently making changes to the wrong variant, or worse, a group of wrong variants.
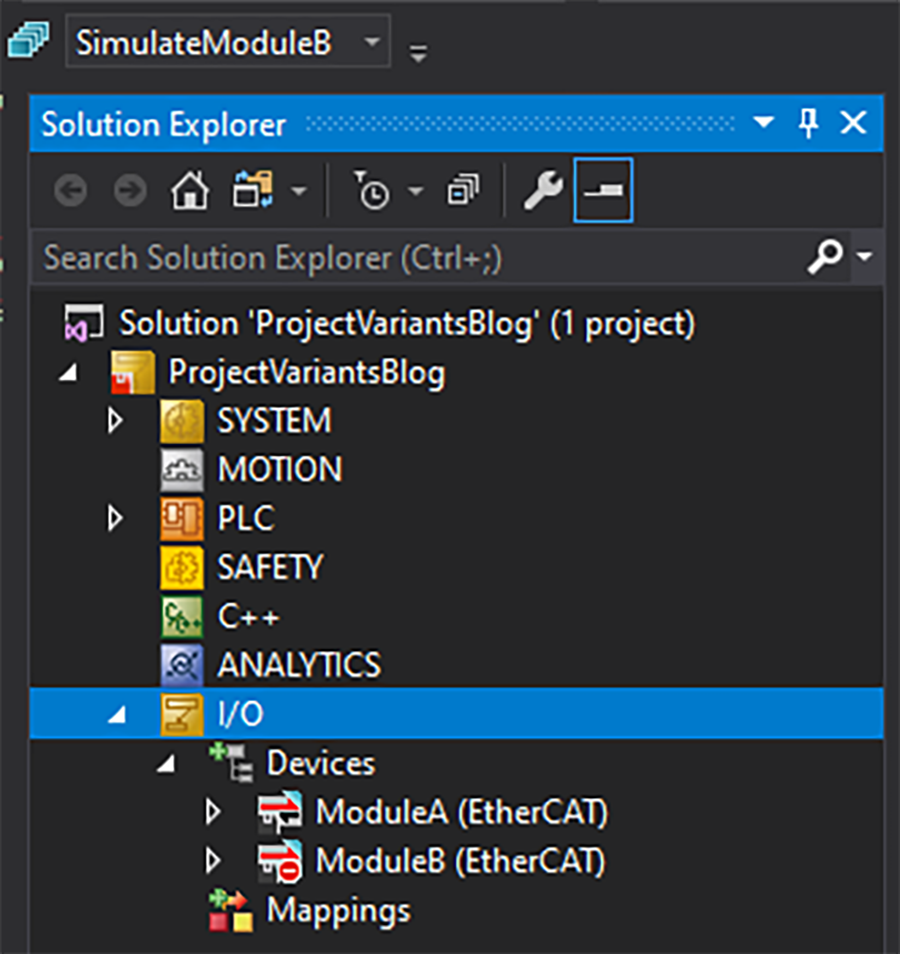
In this example, I can choose four variants:
SimulateAllModules – Everything is simulated. This allows easy testing on engineers’ laptops for offline development. Notice how EtherCAT masters ModuleA and ModuleB are both disabled.

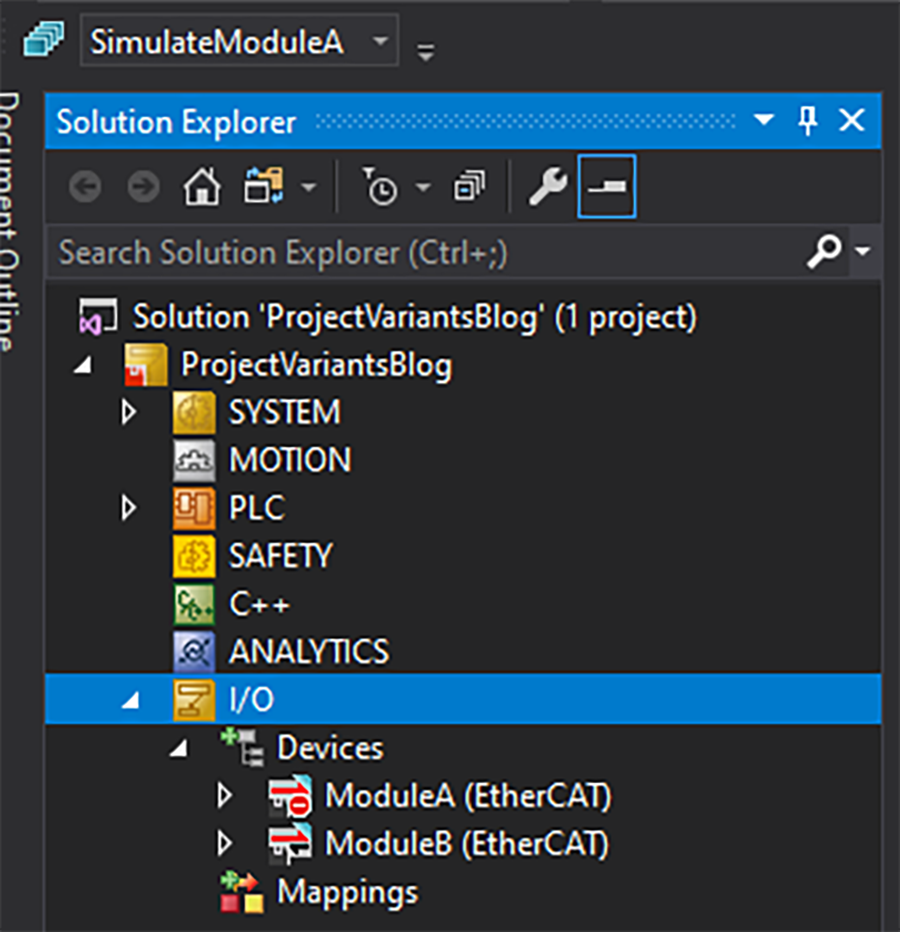
SimulateModuleA – If commissioning is occurring but hardware isn’t ready for Module A yet, we can enable the real hardware for Module B and still simulate Module A. Notice how ModuleA is disabled, but ModuleB is not.
SimulateModuleB – For situations similar to “SimulateModuleA”, but with ModuleB disabled and ModuleA enabled.
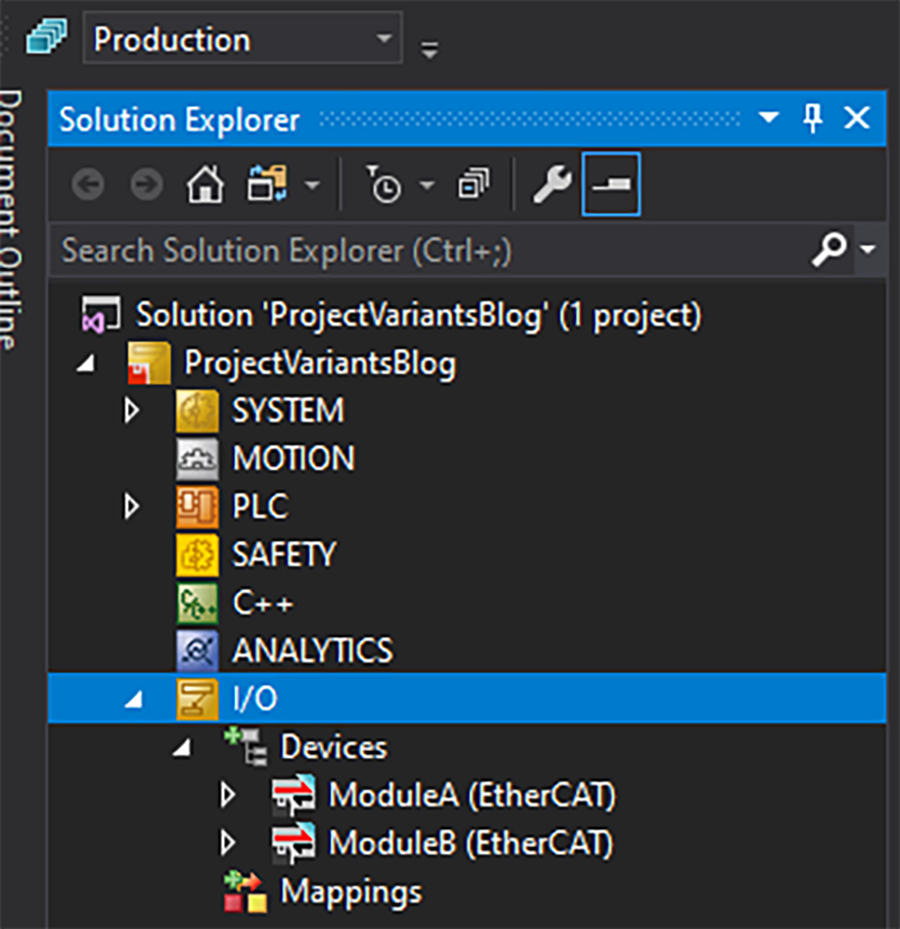
Production – Full machine hardware is available, nothing is simulated. All hardware enabled.
Switching between variants is as simple as selecting a new option in the dropdown. This can be a huge time saver when commissioning the machine if you need to optionally disable hardware components. But it also allows us to quickly switch between our simulation environment for offline development and our production environment for commissioning/onsite troubleshooting purposes. Also, changes made in the hardware configuration for simulation will not affect hardware configuration in the production environment – freeing offline developers from worrying about problems with merging updated code into deployment branches.
Using Variants to Run Different Code
Back to Table of Contents
Variants do not affect project code components – at least not by changing the code that is present. This is generally a good thing, as it reduces confusion in the codebase. But we still have options to allow our currently active variant to affect what code is running by using compiler defines and conditional pragmas.
To set this up, enable Defines in the PLC project and enable Implicit defines as shown here:
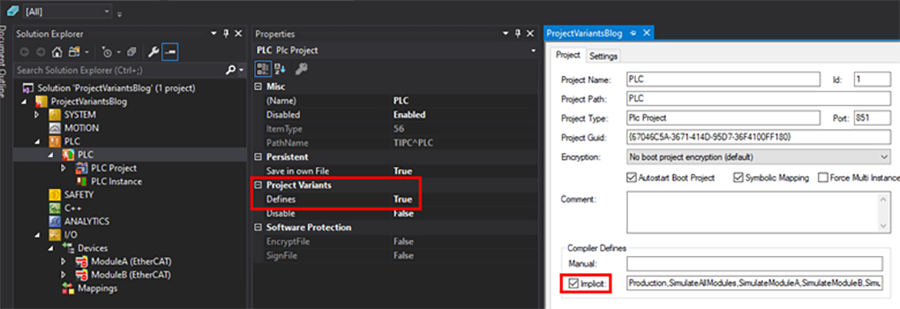
These settings will define identifiers for the compiler with the name of the currently active variant and the group to which that variant belongs. The compiler can then use these identifiers to choose whether or not to declare variables or execute code.
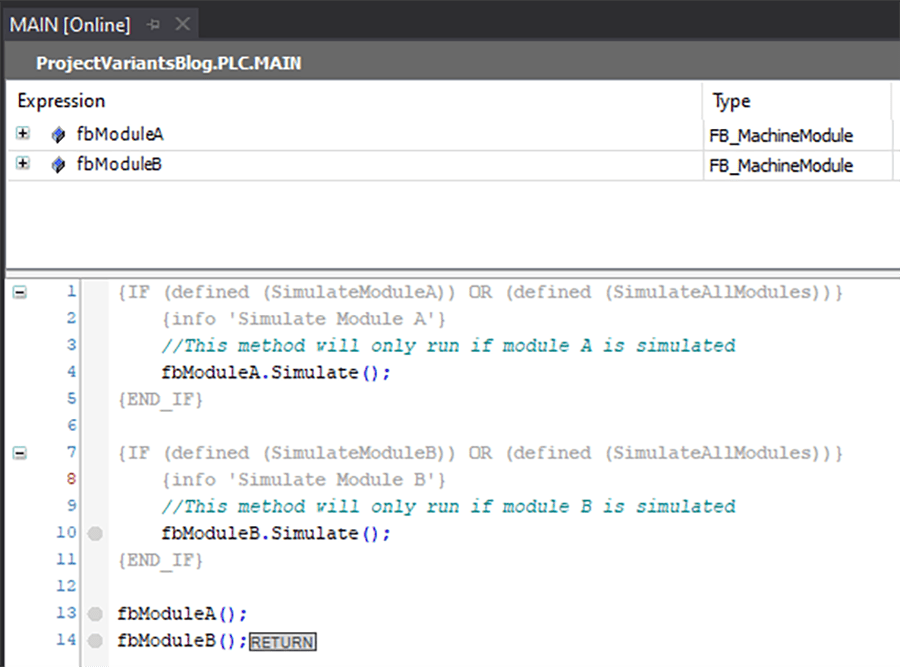
Here is an example of using compiler defines in the implementation section.
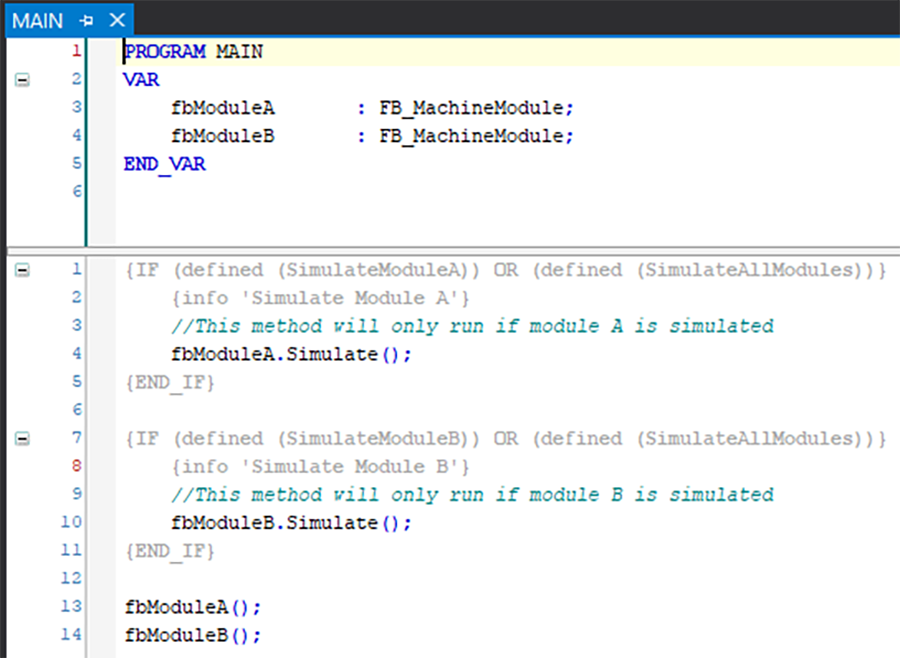
Here, the Simulate methods of each machine module function block only run if an identifier is defined for a project variant in which that module is simulated. In other words, if the SimulateModuleA project variant is currently active, then an identifier with the name of “SimulateModuleA” is implicitly defined. Using the conditional pragma, (defined SimulateModuleA) evaluates to TRUE, and we execute Module A’s simulation method.
One potential problem with this approach is that if the conditional pragmas are used as shown here, it may be difficult to tell what is being simulated. When I go online to monitor the PLC, this is all that I see:
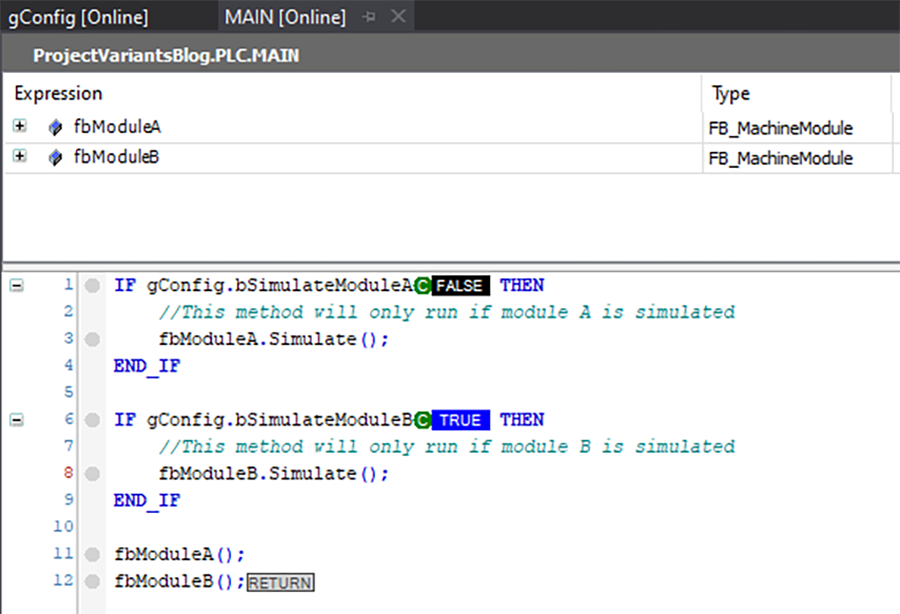
It’s impossible to tell from this view what is being simulated. A more readable solution would be to use conditional pragmas in the declaration section, as in the following example.
Here I have defined a global variable list with a Boolean variable for simulating each module. If the proper project variant identifier is defined, then the Boolean will be set to true, and simulation will occur. Otherwise, it will be defined as false, and simulation will not occur.

Now with some slight refactoring of the implementation section, it is very clear which modules are being simulated.
Using these compiler defines gives us great flexibility in what code we run based on which project variant is selected. Of course, to paraphrase a popular neighborhood hero’s uncle: with great flexibility comes great responsibility. Misuse or overuse of compiler defines and conditional pragmas can complicate a codebase or make it difficult to monitor. We’re trying to make our lives easier with project variants, not harder, so keep this in mind!
Simulating Axes with Variants
Back to Table of Contents
Simulating axes in TwinCAT is incredibly easy, and variants can make the process even more seamless.
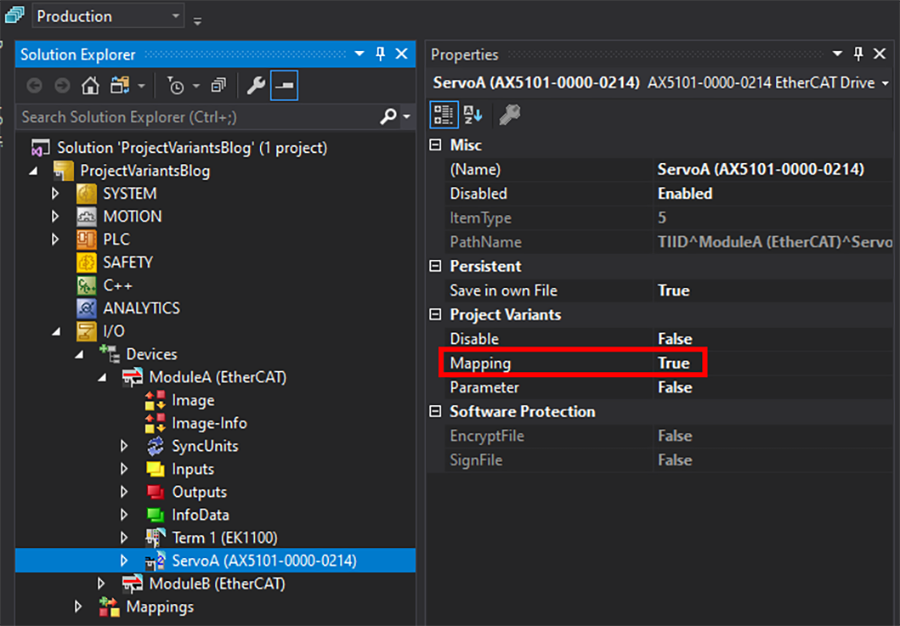
To set up, add axes to your hardware configuration. Set the mapping to be variant dependent.
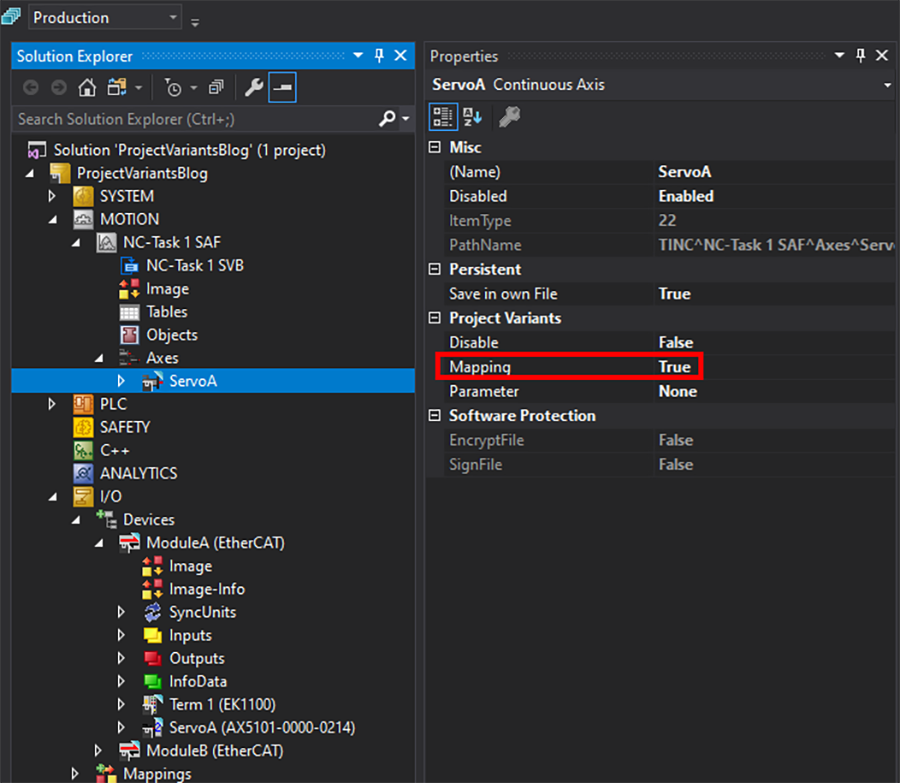
For the corresponding axis in MOTION, set the mapping to be variant dependent also.
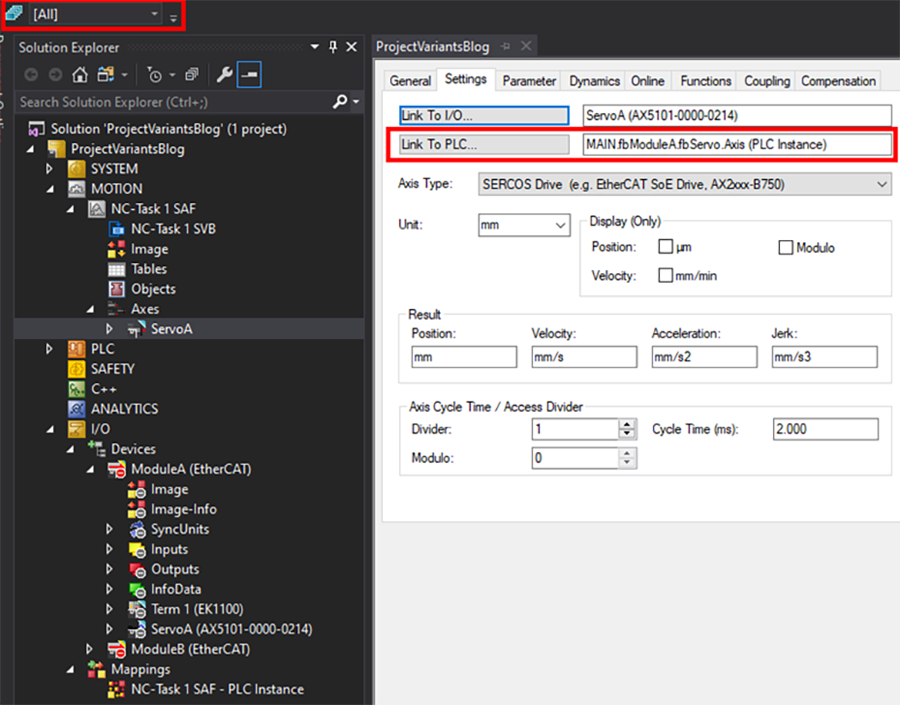
Now, open the axis settings tab in MOTION. For ALL variants, link the axis to the corresponding PLC axis reference instance.
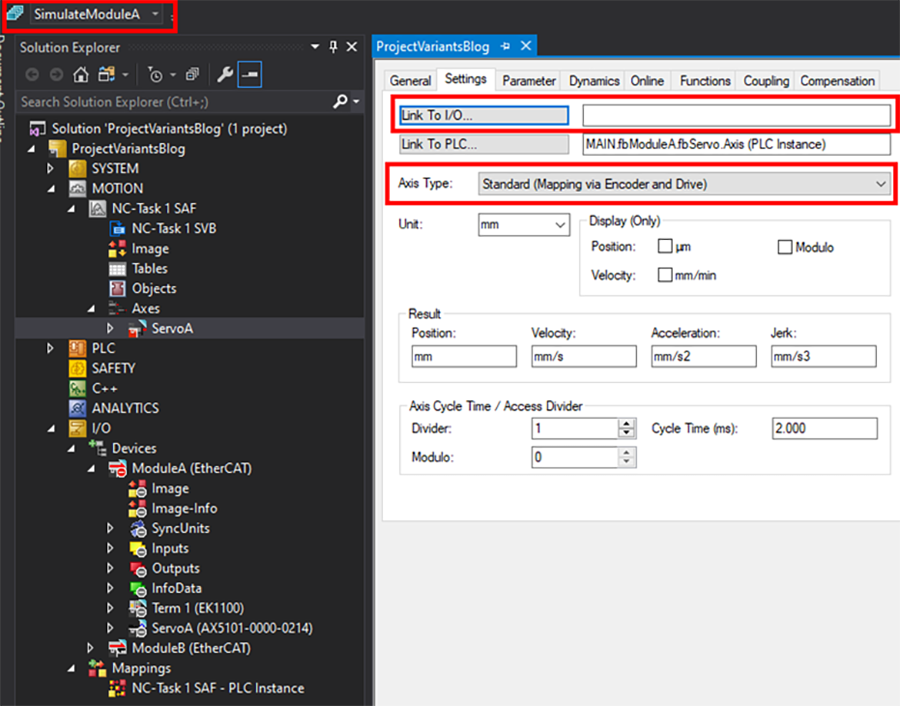
Now, for all variants or groups of variants for which the axis will be simulated, remove the link to I/O and make sure the Axis Type is “Standard (Mapping via Encoder and Drive)”.
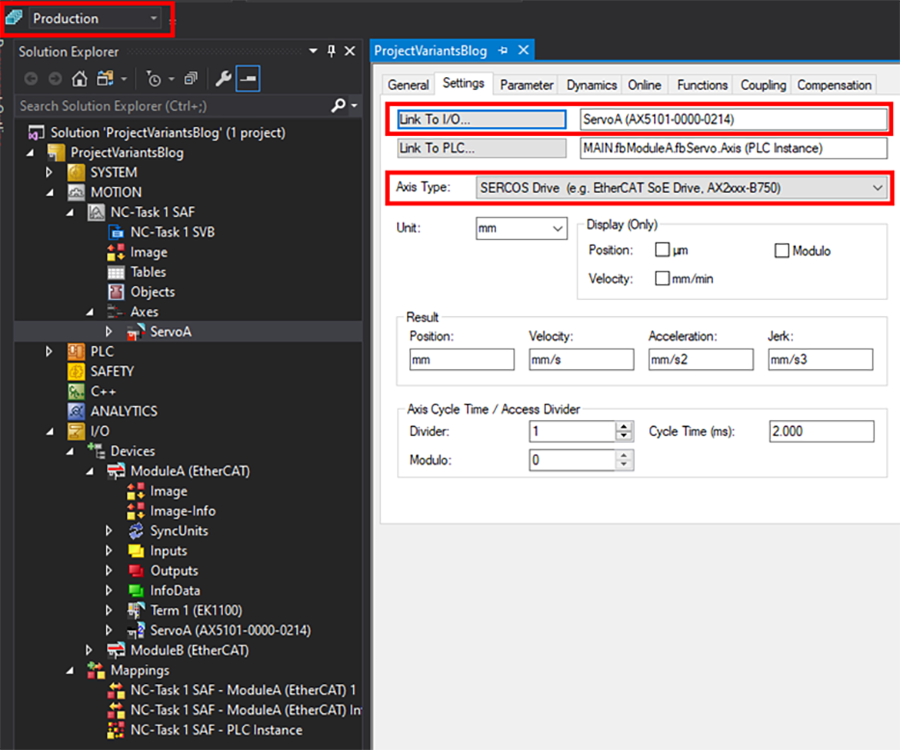
Finally, for all variants or groups of variants for which the axis will not be simulated, make sure the axis is still linked to the proper IO and the axis type is correct.
And that’s it! Now switching variants will also switch your axis to a simulated axis or not, based on whether or not the axis is linked to IO in the selected variant. Simulated axes can be very helpful for testing motion control logic without the actual hardware.
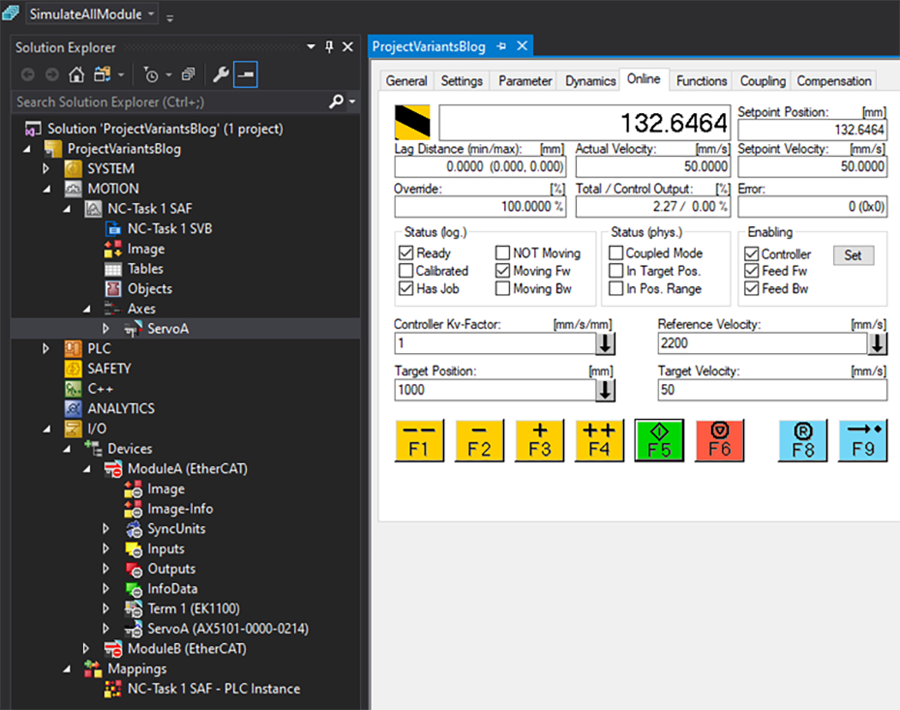
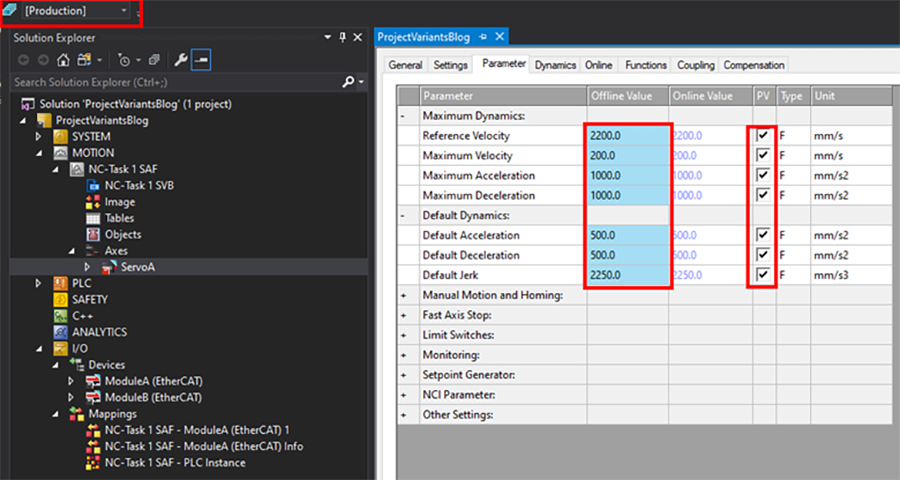
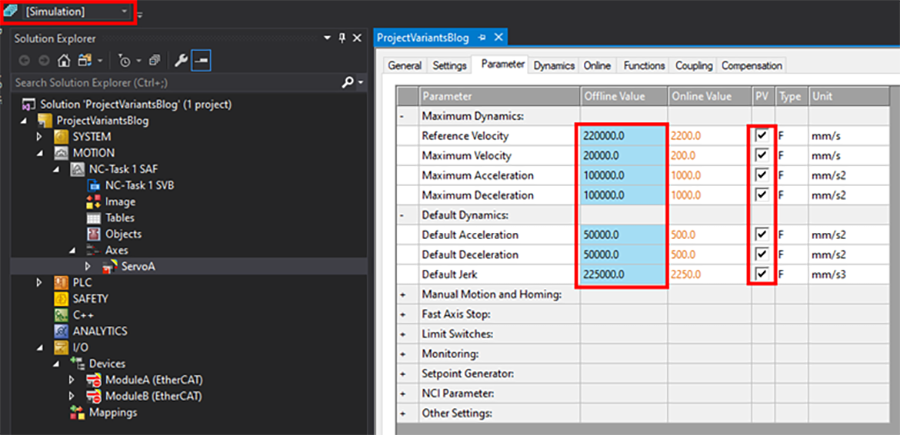
Another benefit of project variants and TwinCAT motion is the ability to adjust parameters. Increasing the limits for basic motion parameters (velocity, acceleration, jerk) by orders of magnitude allow for axes in simulation to be run much faster than waiting for the axis with its real limits to complete a specific motion command. This is particularly useful when performing unit tests and axes need to complete several point-to-point movements that would otherwise take a significant amount of time. An example of this follows.
Using Variants for Multiple Similar Machines
Back to Table of Contents
Oftentimes controls engineers run into situations with multiple machines that use the same codebase, but only vary slightly – in hardware configuration or code.
There are a few ways to manage a project like this in TwinCAT:
1. Maintain separate repositories or branches for the different machines.
This is definitely not the ideal way to approach this situation. Imagine if you needed to make a change that applies to all the different machine types. You’d need to add that change to every single repository or branch separately! It’s a recipe for making mistakes. This approach would probably only be the best choice if the machines vary significantly.
2. Have multiple TwinCAT XAE projects with different hardware configurations that all reference a single PLC project.
This works pretty well, and DMC has done this in the past. The downside to this approach is that to switch to a different machine type, you need to open up an entirely separate solution, which is time consuming.
3. Use project variants.
The advantage of the project variant approach is that the different machine configurations are stored in one solution. Switching between them is as easy as selecting an option in a dropdown.
To illustrate this use of project variants, we’ll use a basic example. Let’s say Machine Type 1 has a sensor wired to a different location than on Machine Type 2.
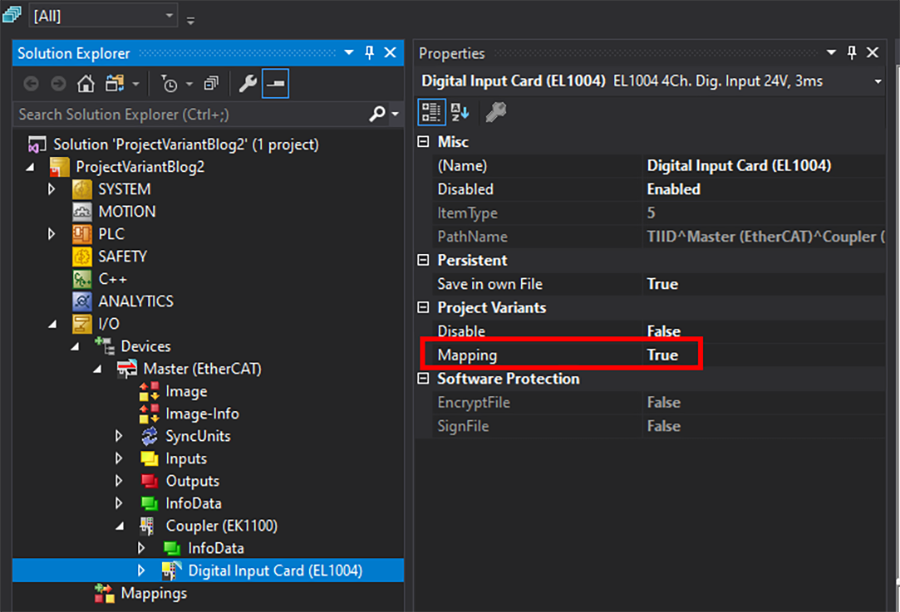
To set this up, we’ll enable mapping on the IO card(s) to be project variant dependent.
We will also make mapping for the PLC instance project variant dependent.
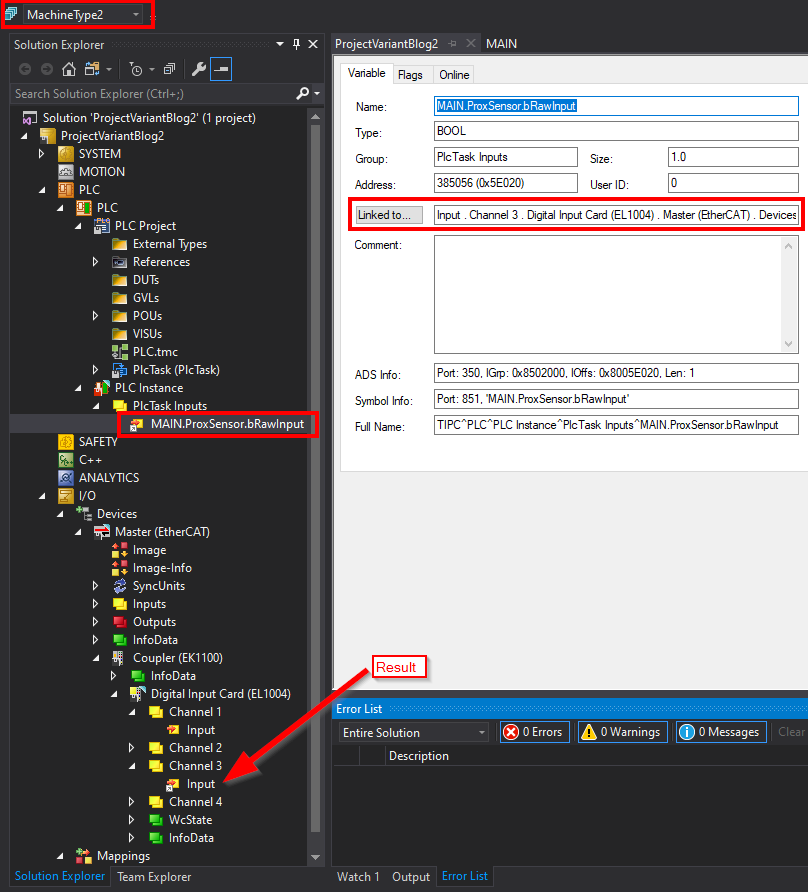
Now, we simply need to select each project variant and map the PLC input to the appropriate hardware for that variant.
Machine Type 1:

Machine Type 2:
This example is pretty basic, but the concept can be extended all the way up to fully separate EtherCAT masters with very different hardware configurations for each machine configuration. However, this brings back the discussion of responsibility in the use of project variants – at some point, it might just make more sense to create a new project if one machine differs vastly from another. What should be done with project variants and what should be done with a new project is at the software architect’s discretion.
If you’ve used project variants for multiple similar machines, I’d love to hear your perspective on the positives and negatives of the experience. Please leave a comment below!
Gotchas
Back to Table of Contents
Project variants are incredibly useful, but like any feature that introduces complication, there are a few things to look out for.
- Always make sure you have the correct variant/group selected.
The solution explorer often does not allow you to undo changes made. So if you make changes on the wrong variant/group, you might have to reset your local branch and try again. Watch out!
- If you want a setting to be variant dependent, don’t forget to enable it in the solution explorer item’s properties.
Otherwise switching variants will have no effect!
- Variants are best used sparingly.
There’s no need to make everything variant dependent; this will just introduce another failure point for you and your team. Imagine not knowing a setting is variant dependent and making a change while you have a certain variant selected, only to discover months later that this update did not propagate to other relevant variants! For this reason, it may be prudent to make most solution explorer changes with the [All] group selected, unless you are specifically intending to make a change to a specific variant/group.
If you’re going to enable a setting to be variant dependent or going to use conditional pragmas in your code, have a good reason to do so. To avoid confusion, you should default to disabling variant dependency for any setting unless you have a reason to do otherwise.
Be intentional and communicate variant dependency out to the rest of your team. And of course, documentation and commenting code are always good practices.
Further Reference
Back to Table of Contents
For more information on variants, I would encourage reading Beckhoff’s Infosys. Here are some good links:
There is definitely more potential for project variants than discussed here. Leave a comment below if you have used TwinCAT variants/have interesting examples of novel applications for them! If you’ve run into “gotchas” that arose from the use of variants, let us know here as well, so we can all learn and avoid potential problems in the future.
Thanks to Kevin Staniszewski for contributing additional content to this article.
Learn more about DMC's Beckhoff and TwinCAT 3 programming expertise.