Using the LJV-7000 laser head is a no-brainer for any high speed imaging measurement system. This blog will discuss how to use LabVIEW to gain full control of the many useful settings and sampling speeds (up to 64 kHz) that the laser head boasts.
To control this laser, Keyence supplies the LJV-7000 series laser controller with LabVIEW drivers and a DLL. These are at the core of editing controller parameters. Here is the download link (you must login to Keyence's website to complete the download).
Now that you have the drivers, and a very helpful user manual, you can begin your LabVIEW coding.
Note: All the pre-built driver VIs use calls to the library (LJV7_IF.dll). Each of these calls is documented very well in the user manual supplied in the download; I will reference it a lot in this tutorial.
1. Initialize Laser 
This sets up communication with the target device either over Ethernet or USB. You could use the DLL call, but I recommend using the pre-built driver which already defines the library function call and reads the error code out.
2. Set Your Parameters 
This puts the specified setting to the controller, but does not change the setting (more on that in step 3). The configuration VI is called ‘Set Setting’ which has the library function call defined in it. The inputs the set setting function takes is:
- Depth – Use Write Area so you avoid conflicting parameters running on the controller at the same time.
- Device ID - Make sure it is the same one you used in the initialization.
- Target Setting – This tells the controller which setting you want to change. The three items that make up this are Category, Item, and Type. The user manual is used to find what values these are for your setting.
- Data Set - The format for this entry is also in the user manual.
Example: Setting the Encoder Trigger Mode to 2-phase 2 times (left-user manual, right-code).
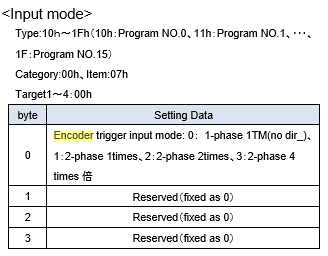
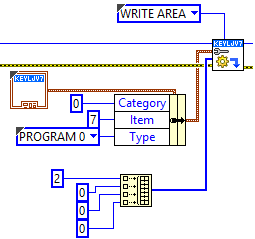
The manual shows the Category is 0, Item is 7, and Type is whatever program you want to write to. I am using Program 0.
3. Reflect Settings to Running Area 
Since I wrote all my parameters to the Write Area of the controller I need to now make them the run parameters. This will make the parameters written to the controller reflected in the run settings.
Note: If you try writing parameters that cannot exist on the controller (like 64 kHz sampling without binning), then none of the parameters will be set.
Now you can customize the Keyence LJ-V series lasers for your LabVIEW application!
Learn more about DMC's LabVIEW vision application development expertise.