Welcome back to “Getting Started with WinCC OA”! If you aren’t familiar with the series’ previous topics, it’s recommended that you read the respective installments before proceeding:
In Part 9 of “Getting Started with WinCC OA,” we’ll look at the Color Database and the implementation of color-based concepts presented in “The High Performance HMI Handbook” by Bill R. Hollifield, Dana Oliver, Eddie Habibi, and Ian Nimmo.
What is a Color Database?
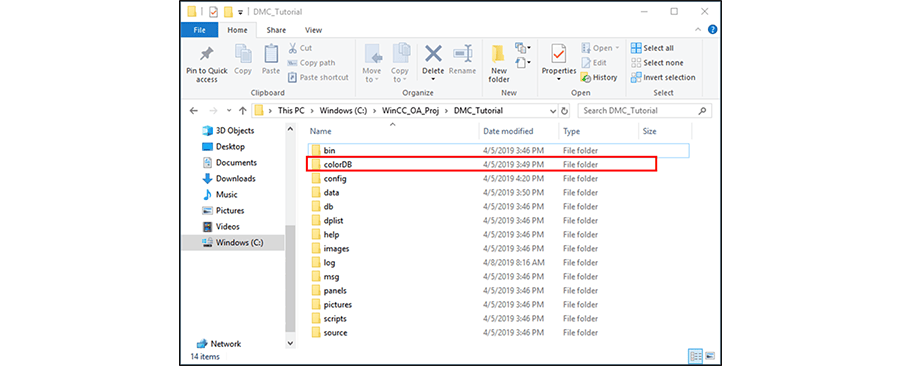
The color database is where project colors are defined and stored. Project colors can be separated into and organized via different databases. Recall the OA folder structure and panel view tree outlined in Part 2: Folder Structure and Gedi Layout, color databases are stored within the ColorDB folder and can be accessed in Gedi via the Color Database element in the Project View tree.

Creating a Database
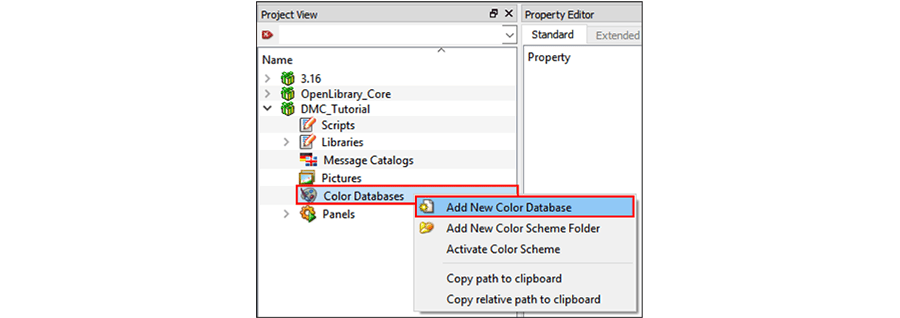
To create a color database, simply right click the “Color Database” Project View tree element and select “Add New Color Database.” For our example, we’ll call this color database “Project Base.”
Creating a Color Database Color
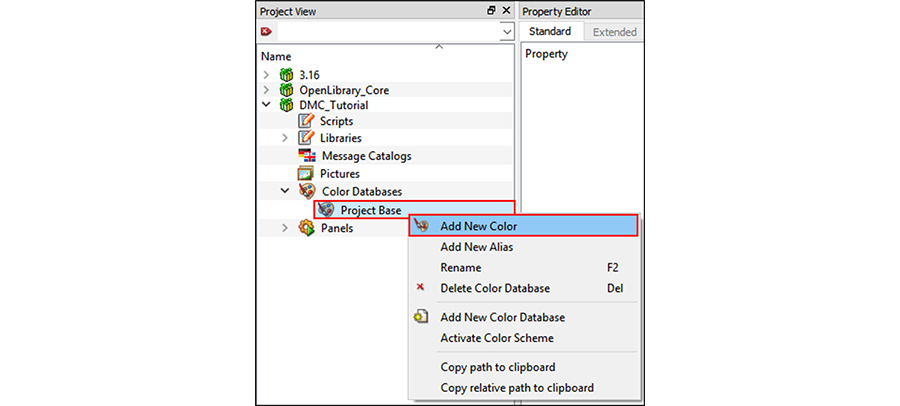
To add a color, right-click the color database that will house said color and select “Add New Color.” For our example, we’ll create the following colors within the “Project Base” database:
| Name |
RGB |
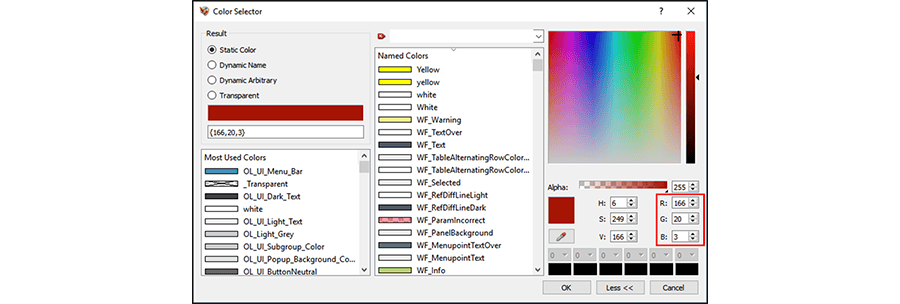
| Base_Red |
166, 20, 3 |
| Base_Blue |
46, 56, 255 |
| Base_Green |
82, 197, 33 |
| Base_DarkGrey |
93, 93, 93 |
| Base_White |
247, 247, 247 |
If following along, feel free to adjust the colors’ RGB values as you see fit.

Creating Color Database Aliases
Programmers use aliases to identify color database colors under different names. Using aliases helps maintain color consistency throughout a project, makes code more readable, and prevents cluttering within color databases
DMC’s best practices involve creating a color database of base colors to serve as a project color foundation. All other color databases will consist of aliases of these base colors.
Before creating an alias, we’ll first create a new color database called “Device Status.” Within the “Devices Status” color database, we’ll create an alias called DeviceStatus_Estopped and assign it Base_Red.
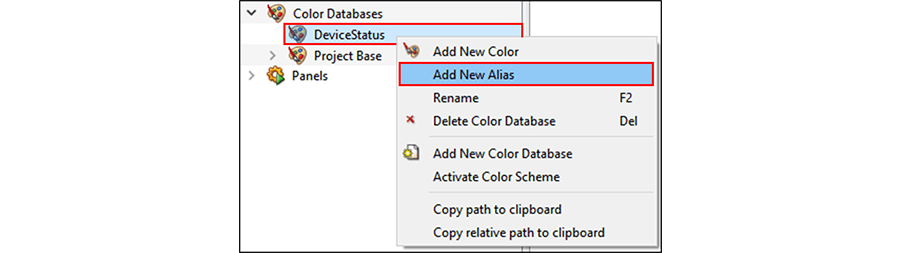

In addition, we’ll create DeviceStatus_Stopped as Base_Blue and DeviceStatus_Running as Base_Green.

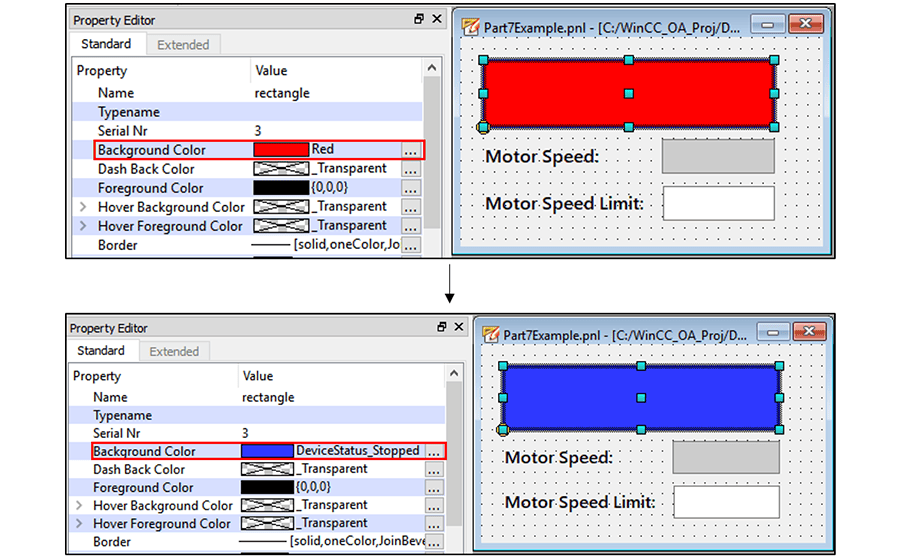
Now that we’ve created new device status colors let’s apply them to our example from Parts 7 and 8. In Part 7 - Interacting with Datapoints via Scripting, we created a simple rectangle (represents a motor device) and assigned it a “Red” background-color within its project properties. Now that we have designated status colors, let’s give it a DeviceStatus_Stopped default color.
In reality, this color will only be visible while editing in Gedi as the example code automatically assigns the rectangle a new color in runtime. Regardless, we’ll still apply the color.
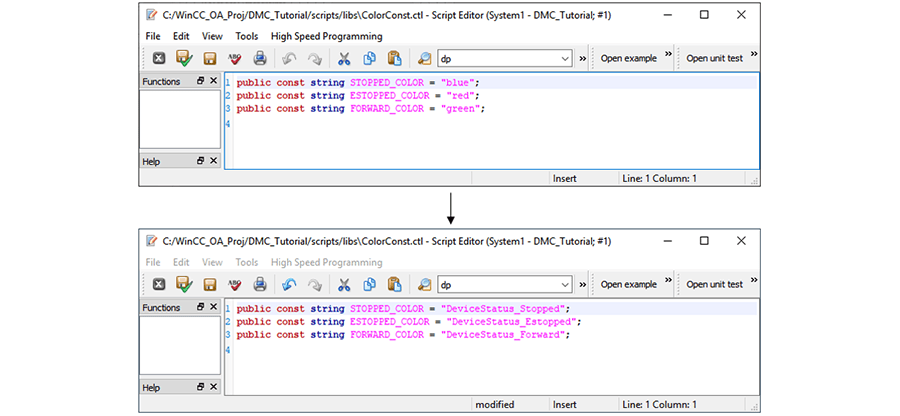
Recall that in Part 08 – Libraries, we created a control file that defined a variety of color constants. Instead of defining the constants as primary OA colors “red,” “blue,” and “green,” we can re-define them as our newly created aliases in the “ColorConst.ctl” file.
The High Performance HMI
The High Performance HMI is a concept presented in “The High Performance HMI Handbook” by Bill R. Hollifield, Dana Oliver, Eddie Habibi, and Ian Nimmo. The book focuses on developing human-machine interfaces in a way that maximizes operators’ situational awareness and increases HMI functionality and efficiency. Though topics in the book stretch from ideal screen topology to control room distractions, I found it worthwhile to highlight some basic ideas on color selection in this blog post.
According to “The High Performance HMI Handbook”
- Color should be used to draw the operators’ attention and highlight abnormal situations
- Color blindness is a prevalent condition that must be taken into account when selecting colors. For those that are color blind, color combinations such as green + red and blue + purple are often hard to differentiate.
For example, consider the following color schemes in device objects in DMC’s WinCC OA Open Library:
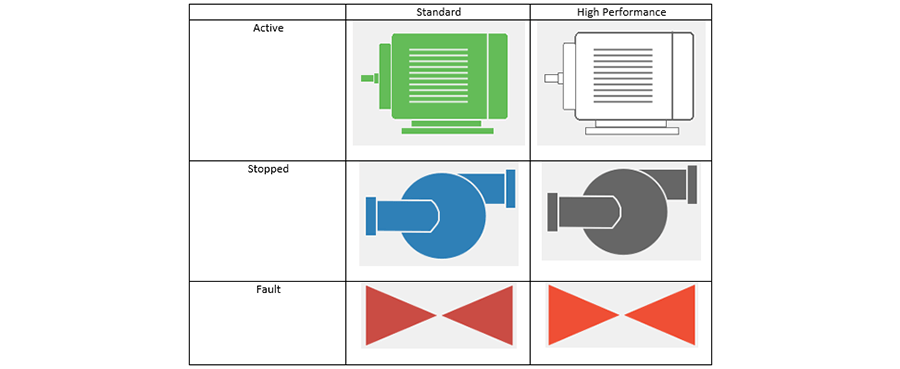
The standard color scheme is generally what those unfamiliar with High Performance HMI concepts might consider ideal and preferable. However, note what the same layout looks like when passed through a color-blind simulator application:
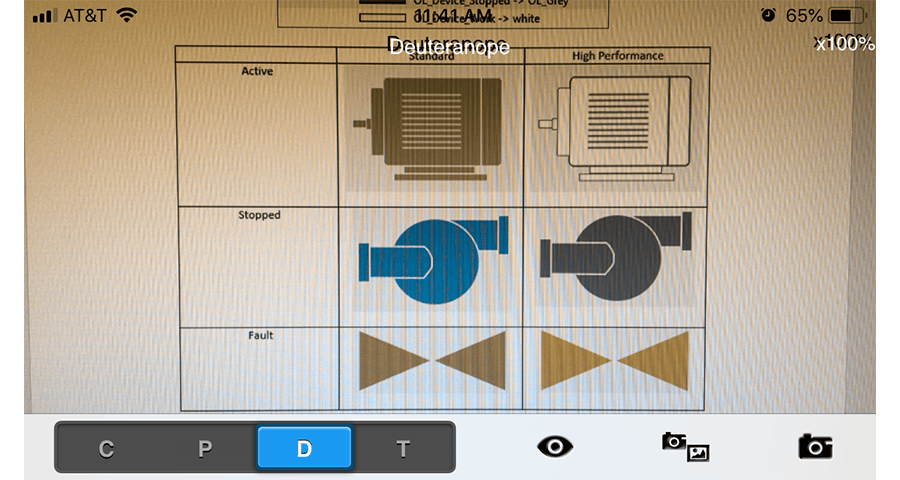
Note that the standard “Active” and “Fault” states are nearly indistinguishable to those with deuteranopia (green-blindness). All High Performance HMI colors are easily differentiable. Also, the High Performance scheme uses color to draw an operator’s attention to a faulted state and leaves normal operation in greyscale colors.
Creating Alternative Color Schemes
Color schemes allow users to overwrite color definitions and allows for color transitioning. This can be helpful when shifting between “day” and “night” modes, for example. For the purposes of this tutorial, we’ll create a High Performance color scheme that that overwrites our DeviceStatus_Stopped and DeviceStatus_Forward aliases with alternative high performance colors.
To create a color scheme, right-click the Color Databases element and select “Add New Color Scheme Folder.” We’ll name this color scheme, “High Performance Colors.”

Within a color scheme folder, you can define colors and their respective color databases. Within the “High Performance Colors” color scheme folder, we’ll create a color database titled “DeviceStatus” and define aliases DeviceStatus_Stopped as Base_DarkGrey and DeviceStatus_Forward as Base_White.

Everything under the Color Databases element and not in a color scheme folder is considered the default color/database. When a color scheme is “Active,” any conflicting colors within the color scheme folder will overwrite its default color counterpart.
Since DeviceStatus_Running and DeviceStatus_Stopped are defined within the High Performance Colors, the Base_White and Base_DarkGrey will represent those color aliases respectively when the “High Performance Colors” are active. Base_Red will continue to represent the Device_Status_Estopped since there is no definition within the “High Performance Colors” scheme.
Activating Color Schemes
There are several ways of activating color schemes within a project:
Activate in Gedi
To activate a color scheme in Gedi, simply right click its respective folder and select “Activate Color Scheme.” To activate the default scheme, simply perform the same action but right-clicking on a default color. This is a good way of testing different color schemes during development.
Activate via Scripting
Color schemes can be altered during runtime by using the function
colorSetActiveScheme(<Color Scheme>)
Where <Color Scheme> is a string of the folder name. To activate the default color scheme, simply use empty quotes. Enabling color schemes via scripting is ideal for switching between color schemes during runtime.

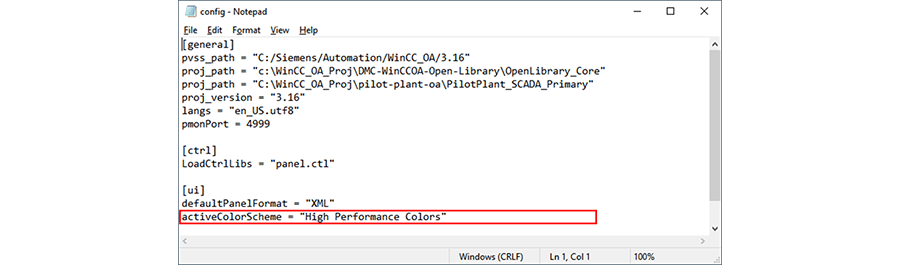
Activate via Config File
The config file will be covered more in-depth in subsequent “Getting Started with WinCC OA” installments. However, it’s important to note that a color scheme can be activated by implementing the following line within the [ui] section of the config file:
activeColorScheme = <Color Scheme>
Where <Color Scheme> is a string of the folder name. Like activating color schemes via scripting, the default color scheme is represented with empty quotes. With that said, it is not necessary to activate the default color scheme via the config file since, as the default, it’s already active upon startup.
Activating color schemes via the config file is ideal if a project will use only one non-default color scheme.
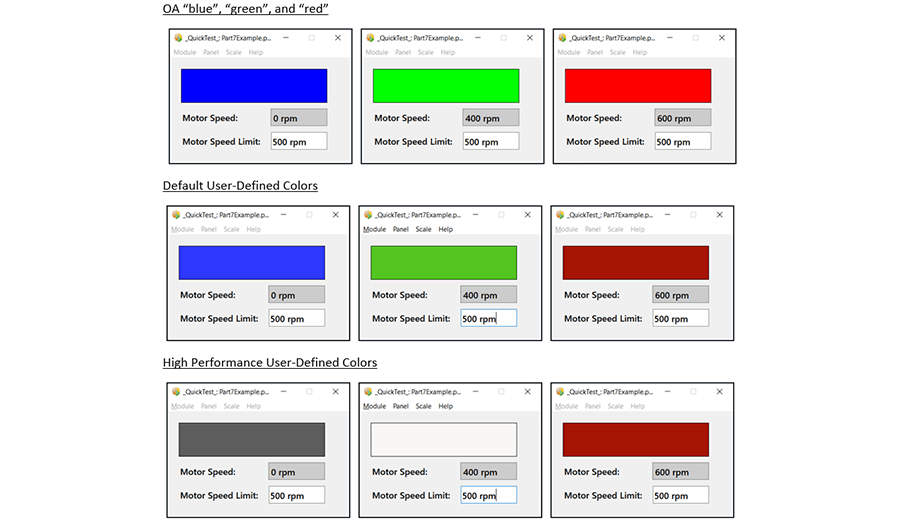
Example Project Colors
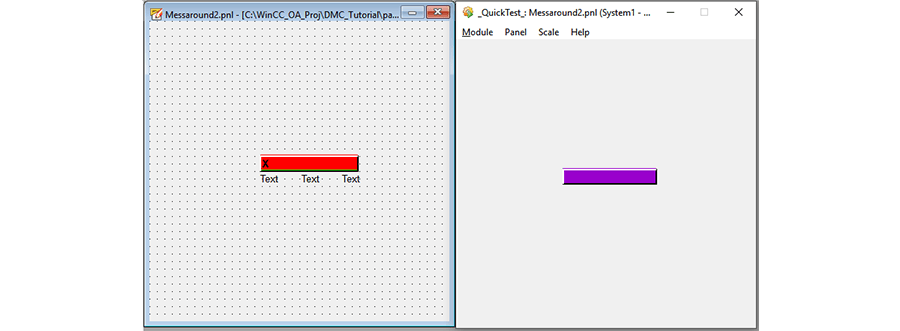
Going back to the example project, we can run a quick test of our panel to view our new default colors. Since we’re working primarily in Gedi, we can activate the High Performance color scheme by right-clicking the “High Performance Colors” folder and activating the color scheme. Here’s how our rectangle’s color has changed over time:
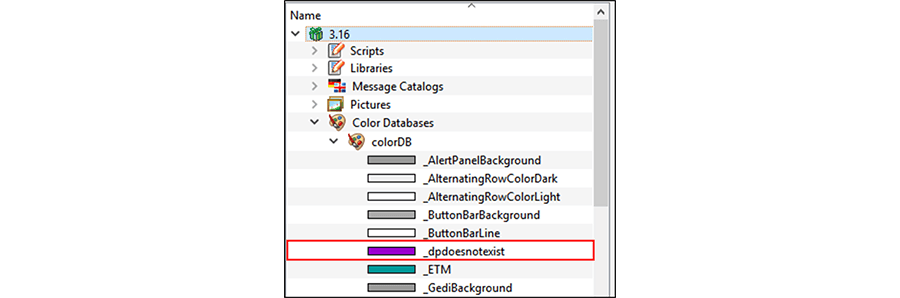
_dpdoesnotexist
WinCC OA comes with an array of accessible and usable colors that can be found within the base OA project. While most colors aren’t important enough to know, the “_dpdoesnotexist” color bears heavy significance in the development and debugging. In default OA objects (and ideally any other user-generated content like DMC’s WinCC OA Open Library), the “_dpdoesnotexist” color will display if the object’s user-specified datapoint or datapoint element does not exist within the project.
Native OA Object in GEDINative OA Object with Invalid DPE in QuickTest
Now that we’ve covered colors and color databases, let’s jump back to panel development. In the next edition of “Getting Started with WinCC OA,” we’ll cover panel nesting and passing parameters from panel to reference panel using $-parameters.
Topics to look forward to in this series:
Contact DMC to get started on your next WinCC project and learn more about our Siemens SIMATIC WinCC Programming as well as our WinCC Open Architecture Development.