Welcome back to "Getting Started with WinCC OA"! If you aren't familiar with the series' previous topics, it's recommended that you read the prior installments before proceeding:
In Part 10 of this series, we'll be exploring popups. Known as "Child Panels" in WinCC OA, popups are an extremely useful aspect of any SCADA system. They can be used for displaying critical alarm information, configuring settings, receiving secondary confirmation — and so much more.
Types of Child Panels
Before we start creating child panels, let's familiarize ourselves with the different types of popups we have at our disposal. The base keyword of all child panel/popup calling functions is "ChildPanelOn." With a quick search of "ChildPanelOn" in the documentation's index tab, we can see there are a variety of child panel functions available.
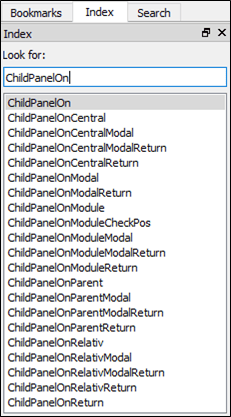
There are seven main keywords that a "ChildPanelOn" function may implement:
- Central
- Modal
- Return
- Module
- CheckPos
- Parent
- Relativ
Central
The "Central" keyword simply indicates that a child panel will be opened and centered in the calling parent panel. In this case, no panel coordinates need to be specified.
Modal
When a "Modal" child panel is opened, the user becomes physically unable to interact with objects outside of the child panel. The child panel must first be closed before continuing operation. This can be helpful for displaying essential warning messages that the user must acknowledge before continuing operation.
Return
A "Return"-designated child panel can return values to the calling script in the form of in/out arguments. We will investigate "Return" panels later in the example.
Module
The "Module" keyword indicates that instead of opening within the calling panel, the child panel will open in its own module.
Modules represent their own program window, meaning that the child panel is disjointed from the calling panel and its respective calling module. If the calling panel is changed/closed, the child panel/module will remain open.
If you would like to know more about modules, they will be discussed at length in the next installment of this series, "Getting Started with WinCC OA."
CheckPos
This "CheckPos" keyword is exclusively used with the "ChildPanelOnModuleCheckPos()" function. In this case, the "CheckPos" indicates that the opened module will be checked for valid positioning and size. This keyword is very specific and not applicable in many situations, especially when you're just getting started with WinCC OA, so we won't dig too deep into it.
Parent
A "Parent" keyword indicates that the child panel is opened within a specified panel. The panel can either be the calling panel or another opened panel.
Relativ
The "Relativ" keyword dictates that the child panel's specified coordinates will not be an absolute location, but rather a relative position based on the calling panel.
Calling/Opening Child Panels – Function Parameters
Depending on which of the aforementioned "ChildPanelOn" functions are used, the user will have the opportunity to pass in a variety of parameters. These parameters, amongst other "ChildPanelOn" function properties, are outlined in the WinCC OA Documentation. The more common parameters include:
- FileName
- File path of the panel to be used as the child
- PanelName
- Name of the child panel that is to be opened
- ModuleName
- Name of the module that is to be created for the child panel
- Used in "Module" "ChildPanelOn" functions
- ParentName
- Name of the parent panel on which the child opens
- Used in "Parent" "ChildPanelOn" functions
- Parameters
- Items passed into the child panel as $-parameters
- Can be an empty dyn_string
- Each item in the dyn_string parameter list uses the format "$<parameter>:<value>"
- x, y
- Position on the parent panel where the child panel is opened
- Not relevant for "Central" "ChildPanelOn" functions
- resultFloat, resultText
- Retuned values from child panels called by "Return" "ChildPanelOn" functions
- Child panels must write their return values to the following DPEs before the child panel is closed:
- "_Ui_<UiNumber>.ReturnValue.Float"
- "_Ui_<UiNumber>.ReturnValue.Text"
- <UiNumber> is a number unique to the active user interface (Gedi or Vision) that can be determined by the function myUiNumber().
- Alternatively, the "_Ui_<UiNumber>" DP can be provided using the myUiDpName() function
- Lastly, the function "PanelOffReturn()" can be used to both close the child panel and write the return values to the correct DPEs.
Closing Child Panels
Almost as important as opening a child panel is closing it once the panel's purpose has been served. To close a child panel, there are two main functions:
- "PanelOff"
- Closes the opened panel/module from which the function is called
- "PanelOffReturn"
- Closes the opened panel/module while also providing a return values (dyn_float and dyn_string) to the child panel's calling "Return"-designated "ChildPanelOn" function.
Example
Let's revisit our example from prior blogs. Instead of entering our "Motor Speed Limit" directly into the corresponding text field, we'll call a popup and enter the value in there. Before calling a child panel, though, there must first be a child panel to call!
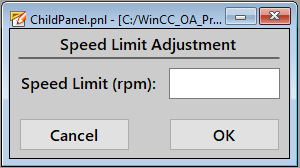
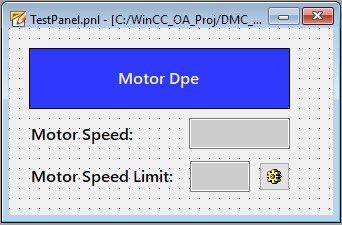
I'll let you use your creative freedom to make a panel at your artistic discretion. Give it hot-rod flames and bunnies, make it monochromatic, or do something in between. Whatever you choose, make sure the panel has a button labeled "Cancel," a button labeled "OK," and a text field to enter the speed limit. I named my panel "ChildPanel.pnl" and it looks like this:
If this was a panel I was working on myself and not just using as an example, the logic approach I'd probably take would be to:
- Pass in the appropriate DPE path as a dollar parameter
- Initialize the speed limit text field with said DPE value (using dpGet)
- Upon pressing "OK" button, set the DPE value to the text field's value using dpSet() and then close the panel
- Upon pressing the "Cancel" button, close the panel
However, we'll be utilizing a "Return"-designated child panel in this example. This means that a value(s) will be returned to the calling function. As such, the approach we'll take for the example is:
- Pass in the current DPE value as a dollar parameter
- Initialize the speed limit text field with said DPE value
- Upon pressing the "OK" button, return the text field's value in the return dyn_string and TRUE in the return dyn_float to the calling function
- Upon pressing the "Cancel" button, return FALSE in the return dyn_float to the calling function
- If the child panel returns TRUE ("OK" clicked) within the calling function, use dpSet() to set the returned string to the appropriate DPE speed-limit value. If the child panel returns FALSE ("Cancel" clicked), do nothing.
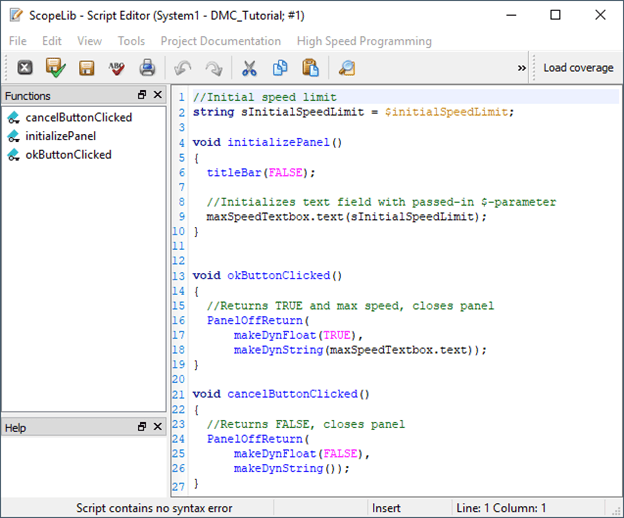
In our child panel's ScopeLib, we have three functions defined:
- "initializePanel()" – called by the panel's "Initialize" event; populates the text field with the passed-in dollar parameter
- "okButtonClicked()" – called by the "OK" button's "Clicked" event; returns the text field's value and a TRUE to the calling function
- "cancelButtonClicked()" – called by the "Cancel" button's "Clicked" event; returns a FALSE to the calling function
//Initial speed limit
string sInitialSpeedLimit = $initialSpeedLimit;

void initializePanel()
{
  titleBar(FALSE);

  //Initializes text field with passed-in $-parameter
  maxSpeedTextbox.text(sInitialSpeedLimit);
}


void okButtonClicked()
{
  //Returns TRUE and max speed, closes panel
  PanelOffReturn(
      makeDynFloat(TRUE),
      makeDynString(maxSpeedTextbox.text));
}

void cancelButtonClicked()
{
  //Returns FALSE, closes panel
  PanelOffReturn(
      makeDynFloat(FALSE),
      makeDynString());
}
Note: The "titleBar()" function used within "initializePanel()" determines whether a called child panel will have a title bar or not.
Child panel with title bar vs. without title bar
In the calling panel (TestPanel.pnl), we'll make the following modifications to the "maxSpeedTextBox":
- Remove the scripting from the "Command" event
- Update the following properties:
- Background Color -> "lightgrey"
- Editable -> FALSE
Note: I also swapped out the "speedTextbox" label shape with a text-field shape so that my "Motor Speed" and "Motor Speed Limit" text fields were visually consistent.
Next, we'll add a simple button that will be used to call our child panel. I gave mine a fun gear icon (via the "Button Label" property; image path of C:\Siemens\Automation\WinCC_OA\3.16\pictures/test_en.gif)
- Add the "settingsButtonClicked()" function call to the button's "Clicked" event
My TestPanel.pnl now looks like this:
In ScopeLib, we'll make the following modifications:
- Remove the "textboxCmd()" function
- Add the following "settingsButtonClicked()" function:
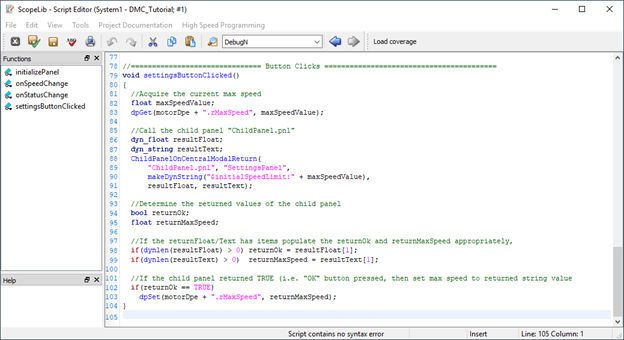
//=============================== Button Clicks =========================================
void settingsButtonClicked()
{
  //Acquire the current max speed
  float maxSpeedValue;
  dpGet(motorDpe + ".rMaxSpeed", maxSpeedValue);

  //Call the child panel "ChildPanel.pnl"
  dyn_float resultFloat;
  dyn_string resultText;
  ChildPanelOnCentralModalReturn(
      "ChildPanel.pnl", "SettingsPanel",
      makeDynString("$initialSpeedLimit:" + maxSpeedValue),
      resultFloat, resultText);

  //Determine the returned values of the child panel
  bool returnOk;
  float returnMaxSpeed;

  //If the returnFloat/Text has items populate the returnOk and returnMaxSpeed appropriately,
  if(dynlen(resultFloat) > 0) returnOk = resultFloat[1];
  if(dynlen(resultText) > 0)  returnMaxSpeed = resultText[1];

  //If the child panel returned TRUE (i.e. "OK" button pressed, then set max speed to returned string value
  if(returnOk == TRUE)
    dpSet(motorDpe + ".rMaxSpeed", returnMaxSpeed);
}
This new function:
- Acquires the motor's maximum speed
- Opens a child panel (of types "Central", "Modal", and "Return") with the motor's current maximum speed passed in as a $-parameter. Recall that:
- Central = Child panel will be centered on calling panel
- Modal = The user may only interact with the opened child panel
- Return = The child panel returns a set of value that may be used by the parent panel
- Interprets the child panel's returned dyn_string and dyn_float data
- If the popup's "OK" button was clicked ("returnOk")
- The returned user-entered max speed ("returnedMaxSpeed")
- If the child panel returned TRUE, sets the max speed DPE to the "returnedMaxSpeed" value
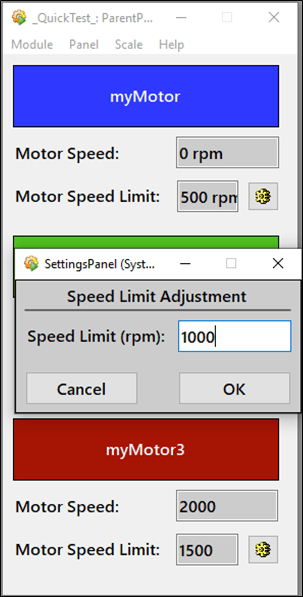
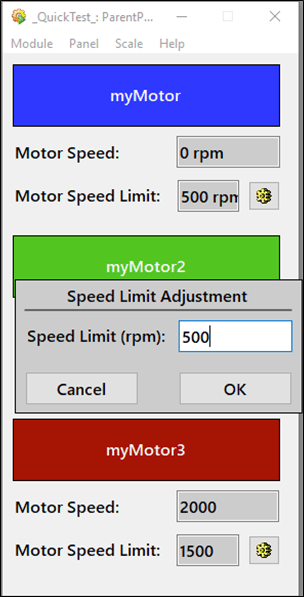
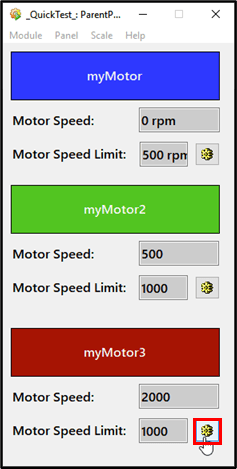
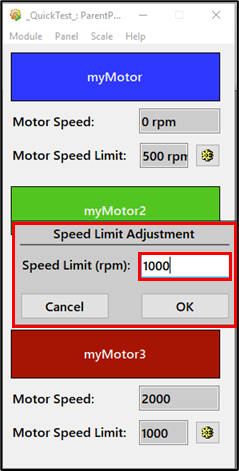
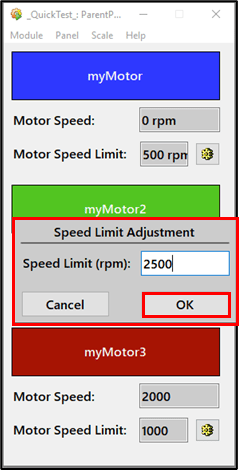
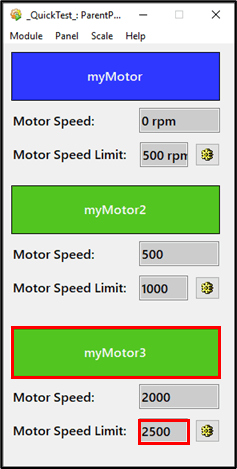
Running ParentPanel.pnl in Quick Test, we can modify the motor speed limit of "myMotor3" (or any of our other motors) using the gear icon and the corresponding child panel.
Child panels are extremely useful for using popups to display additional information, notify users of certain warnings, receive secondary confirmation from the user, and so on. However, we may want to display additional information or panel references in a similar way, but without overlaying additional popup panels on top of the current ones. For this, we'll use embedded modules.
Topics to look forward to in this series:
In the next edition of "Getting Started with WinCC OA", we'll explore the concept of modules and learn how to utilize embedded modules to dynamically open and close reference panels.
Contact DMC to get started on your next WinCC project and learn more about our Siemens SIMATIC WinCC Programmingas well as our WinCC Open Architecture Development.