I was recently working on a multi-axis Yaskawa-based motion control project and ran into an issue using an in-software position latch. In this case, we were running a servo at fairly high speed and trying to record the encoder position when a sensor was triggered. It turned out that the PLC scan rate, servo speed, and gearing ratios involved were resulting in unacceptable accuracy issues.
For this project, all programming was done using Yaskawa’s MotionWorks IEC Express. We were using a Yaskawa MP2300IEC Motion Controller with a few SGDV Sigma-5 Servo Amplifiers to control a set of servos. One of the axes controlled the X-position of a part with respect to our tooling.
For the process, a part would be loaded and then moved into position. A sensor fed directly into the motion controller would then locate the leading edge of the part and very precise position moves would be used to properly locate the tool with respect to the leading edge for the tooling that needed to be done.
Initially, this worked great. While testing at relatively slow speeds, we were seeing excellent accuracy. However, as we wanted to speed up the through-time of the process, we wanted to make each move as quickly as possible, but we found that as we sped up the loading move, our accuracy became unacceptable. This was a concern we'd had while programming – that the accuracy of our in-software position latching would be limited by the scan rate of the PLC. Initially, as we were unsure of the final gearing ratios and required velocities on the servos, we made the decision to give it a try anyway.
Luckily, Yaskawa has made it very simple to make the switch to hardware-based position latching by providing inputs directly on their Sigma-5 Servo Amplifiers and allowing the amplifier itself to do the position latching.
When the digital input is read high (or low, depending on how the user chooses to configure it), the amplifier reads the current position and saves the value to one of its internal parameters. This parameter can then be read directly from the MP2300 to extract the latched position. As the Sigma-5 amplifiers are orders of magnitude faster than the PLC, we can now get a much more accurate latch.
Furthermore, Yaskawa makes it simple for the user to implement, as there are already function blocks available to arm the latch and read the necessary parameters. Yaskawa provides an excellent application example (with code and manual) on their website that saved me a lot of time.
Basically, it boils down to the following steps:
Step 1: Wire the sensor to the EXT1, EXT2, or EXT3 inputs on the amplifier’s CN-1 connector (Yaskawa actually provides latching inputs that can be individually configured as needed). To do this, you will need a CN-1 connector cable.
Step 2: From the Hardware Configuration tool embedded in MotionWorks, you will need to configure a few PN parameters. The reference manual for the servo amplifier you are using will direct you to the correct parameters.
In my case, to use EXT1 I needed to configure the following: PN820 = 2147483647, PN822 = -2147483648, and PN511.1 = 4 (this setting will be determined by your wiring of the latching input – NO or NC).

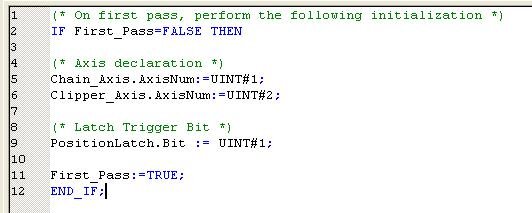
Step 3: Create a TRIGGER_REF.
In my code, I try to have an initialization POU that only runs on startup. For example, in the code below, I’ve initialized two axis and a TRIGGER_REF. In this case, I’m configuring my latch to use EXT1. If I were using EXT2, I would need to initialize my TRIGGER_REF to UINT#2.
Step 4: Now that you’ve configured your trigger and initialized it in your project, you can use it. The easiest way is to just drop in the MC_TouchProbe block provided in the PLCOpenPlus Toolbox.
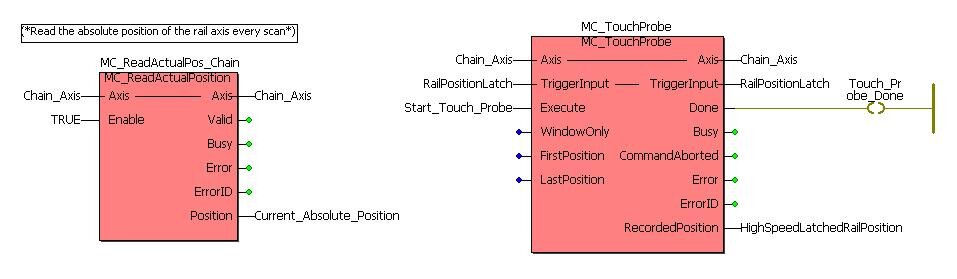
Using the high-speed encoder position latch is now simple. You simply provide an axis and a trigger reference and arm the TouchProbe block when you’re ready to watch for an input.
When the amplifier sees an edge (rising or falling, depending on your configuration), it stores the encoder position and sets a done output bit. Now all you need to do is read out the RecordedPosition.
The process is actually quite simple, but it did take a few minutes the first time I walked through it. Hopefully, these pointers will help save someone else a few minutes of their day!
Learn more about DMC's Yaskawa MotionWorks programming services.