For a recent project using WinCC Professional V12, I needed to have a pop up window that could change based on the screen window that the operator clicks (motor, VFD, valve, etc.). The popup also needed to have its location change based on where the screen window was that the operator clicked.
To implement the popup, I added a screen window to the starting screen. I did not assign any of its properties:
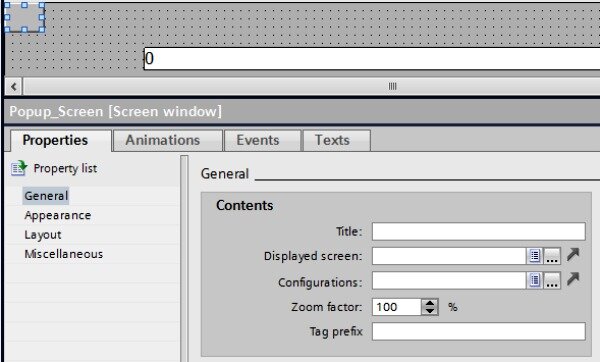
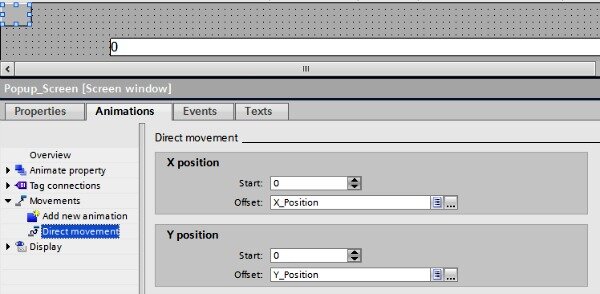
I gave it a visibility animation based on an internal tag (“bShowPopup”). I also gave it direct movement animations based on internal tags (“X_Position” and “Y_Position”).
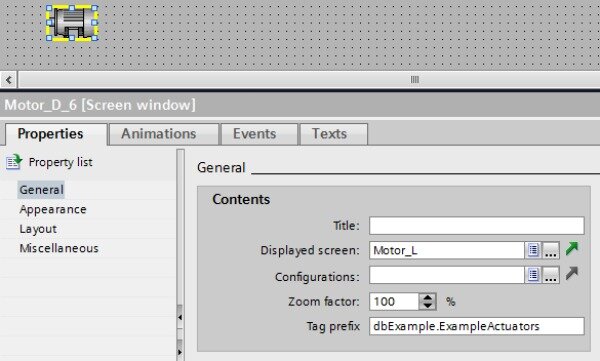
Screens for the actuators were made and they were placed inside the HMI screen windows. I put the actuators in screen windows to take advantage of the tag prefix. The tag prefix is used for the popup and allows for quicker assignment of all of the animations and events associated with the actuator in the screen window.
A C script was written for the actuator screen which could access the properties of the screen window with the actuator and pass them to the popup screen window.
#include "GlobalDefinitions.h"
void OnClick(char* screenName, char* objectName, char* propertyName)
{
	// Set the popup screen window to use the right popup
	ActivateScreenInScreenWindow ("MAIN", "Popup_Screen", "Motor_Popup");

	// Sets tag prefix of popup to same value as the screen window that contains this screen
	SetPropertyByConstant("MAIN", "Popup_Screen", "TagPrefix", GetPropChar(GetParentScreen(screenName), GetParentScreenWindow(screenName), "TagPrefix"));

	//This sets x_postition/y_postion internal tags to move Popup Screenwindow
	SetTagByProperty ("@NOTP::X_Position", GetParentScreen(screenName), GetParentScreenWindow(screenName), "Left", hmiWithoutOperatorEvent);
	SetTagByProperty ("@NOTP::Y_Position", GetParentScreen(screenName), GetParentScreenWindow(screenName), "Top", hmiWithoutOperatorEvent);

	//Unide the popup
	SetBit ("@NOTP::bShowPopup");
}
The first statement depends on the actuator being used. In this case, the popup window has been updated to use the motor popup screen.
The second statement of the script sets the tag prefix of the popup window to use the same tag prefix as the screen window. The function “SetTagByProperty” is setting “X_Position” without an operator event, with the property “Top” (the top edge of the screen window), from the parent screen window in the parent screen.
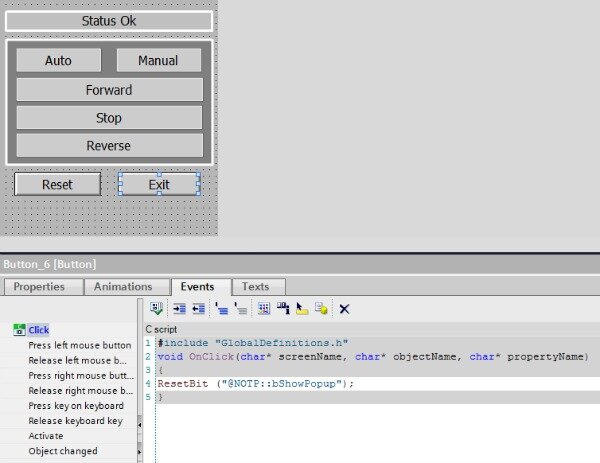
The final statement sets the bit “bShowPopup”, which changes the visibility of the popup window. Exiting the popup window is done by putting a button on the screen used in the popup window that resets the “bShowPopup” bit.
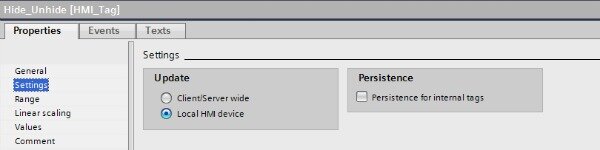
A quick note for if you are using a client/server configuration in WinCC Professional:
Make sure that “bShowPopup”, “X_Postion”, and “Y_Position” are only updating on the local HMI. If you are using a client/server setup, the animations will be occurring on all of the HMIs, not just the one you are working on.
Learn more about DMC's Siemens WinCC programming services.