When using a realtime system for data acquisition or control, there is often a need to transfer files between the real time device and a PC. There are many ways to do this, but newer Linux-based NI CompactRIOs come with WebDAV and SSL support enabled by default. This makes WebDAV an easy option to use right out of the box. The first time I used it, I noticed a couple pitfalls that are worth documenting. This will be a brief post to point out those details. For this post, I used an NI cRIO-9068.
Configuration
As mentioned above, the Linux cRIOs have WebDAV and SSL support enabled by default. To confirm, open NI-MAX, and expand Remote Systems. Expand the cRIO, then Software, then NI CompactRIO. You should see SSL Support and WebDAV Server listed, as in Figure 1.
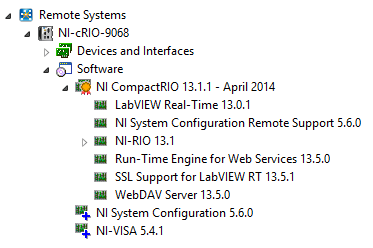
Figure 1: A properly-configured cRIO includes SSL Support and the WebDAV Server.
As long as those are available, you’re already configured.
Establishing a Connection in Windows
If a WebDAV server is running on the cRIO, then you can connect directly in Windows as if it were a traditional network shared directory. Both Windows 7 and 8 have built-in WebDAV clients. So, let’s say the cRIO’s IP address is 192.168.10.200 (and your PC is on a subnet with the cRIO):
- Open Windows Explorer
- In Windows 8, click the Computer menu, then Map Network Drive.
- In Windows 7, press Alt to expose the menu bar, then click Tools, then Map Network Drive.
- Select a drive letter.
- Uncheck Reconnect at logon, since the cRIO may not always be available.
- In the “Folder:” field, type “http://192.168.10.200/files”
- Use your cRIO’s IP address, of course.
- Don’t forget the “/files” at the end! This isn’t a placeholder for the filename you’re looking for, it is the literal string “/files.”
- Click finish, and give it a second. It will then ask you for a username and password.
- These are the same credentials used to log in to the cRIO over SSH, or in NI-MAX.
- By default, the username is “admin” and the password is blank.
- Hit OK, give it another couple seconds, and you should be presented with an Explorer window showing the files on the cRIO’s hard drive.
If this works, then you know WebDAV is working fine on your PC client and your cRIO server.
A Few Brief Words about File Paths
Note that you cannot write files anywhere you like on the cRIO’s hard drive. If you’re familiar with Linux, the hard drive layout will look familiar. /home/lvuser/natinst/bin is where we’ll make files in this example. /C/ni-rt/startup is a symbolic link to /home/lvuser/natinst/bin in order to preserve some compatibility with the conventions of older cRIOs. If none of this makes sense to you, don’t worry about it, just keep your files in /home/lvuser/natinst/bin until you get it figured out.
Transferring files in LabVIEW
If you’ve been able to connect in Windows, then you should be able to connect programmatically in LabVIEW. A complete example VI is show below in Figure 2. Note that this VI runs on the PC, so the transfer is in terms of “getting” the file from the cRIO. The example takes all of its VIs from LabVIEW’s WebDAV palette, which you can access from the Data Communication palette → Protocols palette → WebDAV palette → WebDAV Synchronous.
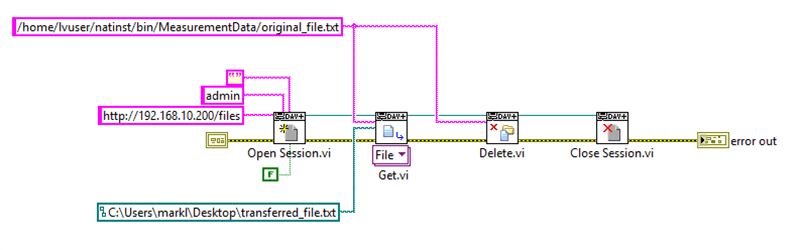
Figure 2: A demo program that transfers a file from the cRIO to the PC, then deletes the file on the cRIO. Note that this VI runs on the PC side.
The Asynchronous VIs will also work, but will return before the operation completes. This is nice if you want to tell WebDAV to get multiple files, and then just let your program move on while those transfer in the background. However, in this example, I want to get my file and then delete it from the cRIO. I therefore use the Synchronous VIs so I know the “get” operation is complete before deleting.
The important information here is the following:
- The “host uri prefix” input of the Open Session VI is exactly the same as what you used to connect in Windows Explorer. Don’t forget, you need the literal “/files” part at the end.
- The “username” and “password” inputs of Open Session are the same as what you used in Windows Explorer also.
- The “verify server” input of Open Session can be used for higher-level authentication, but for the cRIO, set it to false.
- The “relative uri” input of Get is the path to the file you want to get, using the UNIX file path convention.
- The “local file path” input of Get is where your file will go on your PC, using the Windows file path convention.
- You cannot just give it a directory path. This VI is not smart enough to know that you want to put it there and keep the same filename. Your “local file path” must be a path ending in a file name.
- It will be happy to overwrite a file on your local drive, if a file already exists at “local file path.”
Conclusion
Since the cRIO hosts the WebDAV server, the PC is acting as a client that connects, gets the files it wants, then disconnects. This is completely different than having the cRIO send (or “put”) files to the PC, but has the advantage of being already configured by default. For more information, see the online manuals for the synchronous and asynchronous VIs.