Lately, I've gotten reacquainted with an old friend of mine: the Revit API. Revit is an incredible piece of architectural software from Autodesk, and one of its features is the ability to expand its functionality through the use of add-ins. Revit add-in development is now one of the many services that we're able to offer here at DMC, and I'd like to celebrate that fact by sharing an article about how to get started with Revit add-in development.
First of all, this article assumes you know/have the following things:
- Intermediate C# and .NET development experience or knowledge
- A license for Revit (preferably 2013 or later) so you can actually test your add-in
- A license for Visual Studio (I'll be using 2015 for this example). You can develop Revit macros using Revit’s built-in code editor, but developing add-ins (external commands and external applications) pretty much requires Visual Studio.
The first thing you'll want to do is set up your development machine. I chose to use a virtual machine (VM) running Windows 8, for reasons that are beyond the scope of this article. Make sure you check the system requirements for the version of Revit that you're developing for. Install Revit and your chosen version of Visual Studio, and you're ready to get started.
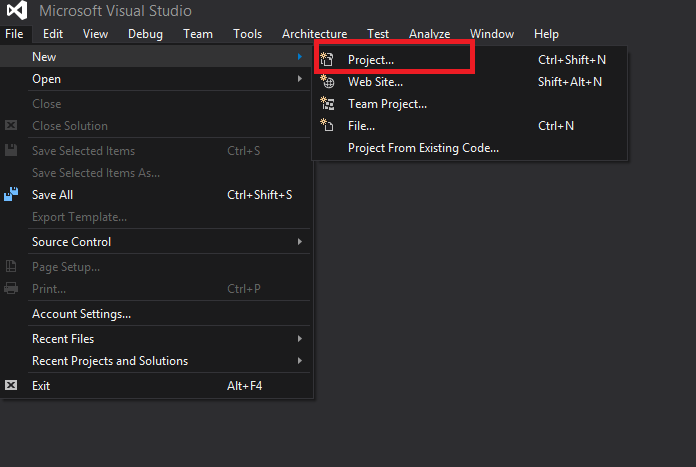
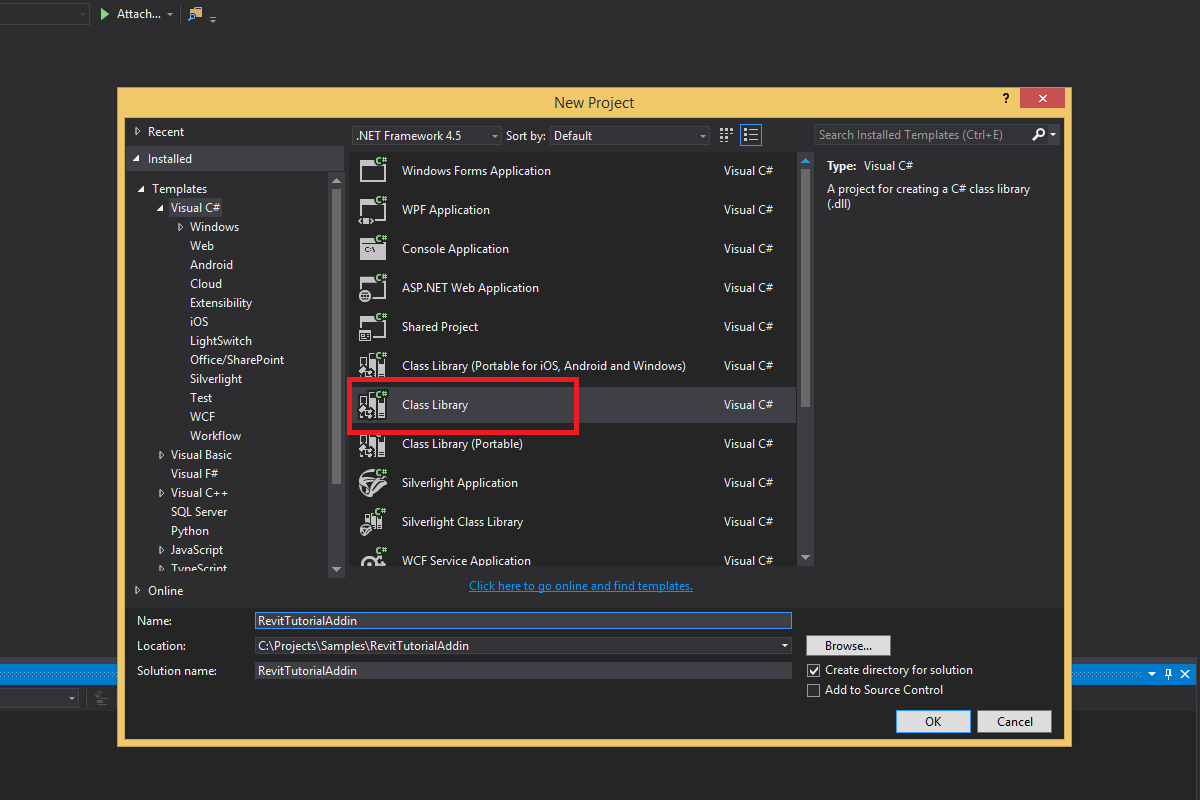
To create a new Revit add-in, open up Visual Studio and start a new Class Library project.
Visual Studio is kind enough to provide us with a class, named "Class1.cs".

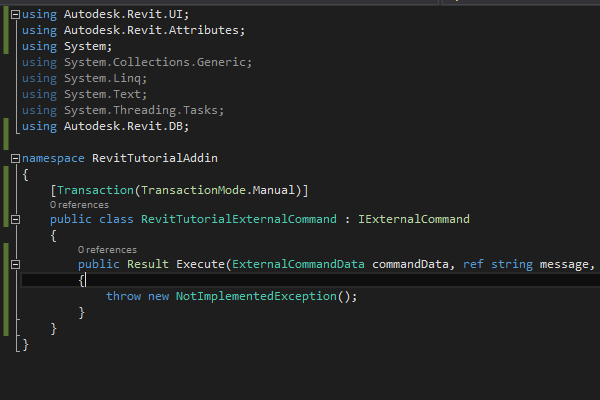
Either rename it, or delete it and replace it with another class (.cs) file, and make sure the new class is named something that makes sense. I'm naming mine "RevitTutorialExternalCommand". Once that's done, we're going to make our new class implement the interface "IExternalCommand".
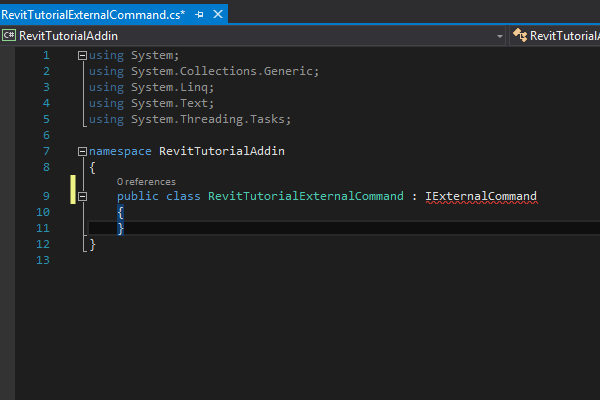
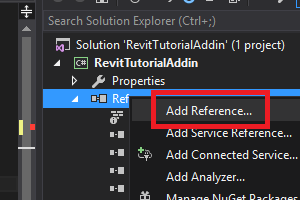
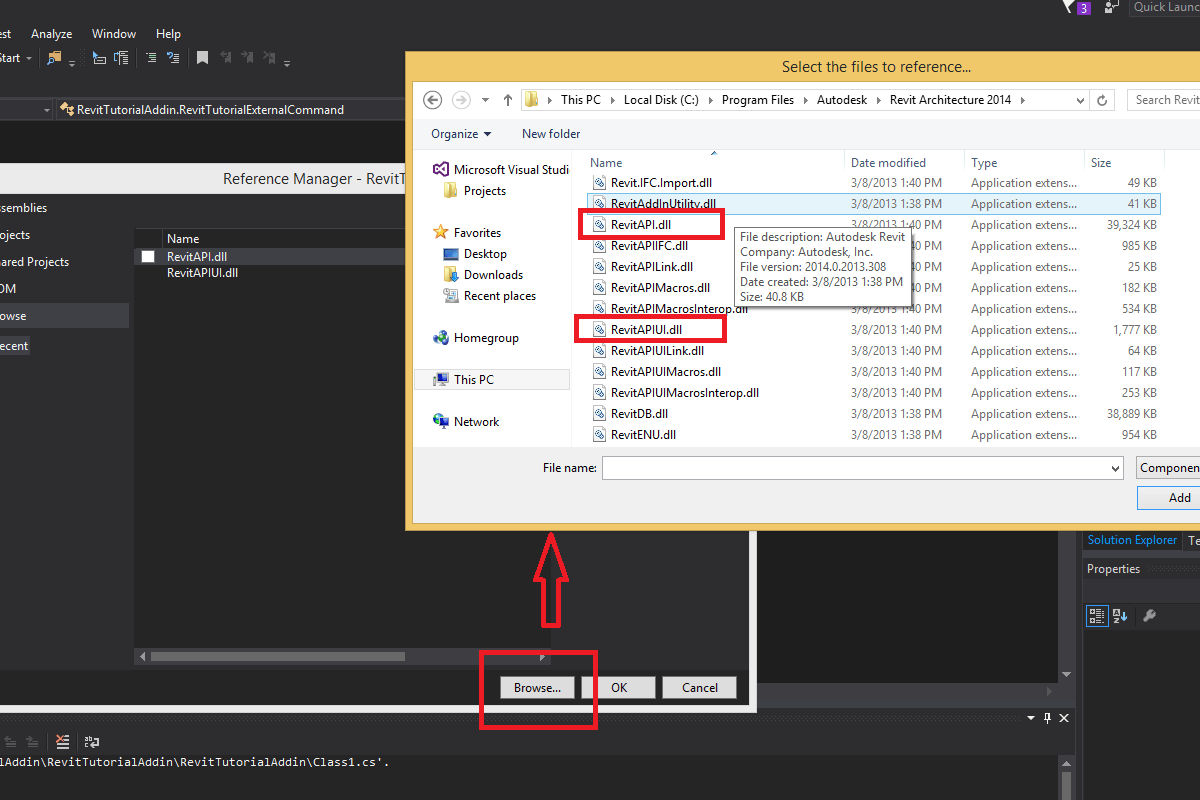
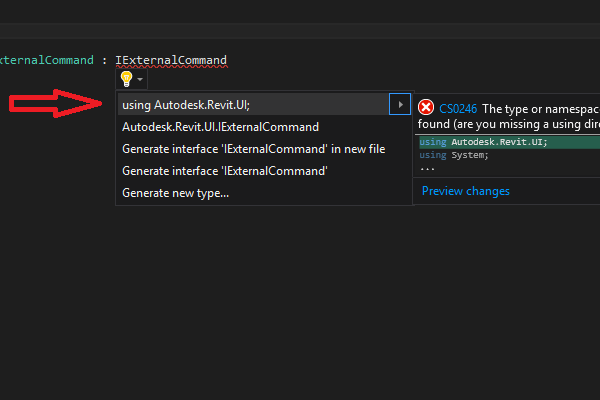
As you probably know, that squiggly red underline means Visual Studio doesn't recognize that reference. This is because IExternalCommand is an interface from the Revit API libraries. So to use it, we'll have to add a reference in our project to the Revit API dlls. You can find these in the directory where you installed Revit. The files we're looking for are RevitAPI.dll and RevitAPIUI.dll. These are the two libraries that you'll use most often when developing add-ins for Revit.
Once we've added references in our project to these files, we can add the line:
using Autodesk.Revit.UI;
to our class file.
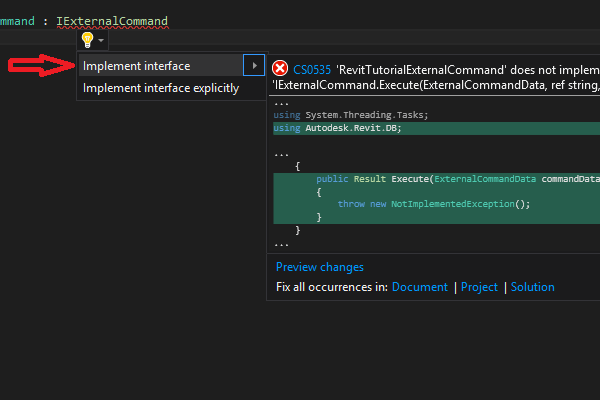
Now we still have the red squiggly underline; as you probably guessed, Visual Studio now recognizes the interface name, but it's warning us that we're not correctly implementing the interface. In order for our class to implement it, we have to add the Execute method to the class. This method has the following signature:
public Result Execute(ExternalCommandData commandData, ref string message, ElementSet elements)
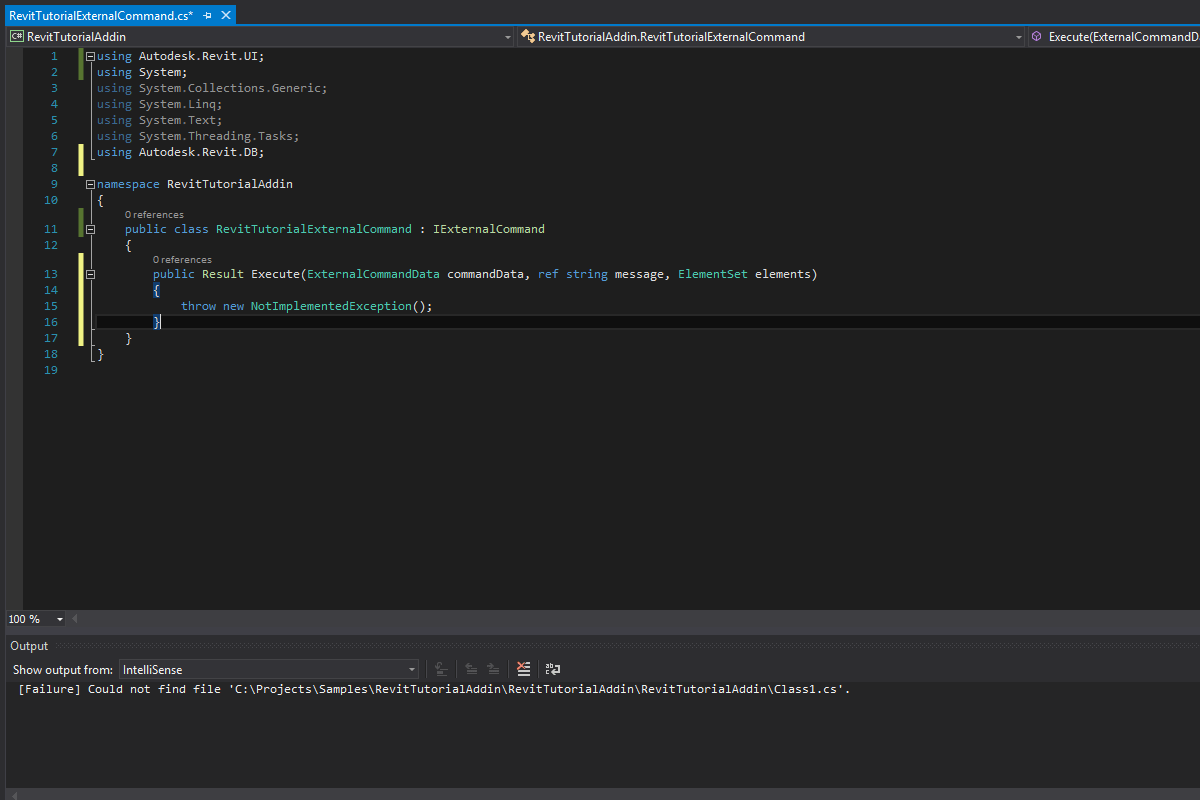
The access modifier has to be public in order for Revit to be able to run our add-in. This method essentially serves as the entry point for your add-in - this is the equivalent of "public static void Main()". There's one more thing we should do before actually writing code - add an attribute that determines the transactional behavior of the external command. This attribute is in the namespace Autodesk.Revit.Attributes, so you'll want to add that to your using statements. Revit transactions are outside the scope of this article, but the short version is that anything your add-in does to change the file that it's working with has to be done within the scope of a transaction, so the TransactionMode enum that we supply to the Transaction attribute allows us to decide whether a transaction is automatically wrapped around our entire add-in, or whether we have to manually start and commit Transactions. It's usually a good idea to use Manual, so that's what I'm showing here.
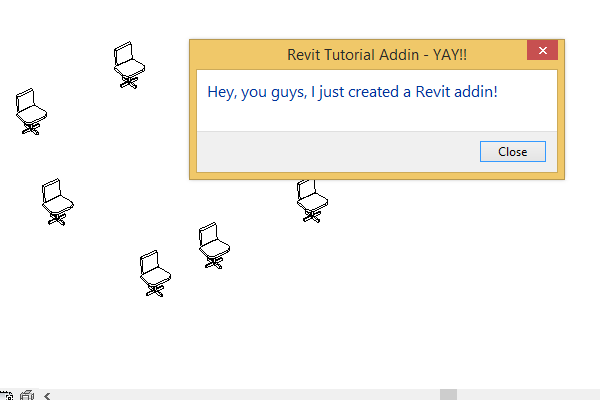
Finally, let's write some code to make this add-in actually DO something. We'll keep it simple for this first tutorial: we'll just display a message box for the user.
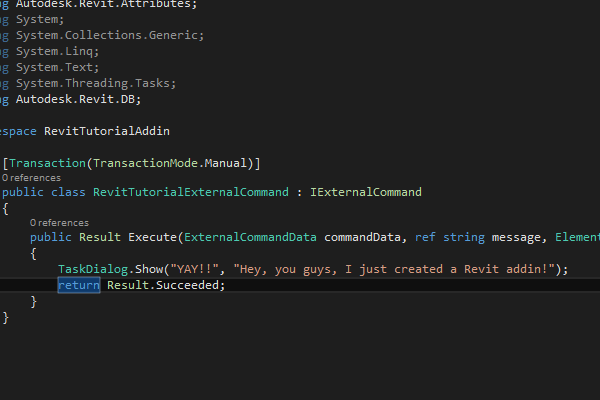
In the above image, you can see I've used a class called TaskDialog's "Show" method, and passed it two strings as its parameters. The first parameter is the "title" displayed at the top of the message box. The second parameter is the content text of the message box. At the end of our Execute method, we return an Autodesk.Revit.UI.Result, an enum with three possible values: "Cancelled", "Succeeded", and "Failed". We'll return Succeeded for now.
Finally, we'll build our solution, start Revit, and try it out.

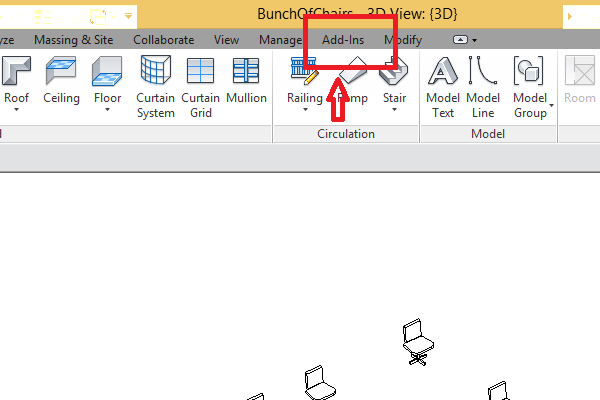
But wait, there's a problem... When we have add-ins loaded, there's supposed to be an "Add-ins" menu tab at the top, right next to "Modify". You can see in the above picture that it's not there. This is because we haven't actually deployed our add-in so that it can be loaded by Revit. We need to do two things to make this happen:
- Write an add-in file (an XML file with a ".addin" extension) that Revit reads when it starts up in order to determine which add-ins are to be loaded
- Build our project to produce a dll file, and place it somewhere accessible (we've already done this one)
Let's go ahead and write that .addin file. You can do this using Notepad, Notepad++, or any other text editor. When creating the file, you need to put it in the add-ins folder for your targeted version of Revit, which can be found at C:\Users\[YOUR USERNAME]\AppData\Roaming\Autodesk\Revit\Addins\[YOUR REVIT VERSION YEAR]. So for me, it's C:\Users\Christopher Olsen\AppData\Roaming\Autodesk\Revit\Addins\2014. The AppData folder is usually hidden by default, so you'll have to make sure Windows Explorer is configured to show hidden files and folders.
As mentioned before, this .addin file is in XML format.

Our root element here is the RevitAddIns tag. Within this tag, you'll place one or more Addin tags (yes, you can use one file to specify multiple add-ins for Revit to load). The "Type" attribute on the Add-in tag is for specifying what kind of add-in this is. The two most popular options are "Command" and "Application". Since we've written an external command (as indicated by the fact that we used the IExternalCommand interface), we'll use the "Command" value for this attribute.
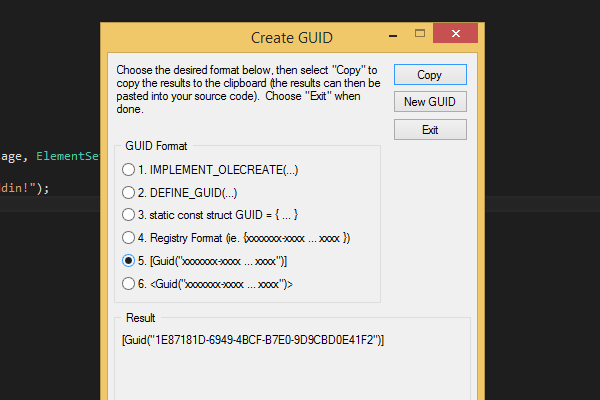
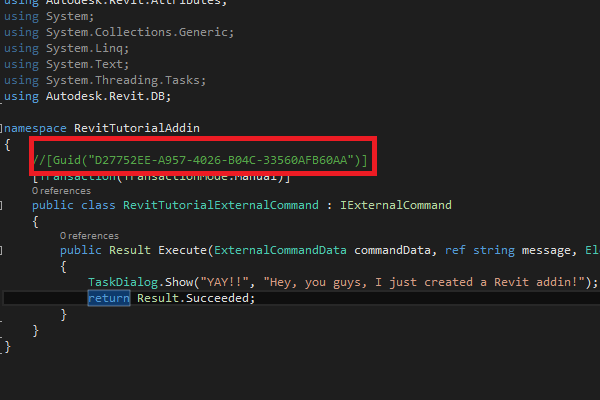
Nested inside the AddIn tag, we have several important elements. The Text tag is where we specify the display name for our add-in in the "External Commands" drop-down menu in Revit. The Assembly tag must contain the file path to the dll for our add-in - in this example, I've pointed it toward the dll file in my project's obj\Debug folder in order to make testing and debugging easier. AddInId is essentially the ID of your add-in, and must be unique for a session of Revit - the best way to do this is to generate a new GUID in visual studio (you can do this by going to the Tools menu, and clicking on "Create GUID". You don't have to put this GUID in your code somewhere, but it's common practice to place it in a comment right above your class definition.
Next, we have the FullClassName tag, which must contain the namespace and class name for your external command. The VendorID tag is required, and is supposed to be unique for a given session of Revit - Autodesk recommends using the url of your company's website. Finally, VendorDescription is a more verbose description of your company - if your external command throws an unhandled exception, Revit will display an error message on screen that ends with "For more info, contact this knucklehead that developed the add-in: [VendorDescription]". I've paraphrased the actual text of the error message, for comical effect.
And that's it. There are many more things we can specify in that .addin file, but these are the core ones you'll really want to use. Other tags you can add to this file include the path to an image that will be displayed for your add-in in the external command drop-down menu. For a full run-down, check out the table on Autodesk's knowledge base website.
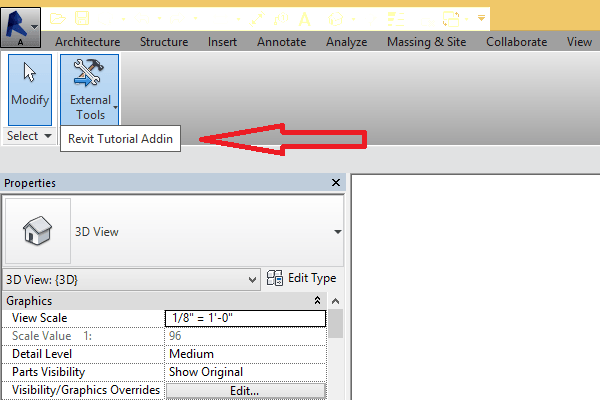
Now, if we open Revit, we see that the "Add-Ins" tab has been added, and clicking on the "External Tools" drop-down shows us our add-in. If we click on it, our external command's "Execute" method runs, and we get our message box.
Now that we've got the super basic stuff out of the way, we can turn our attention to doing something meaningful in a Revit add-in. In my next blog post, we'll go over how we can have our user select elements, and how we can then perform operations on those elements.
Learn more about how DMC can help you develop custom software.