Flashing an ECU can be a time-intensive process, so it’s no wonder that automotive OEMs are looking for ways to speed up production. Luckily, Vector has released a set of C/C# API commands called vFlashStation.
This library has the capability to simultaneously flash up to eight ECUs on separate communication channels. Additionally, these APIs are compatible with several application environments, including LabVIEW.
Learn vFlashStation API Calls
This blog explains how we were able to integrate Vector’s vFlashStation API with NI’s LabVIEW development environment to flash software to multiple ECUs at a time.
To flash an ECU, there are five necessary commands:
- Initialize()
Description: Synchronously initializes the vFlash library. This must be called before calling any other command.
- Load Project(string Path, uint channelID, out long projectHandle)
Description: Synchronously loads a packed project (.vflashpack) to a specific channel. The flash project contains important data such as the security seed key and necessary flashware. The packed project must be initially created using the vFlash GUI that comes with the hardware.
Parameters:
- Path: filepath to the vFlash packed project (.vflashpack).
- channelID: Channel number for the project. It must match the numbers used in the Vector Hardware Configuration screen (vFlash CAN 1, vFlash CAN 2, etc.).
- projectHandle: The method will return a handle (ID) for the newly loaded project.
- Start(long projectHandle, CallbackProgressDelegate progressCallback, CallbackStatusDelegate statusCallback)
Description: Asynchronously starts the flash process for the channel as indicated by the projectHandle.
Parameters:
- projectHandle: Handle (ID) to the project to be flashed. Should have been created during the Load Project method.
- progressCallback: Delegate reporting the flash progress in percent and time remaining (seconds).
- statusCallback: Delegate reporting the status of the flash process (enum containing success or error information).
- Unload Project(long projectHandle)
Description: Synchronously unloads the project associated with the project handle.
Parameters:
- projectHandle: ID of the associated project and channel. Should have been created during the Load Project method.
- Deinitialize()
Description: Deinitializes the vFlash library in order to free allocated resources.
These are the bare bone methods required to flash an ECU through the vFlashStation API. While the other methods are not described in detail in this blog post, Vector also created other API calls to customize reporting, networks, flash attributes, and custom actions.
Create a C-Based Wrapper of vFlashStation API
It’s important to note that the Start API method requires two callback delegates in order to correctly query the flashing status information. This is especially important for simultaneously flashing multiple ECUs. However, LabVIEW does not currently have a way to natively access or call a callback delegate.
The best workaround for this is to create a C-based wrapper to handle the callback delegate. In my case, I created a script using Visual Studio that referenced the vFlashStationAutomation DLL and housed my desired methods and callback delegates. The code snippet below shows how the vFlashStation API and callback delegates are utilized in my wrapper.
        public VFlashStationResult StartFlash()
        {
            VFlashStationResult startResult = VFlashStationAPI.Start(ProjectHandle, ProgressCallback, StatusCallback);
            return startResult;
        }


        /// <summary>
        /// The StatusCallback handles changes of the reprogramming status.
        /// If the reprogramming process was successfully finished, the callback contains
        /// the result <see cref="VFlashStationStatus.Success"/>.
        /// Otherwise the <paramref name="flashStationStatus"/> contains the error code.
        /// </summary>
        /// <param name="ProjectHandle">The project handle.</param>
        /// <param name="flashStationStatus">The flash station status.</param>
        /// <remarks>If detailed error information is required,
        /// check <see cref="VFlashStationAPI.GetLastErrorMessage"/>.</remarks>
        private void StatusCallback(long ProjectHandle, VFlashStationStatus flashStationStatus)
        {
            Status = flashStationStatus;
        }

        /// <summary>
        /// The ProgressCallback contains progress information about the current
        /// reprogramming process containing the progress in percent and the
        /// estimated remaining time in seconds to finished the flash process.
        /// </summary>
        /// <param name="ProjectHandle">The project handle.</param>
        /// <param name="progressInPercent">The progress in percent.</param>
        /// <param name="remainingTimeInSeconds">The remaining time in seconds.</param>
        private void ProgressCallback(long ProjectHandle, uint progressInPercent, uint remainingTimeInSeconds)
        {
            PercentProgress = progressInPercent;
            TimeRemaining = remainingTimeInSeconds;
        }
While not shown in this code snippet, I also kept each of the vFlash API calls exposed as individual public methods in my script (like the StartFlash example above). This made my application a little more flexible from the LabVIEW perspective since I could perform the tasks independently in any sequence.
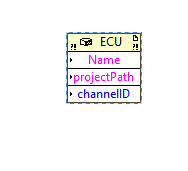
Additionally, I also created a class called ECU in my C# script. This gave me a great way to group the information for each of my channels and neatly dispose of them when I no longer needed them. Each class stores the data that I need such as project path, project handle, channel ID, status, etc.
public class ECU : IDisposable
    {
        public string ECUname { get; private set; }
        public string ProjectPath { get; private set; }
        public long ProjectHandle { get; set; }
        public uint ChannelID { get; private set; }
        public uint PercentProgress { get; private set; }
        public uint TimeRemaining { get; private set; }
        public VFlashStationStatus Status { get; private set; }
        public VFlashStationResult Result { get; private set; }

        /// <summary>
        /// Generate class for each ECU. We get name, project path, and channel ID from LabVIEW
        /// </summary>
        /// <param name="projectHandle"></param>
        public ECU(string Name, string projectPath, uint channelID)
        {
            ECUname = Name;
            ProjectPath = projectPath;
            ChannelID = channelID;
            TimeRemaining = 0;
            PercentProgress = 0;
        }
I then compiled the script to create my own DLL, titled StartFlash.dll. Integrating my wrapper into LabVIEW was simpler since I did not need to worry about the callback delegates.

Call DLL Methods from LabVIEW
There are two ways to call functions wrapped within a DLL: a Call Library Function Node, or an Invoke Node. A Call Library Function is useful when the DLL is a C/C++ DLL, and an Invoke Node is great for C#/.NET assemblies. You can also view NI’s knowledge article, Calling a DLL from LabVIEW, for more details.
In this case, we’ve created a .NET assembly so the correct option is to use the invoke nodes from the .NET palette within LabVIEW.
- Place a .NET Constructor Node on the block diagram to instantiate a class within the .NET assembly.
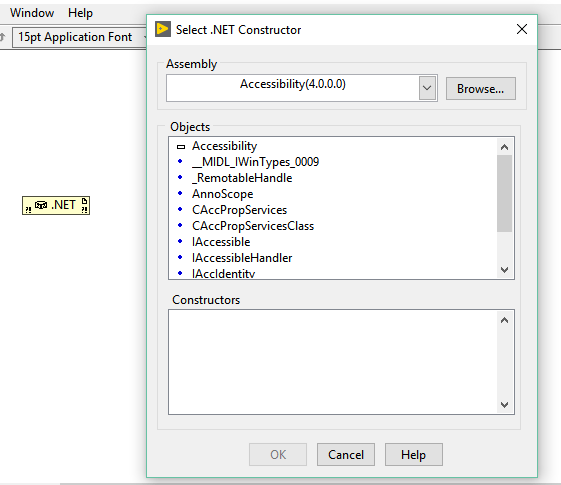
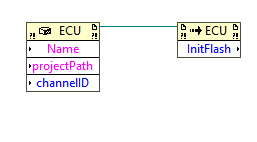
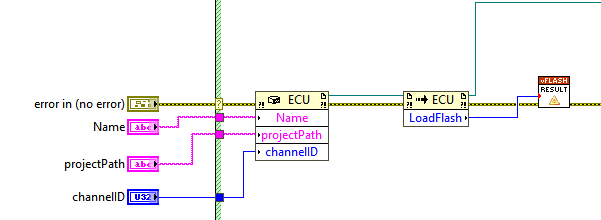
- Select the constructor by browsing for the desired .NET assembly DLL. For this example, we need the StartFlash DLL I created earlier and my ECU class.

You should now have a constructor node with any required inputs (Name, project path, and channel ID). Wiring controls/constants to these inputs will initialize your class data.
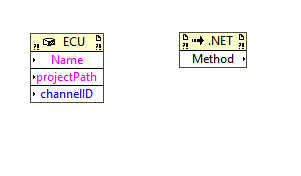
The output of this constructor node is a reference to the newly created class. This reference can now be wired into property nodes or invoke nodes in order to read/write class data or access public methods, respectively.
- Wire the class reference to the input of an invoke node. You should see it automatically adapt to the reference type wired in.
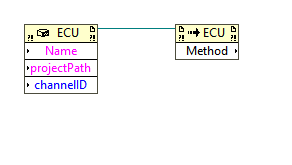
The available methods will automatically be populated based on the class reference. Select the desired method from the method drop-down menu and any inputs/outputs will automatically be created.
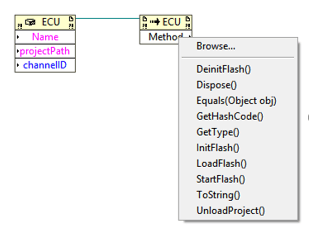
That’s how simple it is to access public methods within a DLL. The only thing remaining is to organize the LabVIEW application to call the vFlash methods in the proper order in order to flash up to eight ECUs at a time.
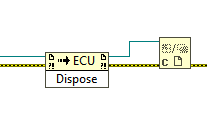
One last piece of advice: It’s always important to properly dispose of any references open in LabVIEW. In this case, we need to dispose of our .NET class and our .NET class reference.
Learn more about DMC's LabVIEW programming experience.