Welcome back to “Getting Started with WinCC OA”! If you aren’t familiar with the series’ previous topics, it’s recommended that you read the respective installments before proceeding:
Now that we have a solid understanding of datapoints and basic scripting, it’s time to combine the two! In Part 7 of the “Getting Started with WinCC OA,” we’ll investigate utilizing and manipulating datapoints within our OA scripts.
Referencing A Datapoint Element
A datapoint element is referenced by: <parent dp(s)>.<dpe>
For example, the elements of the dp “myMotor” are given by:
- “myMotor.iStatus”
- “myMotor.rSpeed”
- “myMotor.rMaxSpeed”
Using Datapoint Values within Scripts
Using scripts, we can link items in our panels to the datapoints that live in the db folder. The fundamental functions utilized in datapoint-scripting interaction include:
- dpGet()
- dpSet()
- dpConnect()
dpGet()
dpGet() is used to assign a datapoint element’s value to an existing script variable and takes the form: dpGet(<dpe>, <variable>);
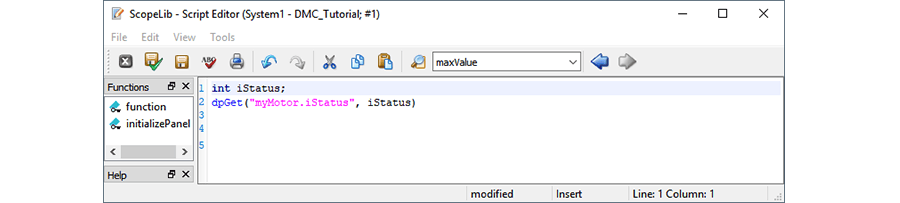
With this dpGet, the variable iStatus will take on the value of myMotor.iStatus.
dpSet()
dpSet() is used to assign a value or a script variable’s value to a datapoint value and takes the form: dpSet(<dpe>, <value>);
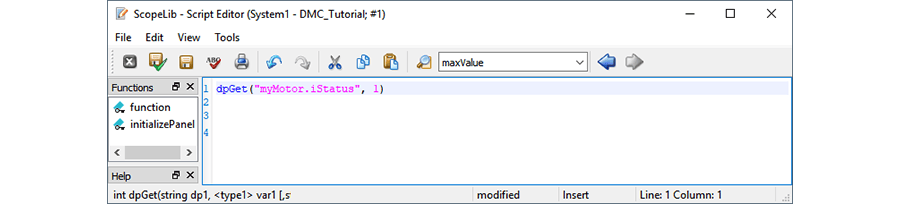
With this dpSet, the dpe value of myMotor.iStatus will be set to 1.
dpConnect()
dpConnect() is used to call a function whenever a specified dp value changes. It takes the form:
dpConnect(string <callback function>, string <dpe>)
The callback function of a dpConnect must be defined in a specific manner:
<returnType> <callbackFunction>(string <dpe>, <type> <dpeValue>)
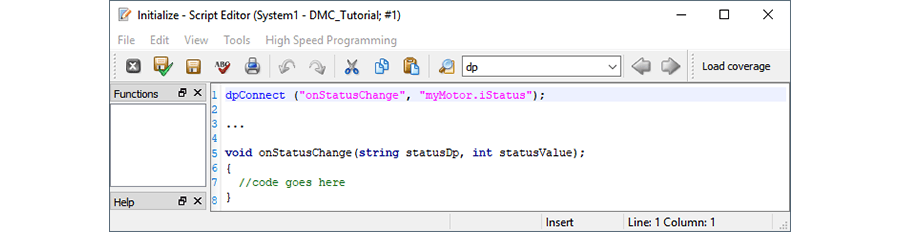
With this dpConnect, the function “onStatusChange” will execute when the value of myMotor. iStatus changes. When “onStatusChange” executes, the function will have the string “myMotor.iStatus” (given by the variable statusDp) and the value of myMotor. iStatus (given by the variable statusValue) at its disposal.
Example
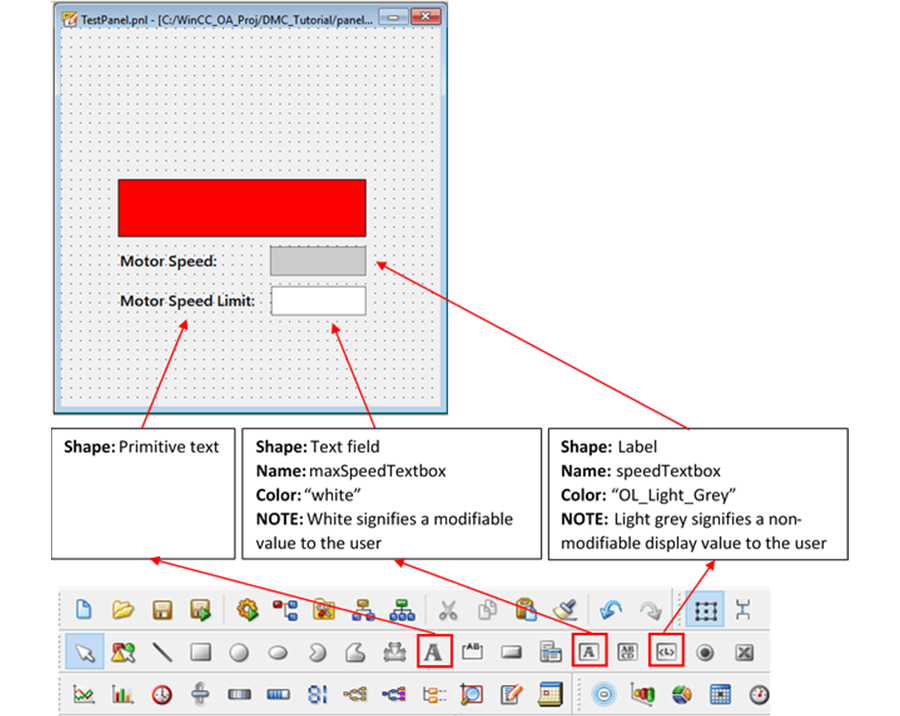
Setting Up the Panel
Let’s revisit our lovely red/green square example and pair it with our newly-created datapoints! Our example will include the following three main objects and their respective behavioral objectives:
- Rectangle (i.e. our motor device icon)
- Color is blue (stopped color) when rSpeed is 0
- Color is green (forward color) when 0 < rSpeed < rMaxSpeed
- Color is red (errored color) when rSpeed > rMaxSpeed
- Speed textbox
- Max speed textbox
- Displays rMaxSpeed
- User can set rMaxSpeed value
We’ll start out by removing the previously-used buttons and adding in some primitive text, a label (used for value display), and text field (used for value display and modification).
Writing the Script
- Ensure the panel’s “Initialize” event still has the following code:
	main()
{
  initializePanel();
}
- Insert the following code within maxSpeedTextbox’s “Command” event:
	main()
{
  textboxCmd();
}
- Add the following script to the panel’s “ScopeLib”:
enum StatusType
{
  Stopped = 0,
  Estop   = 1,
  Forward = 2
};

//=============================== Panel initialization =========================================
initializePanel()
{
  //Whenever rSpeed or rMaxSpeed changes, call the function "onSpeedChange"
  dpConnect("onSpeedChange", "myMotor.rSpeed", "myMotor.rMaxSpeed");

  //Whenever iStatus changes, call the function "onStatusChange"
  dpConnect("onStatusChange", "myMotor.iStatus");
}


//=============================== Text Field Command =========================================
//Textbox is selected and user keys "Enter"
void textboxCmd()
{
  //Assign the textbox's text value to rMaxSpeed
  dpSet("myMotor.rMaxSpeed", maxSpeedTextbox.text);
}


//=============================== On Speed / Max Speed Value Change =================================
void onSpeedChange(string speedDp, float speedValue, string maxSpeedDp, float maxSpeedValue)
{
  //Define the variable whose value will be assigned to iStatus
  int iStatusValue;

  //Determine what value to assign iStatusValue (and subsequently "myMotor.iStatus")
  switch (speedValue)
  {
    //If "myMotor.rSpeed" is 0, set iStatusValue to 0
    case 0:
      iStatusValue = (int)StatusType::Stopped;
      break;

    //Otherwise, if "myMotor.rSpeed" > "myMotor.rMaxSpeed", set iStatusValue to 1
    //           if not, set iStatusValue to 2
    default:
      iStatusValue = (speedValue >= maxSpeedValue) ? (int)StatusType::Estop : (int)StatusType::Forward;
      break;
  }

  //Assign iStatusValue's value to "myMotor.iStatus"
  dpSet("myMotor.iStatus", iStatusValue);

  //Set the maxSpeedTextbox and speedTextbox's test to their respective values
  //NOTE: dpValToString ensures the units we assigned earlier in the series are displayed.
  //      Simply using <Textbox>.text = <speedValue> will work, but will not display appropriate units
  maxSpeedTextbox.text = dpValToString("myMotor.rMaxSpeed", maxSpeedValue, true);
  speedTextbox.text = dpValToString("myMotor.rSpeed", speedValue, true);
}

//=============================== On Status Change =========================================
void onStatusChange(string statusDp, int statusValue)
{
  //Define the variable whose value will be assigned to the rectangle's color property
  string rectangleColor;

  //Determine color to assign to rectangle based off iStatus
  if (statusValue == (int)StatusType::Stopped)
  {
    rectangleColor = "blue";
  }

  if (statusValue == (int)StatusType::Estop)
  {
    rectangleColor = "red";
  }

  if (statusValue == (int)StatusType::Forward)
  {
    rectangleColor = "green";
  }

  //Assign selected color to rectangle
  setValue("rectangle", "backCol", rectangleColor);
}
- Be sure to review and understand the example script
Running the Example Code
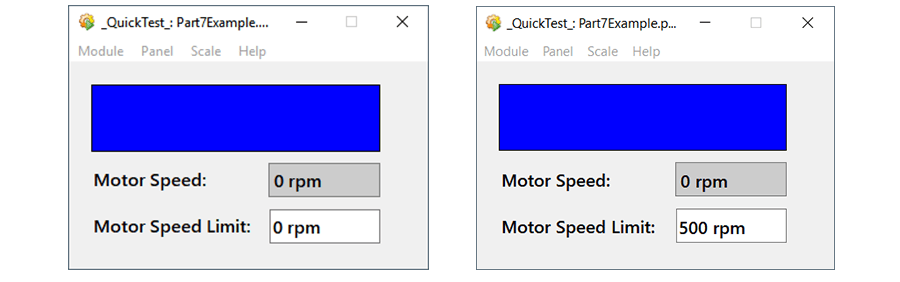
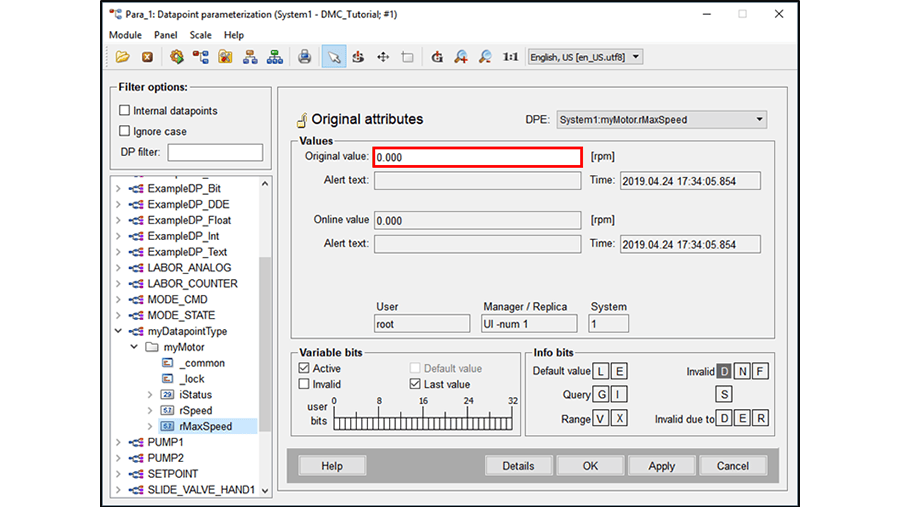
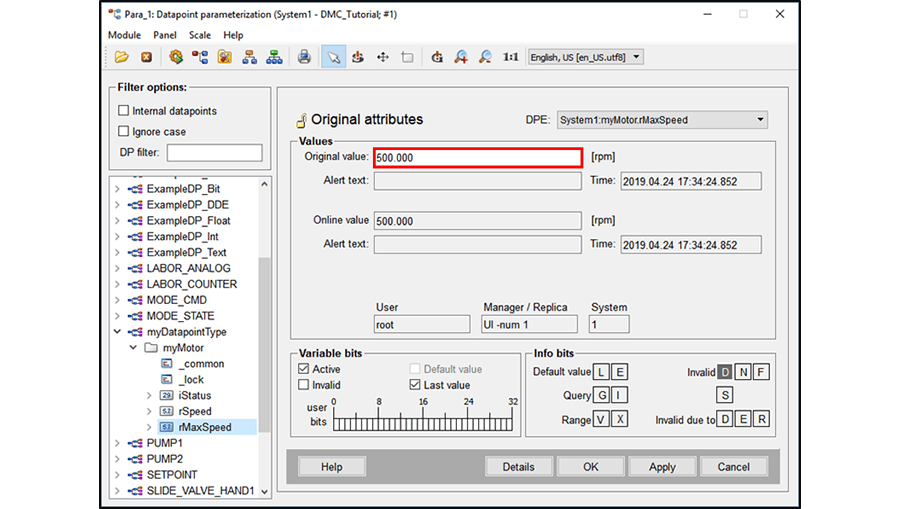
Run the panel in QuickTest Module and open/view the “myMotor” datapoint in Para. Upon modifying the Motor Speed Limit textbox and pressing 'Enter' on the keyboard, we can see the rMaxSpeed value change in Para.
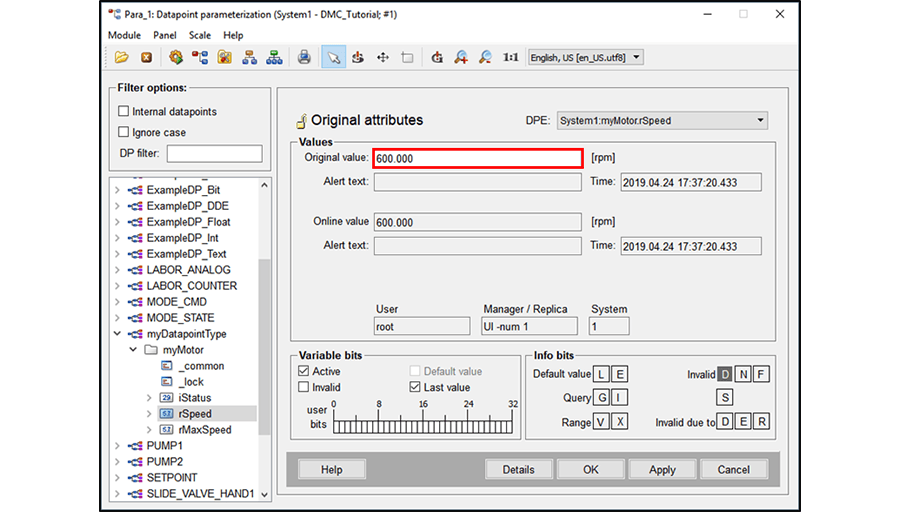
Upon modifying rSpeed in Para (simulating a linked PLC tag change), we can see the rectangle’s color change from green as 0 < rSpeed < rMaxSpeed and then to red as rSpeed > rMaxSpeed:


Now that we have a basic understanding of scripting and how to interact with datapoints, we’re ready to expand our horizons beyond the boundaries of panel scripting environments and write code that is accessible globally in our OA program.
Topics to look forward to in this series:
Contact DMC to get started on your next WinCC project and learn more about our Siemens SIMATIC WinCC Programming as well as our WinCC Open Architecture Development.