


Ignition Perspective’s Table component offers great flexibility when designing powerful user interfaces, including the ability to display other views within table cells. In this article, we’ll cover how to configure a table cell to use an embedded view, allowing us to build screens that make it easier for users to understand and interact with the data.
The Example
For this example, let us imagine there are simple weather stations across the country reporting the communication status, the type of weather (represented by an integer), and temperature. Each city is set up with User Defined Types (UDT) containing this information [Figure 1]. We will then use this information to build an interface to allow users to individually enable and disable weather stations and view their statuses.

Setting Up the Table
First, we will add a table to a Perspective screen and bind the table’s data property to the tags. To do this, we look through the Cities folder and parse the tag values into a JSON format [Figure 2].
This method is preferred for its scalability, as new cities added to the tags will automatically appear on the screen. This results in a table with the raw tag data.


Column Configuration
But how do we make the data easier for users to quickly understand? We can do that by enhancing the table by configuring the five columns to have the following display:
- City: the name of the city
- Enabled: a toggle switch controlling if a weather station is enabled or disabled
- CommsStatus: an icon indicating if a weather station is communicating properly
- Temperature (F): the last reported temperature
- Weather: an icon based on an enumeration
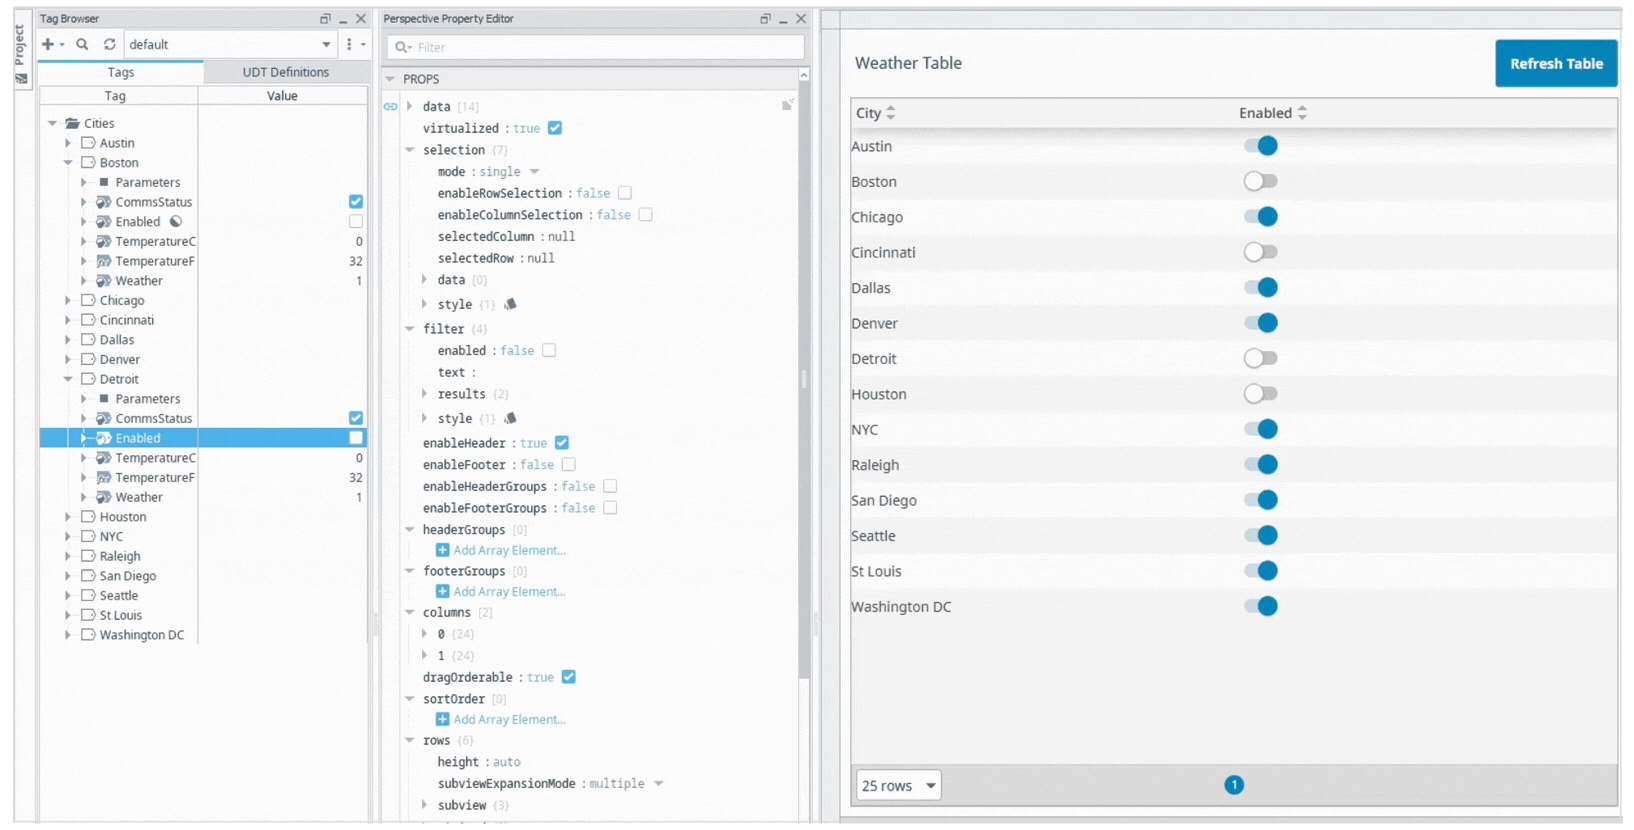
The end goal is to have a table that looks like this.

Background Knowledge: Passing Data into an Embedded View in a Table
Before discussing the detailed process for configuring each column, let’s first explain how to transfer data into embedded views in tables, as this understanding is crucial for our example. To start, the Perspective table component has a set of properties per cell. The full list is:
:column: the current column namecolumnIndex: index of the current columnrow: index of the current rowrowData: table data for the current row in a JSON formatrowIndex: the displayed index of the current row (if only a select number of rows are displayed at a given time)value: the value being passed into the cell
The table component also has a columns property, where for each column you can set the viewPath to be a path to another Perspective View. This is how you configure a view to be embedded in a table. Now the problem is, how do you pass information from your table into this embedded view?
The answer is to set the embedded view’s parameters to match the names of the table properties. For example, if you want to pass in the name of the current column into your embedded view, you would add a parameter called column to your embedded view.
You can also add custom properties under columns.viewParams to pass into the embedded view. Similar to the built-in Ignition cell properties above, once an input parameter with the same name as the new custom property is set up on the embedded view, that value will be passed in from the parent.
Column: Enabled
Now that we have the background knowledge of how to pass information into an embedded View, let’s use that to configure the Enabled column. The first step will be to create a view called EnabledView that contains a toggle switch component and link the view path to the Enabled column’s viewPath property [Figure 5]. By adding an input param called value to EnabledView [Figure 6], the enabled status will be passed automatically into EnabledView.


But how do you make sure the tag value is updated when the user presses the toggle button? There are a few different possible solutions for this:
Option 1: Create a Message Handler to write to tags and refresh the table data. This is DMC’s recommended approach because it centralizes all tag reads in one place, which is more performant, especially for large datasets. It also ensures that the table data is always synchronous, which is necessary if the table has columns that rely on multiple tag values. For instance, in our example, the CommsStatus column relies on the Enabled column data. So when you update the Enabled column, you also want the CommsStatus column to update.
Option 2: Pass in the tag path into the embedded view and do a bidirectional binding within the embedded view. While this approach may be more straightforward for smaller tables, it can negatively impact performance because tag reads occur in each cell rather than in a single table-level read. This method also does not automatically refresh the table data, which, in our example, would mean the CommsStatus column would not update to reflect the change in the Enabled column.
And you might be thinking–why not just have value property in the EnabledView set to an in/out param? Despite being an in/out param, this will not actually write back to the desired tag. This is because the table cell is linked to the manually parsed dataset and is not bidirectionally linked to the original tag.
For this example, we will implement a Message Handler. The first step in implementing this is to add another input, called row, to the EnabledView. This will inform the Message Handler what index of the data array to use. Notice that row, not rowIndex, is used since rowIndex only uses the rows that are displayed. If there were more cities, this number would differ from row as it would change depending on which page is being viewed.
Then, on the toggle switch’s component event, we will add a script to trigger the Message Handler being sent [Figure 7]. Finally, on the main table, we will add a Message Handler that takes in the payload and uses that to both write to the tag and refresh the entire table [Figure 8]. After making those changes, toggling the switches writes to the respective tag!


Column: CommsStatus
This column will use an icon to indicate the communication status based on both the rowData.CommsStatus and rowData.Enabled properties. To pass that information into the embedded view, we will add rowData as a param to the View [Figure 10].

The bindings on the icon property are set up such that:
- A gray material/wifi_off icon indicates the station is disabled.
- A gray material/wifi icon indicates comms are good and the station is enabled.
- A red material/wifi_off icon indicates that comms bad and station is enabled.

Then the color property has the following binding, where the color codes are hardcoded. If you would like to do more advanced CSS handling of the color animations, check out DMC’s blog on CSS styles.

Column: Weather
The Weather column will be set up similarly to CommsStatus, but we’ll add an additional input param called color, which is bound to the icon’s color property [Figure 13]. In the table, in the Weather column, add a viewParam.color and bind it to a new field where users can specify the color of the weather icons [Figure 14].


Conclusion
With the customization now finalized, the table provides users with a straightforward method for enabling/disabling each city, alongside clear graphical representations for efficient data interpretation. This enhancement streamlines user interactions and helps increase the functionality of the Ignition system.
At DMC, we know how important it is to our clients to have easy-to-understand data visualization. Using embedded views in tables is just one of the many ways engineers at DMC leverage Ignition’s tools to build intuitive screens that provide value to our customers. For more tips and tricks, check out our other blogs where engineers explore more ways to use Ignition’s powerful features.
Need help with embedded programming or ready to take your Manufacturing Automation project to the next level? Contact us today to learn more about our solutions and how we can help you achieve your goals.