


Recently, while at a client’s worksite, I updated a data table with a new data set. To maintain the UDTA structure, the data had to be entered manually, line-by-line. As I worked through the changes, I started thinking about ways to make the process more efficient. Could a custom Python script parse the XML version of the code and update the values automatically? Could a simple find-and-replace operation in a text editor be enough?
As it turns out, I’m not the first person to encounter this challenge. Rockwell offers a utility called Config Tool that can connect to .ACD files and significantly reduce the time required for these types of updates. In this article, I’ll walk through the use case that led me to the tool and show how it can help streamline tag modifications on future projects.
First Startup
The version of PAX Config Tools we have is 7.8.2. Select it to start the application, and make sure you run the “App” version as an Administrator.
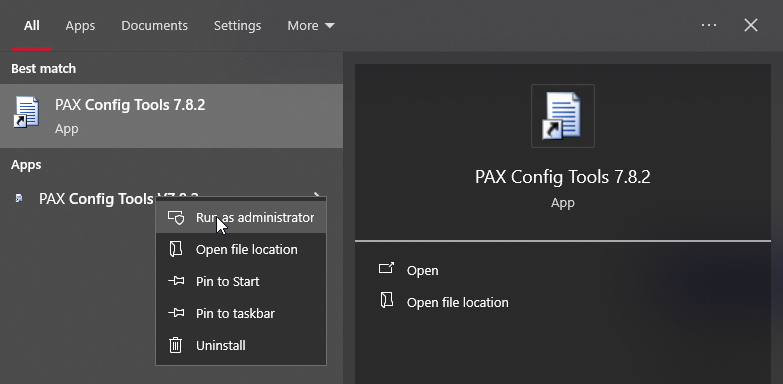
When you run the tool for the first time, you’ll need to select and connect the program you want to modify.

Upon selecting “Add Controller…”, navigate to the file path where you have the .ACD file saved. Select it, and the following window should pop up.

This window lets you change how the tag descriptions are read. In our particular use case, since we aren’t concerned with the descriptions, leave the default populated values and press “OK.”
The Configuration tools will show “Connecting to Logix Services,” and it might take a few minutes to run. When it completes, your controller name will appear under “Logix Controllers.” Now that the program has been loaded in, the Tool gives access to tags used throughout the program, both local and global.

Use Case: Using Excel Tables for Tag Updates
To help speed up the repetition described above, the Configuration Tool proves itself quite useful. The first step is to set up which tags need to be exported for manipulation in Excel. To start, this is what the tags look like in their local form underneath the relevant AOI.

Based on this structure, we can only manipulate one cell at a time. Now I’m going to export these tags so I can manipulate them in Excel.
Exporting Studio 5000 Tags to an Excel Document
Upon right- clicking on the controller that was loaded into the PAX Config Tools application, I will select “Export Tag Data to Excel Workbook…”

This will populate a window (shown below) with several configuration settings. First, you’ll need to create an Excel document to save the tag data. I elected to place it on the computer desktop, but it won’t be best to store it here for the long term.

After saving, it should populate the save location in the grey box beneath.

To make this exported spreadsheet as compact as possible, I want to create an export filter that lets me select only relevant data. To do this, I select “Edit Export Filters…”

This will open a new window. If this isn’t the first time you’ve generated an export filter, you can look through the ones that have been generated before. I want to add a new one, so I press “Add.”

Assign the filter a name.

Once the filter is created, I need to add data types to pull the tags. I click “Add Data Types…”

The next screen lets you add a data type filter to what data is exported. The data type I’m looking for is missing “Ratio_Slide_Pos,” which means I will need to add it to pull those tags from that data type.

If I right-click in the open space, I can select “Edit Data Type Filter…”, which opens the interface to change the visible data types.

From the “Edit Data Type Filters” window, I’ll want to click “Add…” to add the Ratio_Slide_Pos as a visible data type.

Once the data type filter is created, it will blank out the “Select Filter:” and “Elements in the Selected Filter:” fields.

Next, I will add a filter, which allows me to select the local UDT that houses all the valve data. Because this UDT table contains more data points, the easiest way to break it up is to assign an individual folder to each column. Next, click “Add…”

Within the “Select Data Type Elements” window, it will only include the controller-level tags visible in that AOI or UDT. In this case, I can see all the valves that were added in the program. I’ll start by selecting Valve1.

At this point, it will ask to “Enter View Name,” where I’ll put a descriptive filter name for these selected data points. For simplicity, I’ll call it “Valve1_View”.

Once I enter the new filter name, the tables will show up as elements in the selected filter.

Once I finish creating the other filters for Valve2 and Valve3 and click “OK,” it takes me back to the “Select Data Type Filters” screen so I can select the newly created filter.
From the “Edit Data Export Filters” window, I can add the new filters that I will need to export. Now that they are grouped by column, they will be easier to select in a large group.

Now there’s nothing left to do but export to the Excel file so we can see the data in spreadsheet format. When I click “Export,” it generates an Excel file in the selected file path.

The tags are now ready to be updated with the relevant data.
Importing Excel Document Back into Studio 5000
After making the necessary tag changes, it’s time to import these Excel sheets back into Studio 5000. To show the changes, below is the value that I manipulated, changing it to “123456.”

To do so, right-click on the relevant controller and select “Import Tag Data from Excel Workbook…”

Go to the file path location where you saved the modified Excel file.

Once it opens, select the worksheets to import. Select the sheets that have been modified, and click “Import” once ready.

Once the import is complete, the following window will appear.

After clicking “OK” and returning to the window “Import Tag Data from Excel Workbook”, you can close the import window.
Next, it’s important to close the Pax Config Tools before you open the .ACD file. When you try to close the program, it will prompt you to save changes. Make sure to click “Yes.”

Then another window will populate asking if the program can modify the .ACD file. On this screen, the user will also want to click “Yes.”

The program may take a couple of minutes to complete the changes. Once the changes complete, another pop-up window will appear, notifying the user that the save was successful.
At this point, it’s safe to close out Pax Config Tools.
When ready, open the modified project file in Studio 5000. When you investigate the modified tag, it should be clear that the tag entry that was modified in Excel, then imported to Config Tools has successfully been changed in the .ACD program.

Hopefully, this example clarifies how you can use this tool to make a large number of tag changes in Excel and then import them easily into Studio 5000. While I can’t get back the couple of hours I spent typing table values by hand, I’m grateful to have found this Rockwell-provided tool, which will no doubt be a valuable time-saving asset for me in the future. May this article serve as a cautionary tale for you, the reader, and hopefully you’ll find a use case for the Configuration tool as well. If you’ve found yourself at a crossroads in your project development and are wondering if there might be an easier way, know you’re not alone.
Have an upcoming project? DMC can help you take the next step!
Contact DMC’s Automation Team to learn more about Rockwell PLC programming, data aggregation, and tools for streamlining your workflow.