"Documentation"
The word alone sends shivers down the spine of even the most grizzled engineer and fuels nightmares for the rest of us. Maybe it’s not quite that bad, but keeping accurate and effective documentation is a critical element of any project, and it’s easy to do wrong.
At DMC, we have developed a handful of methods and tricks to fend off the perils of poor documentation when working with Altium Designer. For the second part of my Exploring Altium series, I’ll share some of these handy methods. If you missed the first article and are interested in learning about pin swapping, you can find it here.
Integrated Revision Control
Using revision control is, indubitably, one of the most important aspects of the software design process. This is particularly true when coding in parallel with other team members. Our weapons of choice at DMC are Apache Subversion (SVN for short) and the TortoiseSVN shell extension for Windows, although there are several other popular revision control utilities available (CVS, Git, and Arch, to name a few).
Committing a board layout or schematic file with TortoiseSVN works just like you would expect: after adding the file to the repository, you select SVN Commit, prepare your log message, and lock it away in the archive.
The downside? You have to navigate all the way to the file storage location in your browser. In Altium, the directory hierarchy tends to be flat (so it isn’t a huge hassle to find the file manually), but the process can be tedious and takes a few extra seconds each time.
It’s common knowledge that, among engineers, laziness is a virtue. Stated another way, we love to simplify tedious processes to save time and effort. If it takes me 5 minutes to set up a system that saves me 10 seconds per commit, I’ll have made my time back in 30 commits. Not to mention, I’ll never have to spend any time searching my Projects directory for that pesky microcontroller schematic page.
Altium, having anticipated my laziness, offers integrated version control in Altium Designer, and it’s a cinch to set up. This tutorial will assume that you’ve already installed your revision control utility of choice.
First, navigate to the DXP menu in the top toolbar and select Preferences… In the dialog box that opens up, expand the Version Control tab and click on the General menu item.
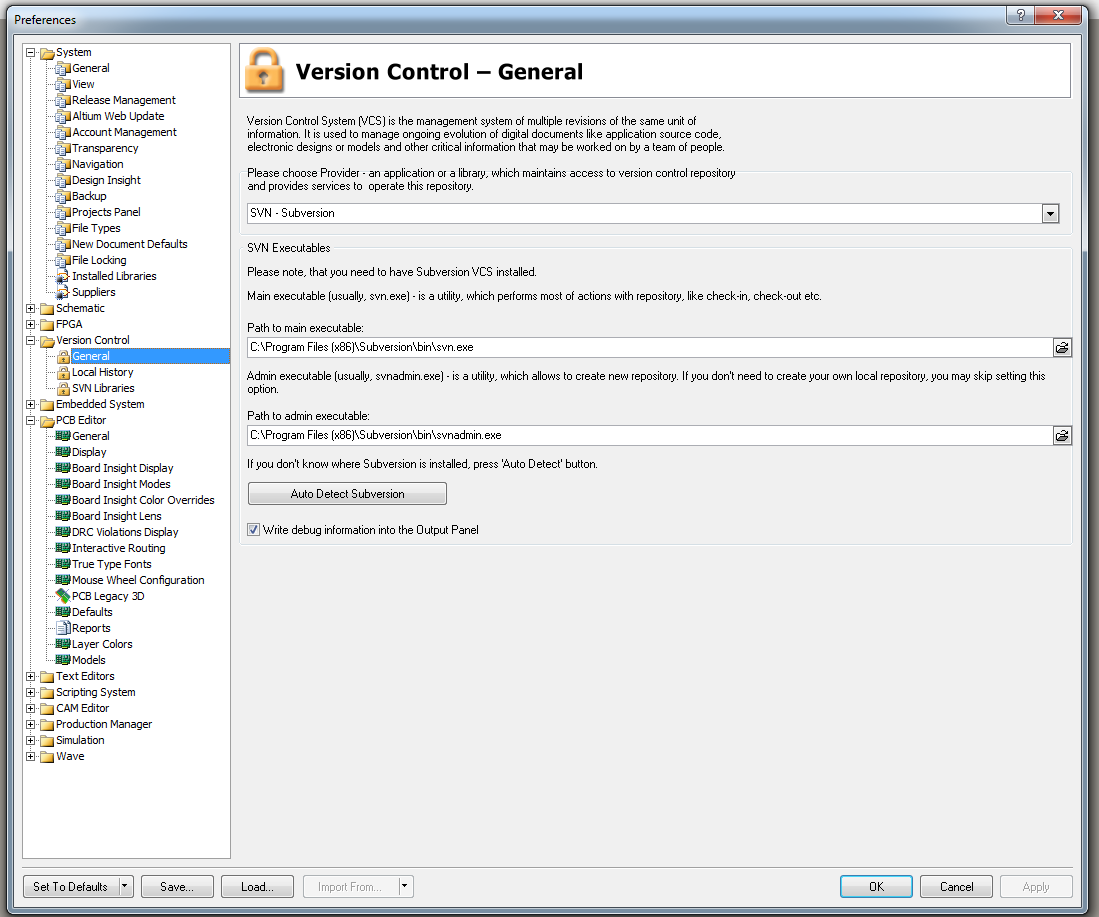
You can see that I’ve already set up SVN on my computer. However, the only actions required to setup SVN or CVS is to provide the path to the main executable(s) on your local machine. If you use SVN, you can try clicking “Auto Detect Subversion,” although this isn’t always reliable.
Click OK to commit the changes and exit out of the Preferences Menu. Let’s create a repository and archive our first Schematic revision. Since I use SVN primarily, the following instructions will apply most to this utility. You can find a more general version of these instructions on the Altium Wiki.
I created a very simple schematic page that is not linked to a project for this tutorial; you are free to use revision control for both project files and non-project files alike. In the Projects window, you will see the Schematic listed with a letter icon (white or red, depending on whether or not you have unsaved changes). If the Projects window is not displayed, click System -> Projects in the bottom right toolbar to enable it.
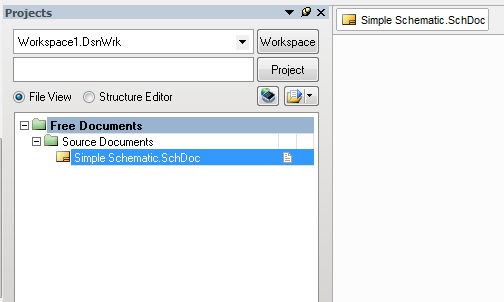
We can very easily create a new repository by right-clicking on the document name in the Projects window, hovering over Version Control, and clicking Create Repository…
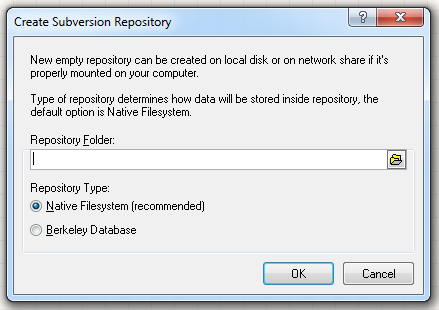
Note that you will need to select a folder that is empty and is enabled for write access. Select the appropriate folder and click OK. Altium should report that the repository was successfully created. Feel free to navigate to the folder with the file explorer to confirm that the repository skeleton was generated.
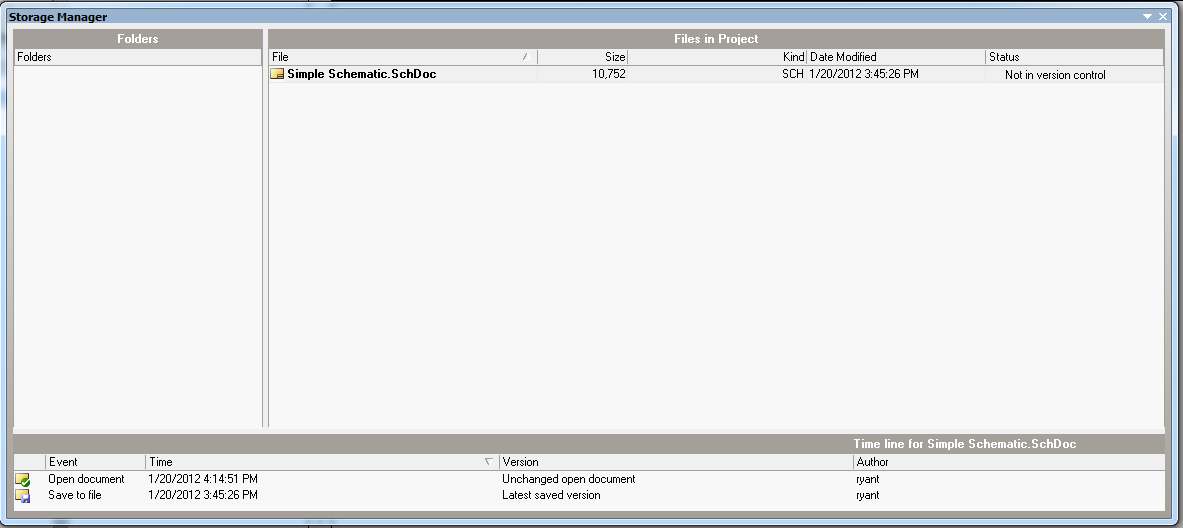
To link this new repository to your Altium project or source files, first open the Storage manager by clicking on the System tab in the lower right toolbar, then clicking Storage Manager.
In the Folders window, right-click and select Link Local Folder to Repository Folder… In the resulting dialog box, select the folder that contains your source/project file(s) in the Local Directory drop-down box, and then provide the path to the repository folder that we created previously. Note that if you are using SVN, you can also access a networked repository by supplying the server address.
Now that the repository has been linked, it’s time to archive our first revision! This can be done either in the Storage Manager or in the Projects window. Since most of the design time is spent in the Schematic/PCB Editor with the Projects window handy, I will show this method. Refer to the Altium tutorial linked above to learn how to add a revision from the Storage Manager.
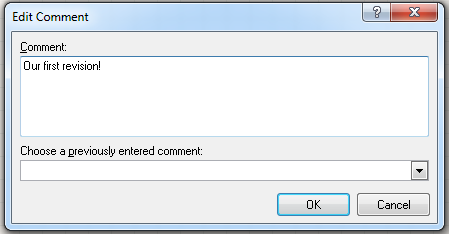
Back in the Schematic Editor, find your source file in the Projects window. Right click on the source file of interest, and hover over the Version Control item. In the expanded dialog, select Add to Revision Control. Create a log message (or recover a previously entered comment in the drop-down box), and click OK to commit the revision.
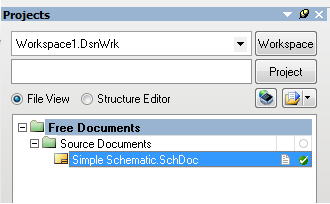
All right! Notice that a green check box icon now appears to the right of the source file name in the Projects window. This indicates that the local file is unchanged from the most recent revision in the archive.
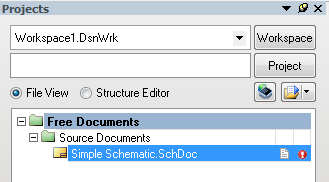
If any local changes are made but not committed, this will change to a red exclamation point. You’ve gotta pay attention to the exclamation points!!
Boom, integrated revision control!
If you’re working with a team of other developers, and there’s a chance of team members editing the same file, it is good practice to check the status of the source files before making any local changes. Altium can be forced to check the revision status of a source file by right clicking on the file name in the Projects window, hovering over Version Control, and clicking Refresh Status… If any files have been changed or conflicted in the archive, the icons to the right of the source file names will change appropriately.
Let’s say another developer made a change to the archive while you were on an extended coffee break (hey, it happens sometimes!) and the commit log message was vague (à la Changed some stuff around). How do you check what was changed? Simple!
Open the Storage Manager up again (System -> Storage Manager) and find the VCS Revisions pane. Note that you might see a Time Line pane instead. Right click on the pane header and click “Switch to Classic View” to reveal VCS Revisions.
CTL-click to select both your local copy and the current archive version (that your unspecific colleague committed while you were loading on caffeine). Right-click on the selection and click Compare.
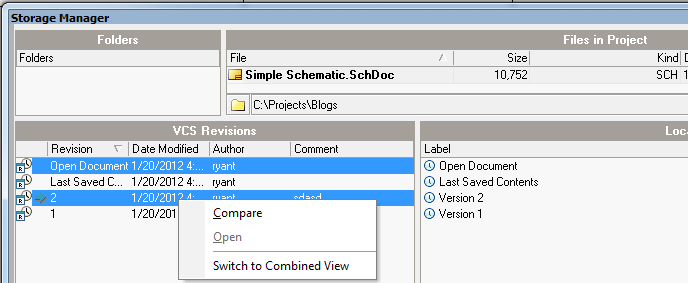
For Schematic and PCB documents, Altium will open separate tabs for the two versions in question as well as a Differences window. You can then visually compare between the two revisions, or navigate them by clicking on a detected difference in the Differences window.
Altium can also perform a diff on any ASCII files (output reports, for example) that are archived, although you might prefer to do this with the diff tool provided by your version control utility. I use WinMerge on my machine (along with many DMC employees), and I prefer it over most tools for comparing source code.
All right, you’ve set up integrated revision control and learned how to compare between Schematic versions (the same procedure works for PCB layouts as well)! It’s time to move on to another aspect of documentation management.
Using Custom Parameters
I’m sure those familiar with the electronic design process (and many other types of design) will agree that the design phase of any full-scale project can easily become eclipsed in magnitude by the effort required to source, build, and test the design. For this reason, it’s absolutely critical to make sure part selections, component costs, and available quantities are documented well. I’ve been burned in the past by not putting enough effort into this part of a project, and as a result, I’ve applied DMC’s established methods in every subsequent project (to great success, I might add).
The Bill of Materials is one of the key links between a PCB design and a physical product, so efficiently managing this document can grease the wheels of your project. At DMC, we’ve honed a very simple process that takes most of the frustration out of keeping the BOM up-to-date. The key? Custom parameters.
In Altium, when you place a generic component into a schematic, that component will typically have a default set of parameters describing the footprint, revision date, author, etc. Here is an example default parameter set for a through-hole LED. You can access this dialog by right-clicking on a component in the Schematic Editor and clicking Properties
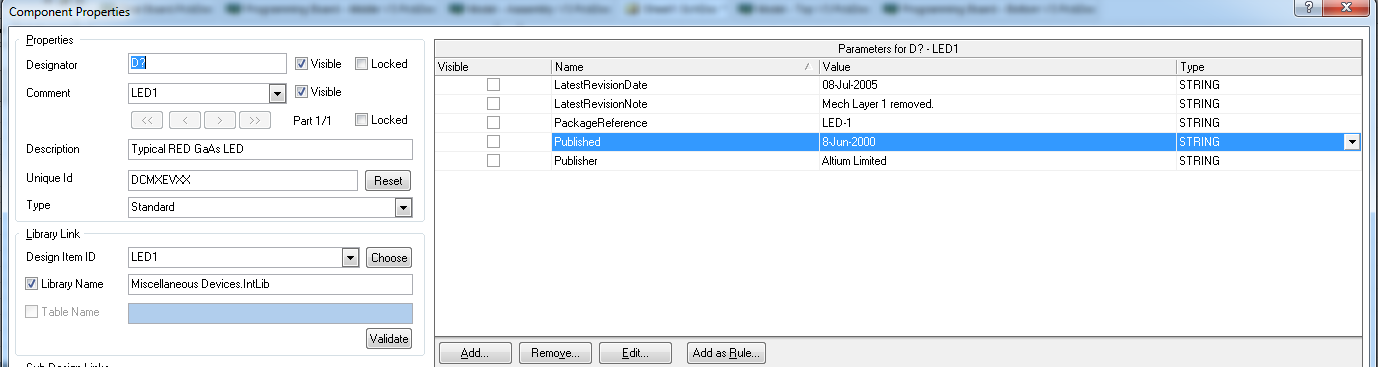
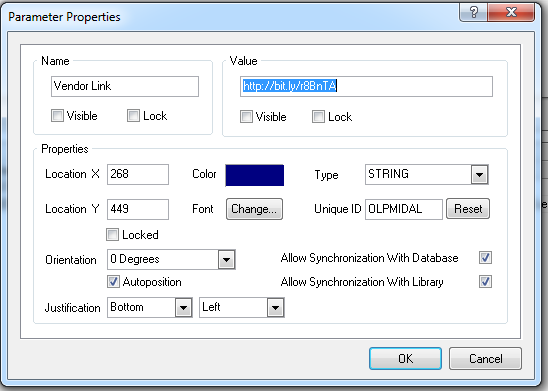
Notice that you have the options to Add, Remove, or Edit these properties for the selected component. If we wanted to capture, say, a link to the vendor’s product page for this LED, adding a parameter would be the perfect storage location. Clicking Add… brings up a dialog box where the Name and Value fields can be added:
After saving the change, the new parameter will now appear along with the default properties:

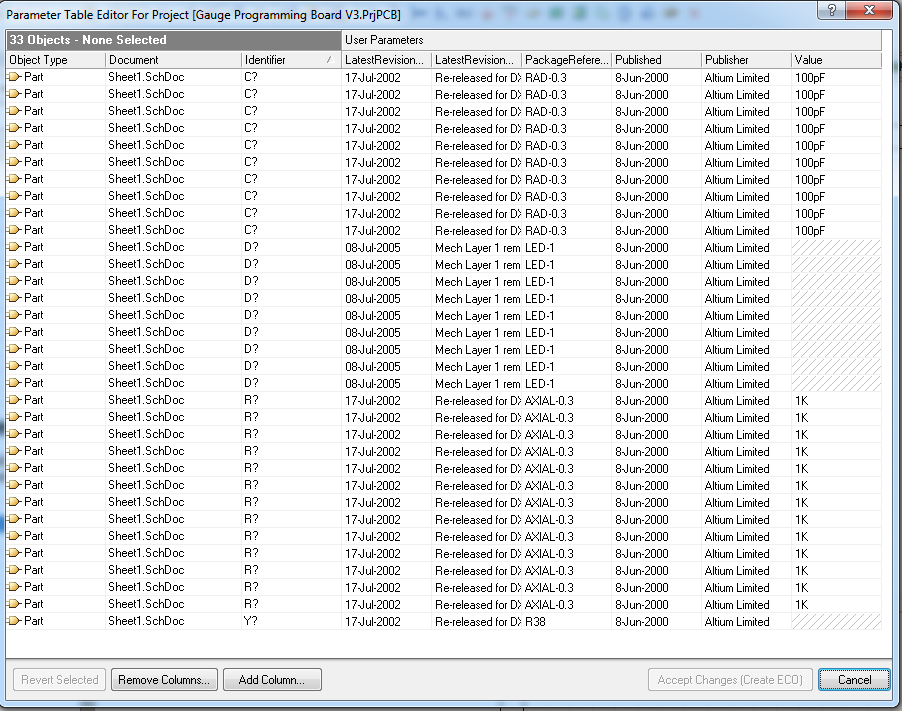
As with many functions in Altium, batch editing of parameters is also possible. And that’s where the real fun begins. In the Schematic Editor, click Tools -> Parameter Manager…(keyboard shortcut T, R) and make sure Parts is the only box checked under the heading “Include Parameters Owned By” in the dialog that opens up. Pressing OK brings up the master parameter list for the current schematic. Here is an example parameter list for a simple design:
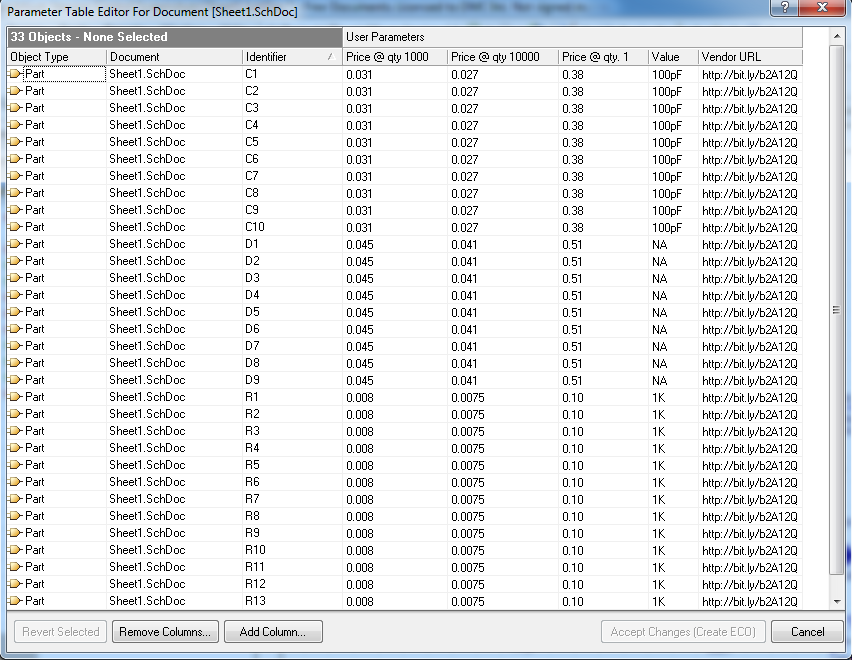
Let’s say that we’ve already picked a manufacturer and a vendor for the capacitors. In addition, we know the price points for this part at different relevant quantities. These are all important data for the Bill of Materials, but it would be a real pain to manually add them to the BOM after it has already been generated.
Easy: Add columns to represent each of these properties and add the appropriate values to each batch of components. For this example, I will include a vendor URL and prices at three useful quantities (1, 1000, 10000).
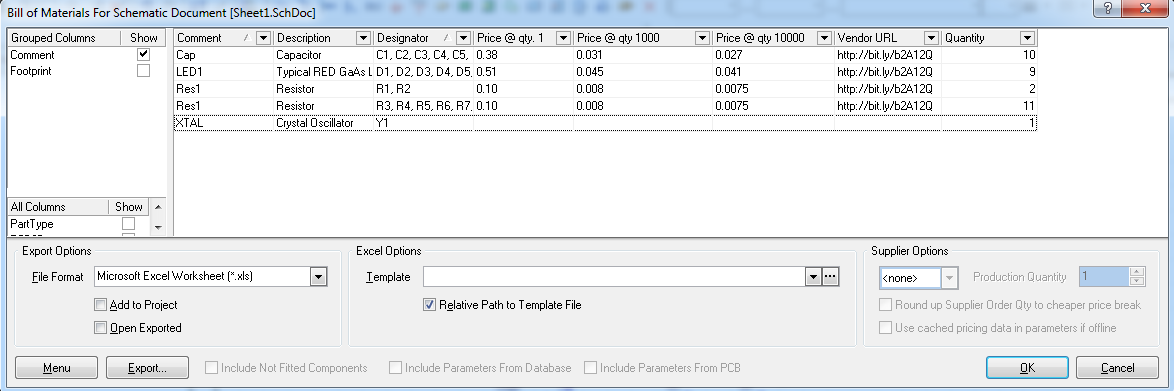
Awesome! Now what? While we’re at it, we should make sure this information makes it onto the Bill of Materials, especially now that our vendor links and prices are included.
In the Schematic Editor, select Reports -> Bill of Materials. If you haven’t previously set up the Bill of Materials, a standard set of columns will be shown for each part in the design (Description, Designator, Quantity, etc). However, this is completely customizable by checking/unchecking the appropriate boxes in the “Columns” pane on the left side of the window. Here, I’ve removed some of the default columns and replaced them with the parameters we just added in the last step:
Hitting OK will commit these changes within Altium.
One final feature of the BoM generation tool worth mentioning is the BoM Export. Notice the Export Options area in the bottom left corner of the window. Choosing an output file format (plain text, XML, CSB, XLS, etc.) and clicking Export … will allow you to save a copy of the Bill of Materials that can be easily shared with non-Altium users.
Recap!
Having followed this tutorial, you’re now an expert at integrated version controls, custom component parameters, and generating effective Bills of Materials! With these simple, yet powerful, techniques, keeping on top of a project's documentation will be less of a chore. It might even, I dare say, make documentation fun.
...Okay, maybe not. But it will help you get more mileage out of the time you spend working in Altium - which makes those extended coffee breaks much more well-deserved.