Azure Active Directory (Azure AD) is Microsoft’s enterprise cloud-based platform to secure and manage users. As a Microsoft Gold Partner, DMC has extensive experience integrating this platform with web applications to ensure security and privacy. This blog will explain how to properly configure a React/ASP.NET Core 5.0 web app to use Azure AD authentication/authorization.
Note: This blog assumes you have already created an ASP.NET Core 5.0 API.
1. Register the Client and Server Apps in Azure
To start, we will register the two parts of our web app in Azure. We will also assign permissions to different roles for our application.
Client App Registration
- In the Azure portal, navigate to “App Registrations” and create a new app registration. You my also be asked for a redirect URL. Leave this blank for now (it will be addressed in a later step).
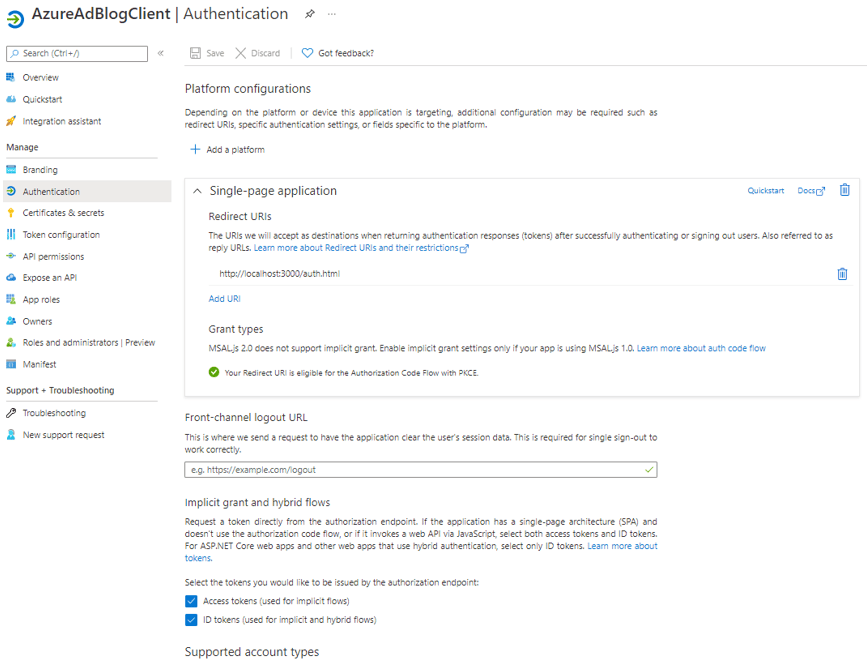
- Click into the new registration and select Manage > Authentication.
- Under Platform Configurations, select “Add a platform” and add a single-page application platform.
- For a redirect URI, use http://localhost/auth.html. This will be the local development redirect URI.
- When configuring a production registration, you will need to use https://[productionURL]/auth.html instead.
- Under "Implicit grant and hybrid flows," enable access tokens and ID tokens.
- Click “Overview” and copy the value of application (client) ID. It will be used in the next step.
Note: You can have multiple redirect URIs for one site. If you need to deploy your development app to a test site, simply add a redirect URI https://[testSiteUrl]/auth.html to this registration. When configuring a production version of your application, you should set up separate app registrations.
Note: auth.html is necessary because the javascript package we use for Azure AD Authentication automatically includes auth.html in its authentication request. If this package is not used, you are able to choose anything as your redirect URI.
For more on redirect URIs, see the official Microsoft documentation.
Server (API) App Registration
Expose the API
- In the Azure portal, create another app registration. Leave “Redirect URI” blank.
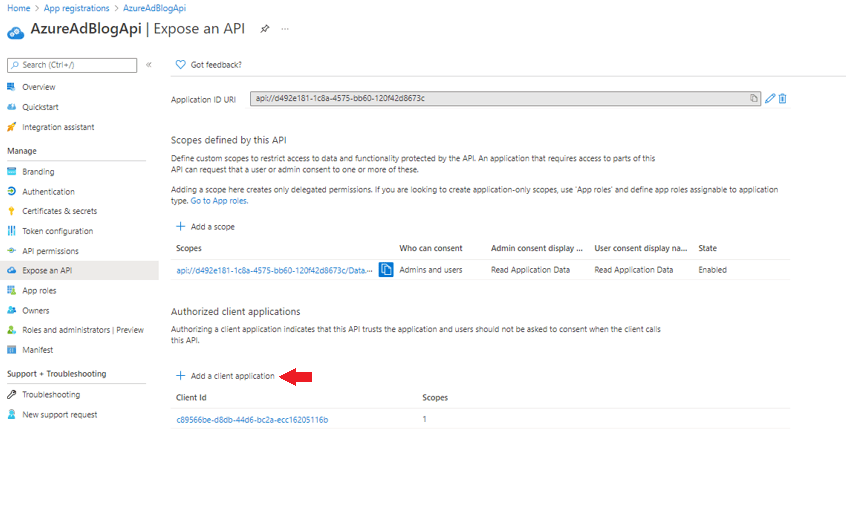
- Click Manage > Expose an API and select “Add a scope.” This scope will be used to give the client application (not users) access to your API (roles will be used to authorize individual users).
Note: This feature was in preview at the time this blog was written. If this option does not appear, you can edit the app manifest directly.
- Name your scope (e.g. Data.Access) and fill out the remaining fields with descriptions relevant to your selected name. Leave the field “Who can consent” as admins only. Then, enable and add the scope.
- Under authorized client applications, click “Add a client application.” Select your scope and paste the application ID from the previous section into the field “Client ID.”
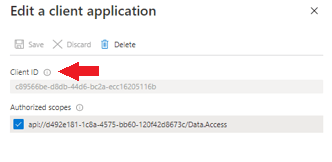
Note: this gives our client (React) app access to this scope without consent being explicitly given by a user/admin. To require consent from users, skip this step and review the value of “Who can consent?” in step 4 and change it to include users.
Create Roles
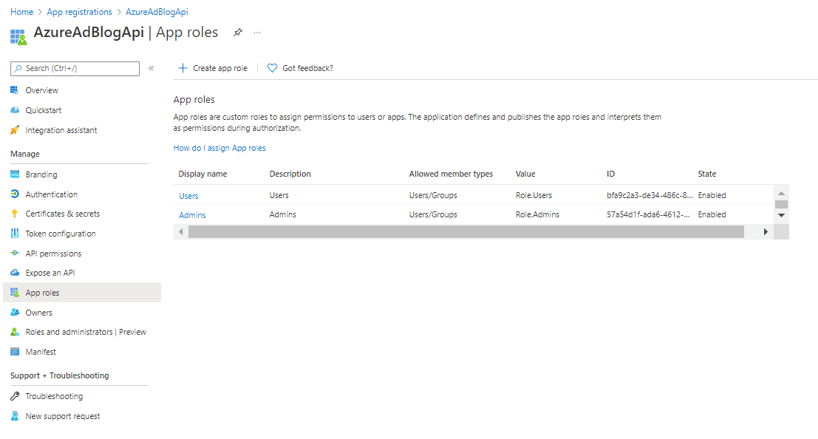
- Click into the new registration and select Manage > App Roles.
- Add the necessary app roles for your application (I used admin and user). The value will be used by the server application to check if the user has the appropriate role. Select that the role is valid for users/groups.
Note: To assign these roles to users/groups in the Azure portal, navigate to Enterprise applications > Manage > All Applications and find your server app. Click the server app, and select Manage > Users and Groups. From here, you can add the appropriate users and groups for your app.
2. Configure API to use Azure AD Auth
In this step, we will configure the ASP.NET Core backend to use Azure AD Authentication. We will need the following values from Azure to do this:
- azureAdDomain - can be found in the Azure portal by searching for Azure Active Directory and looking at the Primary domain under Overview > Tenant Information.
- APIClientId - can be found in the Overview section of the API app registration, under the name Application (client) ID.
- azureTenantId - can also be found in the Overview section of the API app registration, under the name Directory (tenant) ID.
Note: This section assumes that you have scaffolded an ASP.NET Core 5.0 API.
Configuring the API to use Azure AD Authentication is a relatively simple process. The authentication requests to Azure are handled on the front end, so we just need to configure the API to check that the request is authenticated.
- Add the following to appsettings.Development.json (using the values mentioned above):
 	"AzureAd": {
    "Instance": "https://login.microsoftonline.com/",
    "Domain": "[azureAdDomain]",
    "ClientId": "[APIClientId]",
    "TenantId": "[azureTenantId]"
},
- Add the following to the beginning of ConfigureServices in Startup.cs:
 services
	.AddAuthentication(JwtBearerDefaults.AuthenticationScheme)
	.AddMicrosoftIdentityWebApi(Configuration.GetSection('AzureAd"));

	services.AddAuthentication(options =>
	{
		options.DefaultPolicy =
			new AuthorizationPolicyBuilder()
				.RequireAuthenticatedUser()
				.RequireClaim(
			"http://schemas.microsoft.com/identity/claims/scope","[scopeName]"
			)
			.Build();
		});
This code will use the values from appsettings.Development.json to authenticate requests (using the values included in a JWT with the request).
Additionally, it sets up a default authorization policy that requires your scope ([scopeName]) for all requests. This is the scope we configured in step 1, which will be used by our client application. This scope is not used to authorize specific users. Instead, it is used to authorize the client application itself. Roles (see step 4) will be used to authorize specific users.
- Add the following code after app.UseCors() in Startup.Configure:
app.UseAuthentication();
            app.UseAuthorization();
The order of the methods determines when each piece of middleware runs in the HTTP request pipeline.
- Add the “Authorize” attribute to any endpoints/controllers you would like to use Azure AD Auth to secure. To authorize for specific roles, use the following syntax:
[Authorize(Roles = "]roleName[")]
“roleName” should correspond to the value of the appropriate app role defined on the API app registration. I.e., an app role named Users defined with value Role.Users would have a roleName of Role.Users.
Conclusion
Your API is now integrated with Azure AD authentication! In general, the React app will request tokens from Azure AD, which it will include with requests to our API. The code we just set up will authenticate and authorize requests using the values in these tokens.
Read more about DMC’s Microsoft Consulting Services and contact us today to get started on your next project.