You’ve just finished creating an amazing WPF desktop application. You want to send a friend an MSI so they can install it on their host, but you've never generated an MSI.
Fret not! This blog will walk you through generating an installer to install .exes onto a system using a Windows 64 bit processer. We will be using WixSharp, written by Oleg Shilo, to generate our installer.
A few notes before we start:
- The app I am creating an installer for uses .NET Core 3.1
- WixSharp requires .NET Framework to run, therefore, you will not be able to reference a .NET Core application directly from your WixSharp project.
- This demo was created using WixSharp version 1.19.0, WixToolset version 3.11.2, and WixSharp Project Templates version 1.15.0.
- If you’ve already published your app, you can skip to the section Installing Wix Dependencies
Publishing Your App as A Single .exe
You can package your entire app as a single .exe. To do so, access your publishing settings by right clicking on the project you want to publish and selecting “Publish” from the drop-down menu.
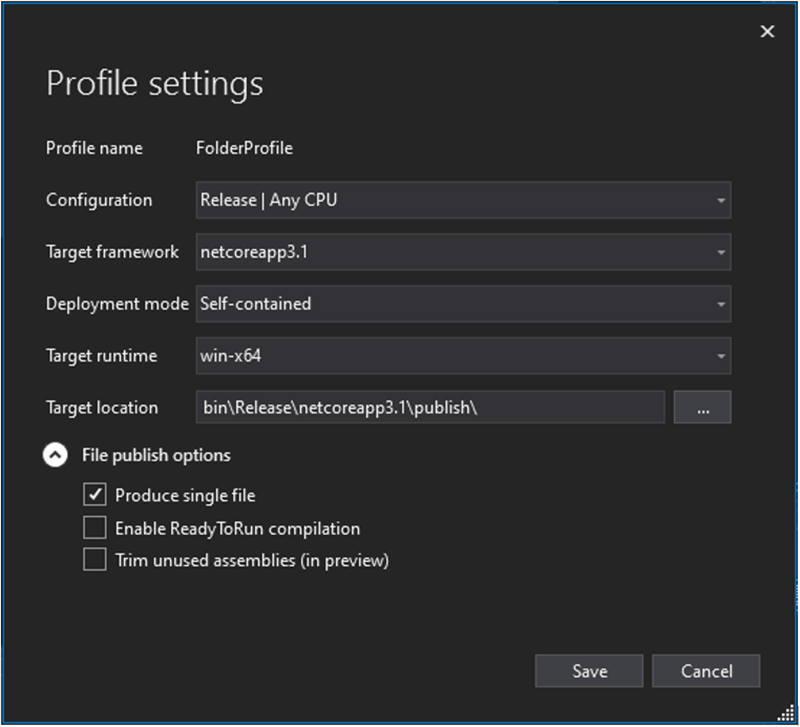
You can use the settings shown above to generate a single .exe intended to run on windows' 64 operating systems. Save your settings, and then click the “Publish” button in the upper right-hand corner of the Publish window.
This will generate a .exe and a .pdb file within the bin folder of your application at the path Release>{.NET version}>publish. You will only need the .exe to run your application; you can test this by copying and pasting the .exe to your desktop and running the .exe to launch your application.
Installing WiX Dependencies
Start by installing the latest stable version of the WiXToolset. Within the git repository, you can download the .exe listed within the project assets.
Next, install the WixSharp Project Templates. These will install within your instance of Visual Studio and allow you to generate template WixSharp projects, which helps to streamline development.
Add a new project to your solution, of template type WixSharpSetup. The other project templates provide other features, but, for the purposes of this example, we will use the basic setup project.
Once you've generated your project, install the WixSharp NuGet dependencies. To do so, right click on your new WiX project and select Manage NuGet Packages from the dropdown menu.
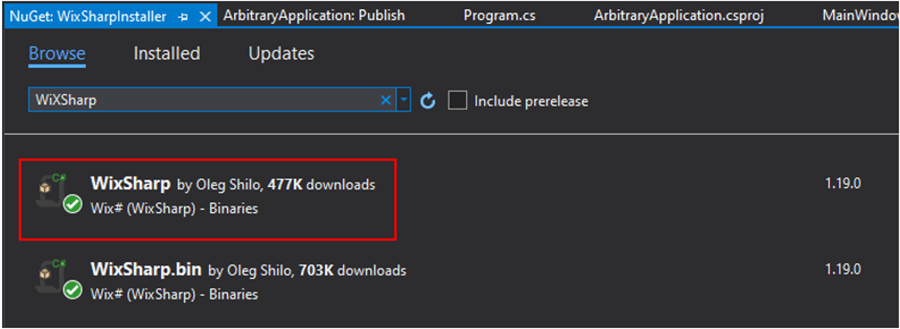
Installing the WixSharp package will automatically include the WixSharp binaries; you do not need to install them separately.
Once you've installed your dependencies, you can open the Program.cs file within your project. Remove the comments reminding you to install WixSharp.
Additionally, you can replace the Program class with the one shown below, which will display a custom UI for your user while installing your app (shown at the bottom of this blog) and installs the .exe within the system's program files, as well as within the start menu and on the user's desktop.
You will need to add two using statements to run the below code: using System.Linq and using WixSharp.Controls. Feel free to remove the comments as needed.
| |
class Program
{
private static void Main()
{
// Name of your application if you search for it within your programs (if you need to uninstall).
var productName = "Arbitrary Application";
// Path to the directory where an exe will be generated.
var directoryPath = "%ProgramFiles%\\ArbitraryApplication\\";
// Path to the .exe you want to have your MSI install. It is located relative to your WixSharpInstaller project.
var fileString = "..\\ArbitraryApplication\\bin\\Release\\netcoreapp3.1\\publish\\ArbitraryApplication.exe";
// Generates a new project with an identifying GUID, an installer UI, and a specified platform.
var project = new Project(productName, new Dir(
directoryPath, new File(fileString)))
{
ProductId = Guid.NewGuid(),
UpgradeCode = new Guid("8978A875-366E-42B1-81E6-9A7FF2E58BD0"),
Platform = Platform.x64,
UI = WUI.WixUI_InstallDir,
};
// Defines the custom installation UI.
project.CustomUI = new DialogSequence()
.On(NativeDialogs.WelcomeDlg, Buttons.Next, new ShowDialog(NativeDialogs.VerifyReadyDlg))
.On(NativeDialogs.VerifyReadyDlg, Buttons.Back, new ShowDialog(NativeDialogs.WelcomeDlg));
// Defines logic to implement upgrades
project.MajorUpgrade = new MajorUpgrade()
{
Schedule = UpgradeSchedule.afterInstallInitialize,
AllowDowngrades = true,
};
// Generates the file shortcuts to your .exe using LINQ.
project.ResolveWildCards()
.FindFile(f => f.Name.EndsWith("ArbitraryApplication.exe"))
.First()
.Shortcuts = new[] {
new FileShortcut(productName, "%Desktop%"),
new FileShortcut(productName, "%ProgramMenu%")
};
// Builds your MSI.
Compiler.BuildMsi(project);
}
}
|
If upon building your project, you generate errors that look like the ones below, you will need to update your framework to match that required by WixSharp.
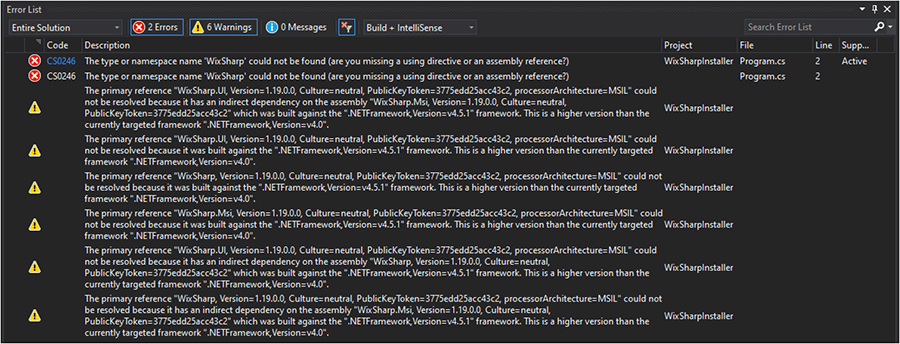
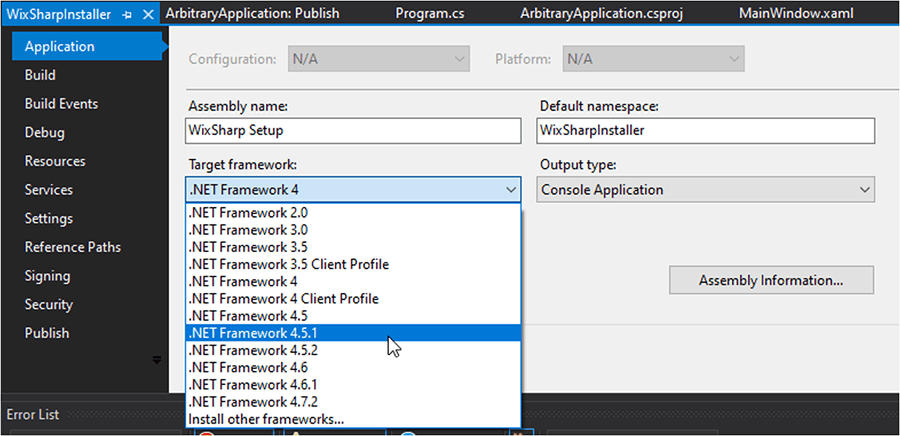
To do so, right click on your WiX project and select Properties. Here, you can update the framework to match the one noted in your error messages (in the case of the screenshots, .NET Framework 4.5.1.).
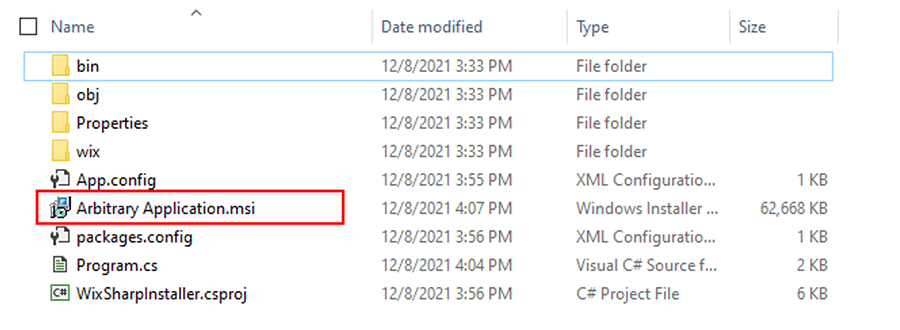
Once you've updated your target framework, you should be able to successfully build your app! The MSI will take a moment to generate; you will know your process is complete when a console window loads and then closes itself. At this point, you should be able to open your WiX project within your file explorer to find your brand new MSI!
 Another common error you may run into can occur if you do not install the WiX Toolset linked at the top of this article. There is a WiXToolset NuGet package that is not the same as the WiX Toolset you need for this workflow. If your toolset is not installed, you may see a 'WiX binaries cannot be found. Wix# is capable of automatically finding WiX tools only if WiX Toolset Installed.'
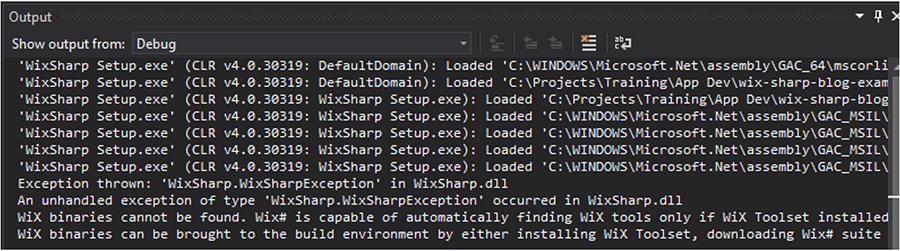
To fix this issue, install the WiX Toolset found here.
Now that you know the basics for generating an MSI file, you can customize your installer using the WixSharp library. You can create a custom UI workflow, update where your application automatically installs to, and much more. For examples of how to implement these functions, see the WixSharp git repository.
Running Your Installer
You can now run your installer and install your application!
Learn more about DMC's Application Development expertise, and contact us to get started on your next project.