For a recent project, I created a combo box object that is set using a VBScript.
The following blog details some advantages of using a VBScript and four steps to loading a combo box using a VBScript in WinCC Pro.
Advantages of VBScript
The main advantage of using a VBScript is that you can display a variety of data in the combo box. It allows you to access the combo box's properties and links those directly to PLC tags instead of having a static combo box that displays the same thing all the time. It even allows you to change the length of the combo box. Changing the length of the combo box can be especially useful in an application that involves multiple recipes. You can have one combo box that changes based off of which recipe you run.
Loading a Combo Box
Step 1 - Add a Combo Box Object to a Screen and Create the VBScript
You either can create the script in the Activate event of the combo box, or you can create a script in the Scripts folder in WinCC Pro. If you are going to be using a lot of dynamically loaded combo boxes, then I would suggest creating it in the Scripts folder.
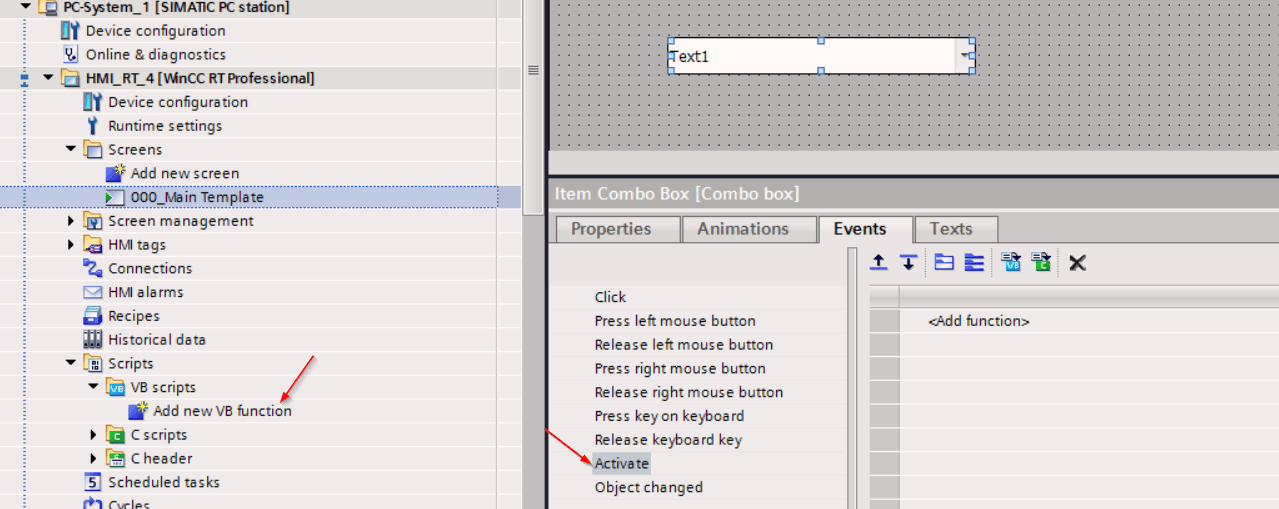
Step 2 - Access the Combo Box From the Script
In the script, you need to point to the combo box that you just added so you can access its properties. In this example, I put the combo box on the screen called 000_Main Template. Once you do that, you will be able to set any of the object's properties in your script.
Dim combobox
Set combobox = HMIRuntime.Screens("000_Main Template").ScreenItems("Item Combo Box")
If the popup on a screen contains a combo box, then you have to have the whole path of the screen.
Set combobox = HMIRuntime.Screens("000_Main Template").ScreenItems("Popup Screen").ScreenItems("Item Combo Box")
Step 3 - Get the Number of Items You Want to Display
Next, you have to set the number of items you want the combo box to display. In this example, the PLC is setting an array of strings, and I want the combo box to display those strings. If you have a set number of items you will always be displaying you can hardcode this value either through scripting or through the object properties.
To find out how many items you want the combo box to display, loop through the PLC array and do a string compare on each item in the array. If the string is not empty, increment the number of items to display.
'Getting the number of items in the combobox
Dim iIndex
Dim iNumberOfItems
For iIndex = 0 To 16
	If  StrComp(SmartTags("dbHMI.arItemList{" & iIndex & "}"),"") = 0 Then
		Exit For
	Else
		iNumberOfItems = inumberOfItems + 1
	End If
Next
Then, set the combo box property for the number of items it displays based off of the tag you calculated above.
combobox.CountVisibleItems = iNumberOfItems
Step 4 - Set the Text of the Combo Box
Finally, you are ready to set the text of the combo box. First, access the combo box index to which you want to write. Then once that is set, set the text of the index.
The index of the combo box starts at one while the string array index starts at zero. So, add one to the string array index to get the combo box index. Another solution would be to start the PLC array at index 1 instead of the default of 0.
For iIndex = 0 To iNumberOfItems

	combobox.Index = iIndex+1
	combobox.Text = SmartTags("dbHMI.arItemList{" & iIndex & "}")

Next

And that's the script!
Learn more about DMC's WinCC programming services.