React has quickly become one of DMC’s favorite tools for web frontend development due to its component-based structure and growing adoption.
However, between the JSX syntax, component lifecycle, and state management, learning to use React effectively sometimes feels like learning a language in and of itself.
If you're getting your feet wet in React, here are some of DMC’s top tips for making components.
1. Make Lots of Components
React’s component-based structure allows very convenient segmentation of different portions of a user interface. However, it can often be unclear where one component should end and where another component should begin. If you were to recreate this page in React, would the Categories listing be a component or just a portion of a component for the whole page? Would each section be a component? Would each link?
Often, large components that have a lot of different functionality mixed is a sign of a newer React developer. Just as with object-oriented code, breaking down classes or functions to their essentials and handing off the specifics to helpers makes the code a lot more readable and easier to maintain.
In our experience, if you’re asking the question, “Should this be a separate component?” the answer is probably yes.
Regarding hard and fast rules, the following guidelines have served us well. You should pull UI code into a unique component if:
- You want to use the same (or a parameterized version of the same) element elsewhere in your application
- You want each item in a list of data to have a similar display (in other words, you want to map a list of data to it)
- It forms its own functionally or visually distinct section or subsection
For example, you could implement the Categories sidebar on this site doing something similar to the following. This approach is hard to read, debug, and maintain - splitting each UI section in a map into its separate components would be better.
render() {
    return (
        <div>
            <h1>Categories</h1>
            {this.props.categories.map(category => (
                <div>
                    <h2>{category.name}</h2>
                    <ul>
                        {category.subCategories.map(subCategory => (
                            <div>
                                <li className="bullet">{subCategory.name}</li>
                                {subCategory.subSubCategories.map(subSubCategory => (
                                    <div>
                                        <li className="indented-bullet">{subSubCategory}</li>
                                    </div>
                                ))}
                            </div>
                        ))}
                    </ul>
                </div>
            ))}
        </div>
    );
}
2. Make Lots of Functional Components
As you make more components, you’ll need to lift state up by lifting shared state up to the closest common ancestor. Sometimes, you’ll only need to pull one value out of a component’s state and leave it otherwise unchanged. But often, a component that doesn’t have any state remains. If this is the case, it is an excellent opportunity to convert to functional components.
We find that functional components (components which are used as a function call rather than as a class instance) are often more concise and better broken up than components that rely heavily on state. Functional components are also simple to debug. It's clear what to render on the page based on what's passed into the component.
As you begin to convert your components over to functional versions, you may notice you have separate components for data management and display. Dividing components into two categories is a whole different way of thinking, best explained by Dan Abramov.
3. Consider a State Management Library
As your state begins to lift higher and higher in your application, you will flow through Container components to drive Presentational components. You may start to notice that a portion of the component state drives the display of another component nested deeply within its children components.
If the state of your application is already far from the display it drives, then it's likely time to consider a state management library.
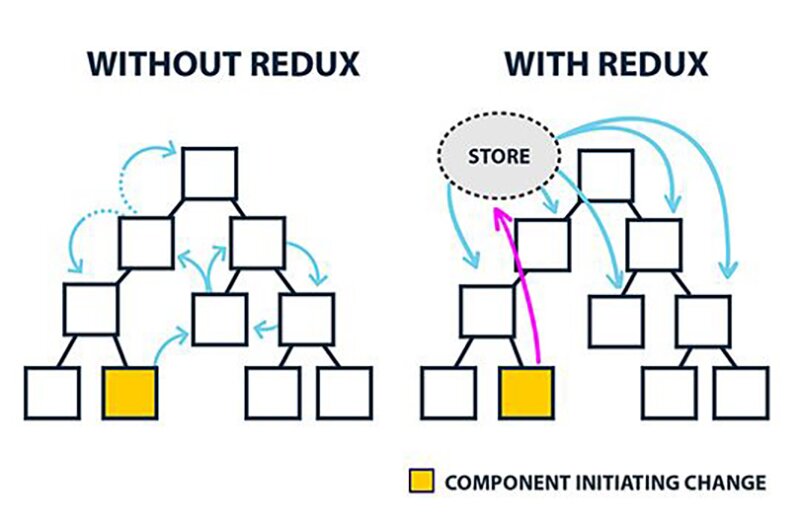
State management libraries allow you to interact with the (likely centrally-held) state of your application consistently and predictably. It minimizes the need to pass so many props as well as to update functions between components. Redux is probably the most popular option for managing state in React applications, but there are many options out there (including MobX and Unstated).
Integrating a state management library can simplify complex interactions between states for different components, but tends to produce more ‘boiler-plate’ code.
4. Make Some Async Components
On the other hand, if your app is comparatively small or you don’t want the overhead of a component management library, you may end up using the component lifecycle methods to give a component asynchronous functionality. The component can then interact with some external data source on its own.
Let’s say that we’re building a sidebar for a grid of houses. Whenever a user clicks on the row for the house, the sidebar fetches the data for that house from some external source and displays it. Here’s what a container component for that might look like:
interface State {
    house?: House;
}

interface Props {
    houseId: number;
}

class HouseSidebarContainer extends React.Component<Props, State> {
    constructor (props: Props) {
        super(props);
        this.state = {
        };

        this.loadHouse = this.loadHouse.bind(this);
    }

    async componentDidMount(){
        await this.loadHouse(this.props.houseId);
    }

    async componentDidUpdate(prevProps: Props){
        if (prevProps.houseId !== this.props.houseId) {
            await this.loadHouse(this.props.houseId);
        }
    }

    render () {
        return this.state.house
            ? <HouseDisplay {...house} />
            : <LoadingSpinner />;
    }

    async loadHouse(houseId: number) {
        let houseData = await fetchHouse(houseId);
        if (houseData) {
            this.setState({house: houseData})
        }
    }
}
The significant thing to recognize is that the render function cannot be asynchronous, so any asynchronous logic must be handled outside of the render function and updated in state.
The other thing to remember is that changing the props (in this case, the viewed house) doesn’t trigger a remount of the component, and must be watched manually by the componentDidUpdate function.
5. Use Other People's Components
Now that you’re getting pretty good at making your own React components, it’s time to avoid it as much as possible! I’m joking, but it’s important not to spend too much of your time on components that are common to a lot of applications.
Simple items, like breadcrumbs, don’t take too long to implement, but that time can pile up when you implement each one yourself. More complex items, like a datepicker, may take substantial development effort to implement. The good news is that someone has done this before, and you can take advantage of their experience. The bad news is that it can be challenging to identify the best implementation out there, and using a component that’s buggy or has a poor API can cost you as much time as implementing it yourself.
This time loss is especially true for simple components: it may take just as long to fit in a simple third-party component with options that don’t quite fit as it does to write the component yourself. In such instances, larger sets of components with similar interfaces (a component library) can speed up development.
When you start working on a new app, it’s worth your time to investigate using a component library, which will allow you to use a wide set of components with similar interfaces and uniform styles. There’s a wide variety out there, each with its pros and cons.
Based on our experience, we recommend picking a library that already looks similar to the app you want to build. While most libraries offer some way to customize their styling, if you have to make a lot of styling changes to each component, you haven’t saved much time over implementing your own components. Component libraries we’ve enjoyed recently include React Material-UI, Semantic UI, and Reactstrap.
Even if you pick the best possible library for your project, it’s unlikely to contain every single UI component you need. You’re likely to need to pick up at least one or two components a la carte, like a chart, datepicker, or a treeview. My first stop when looking for a new component is React Rocks, which provides excellent listings of components for many different needs.
Just like when using any external dependency, you’ll want to make sure that whatever you pick is being actively used and maintained, that the API makes sense to you, and that the license fits the needs of your application.
Learn more about DMC's Application Development Services