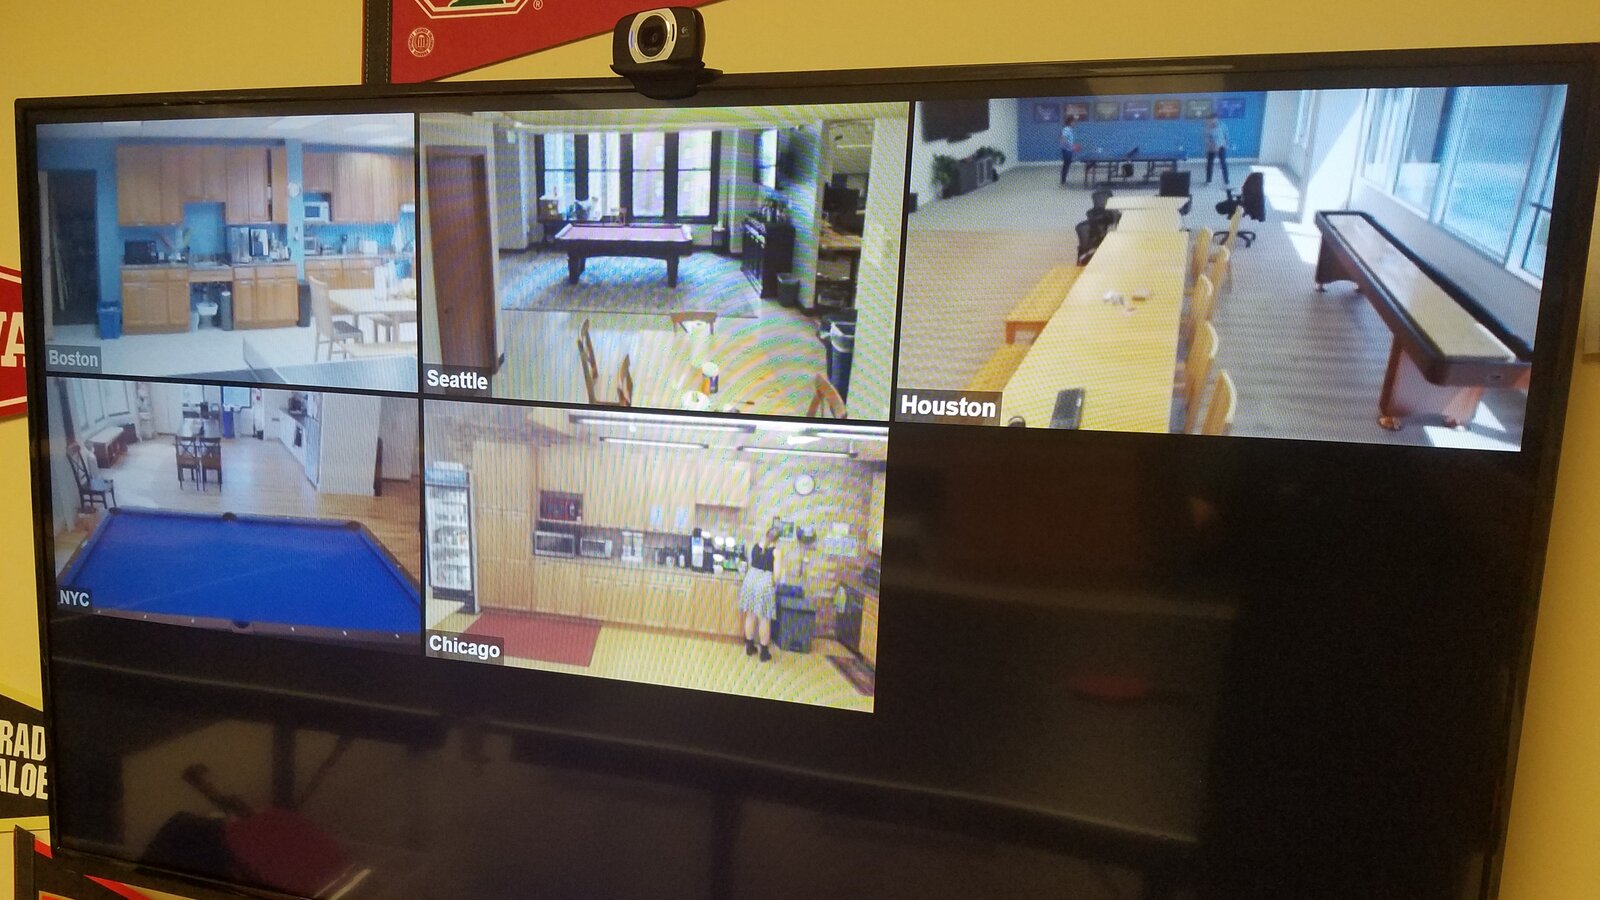
At DMC, we like to keep in touch with colleagues across all of our offices. So, for a while now, we’ve had a video “portal” set up in the kitchen area of each office. We were initially using an off the shelf video conferencing service, but it was cumbersome to use and needed a manual restart every few days. I thought it would be fun to see if we could build a replacement ourselves.
I first considered setting up a dedicated IP camera in each office. But then I thought, hold on, it’s 2019, I bet there is a web-based solution out there for streaming video feeds!
As it turns out, that solution is called WebRTC, and it is the web standard for real-time peer-to-peer communication. WebRTC is an asynchronous peer-to-peer architecture, and the only need for a centralized server is for exchanging the connection set up information.
Getting Started in WebRTC
Most of the available tutorials on WebRTC only show a trivial implementation of two client objects in the same browser window. After some searching, I found a great example of a basic implementation of 1-to-1 video using WebRTC and a simple Node.js server to relay messages over Websockets.
Using this example as a baseline, all I had to do is extend it to support an arbitrary number of participants. Additionally, I decided to add some CSS styling to arrange the video containers on the screen and labels to identify each participant.
To try it out for yourself, install node.js if you haven't already, download the full source code here, unzip the file, and start the node server locally:
 npm install
 npm start
With the server running, go to https://localhost:8443 in Chrome. You’ll need to click through the invalid SSL certificate warning, enter a display name, and allow the page to use your camera. After that, you'll be able to open multiple windows and see yourself multiple times. Likewise, you can enter the IP address instead of localhost, and you'll be able to establish connections between any computers on your local network.
Setting Up the Video Chat
The core functionality is all in the client-side javascript, which handles establishing and managing the connections to all the other participants. When the page is loaded, we generate a random identifier and capture a user-entered display name.
function start() {
  localUuid = createUUID();

  // check if "&displayName=xxx" is appended to URL, otherwise alert user to populate
  var urlParams = new URLSearchParams(window.location.search);
  localDisplayName = urlParams.get('displayName') || prompt('Enter your name', '');
  document.getElementById('localVideoContainer').appendChild(makeLabel(localDisplayName));
Next, we can specify the video and audio parameters (in this implementation, audio is disabled) and grab the local video stream.
// specify no audio for user media
  var constraints = {
    video: {
      width: {max: 320},
      height: {max: 240},
      frameRate: {max: 30},
    },
    audio: false,
  };
Once we successfully have the local video stream, we can set up the connection to the WebSockets server and set up callback functions. When the connection first opens, we send out a message to anyone who might already be connected, informing them that we joined the party.
// set up local video stream
  if (navigator.mediaDevices.getUserMedia) {
    navigator.mediaDevices.getUserMedia(constraints)
      .then(stream => {
        localStream = stream;
        document.getElementById('localVideo').srcObject = stream;
      }).catch(errorHandler)

      // set up websocket and message all existing clients
      .then(() => {
        serverConnection = new WebSocket('wss://' + window.location.hostname + ':' + WS_PORT);
        serverConnection.onmessage = gotMessageFromServer;
        serverConnection.onopen = event => {
          serverConnection.send(JSON.stringify({ 'displayName': localDisplayName, 'uuid': localUuid, 'dest': 'all' }));
        }
      }).catch(errorHandler);

  } else {
    alert('Your browser does not support getUserMedia API');
  }
}
Whenever a new message is received, we check if it’s intended for us and whether it’s for setting a new peer or initiating the connection. SDP stands for Session Description Protocol.
function gotMessageFromServer(message) {
  var signal = JSON.parse(message.data);
  var peerUuid = signal.uuid;

  // Ignore messages that are not for us or from ourselves
  if (peerUuid == localUuid || (signal.dest != localUuid && signal.dest != 'all')) return;

  if (signal.displayName && signal.dest == 'all') {
    // set up peer connection object for a newcomer peer
    setUpPeer(peerUuid, signal.displayName);
    serverConnection.send(JSON.stringify({ 'displayName': localDisplayName, 'uuid': localUuid, 'dest': peerUuid }));

  } else if (signal.displayName && signal.dest == localUuid) {
    // initiate call if we are the newcomer peer
    setUpPeer(peerUuid, signal.displayName, true);

  } else if (signal.sdp) {
    peerConnections[peerUuid].pc.setRemoteDescription(new RTCSessionDescription(signal.sdp)).then(function () {
      // Only create answers in response to offers
      if (signal.sdp.type == 'offer') {
        peerConnections[peerUuid].pc.createAnswer().then(description => createdDescription(description, peerUuid)).catch(errorHandler);
      }
    }).catch(errorHandler);

  } else if (signal.ice) {
    peerConnections[peerUuid].pc.addIceCandidate(new RTCIceCandidate(signal.ice)).catch(errorHandler);
  }
}
Once we have a new peer, we can add them to the peerConnections object, with the UUID as a key.
function setUpPeer(peerUuid, displayName, initCall = false) {
  peerConnections[peerUuid] = { 'displayName': displayName, 'pc': new RTCPeerConnection(peerConnectionConfig) };
  peerConnections[peerUuid].pc.onicecandidate = event => gotIceCandidate(event, peerUuid);
  peerConnections[peerUuid].pc.ontrack = event => gotRemoteStream(event, peerUuid);
  peerConnections[peerUuid].pc.oniceconnectionstatechange = event => checkPeerDisconnect(event, peerUuid);
  peerConnections[peerUuid].pc.addStream(localStream);

  if (initCall) {
    peerConnections[peerUuid].pc.createOffer().then(description => createdDescription(description, peerUuid)).catch(errorHandler);
  }
}
The rest is just handling the nitty-gritty details of WebRTC, which involves several messages back and forth before you can get the remote video stream. Once you have it, you can manipulate the DOM to add it to the page.
function gotRemoteStream(event, peerUuid) {
  console.log(`got remote stream, peer ${peerUuid}`);
  //assign stream to new HTML video element
  var vidElement = document.createElement('video');
  vidElement.setAttribute('autoplay', '');
  vidElement.setAttribute('muted', '');
  vidElement.srcObject = event.streams[0];

  var vidContainer = document.createElement('div');
  vidContainer.setAttribute('id', 'remoteVideo_' + peerUuid);
  vidContainer.setAttribute('class', 'videoContainer');
  vidContainer.appendChild(vidElement);
  vidContainer.appendChild(makeLabel(peerConnections[peerUuid].displayName));

  document.getElementById('videos').appendChild(vidContainer);

  updateLayout();
}


function updateLayout() {
  // update CSS grid based on number of diplayed videos
  var rowHeight = '98vh';
  var colWidth = '98vw';

  var numVideos = Object.keys(peerConnections).length + 1; // add one to include local video

  if (numVideos > 1 && numVideos <= 4) { // 2x2 grid
    rowHeight = '48vh';
    colWidth = '48vw';
  } else if (numVideos > 4) { // 3x3 grid
    rowHeight = '32vh';
    colWidth = '32vw';
  }

  document.documentElement.style.setProperty(`--rowHeight`, rowHeight);
  document.documentElement.style.setProperty(`--colWidth`, colWidth);
}

function makeLabel(label) {
  var vidLabel = document.createElement('div');
  vidLabel.appendChild(document.createTextNode(label));
  vidLabel.setAttribute('class', 'videoLabel');
  return vidLabel;
}
On the HTML side, all we need is a reference to the javascript and a container div for the local video. The remote video streams get appended to the same div by manipulating the DOM from the client-side javascript. Some CSS also takes care of arranging the videos in a grid based on the number of connected peers and displaying their name in the corner.
<html>

<head>
  <!-- prevent extraneous favicon requests -->
  <link rel="icon" href="data:,">

  <link rel="stylesheet" href="style.css">

  <script src="https://webrtc.github.io/adapter/adapter-latest.js"></script>
  <script src="webrtc.js"></script>
</head>

<body>

  <div id="videos" class="videos">

    <div id="localVideoContainer" class="videoContainer">
      <video id="localVideo" autoplay muted></video>
    </div>

    <!-- Remote videos get appended here -->

  </div>

  <script type="text/javascript">
    start();
  </script>

</body>

</html>
We can also take care of peer connections that have dropped off by removing the video element from the DOM.
function checkPeerDisconnect(event, peerUuid) {
  var state = peerConnections[peerUuid].pc.iceConnectionState;
  console.log(`connection with peer ${peerUuid} ${state}`);
  if (state === "failed" || state === "closed" || state === "disconnected") {
    delete peerConnections[peerUuid];
    document.getElementById('videos').removeChild(document.getElementById('remoteVideo_' + peerUuid));
    updateLayout();
  }
}
For the node.js server, all we need to do is serve the client-side files, and then set up a WebSocket server that re-broadcasts any messages that it receives.
// Create a server for the client html page
const handleRequest = function (request, response) {
  // Render the single client html file for any request the HTTP server receives
  console.log('request received: ' + request.url);

 if (request.url === '/webrtc.js') {
    response.writeHead(200, { 'Content-Type': 'application/javascript' });
    response.end(fs.readFileSync('client/webrtc.js'));
  } else if (request.url === '/style.css') {
    response.writeHead(200, { 'Content-Type': 'text/css' });
    response.end(fs.readFileSync('client/style.css'));
  } else {
    response.writeHead(200, { 'Content-Type': 'text/html' });
    response.end(fs.readFileSync('client/index.html'));
  }
};

const httpsServer = https.createServer(serverConfig, handleRequest);
httpsServer.listen(HTTPS_PORT);

// ----------------------------------------------------------------------------------------

// Create a server for handling websocket calls
const wss = new WebSocketServer({ server: httpsServer });

wss.on('connection', function (ws) {
  ws.on('message', function (message) {
    // Broadcast any received message to all clients
    console.log('received: %s', message);
    wss.broadcast(message);
  });

  ws.on('error', () => ws.terminate());
});

wss.broadcast = function (data) {
  this.clients.forEach(function (client) {
    if (client.readyState === WebSocket.OPEN) {
      client.send(data);
    }
  });
};
WebRTC requires TLS, so it does need a certificate, and you can optionally add a redirect from HTTP to HTTPS. The server can be run locally or easily deployed as a Windows service using node-windows.
Caveats
The main downside with this implementation is that it creates a mesh network, with each participant sending a separately encoded video stream to every single other participant. If you add more than a handful of participants, you’ll notice that you'll start maxing out your CPU and performance will degrade. For larger groups, you'll want to look into using a centralized server to forward each client's video feed to all its peers. This article does a nice job of laying out the options.