Factories often think their data is safe within their private networks—but that isn’t necessarily the case. If someone were to gain access to your network, they could potentially read sensitive, internal data being sent from your PLCs. Especially with the rise of IIoT, the interconnectedness and large data-sharing capabilities of industrial devices, this security threat is only growing. Data sent through the internet could be read, stored, or even manipulated by an outside party before reaching its endpoint.
Securing data in your factory’s private network may come as an afterthought, but it is an important part of keeping your data safe. So, how can we protect your data? Transport Layer Security (TLS) may be the answer!
What is Transport Layer Security?
TLS, or the former SSL (Secure Socket Layer), has been around for many years and is mostly used to securely browse the web. Have you ever noticed the little lock in Google Chrome by the address bar?

This is telling you that your connection is secured with TLS. Some websites use Hypertext Transfer Protocol Secure (HTTPS) to define how messages are formatted, transmitted, and includes TLS encryption. However, some websites use Hypertext Transfer Protocol (HTTP), which is the same protocol but is transferred without TLS encryption. HTTPS ensures that the data you are sending over the internet can only be viewed by yourself and the website you are connected to.
How Does Transport Layer Security Work?
TLS works based on asymmetric cryptography which uses key pairs to encrypt and decrypt data. These keys are very large, random strings of numbers that have a somewhat magical mathematical connection to each other. The magic math is that any data encrypted with one key can only be decrypted by the other and vice versa.
Now, I know “magic math” probably isn’t a good enough answer for you, so let me go deeper. With the correct key, decrypting data is as simple as putting the encrypted data into an algorithm with the key and boom—unencrypted data. Without this key, however, the number of possible keys is so large that trying to crack the key through brute force would be nearly impossible with a modern computer.
Key pairs have a private and public key. The private key is kept secret from the world so that only the owner of the private key knows its value. The public key can be shared with others that want to encrypt data to the owner of the private key. Here we come to the next magic math trick; data encrypted with the public key cannot be decrypted with the public key. Therefore, any data encrypted with the public key can only be read by the owner of the private key and is secure, as long as their private key is not compromised.
The Weakness of Key Pairs
So, we know TLS uses key pairs, and since key pairs are basically magic, what could go wrong? One of the vulnerabilities of key pairs is the possibility of a man-in-the-middle attack.
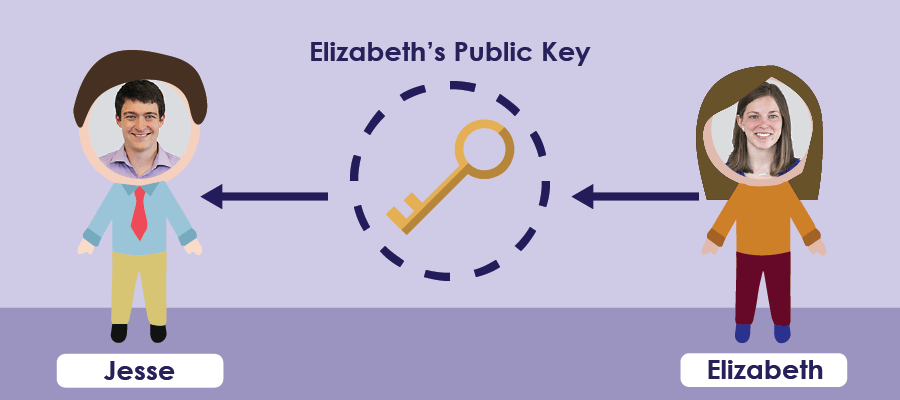
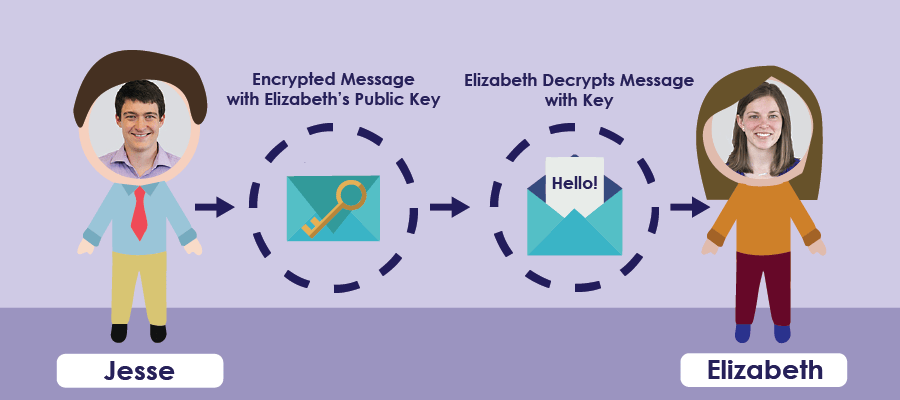
Let’s say I want to send my co-worker Elizabeth an encrypted message. First, Elizabeth would need to send me her public key, I would encrypt my message with her public key and send it to her. She would decrypt the message and be able to read it.
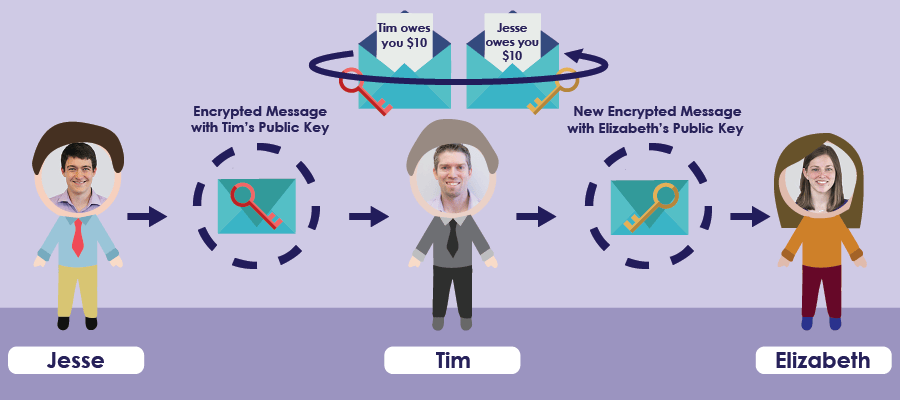
But how does she send me her public key in the first place? She would send it, unencrypted, through the internet. Maybe that key would go through Tim J’s server, where he decides to cause some trouble… Tim J replaces Elizabeth’s public key for his own and sends his public key to me.
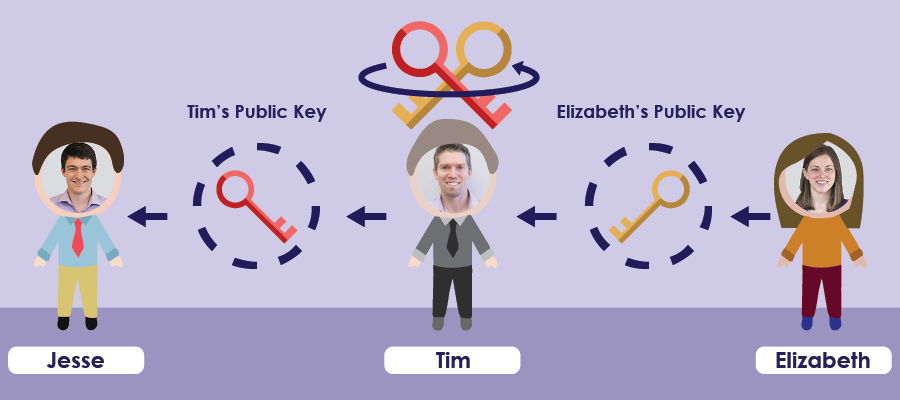
Now, I’m going to send an encrypted message to Elizabeth. I use what I think is her public key, which is actually Tim J’s public key, to send the message. Tim J can intercept the message, decrypt it with his private key, change the message, encrypt it with Elizabeth’s real public key, and pass the message to Elizabeth.
So, how do we determine what is really someone's public key?
Certificates
Certificates are used to identify the subject of a public key. They include information on the key, like who it belongs to, and more. They are also signed by a Certificate Authority (CA). Devices are programmed to trust any certificates that are signed with that CA’s private key. If you trust a CA, you can trust anything the CA signs. Your computer has a list of about a dozen CAs that it will trust for web browsing, emailing, etc.
So, if I pass my certificate to Elizabeth and she verifies that my certificate is signed with a Certificate Authority that she trusts, she can ensure that the public key is mine and only I will be able to decrypt messages signed with that public key. This trust of CAs is how Elizabeth can be sure she is talking to me—and only me.
Generating Certificates Walkthrough
Phew! We now have enough of a background to make this work on a Siemens PLC. So instead of sending encrypted messages to Elizabeth, I’ll show you how to setup a TIA Portal project to send an encrypted TCP packet to a Dotnet Core application on my computer.
Before managing certificates in TIA Portal, you first need to add project protection. You can do this by going to the Project Tree -> Security settings -> Settings and selecting “Protect this project.”
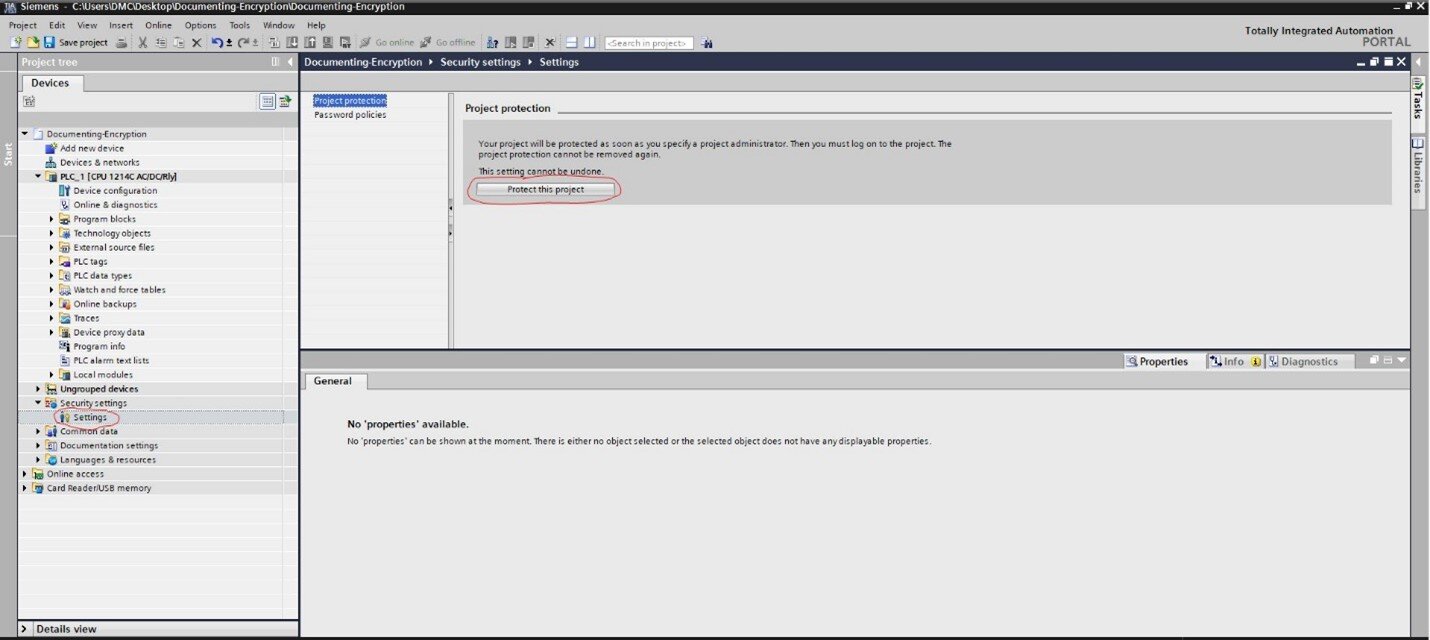
You’ll be required to create a username and password, which will be necessary to open the project in the future.
Now, you'll see that under security features in the project tree, you have a certificate manager. The certification manager holds all certificates required by your project. In the certificate manager, there is already a trusted CA that was generated when you password-protected your project.
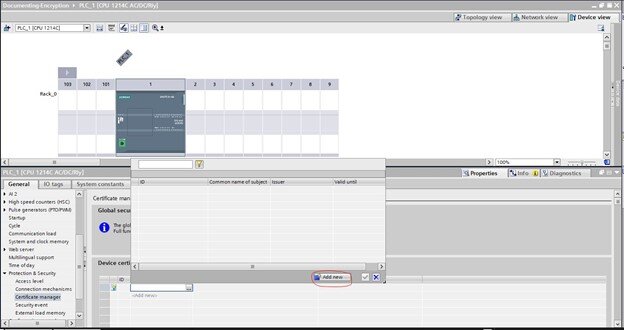
To create a certificate for a PLC, you need to go to the PLCs hardware configuration -> Properties -> Protection & Security ->Certificate manager. Check the box for "Use global security settings for certificate manager." You'll then be asked to confirm that any local certificates will be deleted, which is fine because no local certificates should have been created. Now, under device certificates, select “Add New.” Here, you will be signing the certificate with the Siemens CA and this is your PLC’s certificate.
You'll want to sign your certificate with the certificate authority generated by your project, so select 2: Siemens TIA Project(xxx). All other values should be valid.
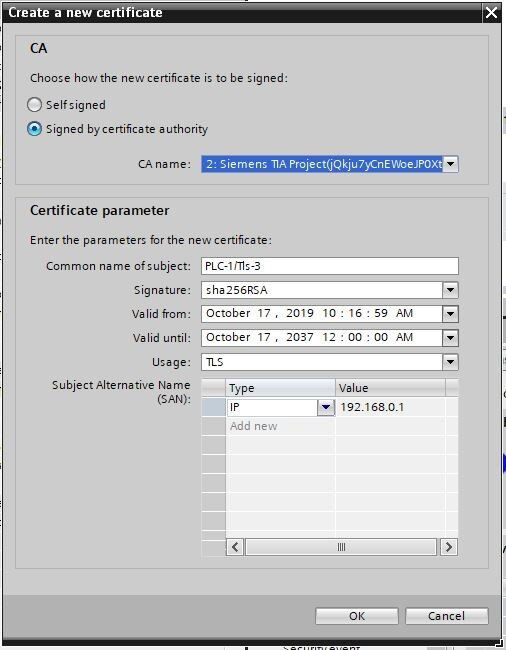
You now have a device certificate for the PLC, signed by the CA for the project.
Next, you’ll need to create a certificate for the Dotnet Core project. This certificate will be generated outside of TIA Portal, so we need to extract our project CA and do some processing with OpenSSL. OpenSSL is a free tool used for cryptography.
You can export the project CA in .p12 format by right-clicking the CA in the certificate manager and selecting “export.” Make sure to select .p12 format! This will also extract the CA’s private key because otherwise, you only get the certificate.
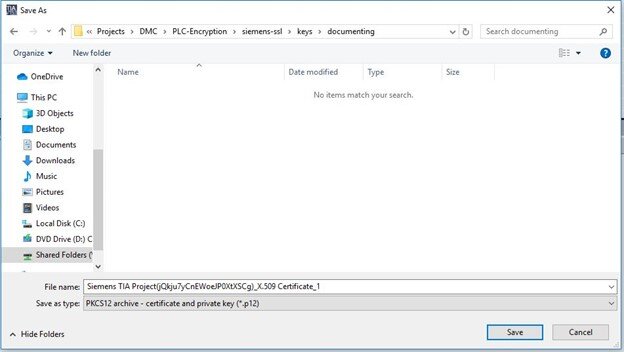
Note: I suggest renaming the CA file to CA.p12.
Extract the public key with:
openssl pkcs12 -in CA.p12 -nocerts -out ca_private.pem -nodes
Extract the CA certificate with:
openssl pkcs12 -in CA.p12 -nodes -clcerts -nokeys -out ca_cert.crt
Now, you have two files: the CA’s private key and certificate.
You can create a server private key and a “Certificate Signing Request” (CSR) with one command:
openssl req -out server.csr -new -newkey rsa:2048 -nodes -keyout server_private.crt -sha256
Sign your Certificate Signing Request with the CA’s private key with this command:
openssl x509 -req -days 360 -in server.csr -CA ca_cert.crt -CAkey ca_private.pem -CAcreateserial -out server.crt
Now, you have a server certificate and private key. This Dotnet project requires the CA certificate, the server private key, and the server certificate in .pfx format. You can merge these together with this command:
openssl pkcs12 -export -in server.crt -inkey server_private.crt -out server.pfx -certfile ca_cert.crt
You should now have server.pfx for your Dotnet project.
Implementing TLS Encryption on S7-1200/1500
Note: TLS encryption requires an S7-1200 with at least firmware 4.3 or an S7-1500 with at least firmware 2.0.
Siemens recently added a new TCP connection structure for TLS encryption: TCON_IP_V4_SEC. This new structure contains a copy of the previous structure, TCON_IP_V4.
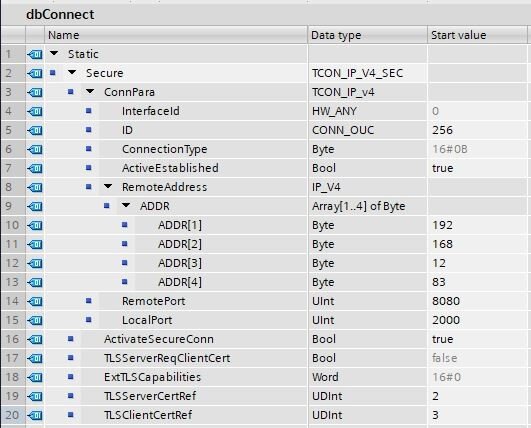
ActivateSecureConn is used to activate encryption. TLSServerCertRef requires a reference to the CA that signed the server’s certificate. In this case, that is the project CA. The 2 refers to the ID referenced in the Certificate Manager and the TLSClientCertRef references the device certificate for the PLC.
Below is a copy of the code used to send data to your Dotnet core project:
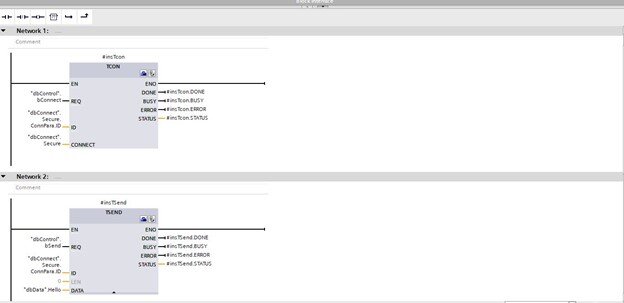
You can connect to the project with the dbControl.bConnect tag and send data with the dbControl.bSend tag at the dbData.Hello tag.
Now, we just need to implement the Dotnet core project. The project is zipped and can be found here? All you need to do is update the IP address localAddr to your host's IP address, call dotnet build, and then dotnet run server.pfx with the certificate file created in the last step. You should now be able to send encrypted data from your PLC to your computer!
Understanding security threats is important when developing your production code, but it’s often overlooked. I hope this helps you understand and prevent unauthorized parties from accessing and manipulating your data.
Learn more about DMC’s Embedded Development expertise and contact us to get started on your next project.