A lot of work goes into creating a polished, custom application. If you’re like me, it may have never occurred to you that after all of your hard work, there still lies one hurdle: Windows Security. So how do you convince everyone else that your shiny new application isn’t actually malware?
The key to this is digital signatures. A digital signature essentially lets the user know who the developer is, but for this information to be trustworthy, it has to come from a certificate authority, such as Digicert. A certificate authority sells code signing certificates and performs identity verification before sending them out, providing 3rd party proof that you are who you are claiming to be.
It is possible to digitally sign an application without purchasing a certificate from an authority. Though, since this signature has not been verified, it does not increase the validity of your application.
In this post, I will go over the process of applying a digital signature to a LabVIEW application.
Step 1: Purchase a Signing Certificate
The first step is to purchase a signing certificate from a certificate authority. When you do, you will usually have some options. Code signing certificates can come in two formats: Extended Validation (EV) and normal.
An EV certificate is more expensive and has a more extensive verification process, but this option comes with instant verification. The non-EV certificate does not have instant verification. So, an application signed in this manner will still have to gain a positive reputation before it passes Microsoft’s Smart Screen filters. The reputation will grow based on the number of installations of the application across the world.
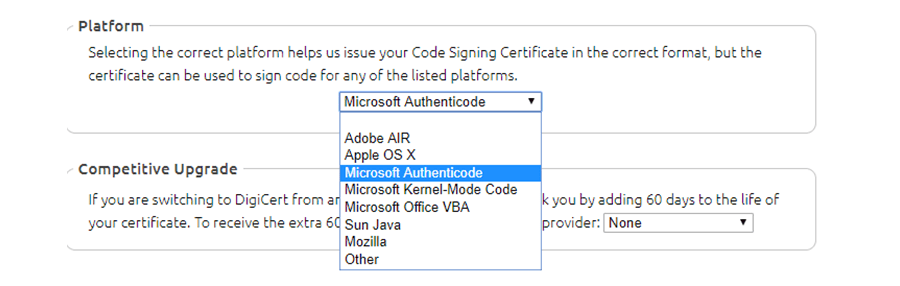
When purchasing the code signing certificate, you will likely be asked to select a Platform. We want to choose Microsoft Authenticode because that’s what LabVIEW executables use.
This guide follows the non-EV certificate. If you purchase an EV certificate, you are mailed a USB that contains the key and further instructions.
For more information on this step, see here.
Step 2: Install the Certificate
Once your certificate is verified, you will receive an email with a link for installing your certificate. Install your certificate in the Personal Certificate store of the browser that you open this link in. The guides from my Certificate Authority used Internet Explorer, so I followed their example.
Installing your certificate is a straightforward process. For more information, see here.
Step 3: Extracting the Certificate
Now that you have installed the Certificate to your build machine, you must extract it to a format that LabVIEW supports. There are several different formats available; National Instruments supports the PFX format for signing LabVIEW executables, so this guide will assume you’re using that format.
Follow the tutorial here to extract your certificate in the proper format. Be sure to name the certificate as something relevant to your company or application and save it to a location that is easy to find.
Step 4: Apply the Certificate to the Application
Now, we can apply the signature to our LabVIEW application. In the Properties for the Build Specification that you are trying to sign, navigate to the Windows Security category and check the box for Apply digital signature. You should now be able to find your digital signature in the Personal store certificates dropdown.

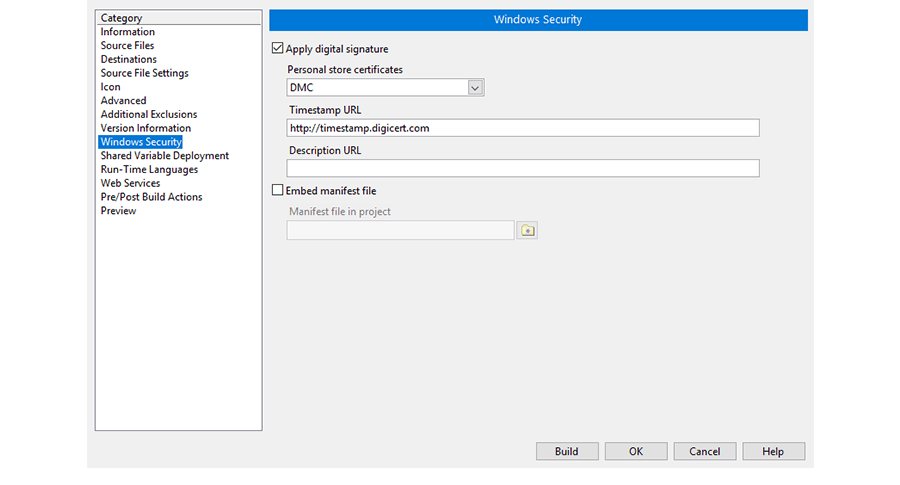
Next, we need to provide a timestamp URL. The timestamp URL is the URL of the timestamp server from the certificate authority that you worked with. This URL allows the signed software to get the current date associated with it when it is downloaded. This is important to ensure that the digital signature is still valid at the time that the user is installing it. In our example, the timestamp URL was timestamp.digicert.com
Be sure to sign both your executable and your installer, or any other build specification that you are distributing. Once we complete this step, we can check the properties of our new application and see the signature applied to it.
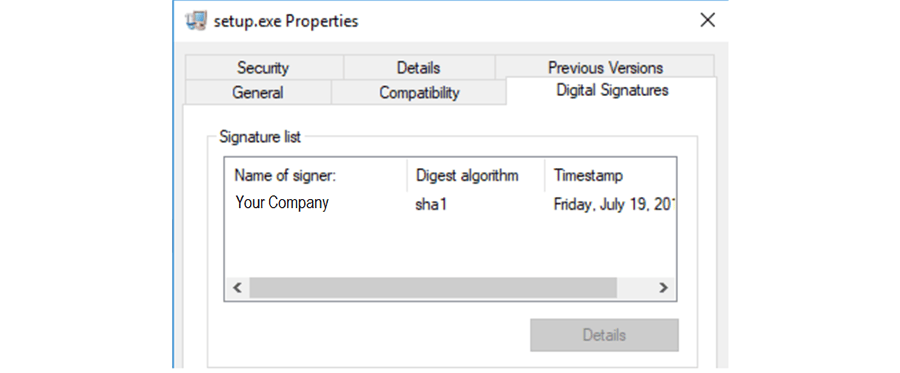
And we’re done! The application will now gain a reputation with each install and will pass Microsoft Smart Screen soon enough.
Learn more about DMC's LabVIEW programming expertise and contact us with any project inquiries!