Step One: Determine if You Want a Malleable VI
Malleable VIs are designed for situations in which you want a VI to adapt its inputs and outputs to multiple different data types. This is particularly helpful because malleable VIs do not require you to create a VI for each data type individually as polymorphic VIs do. For example, if you'd like to shuffle the order of the elements in an array, the operation will be the same regardless of the data type of the element. However, if you'd like your VI to have inputs and outputs that make up only a specific subset of datatypes, or if the VI requires different operations depending on the type, then a polymorphic VI will likely better suit your needs.
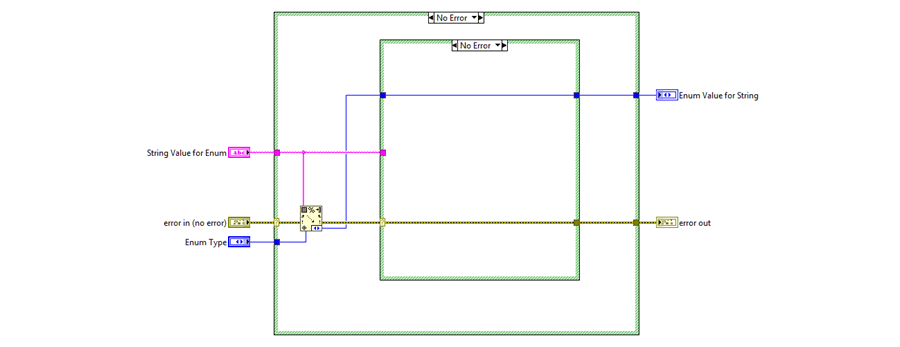
One particularly helpful malleable VI use-case is when programming with custom enums. The VI shown below is a malleable VI that converts a string to the type of enum that is wired in.
To learn more about the distinctions between malleable VIs and polymorphic VIs, Check out this NI page. If you determine that a malleable VI is right for you, continue to Step 2.
Step Two: Rename Your VI to Have the .vim Extension
To make a standard VI malleable, first change the standard .vi extension to .vim.
Tip: It's also a good practice to choose a different color for your malleable VI icons. A distinctive color helps the programmer easily identify the VI as malleable from the block diagram and avoid accidental runtime errors. The orange that NI uses for the LabVIEW-provided malleable VIs is R: 255 G:204 B:153 (shown below for LabVIEW's 2D Sort Array).

Step Three: Edit the VI Properties
To access the VI Properties Dialog Box, go to File ->VI Properties. Next, select Execution from the Category dropdown and make the following changes:
Select: Preallocated clone reentrant execution
Check: Inline subVI into calling VIs
Uncheck: Allow Debugging and Enable Automatic Error Handling
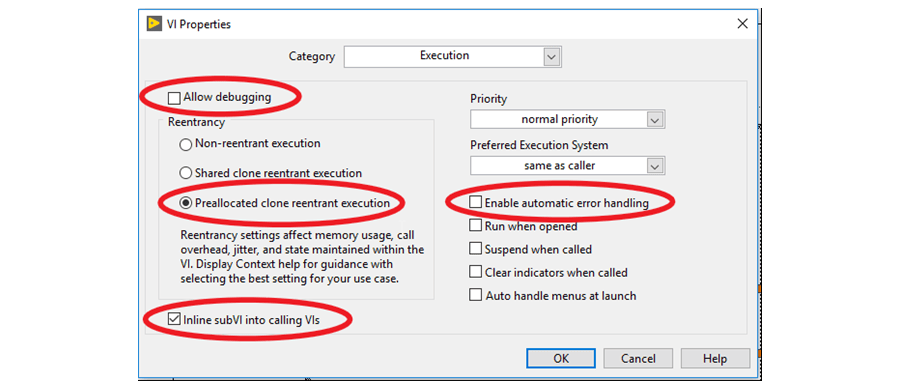
Click OK.
Step Four: Set Your Default Inputs and Outputs
The controls and indicators that are hooked up to the connector pane in your malleable VI define the default input and output data types for the VI.
Step Five: Use Your Malleable VI
When you add a malleable VI to a block diagram, the input and output types will be set to the default. However, when you wire in a control, indicator, or constant, the types will update automatically. If multiple inputs or outputs have corresponding types, wiring up one of these will define the others. Wiring up incompatible types to same-type inputs and outputs will result in a broken wire.
Keep in mind that though a malleable VI can take in and return any data type, it can still error at runtime if there is some incompatibility in the code.
Now, you’re ready to start using this tool in your LabVIEW code. Check back soon for an "Advanced Malleable VIs" blog.
Learn more about DMC’s LabVIEW Development Services and Contact Us for any inquiries.