One of the fastest-growing SCADA/HMI platforms today is Inductive Automation's Ignition. In addition to the well-known Vision visualization module, Ignition contains Perspective, a web-friendly visualization module which works in any web browser—even on mobile!
Although most Ignition functions work the same across Perspective or Vision, there are some necessary adjustments to work better in a web-friendly environment. This multi-part blog will serve as a guide to setting up dynamic Perspective screens that take full advantage of the powerful new features.
In part 3, we created a template view that controls an enable property and shows a numeric tag. In this part, we will go over how to add parameters to your embedded view, then use those parameters to drive indirect tag bindings. We can then use our parametrized template in a flex repeater to maximize our layout efficiency.
Adding View Parameters
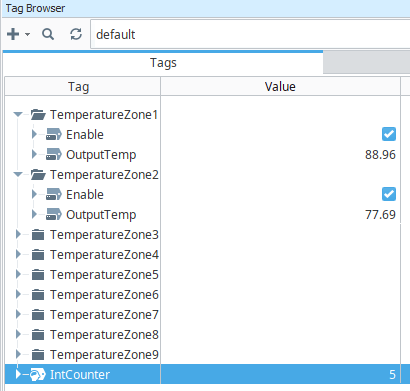
First, we will cover how to add a parameter to a view and change the tag binding based on that parameter. My example project has the following tag structure, where each TemperatureZone folder has an Enable tag and OutputTemp tag. We want the parameter to change which temperature zone the view displays.
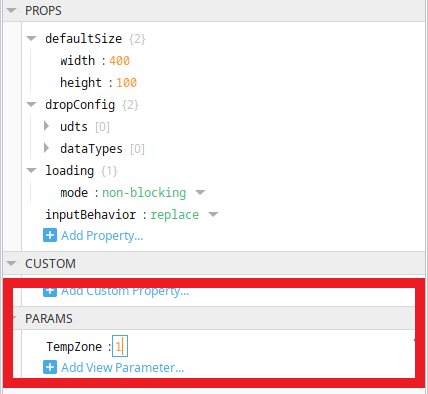
First, open the flex container template view we created in part 3. Select the view in the project browser, which will open the view properties in the property editor. Press the blue "Add View Parameter" button to create a new param. Change the param name to "TempZone" and set the value to 1.
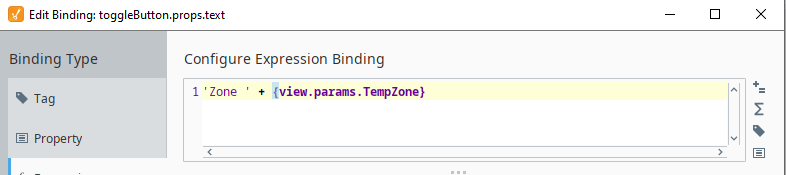
Next, we are going to adjust the button text to display the name of the current zone. Select the button and add an expression binding to the "text" property. Add the following expression, which will display the parameter value with the Zone prefix:
'Zone ' + {view.params.TempZone}
Indirect Tag Bindings
Next, we will change our temperature tag binding to an indirect tag binding. If you are creating an indirect binding from scratch the method is the same. Select the temperature label and change the tag binding type from Direct to Indirect. Next, delete the "1" index from the tag path (or whatever index distinguishes your tag folders or UDTs).
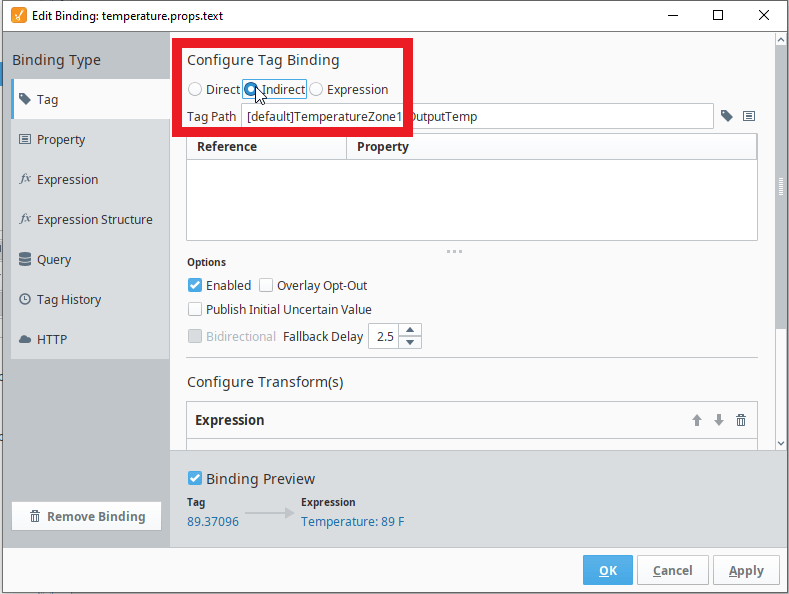
Place your cursor where you wish to add the indirect reference (where the 1 used to be), then press the property reference button to the right of the tag path entry box. Find the TempZone parameter in the tree and press Ok to insert the TempZone param. The reference is now shown in both the tag path and the reference list. You will know that you've configured the binding correctly when the Binding Preview shows the tag value, not an error.
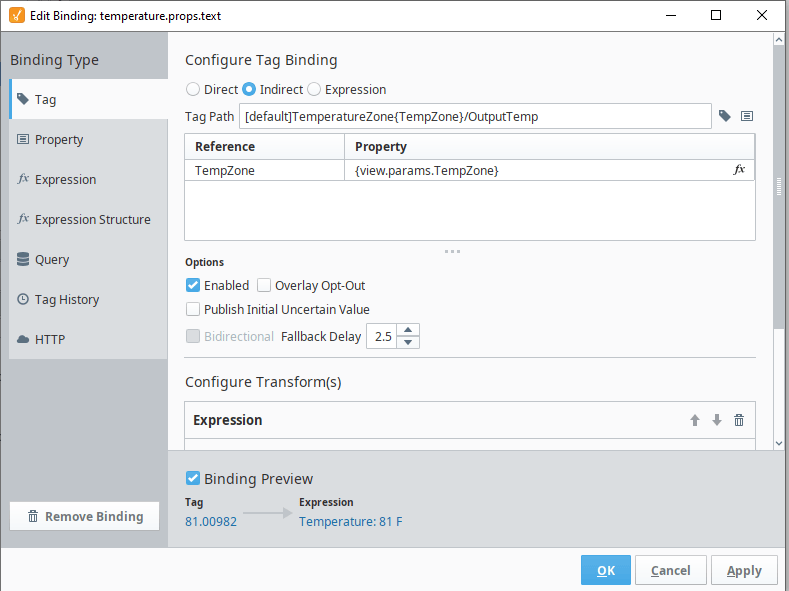
(Note: Previous guides did not explicitly cover binding the "enable" custom property to the enable tag. This can be accomplished with an indirect tag binding on the custom property. Don't forget to set the bidirectional checkbox so the property can write back to the tag!)
Configuring Embedded View Parameters and Flex Repeaters
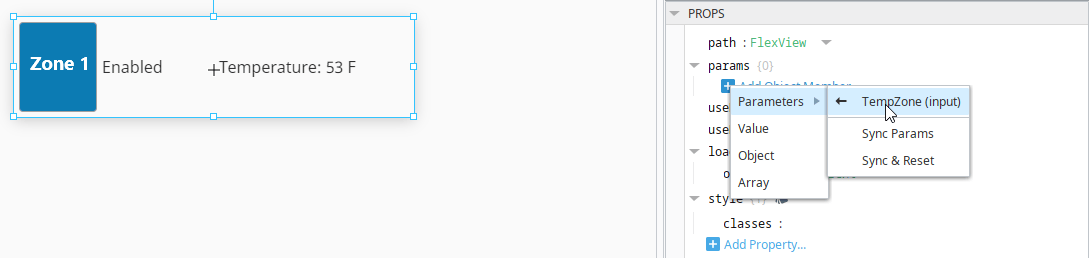
Once you have added a parameter to a view, you can add a value to that parameter on any embedded view instances. Select the embedded view, then find "params" in the property editor. Click "Add Object Member", then find TempZone (input) in the parameters list. Once you add that parameter, it will appear in the parameters list and you can edit the value. Try changing the TempZone param to different values to see how the template reacts.
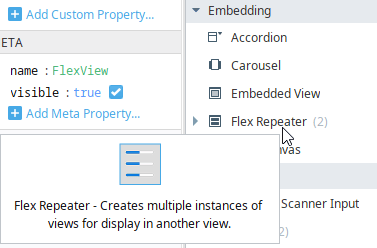
One of the most common ways to embed templates is the flex repeater. This object works like a flex container, but it creates multiple instances of a single specified view. Drag a flex repeater from the toolbox to the main view.
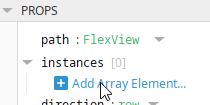
Next, select the flex repeater and change its path property to the path of the template view. Under instances, click "Add Array Element" and add three instances of the template.
The three instances will appear as array objects under the instances property. Each instance has an instanceStyle and instancePosition, but you will need to add the TempZone parameter. Click the grey plus button by the instance number and add TempZone (input) as a parameter.
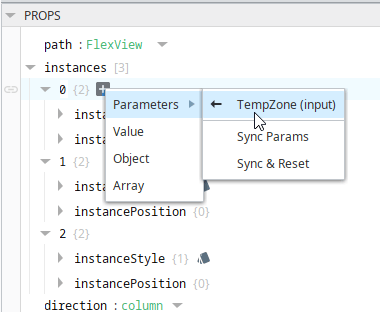
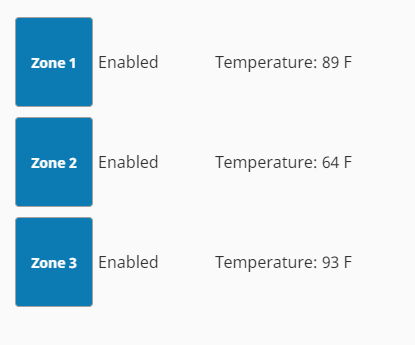
Change each TempZone parameter to a different index. The objects inside the template will use that parameter value for display (Zone 1, Zone 2, Zone 3) and for their indirect tag bindings (note the different temperature values).
In this guide, we've learned how to create view parameters, use them to drive indirect bindings, and how to use flex repeaters to efficiently copy embedded views. In the next guide, we'll cover a more advanced flex repeater technique to allow for a variable number of instances.
Learn more about DMC's Ignition expertise. Contact us to get started on your next HMI, SCADA, or MES project.
See other blogs in this series: Creating Dynamic Ignition Perspective Projects
Part 1: Bindings and Transforms
Part 2: Button Event Actions
Part 3: Embedded Views and Flex Containers
Part 4: View Parameters, Indirect Bindings, and Flex Repeaters
Part 5: Flex Repeaters with Variable Number of Instances (coming soon)
Part 6: Changing Colors and Other Properties (coming soon)