Recently, when working on an end of line calibration machine project, I found myself working to achieve parallel programming using two CCS programmers. During the process, I ran into several specific quirks and challenges. Below is a tutorial and troubleshooting guide that may help others who find themselves in similar positions. In this document, I will cover everything needed to get the programmers to work independently, and then address the weird nuances of parallel.
Background
The system we tested on had/did the following:
Methods
There are two main methods you can use to communicate with the programmers: CCSLoad.exe and Windows command line.
CCSLoad.exe
CCSLoad is the driver interface that allows you to execute operations with the programmers. I highly recommend starting with this to verify that everything is in working order.
- In the Diagnostics tab, check that software and hardware versions are fully up to date according to CCS’s website. You can also update firmware/software directly from the tab.
- You should be able to perform read/write operations using the programmers at this stage.
- One common issue we noticed with older firmware versions of the Prime 8 was the slow speed of programming all 8 slots. The solution was to update to the latest firmware version.
- The ICDU80 did not give us any issues.
- If you have any issues performing actions with the driver, check the following:
- If you are not connecting to the device, check your USB connection.
- If you are failing to write, check your target file. Make sure that the chip type is specified in the file and that it matches the target.
- 'Erase' and 'Read' functions should work as long as the chip is functional, both may be useful for troubleshooting the target chip itself.
- Once you can successfully read, write, or perform actions without any issues, you are ready to move on to the windows command line. With the CCLoad program, you can only operate one programmer at a time. It must disconnect from one before connecting to another. With the windows command line you will be able to operate them both in parallel.
Windows Command Line
Full documentation of Command Line Usage can be found here:
C:\Program Files (x86)\PICC\ccsload.chm (Windows User Interface --> Command Line Usage)
This page provides a comprehensive list of all commands and their associated actions. I will be covering all commands that we used — which were a very small subset of all the available ones.
Because we are using LabVIEW, we will use System Exec.vi to call the windows command line and send commands this way; however, the process should be the exact same as long as you are using something to call the command line.
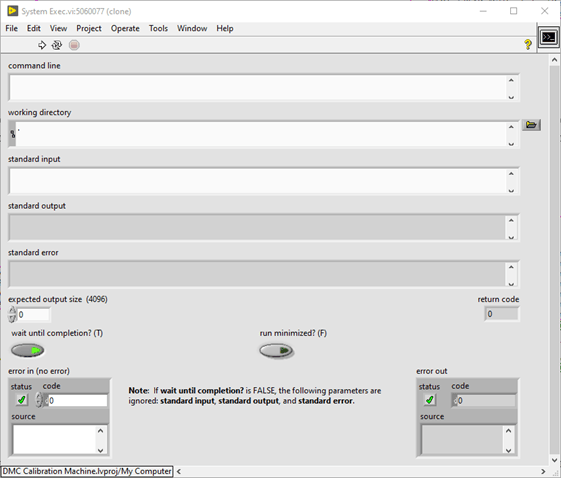
The only three input parameters relevant for us are “command line”,” wait until completion?”, and “run minimized?”.
- "Command line" is the input string that determines the operation you want to perform.
- "Wait until completion" delays the transfer of information downstream until this VI has finished executing.
- "Run minimized" determines whether you want the command line window to pop up on execution or stay hidden in the background.
Here is an example of an erase command we are sending using LabVIEW.

Some things worth noting:
- The first line is the path to the ccsloader.exe command line.
- We are using the windows command line to call this new command line — which is then responsible for communication to the programmers.
- We specify the Port/Device because we will eventually be programming with two. If you are only using one Port/Device, this is not necessary as it should auto detect.
- The nickname/alias for each device can be set manually here: "C:\Users\[your windows username]\AppData\Roaming\PICC\pcw.ini"
- We always specify the device. I’ve found when you don’t specify, it can fail.
- +ERASE is the actual operation we want — which erases the chip. The first 3 lines are all setup, and the following line(s) is the operation.
When starting out, I highly recommend disabling ‘run minimized’ and enabling ‘wait until completion.’ This opens the command line on execution, and it also shows you exactly what it’s doing: like connecting, erase/read/write operations, and any errors it encounters. When it does error, it only briefly shows the error before it closes the window, so I recommend taking a video or recording it somehow to go back and replay what error it showed. Any other combination of these settings will not give you live feedback.
Here's another example, except, this time, we are using the Prime 8 and performing a write action:
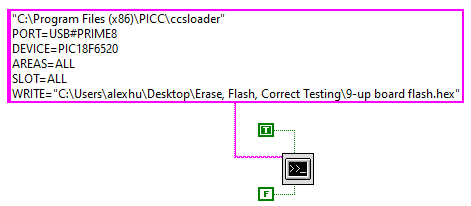
Notice that everything is the same except for the difference of PORT, DEVICE, and an additional line that defines the SLOT. For the Prime 8, since it is a multi-device programmer, you have to specify which slots you’d like to perform actions on. You can also see the format used for writing a target hex file.
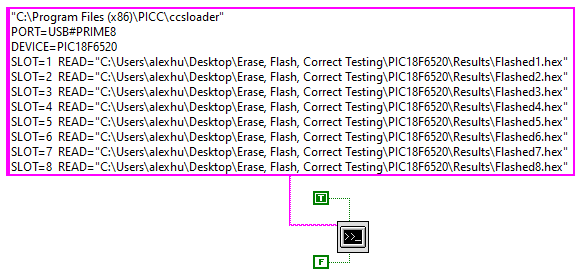
The last example will be a read operation. Reading back from the device is important because we need to know if our operation was successful. It’s nice when the command window tells us, but it’s also good to verify the code itself. So, I recommend reading from the device both after erasing and writing. After erasing, the hex file should be full of 00 or FF, and you should be able to observe the difference post-write.
Here is an example of a command reading from all 8 slots of the Prime 8. Notice how we have to specify a different file for each slot since we need to verify all 8 slots are working.
Using these three commands, you should now be able to erase, write, and read using the windows command line: just like the CCSLoad driver interface. Once you get that, it’s time to move onto the last two steps: +STAYOPEN and parallel programming.
+STAYOPEN
At this point, while performing operations, you may have noticed that the compiler must always connect to the device before starting its operation, and it closes automatically after it finishes. This is quite time-consuming as the time taken to connect to the device(s) often takes longer than the operation itself. The solution for this is to incorporate the command +STAYOPEN. This establishes a connection to the device and leaves it open — allowing you to send future commands without needing to connect over and over again. You essentially front-load the connection time once at the beginning and never have to worry about it again. The downside is you lose the ability to see the compiler updates from your commands — which is why it was important to establish everything was working before we got here.
It’s also important to know that if you use +STAYOPEN, you must also use +CLOSE to close the connection after, since it will not auto-close anymore. These commands look like this:
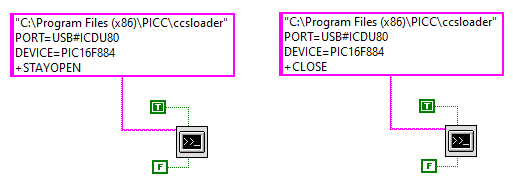
I recommend performing the following series of operations with each programmer to verify that everything is working properly before moving onto parallel programming.
- Open connection
- Erase chip (verify that it is erased)
- Read from chip
- Write hex file to chip
- Read from chip (verify that it is no longer erased)
- Close connection
Parallel Programming
Using multiple programmers in parallel is not an explored space according to CCS, but they have worked with me to get it working. That means, for the following steps, your mileage may vary. CCS support may be a useful tool in case you find your system reacts differently. We did perform parallel testing successfully with multiple computers, so there is some level of consistency present.
There are two categories of parallel programming: with and without the use of +STAYOPEN. I will first cover parallel programming without using +STAYOPEN.
The first thing you will have to do is make a copy of the ccsloader.exe application. You can simply CTRL+C CTRL+V it, and rename it something like this:

We will now need two instances of it, one for each programmer.
The ‘trick’ I’ve found is to duplicate the LabVIEW calls at this step: one for each programmer. Make sure to change the target compiler and the PORT. When you call them, do not call them at the same time. You should actually delay the calls about a half second apart. I found the secret recipe is:
- Send a command to the ICDU80
- Wait ~500ms
- Send a command to the Prime 8
This looks something like this:
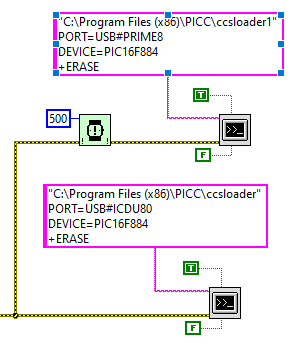
Notice how:
- They are not wired in series. Remember, we want ‘wait until completion’ to be true.
- We are calling both instances of ccsloader/ccsloader1 and specifying different port values.
You should observe both compiler windows opening (slightly staggered), then both connecting successfully and performing the operation.
If this fails, you can try the following troubleshooting steps below:
- If one fails to connect, open in driver interface to try to ‘reset’ the connection.
- Swap the order of the programmer calls.
- Fiddle with timing between device calls.
You should now be able to erase, write, and read using BOTH devices at the same time! The final issue to address is to incorporate +STAYOPEN, since we are still losing a lot of time connecting to the programmers.
Parallel Programming with +STAYOPEN
In a perfect world, we would be able to copy the same line of logic as when we used +STAYOPEN using a single programmer, but, unfortunately, it is not that easy. Initially, according to CCS support, the ccsloader program does not support two ‘STAYOPEN’ sessions on the same machine.
When +STAYOPEN is used, the process creates a Windows server that can communicate with a client. That server has a fixed ID number built into the program. So, when we try to send two instances of the same ID, it doesn’t work; however, CCS were able to get back to me and send over another version of the ccsloader application that, instead, uses the full path and filename as part of the ID. This means that, with our ccsloader and ccsloader1, they should generate two unique IDs.
If you are at this point, you will need to ask support@ccsinfo.com for this version as I am unable to provide it here.
The following steps assume you do have this new version (simply replace the ccsloader and ccsloader1 with copies of the newer version).
- You can now replicate the calls we did in ‘Parallel Programming without STAYOPEN’.
- Delay the calls by 500ms.
- Any future commands do not need to be delayed; they can be sent purely in parallel or in series with 'wait until completion' set to false.
- There is no need to set 'wait until completion' to true anymore, since you will not get live compiler updates either way. Only the original +STAYOPEN command can give updates, but it will not give updates on future commands
- Test and verify that the command order still works (Open, Erase, Read, Write, Read), and you’re done!
You have now successfully performed parallel programming using two programmers AND included the usage of STAYOPEN — which has made the overall process more time efficient.
Learn more about DMC's LabVIEW Programming, and contact us today for your next project.