What is different between the SharePoint 2010 and 2013 workflow engines? Here are a few new features we find most relevant to our clients.
With the 2013 designer, we can now:
- Query almost anything: The addition of Call HTTP web service as a designer action extends the reach of workflows without resorting to custom code. Within SharePoint, an HTTP call can query or change list data even on other sites. Externally, we can interface with other applications that support a REST API, including line of business applications or public services.
- Enhance workflow logic: Workflows created with the 2010 designer tended to be very linear - it was difficult or impossible to handle more complex scenarios. There are several logic enhancements in 2013 that clear this up. The big changes are loops (for repeated actions or continuous monitoring of conditions), parallel block completion condition (allows the workflow wait for one action OR another action) and stages (makes it easy to return to an earlier step).
- Improve task assignments: SharePoint 2013 brings more and better options for assigning tasks, collecting responses from users, and customizing the emails.
In a previous SharePoint 2013 Workflow blog post, I described how DMC onboards new employees using SharePoint. Now I will show you how to build parts of the same workflow using these new features.
SharePoint 2013 Workflow for Onboarding New Employees
To build the workflow, we first created three lists to store all the data:
- New employees – custom list used to track the status all new employees and their start date
- New employee tasks template – checklist of all items that must be completed for a new employee.
- Onboarding tasks - standard tasks list with a few custom fields
When each new employee is added to SharePoint, they start the onboarding process which we divided into multiple phases:
- Future hire – employee has accepted an offer but start date is in the future
- Pre hire – start is within 30 days, requests for information should be sent out
- Onboarding – preparation process before start date
- Start week – activities to be completed in the first week
- Active employee – follow up activities more than a week after the start date
The progression of an employee through the phases is controlled by a single workflow defined by two workflow Stages. The first stage copies the checklist items into actual SharePoint tasks tagged with a specific new employee’s name. The second waits until it is time for the next phase in the onboarding process. These stages are outlined in the diagram below: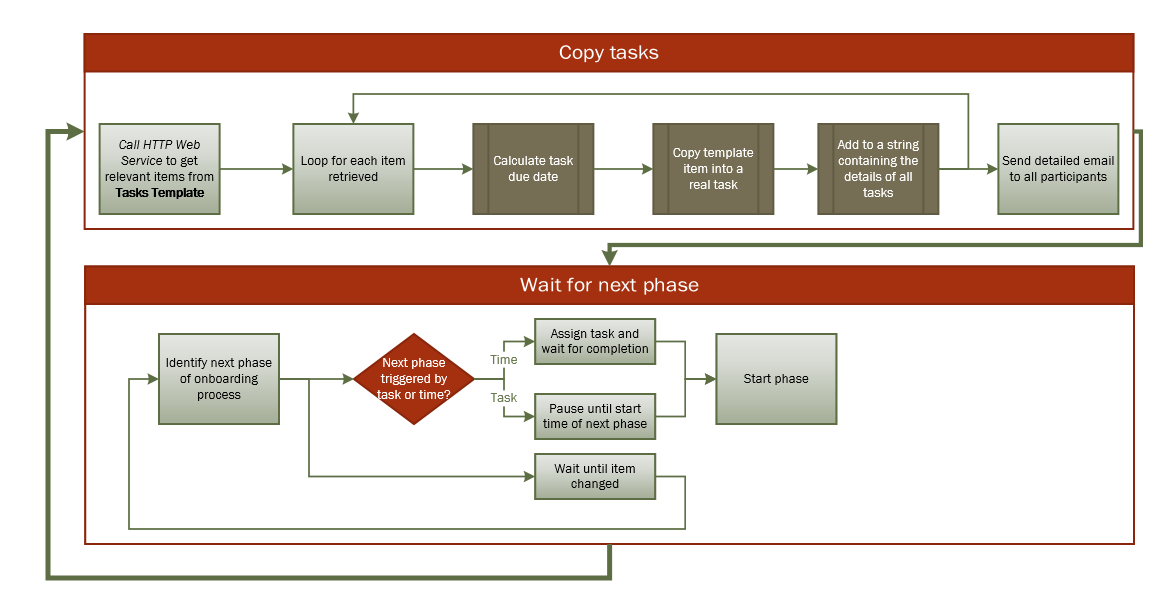
SharePoint REST API
The first step in our workflow is to query relevant tasks from New employee tasks template. There is no native action for reading all items in a list, so we turn to the new Call HTTP web service action to get data from SharePoint REST API.
What is a REST service? It is a method of retrieving data using only a formatted URL. For an example, look at the URL http://dev.markitondemand.com/Api/Quote/?Symbol=MSFT. The link is structured with Symbol=MSFT at the end. Clicking it will show you quote data for MSFT (Microsoft). But change the Symbol parameter to another ticker and you will get a different quote.
SharePoint's API allows you to read and update data from a SharePoint Site. The URL format to get all items from a SharePoint list is:
http://<site>/_api/web/lists/getbytitle(‘<list title>’)/items
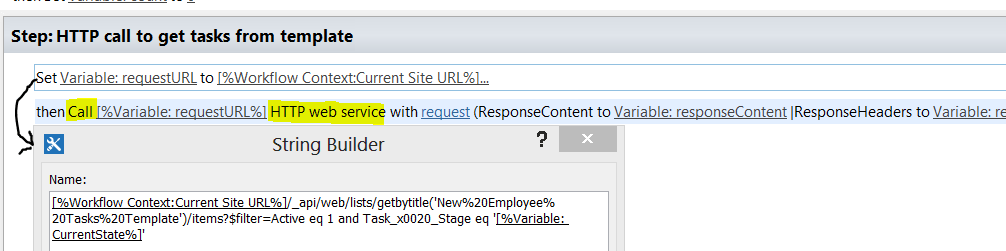
For the onboarding workflow, we need to get all items from the list New employee tasks template and filter the results using two columns as criteria: the column ‘Active’ and the column ‘Task Stage’. Luckily the API also has a filter option.
http://<site>/_api/web/lists/getbytitle('New Employee Tasks Template')/items?filter=Active eq 1 and Task_x0020_Stage eq '<current state>'
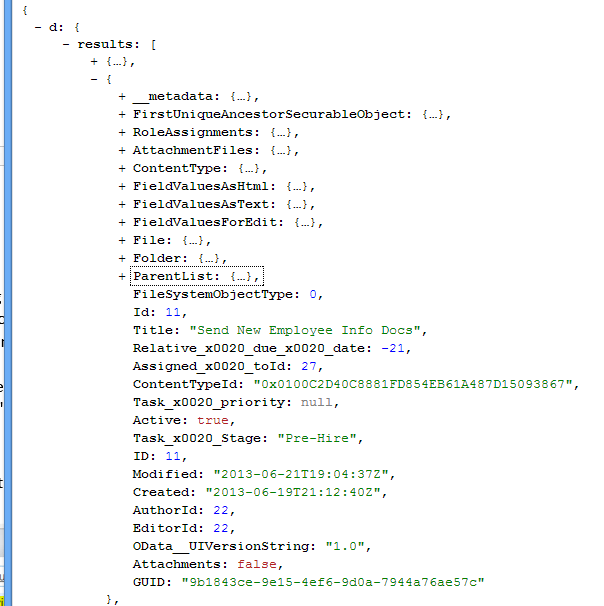
The final URL outputs data in the following format. Under d/results we will see one entry per list item.
To practice using the API, you can create and test URLs in your own site using a web browser. Here are a few tips to help you along.
- Use Google Chrome or Firefox rather than IE for testing the API URLs. This is not a requirement but will make the process easier.
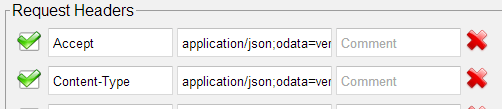
- By default, the API returns data in XML format which can be difficult for us to read and work with. You should switch the format of returned data to JSON by adding two HTTP request headers with Names = 'Accept' and 'Content-Type', and Values = 'application/json;odata=verbose'. These headers tell SharePoint we want JSON. Download the ModHeader extension to add them in Chrome.
- Special characters (e.g. spaces and quote marks) can cause you trouble. They are encoded by the browser and not always in a way you expect. I got the smoothest results by creating my URLs in notepad and then pasting directly into Chrome
- To format the JSON data nicely, try downloading the JSONView Chrome extension.
For a more in depth discussion of the operations available in with the SharePoint REST API, see this article.
Call HTTP web service
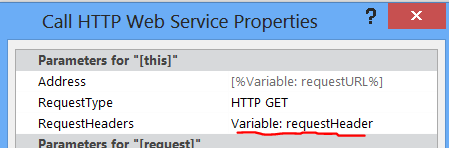
Just viewing the data in a browser doesn't do our workflow much good. To access the API from Designer, we need to build the same URL as a string variable and pass it to the Call HTTP web service action.
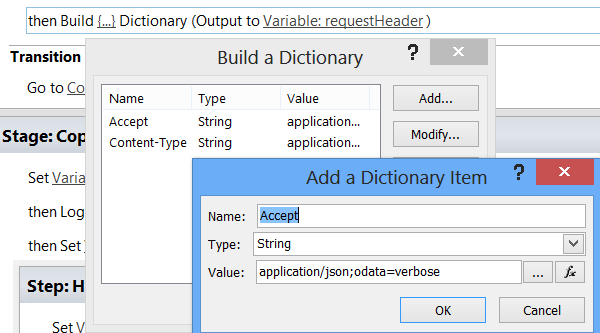
You should also switch the format of returned data to JSON. To do this in Designer, tweak the HTTP request headers by adding the below name/value pairs to a dictionary object and setting the advanced properties of the Call HTTP web service action (right click on the action--> properties):
Dictionaries and Loops
Now that we've got access to the data from within designer, the next step in our workflow is to copy the checklist into actual tasks.
Call HTTP web service action outputs the variable ResponseContent which contains the entire JSON response. ResponseContent is a dictionary variable - dictionaries are a new concept in 2013 with several uses. To work with them, we're going to use a few new actions:
- Get Item From Dictionary – we use this to retrieve data from a specific JSON path. For our API request, we find the results set under d/results. To retrieve a specific attribute from the results set, the path is (<index>)/<field name>. Take a look at the sample output above to see where these values are coming from.
- Count Items in Dictionary – used to count all the items in our results set
- Loop – used to loop through all items in our results set
The steps to create the tasks are:
- Get the results set from our HTTP call and store it as dictionary responseItems
- Count the number of items in responseItems and store it as count
- Create the index variable and set it to zero
- Loop while index is less than count
- Get the item GUID of the next item from responseItems
- Use the item GUID to retrieve details from New employee tasks list
- Calculate the task due date
- Create the task
- Increment index by 1

Assign a task
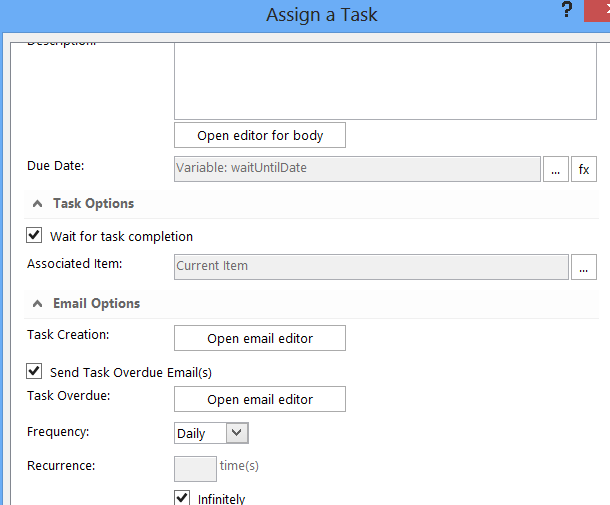
After copying the tasks, the workflow enters the waiting stage. For some of the phases, we trigger on a certain date, like one month before employee start. In other cases we trigger the phase by the completion of a task. With the improved task assignment action we choose to pause the workflow, customize the task email, and automate overdue reminders from a single dialog.
Parallel block completion
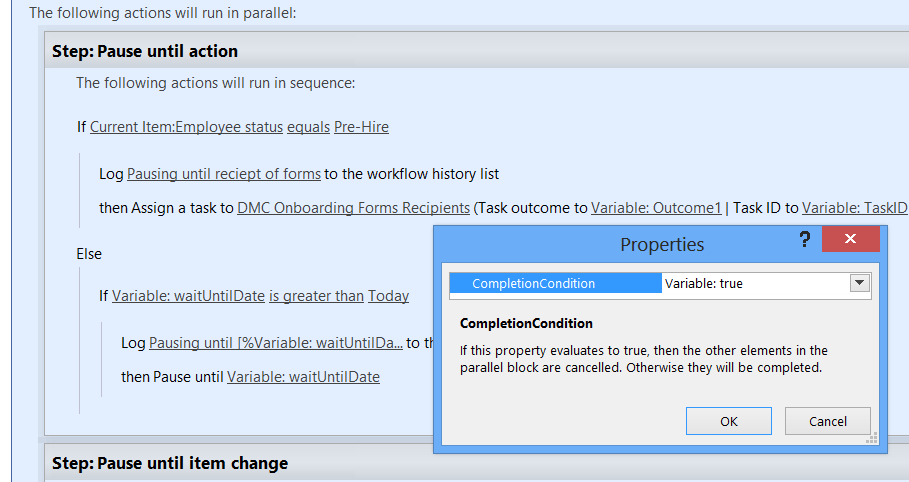
We also need to consider a scenario in which the start date changes, otherwise the workflow might trigger too late. Here, the parallel block completion condition lets us wait until the next phase OR wait until the list item is changed so that we can recalculate the pause time. The completion condition is set in the advanced properties of a parallel block.
Conclusion
Together these new features have enabled us to quickly create a code-free solution.
For help creating workflows to improve the efficiency and effectiveness of your business, please contact us. We would welcome an opportunity to make your SharePoint or Office 365 initiative a success!
Additional Resources
Learn more about DMC's SharePoint Workflow services.