Have you ever been coding the same thing over and over again, and thought “man, there must be an easier way to do this!” Well, I have. And luckily, so has Rockwell! The XML import feature allows you to generate repeat code with ease.
In this blog, I’ll walk you through writing XML code to generate ladder logic in Rockwell. Using these techniques, you can write scripts, macros, and other tools to create .L5X files that can be directly imported into your Rockwell program. You can create data types, tags, rungs, routines, or even entire programs, all from your favorite text-based program.
To see how this technique can be used to buffer IO, check out Brandon's Blog!
To start, let's look at the bare bones of a .L5X file and the required structure. It has a nested structure, with the controller at the highest level and rung content at the lowest. In order for Studio 5000 to recognize the file, you must keep this structure. In this example, I'll write a "rung" import file, but it's easy to adapt to generate routines or entire programs.
Here's a skeleton of a .L5X file:
<?xml version="1.0" encoding="UTF-8" standalone="yes"?>
<RSLogix5000Content SchemaRevision="1.0" SoftwareRevision="28.00" TargetType="Rung" TargetCount="1" ContainsContext="true" Owner="DMC" ExportDate="Mon May 20 15:46:14 2019" ExportOptions="References NoRawData L5KData DecoratedData Context Dependencies ForceProtectedEncoding AllProjDocTrans">
<Controller Use="Context">
<DataTypes Use="Context">
</DataTypes>
<Tags Use="Context">
</Tags>
<Programs Use="Context">
<Program Use="Context">
<Routines Use="Context">
<Routine Use="Context">
<RLLContent Use="Context">
</RLLContent>
</Routine>
</Routines>
</Program>
</Programs>
</Controller>
</RSLogix5000Content>
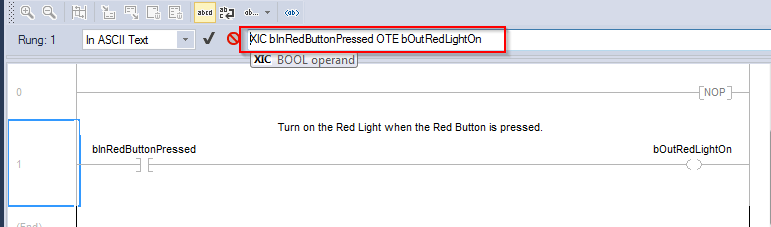
Let's use this skeleton to create a simple rung to turn on the red light if the red button is pressed. While this is clearly overkilled for this one rung, it would be very useful if you had 100 button/light combinations.

We'll need to add code for the tags, the rung logic, and the rung comment. First, let's create the two boolean tags used in this rung. Between the lines <Tags Use="Context"> and </Tags>, insert the following lines. These tell the import tool to make new tags of type bool with the proper names. The line <![CDATA]0[]> sets the initial value of the tag to 0. I often use this feature to initialize values of a user defined type.
<Tag Name="bInRedButtonPressed" TagType="Base" DataType="BOOL" Radix="Decimal" Constant="false" ExternalAccess="Read/Write">
<Data Format="L5K">
<![CDATA]0[]>
</Data>
<Data Format="Decorated">
<DataValue DataType="BOOL" Radix="Decimal" Value="0"/>
</Data>
</Tag>
<Tag Name="bOutRedLightOn" TagType="Base" DataType="BOOL" Radix="Decimal" Constant="false" ExternalAccess="Read/Write">
<Data Format="L5K">
<![CDATA]0[]>
</Data>
<Data Format="Decorated">
<DataValue DataType="BOOL" Radix="Decimal" Value="0"/>
</Data>
</Tag>
You can continue to add more tags as needed, change their properties, and their initial values. Next, let's add logic for the rung. Between the lines <RLLContent Use="Context"> and </RLLContent>, add the following lines.
<Rung Use="Target" Number="1" Type="N">
<Comment>
<![CDATA]Turn on the Red Light when the Red Button is pressed. []>
</Comment>
<Text>
<![CDATA]XIC(bInRedButtonPressed)OTE(bOutRedLightOn);[]>
</Text>
</Rung>
The "text" section is where you add the code for your rung. For something simple like this, it's fairly easy to do (just XIC and OTE instructions). However, if you're unsure of the "text version" of your ladder logic, just double click on the rung number in the ladder editor, and it will display the text.
And that's all you need to do! You can add more rungs just by repeating the pattern. Be sure to edit the targetcount on line 2 to match the number of rungs you're making. Save the file with a .L5X extension and import it directly into your routine!
<?xml version="1.0" encoding="UTF-8" standalone="yes"?>
<RSLogix5000Content SchemaRevision="1.0" SoftwareRevision="28.00" TargetType="Rung" TargetCount="1" ContainsContext="true" Owner="DMC" ExportDate="Mon May 20 15:46:14 2019" ExportOptions="References NoRawData L5KData DecoratedData Context Dependencies ForceProtectedEncoding AllProjDocTrans">
<Controller Use="Context">
<DataTypes Use="Context">
</DataTypes>
<Tags Use="Context">
<Tag Name="bInRedButtonPressed" TagType="Base" DataType="BOOL" Radix="Decimal" Constant="false" ExternalAccess="Read/Write">
<Data Format="L5K">
<![CDATA]0[]>
</Data>
<Data Format="Decorated">
<DataValue DataType="BOOL" Radix="Decimal" Value="0"/>
</Data>
</Tag>
<Tag Name="bOutRedLightOn" TagType="Base" DataType="BOOL" Radix="Decimal" Constant="false" ExternalAccess="Read/Write">
<Data Format="L5K">
<![CDATA]0[]>
</Data>
<Data Format="Decorated">
<DataValue DataType="BOOL" Radix="Decimal" Value="0"/>
</Data>
</Tag>
</Tags>
<Programs Use="Context">
<Program Use="Context">
<Routines Use="Context">
<Routine Use="Context">
<RLLContent Use="Context">
<Rung Use="Target" Number="1" Type="N">
<Comment>
<![CDATA]Turn on the Red Light when the Red Button is pressed. []>
</Comment>
<Text>
<![CDATA]XIC(bInRedButtonPressed)OTE(bOutRedLightOn);[]>
</Text>
</Rung>
</RLLContent>
</Routine>
</Routines>
</Program>
</Programs>
</Controller>
</RSLogix5000Content>
This blog was inspired by a new Excel tool I wrote to help us write sequences for one of our large Oil and Gas clients. These sequences were often very similar, so having a tool to auto-generate them made a lot of sense. Our engineers can now fill out the system parameters in Excel, and a macro generates all the rungs and data required for the program.
What used to take us a few hours can now be done in a matter of minutes! You can learn more about the project and the customer benefits here.
If you need help with Rockwell Programming or any other automation tasks, let us know!