Tables are a fast way to show a lot of valuable data. There are many guides on sorting tables by a column in React, but sorting multiple columns is something that can take some effort. At the end of this guide, you should have a sortable table where you can click multiple columns.
For this tutorial, we will be leveraging the use of LINQ to make sorting quite painless, and optionally Material-UI for styling the table. At the very end, I will also briefly describe a way of implementing this table without using LINQ and only using base React.
Tools Used in this Blog:
- LINQ
- Material-UI (Optional)
- Basic React hooks
- Functional React
Setup
First, we need some data. For the purposes of this example, I just created some dummy data that we can sort. I also defined an interface for the data type and an enum for departments that a person can belong to.
 const dataList=[
    {name: 'Ryan H.',   hours: 30, startDate: new Date('2019-01-14'), department: Department.Marketing},
    {name: 'Ariel P.',  hours: 22, startDate: new Date('2017-03-12'), department: Department.Sales},
    {name: 'Ryan Y.',   hours: 31, startDate: new Date('2015-09-12'), department: Department.Marketing},
    {name: 'Ed T.',     hours: 22, startDate: new Date('2017-03-12'), department: Department.Engineering},
    {name: 'Matt G.',   hours: 30, startDate: new Date('2017-03-12'), department: Department.Marketing},
    {name: 'Olivia H.', hours: 32, startDate: new Date('2018-05-10'), department: Department.Engineering}] as TableData[];
Our interface is TableData. We have an enum called Departments which lists the available department's people may be in:
interface TableData{
    name: String,
    hours: number,
    startDate: Date,
    department: Department
}

enum Department{
    Marketing = 'Marketing',
    Sales = 'Sales',
    Engineering = 'Engineering',
}
It’s important to note that this interface and enum is solely for structuring our table, and not for sorting. We will eventually add another interface and enum for sorting.
For the case of simulation, I’ll be placing the data into another file and returning it from a function call called fetchData.
export const fetchData = () => { return dataList;}
For the table, we’ll be using Material-UI, but this method will absolutely work with just a regular table. If you don’t want to use Material-UI tables, just replace the tags with the corresponding ones below. Everything but TableBody has a corresponding tag which just contains a collection of <tr> tags.
| MaterialUI |
HTML |
| TableHead |
th |
| TableBody |
- |
| TableRow |
tr |
| TableCell |
td |
Now we pull our data from the other file by calling fetchData, set up the appropriate table headers, and map our data to the corresponding table cells. For the sake of keeping clean code, I moved the sortable table headers to another component, so our code should look somewhat like this:
import React from "react";
import {Table, TableRow, TableCell, TableBody } from '@material-ui/core';
import { fetchData, TableData } from "./fetchData";
import { SortableHeader } from "./sortableTableHeader";

export const TableExample = () => {
    const dataList = fetchData();
    return(
        <div>
            <Table>
                <SortableHeader/>
                <TableBody>
                    {dataList.map((data) => { return(
                        <TableRow>
                            <TableCell>
                                {data.name}
                            </TableCell>
                            <TableCell>
                                {data.hours}
                            </TableCell>
                            <TableCell>
                                {data.startDate.toDateString()}
                            </TableCell>
                            <TableCell>
                                {data.department}
                            </TableCell>
                        </TableRow>
                        )})}
                </TableBody>
            </Table>
        </div>
    )
}
import React from "react";
import { TableHead, TableRow, TableCell } from "@material-ui/core";

export const SortableHeader = () => {
    return (
        <TableHead>
            <TableRow>
                <TableCell>Name</TableCell>
                <TableCell>Hours</TableCell>
                <TableCell>Date</TableCell>
                <TableCell>Department</TableCell>
            </TableRow>
        </TableHead>
    );
};
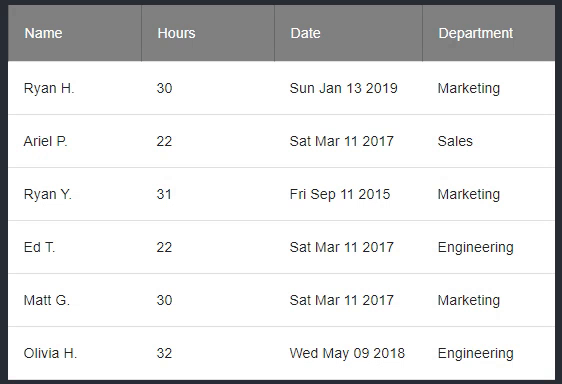
Which outputs something like this:
Implementation
Our overall goal is to create an ordered queue of sorting configurations that will apply each sorting in order through the use of LINQ to our data. We will then update our data list which will be re-rendered and displayed in the desired sorting configuration.
Step 1: Define a Sorting configuration
A sorting configuration is essentially an object that has two things. The property/column of the list that we’re trying to sort, and the sorting type such as ascending or descending. Since our rows are all the same object type: TableData, we can use keyof TableData to get all the properties/columns of our table. The only thing we’d have to do is make an enum of the different sorting types that we need, in this case we’ll stick with the standard ascending/descending.
interface SortingConfiguration{
    propertyName: keyof TableData,
    sortType: SortingType,
}

enum SortingType{
    Ascending,
    Descending,
Step 2: Utilize useState to Maintain a List of our Sorting Configurations
If you’ve never used useState, it’s a React hook that returns an array of two things: the first being the state of an object that is being maintained. The second is basically a function/dispatch that you can call to change the state. Here we’re initializing our list of sorting configurations to be an empty list since we want to start off with an unsorted table.
Note: If you do want a table column to be sorted by default, all you would need to do is add a SortConfiguration object in between the square brackets
  const [sortConfig, updateSortConfig] = useState<SortingConfiguration[]>([]);
    //Below is an example of sorting columns by name by default.
    const [initializedSortConfig, updateInitSortConfig] = useState<SortingConfiguration[]>([
        {propertyName: 'name', sortConfig: SortingType.Descending}
    ]);
Step 3: Create a Function That Adds, Modifies, and Removes Our Sorting Configurations
Most sortable headers are clickable headers that switch between a cycle of unsorted -> descending -> ascending -> unsorted -> etc, but there are many different orders or ways in which you may wish to set this up. You should be able to create your own custom function that edits the sorting configuration given three basic criteria:
- Add a sorting configuration to a column when there is not an existing configuration
- Modify a sorting configuration when there is an existing configuration
- For example, going from descending to ascending, or vice versa
- Provide a way to remove a sorting configuration
- This can be a part of criteria #2, but it is important enough to warrant its own criteria
We’ll be following a cycle of unsorted -> descending -> ascending -> unsorted -> etc… for the purposes of this guide.
We will be making a function called sortBy that will take in a key of TableData. Basically, whenever we call sortBy on a given property/column, it should automatically fulfill our three criteria: add a new configuration when we don’t have one, alter a configuration if we do, and remove a configuration when we need to. We wrap it in a useCallback because, in the next step, we will pass this function down to a prop.
So our basic structure looks like this:
 const sortBy = useCallback(
        (propertyName: keyof TableData) => {
            let pendingChange = [...sortConfig];
            const index = pendingChange.findIndex((config) =>
       						config.propertyName === 	propertyName)
            if(index > -1){
                // Existing configuration
            } else {
                // No existing configuration
            }
            updateSortConfig([...pendingChange]);
        },
        [sortConfig]
    )
We use the spread operator to make a copy of the sortConfiguration. Then we use findIndex to search our copied list and see if there is an existing configuration that’s in our list. We’ll be using a lot of the spread operator, so if you aren’t experienced with using it, you can see more examples in this blog by Jacob Bruce. Now that we have the basic structure laid out, let’s address the first criteria. This one is relatively simple since all we’re doing is adding a sorting configuration given the propertyName that was passed in:
  if(index > -1){
                // Existing configuration
            } else {
                pendingChange = [
                    ...pendingChange,
                    { propertyName: propertyName, sortType: SortingType.Descending },
                ];
            }
Here we use the spread operator to push a new sorting configuration to the end of the queue.
Now we have to handle our second and third criteria which you can only do on an existing configuration. We can remove extra code if instead of modifying we save the existing sort direction, remove the current configuration and lastly, add in a new configuration if it’s necessary to ‘modify’. Technically, our modification is removing a configuration of a property and adding in the same property back, but with a different sortType, but doing it this way makes it so we don’t have to write two similar code branches.
In short, we use our index we found to store the existing sort type. We then remove that configuration using splice. Lastly, we use our saved sorting type to determine if we needed to add a new configuration. In this example, we check if it’s Descending, and if that’s the case, we change that sortType to Ascending. Note how, if the sorting type is Ascending, we do not ‘modify’ our sorting configuration list, but rather just let the code remove the configuration.
Put together we have:
 const sortBy = useCallback(
        (propertyName: keyof TableData) => {
            let pendingChange = [...sortConfig];
            const index = pendingChange.findIndex((config) =>
                                    config.propertyName === propertyName)
            if(index > -1){
                //Save the sortType
                var currentSortType = pendingChange[index].sortType;
                //Remove existing config
                pendingChange.splice(index, 1);
                //check if the sort type we saved is descending
                if (currentSortType === SortingType.Descending) {
                    pendingChange = [
                        ...pendingChange,
                        { propertyName: propertyName, sortType: SortingType.Ascending },
                    ];
                }
            } else {
                pendingChange = [
                    ...pendingChange,
                    { propertyName: propertyName, sortType: SortingType.Descending },
                ];
            }
            updateSortConfig([...pendingChange]);
        },
        [sortConfig]
    )
Now the loop of unsorted -> descending -> ascending -> unsorted -> etc… is complete.
Step 4: Attach Our Function to the Table Headers
Now that we created our function, we need to attach it to table headers and make them something we can click. Since we’re passing down our props to our SortableTableHeader don’t forget to export our interfaces and enums to avoid errors. We’ll need to pass two things to our SortableTableHeader the first is our newly created sortBy function, and the second is our current sortConfig which will be used for arrow indicators to show what direction we’re sorting.
<Table>
    <SortableHeader
          sortBy={sortBy}
          sortConfig={sortConfig}
          />
      <TableBody>
		………
</Table>
</TableBody>
</pre>

<pre class="brush:js">
interface SortableHeaderProps{
    sortBy: (string: keyof TableData) => void;
    sortConfig: SortingConfiguration[];
}

export const SortableHeader = ({sortBy, sortConfig}:SortableHeaderProps) => {
    return (
        <TableHead>
            <TableRow>
                <TableCell>Name</TableCell>
                <TableCell>Hours</TableCell>
                <TableCell>Date</TableCell>
                <TableCell>Department</TableCell>
            </TableRow>
        </TableHead>
    );
};
To keep code DRY, I’ll be making a list of the columns that we want, and the TableData property they correspond to. This way, we can map over the function without copy/pasting TableCell four times.
" {="" return(="" <tablecell="" key="{index}>" {data.label}="" <="" tablecell>="" )="" })}="" tablerow>="" tablehead>="" );=""
Now, we can attach our function to the tablecell by adding the onClick prop to the TableCell, and pass in the corresponding property for the column being mapped. We can also apply our CSS stylings to the table cells at this point. Here I use Material UI’s styling solution, but the key point when doing this is setting the CSS property cursor: ‘pointer’.
 <TableHead>
            <TableRow>
                {tableColumn.map((column, index) => {
                    return(
                        <TableCell key={index}
                            className={headerCell}
                            onClick={()=>sortBy(column.property)}
                        >
                            {column.label}
                        </TableCell>
                    )
                })}
            </TableRow>
        </TableHead>
Lastly, we’ll add an indicator arrow through conditional rendering to show the current sort direction. To do this, we have two conditionals to check what we render. The first is checking if there is an existing sorting configuration, and the second is checking if the sortType is ascending/descending. To make this easier, we can write a simple function that gets us the current sortType from the sorting configuration and returns an appropriate icon.
 const getSortDirection = (property:keyof TableData) => {
        var config = sortConfig.find((sortConfig) => sortConfig.propertyName === property)
        if(config){
            if(config.sortType === SortingType.Descending){
                return <ArrowDownwardIcon/>
            }
            else {
                return <ArrowUpwardIcon/>
            }
        }
        return null;
    }
Our SortableTableHeader code should now look like this, with the appropriate CSS stylings applied in place of headerCell and sortLabel, if you aren’t using Material-UI.
export const SortableHeader = ({sortBy, sortConfig}:SortableHeaderProps) => {

    const {headerCell, sortLabel} = useStyles();

    const tableColumn = [
        {label:'Name', property:'name'},
        {label:'Hours', property:'hours'},
        {label:'Date', property:'startDate'},
        {label:'Department', property:'department'}
        ] as TableColumn[];

    const getSortDirection = (property:keyof TableData) => {
        var config = sortConfig.find((sortConfig) => sortConfig.propertyName === property)
        return config ?
            config.sortType === SortingType.Descending ?
                <ArrowDownwardIcon/>
                :<ArrowUpwardIcon/>
            :null
    }

    return (
        <TableHead>
            <TableRow>
                {tableColumn.map((column, index) => {
                    return(
                        <TableCell key={index}
                            className={headerCell}
                            onClick={()=>sortBy(column.property)}
                        >
                            <span className={sortLabel}>
                                {column.label}
                                {getSortDirection(column.property)}
                            </span>
                        </TableCell>
                    )
                })}
            </TableRow>
        </TableHead>
    );
};
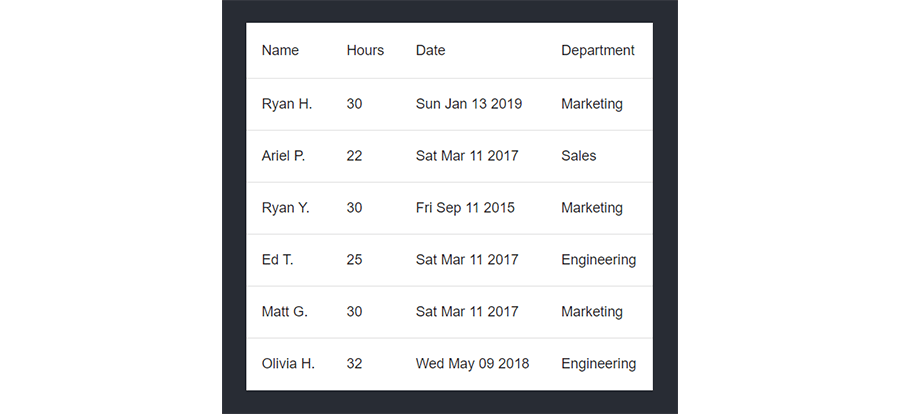
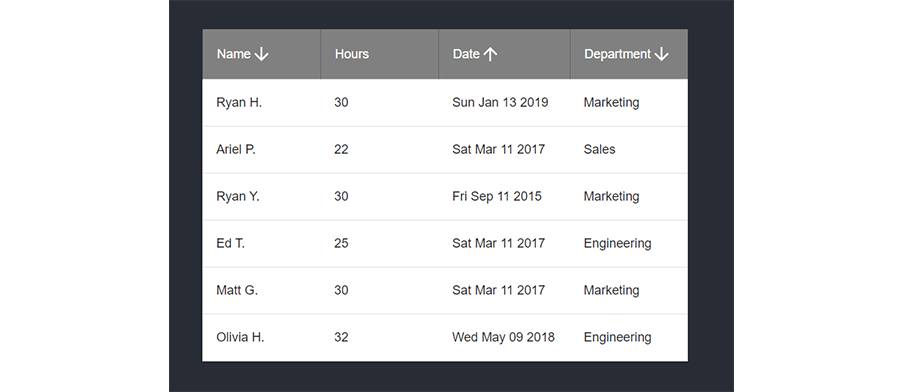
If everything went correctly, you should now see table headers with arrows showing the corresponding sort directions on them.
Step 5: Applying the Sort Configuration with LINQ
The last step is to finally apply the sorting in order.
We’ll be defining our variable, ‘sortedRows’ by a useMemo function, with a dependency on sortConfig and dataList, so that we re-render our sortedRows whenever our sort configuration changes, or whenever our data list changes.
Next, we can turn our standard list of items into a LINQ list by putting it in a LINQ.from call. Now, in order to leverage LINQ's sorting functionality, our list of values has to be an IOrderedEnumerable object. We can get this by applying a basic orderBy function to our LINQ and passing it a lambda that just returns one, which basically says sort this by the key ‘nothing’, and return ‘1’ in all cases to avoid doing any comparison. This returns us our list in an unmodified order, but as an IOrderedEnumerable type.
 //Set up default ordering
        let sorted = linq.from(dataList).orderBy(() => 1);
The reason why we want to do this is so we can apply multiple sorts on top of this which is possible by using the thenBy and thenyByDescending functions from LINQ and using those requires an IOrderedEnumerable. Now that that’s established, we can loop through each of the sorting configurations in order and check which sort type we’re applying.
let sorted = linq.from(dataList).orderBy(() => 1);
        //Loop through the queue
        sortConfig.forEach((sortConfig) => {
            if (sortConfig.sortType === SortingType.Ascending) {
                //Ascending sorting
            } else {
                //Descending sorting
            }
        });
Our last step in sorting is to apply the thenBy conditional on the corresponding property, and LINQ will handle the complicated sorting for us, including comparing integers, strings, and dates. You can read more on LINQ functions, and even pass in your own comparable which is useful for handling sorting between more complex types, but in the case of this guide, we’ll just stick to basic sorting since we’re handling primitive types. If it’s descending, we can use thenByDescending which makes things easier.
 if (sortConfig.sortType === SortingType.Ascending) {
                sorted = sorted
                    .thenBy((dataRow) => dataRow[sortConfig.propertyName]);
            } else {
                sorted = sorted
                    .thenByDescending((dataRow) => dataRow[sortConfig.propertyName]);
            }
In the code above, you see that the arguments for the lambda are an element of the sortedList. In this case, I named it dataRow because each item in the sorted is a LINQ from our dataList so we can think of it as one row. It then selects a corresponding key via the propertyName of our sortConfig, which as you recall is either “name”, “hours”, “startDate’, and “department”. In short, this is us targeting that specific column.
Now, if you have null data, Javascript will run into the null comparison issue, which will mess up the sorting. A quick workaround I do is to sort all the data that is null on the bottom, but prefacing this thenBy with another thenBy that basically checks if the property is null.
Here we return -1 when the data is null which means the object is ‘less than’ an object which does have data, and is sorted lower on the list.
The last thing we need to do is to turn our LINQ into an array by calling .toArray(), and returning that value so that our sortedRows has an array of a sorted dataList. Putting it all together, we have this:
const sortedRows = useMemo(() => {
        //Set up default ordering
        let sorted = linq.from(dataList).orderBy(() => 1);
        //Loop through the queue
        sortConfig.forEach((sortConfig) => {
            if (sortConfig.sortType === SortingType.Ascending) {
                sorted = sorted
                    .thenBy((dataRow) => (dataRow[sortConfig.propertyName] === null ? -1 : 1))
                    .thenBy((dataRow) => dataRow[sortConfig.propertyName]);
            } else {
                sorted = sorted
                    .thenByDescending((dataRow) =>
                    dataRow[sortConfig.propertyName] === null ? -1 : 1
                    )
                    .thenByDescending((dataRow) => dataRow[sortConfig.propertyName]);
            }
        });
        return sorted.toArray();
    }, [sortConfig, dataList]);
You should now have a functioning table with multiple sortable headers! A key thing to note is that you can pass a comparable to the thenBy function instead of just selecting by key. If for some reason things are not sorting as they should, that should be the first point of debugging.
Bonus: Sorting without LINQ
If you’ve made it this far, or just skipped ahead to this section, we’ll be going over the basics of sorting rows based on multiple headers by just using basic comparators.
Comparators are just functions that take in two objects and return a number depending on how they relate to one another. A zero means they’re equal, positive numbers are greater, and negative numbers are less. Now let’s work on converting our sorting function to one that doesn’t use LINQ at all.
Sorting multiple columns may seem complex, but in practice, it’s not really that difficult. Given a list of sorting configurations in the desired order, all you have to check is if the first comparator results in an equality, use the next comparator in order. If we have a list of {a ,1 }, {a , 2}, and {b, 1}. Sorting by the first column results in the equality of a’s. All we’d need to do is check our second column’s comparator to determine what order they should go in.
In this guide, we’ve already implemented a function that can order our sort configurations for us. All we need to do is add a comparators to our SortConfiguration so we can keep track of which compare function we need to use.
export interface SortingConfiguration{
    propertyName: keyof TableData,
    sortType: SortingType,
    compareFunction: TableDataComparable
}

export type TableDataComparable = ((a: TableData, b:TableData) => number);
Next, we add that field to our sortBy function:
const sortBy = useCallback(
        (propertyName: keyof TableData, compareFunction: TableDataComparable) => {
            let pendingChange = [...sortConfig];
            const index = pendingChange.findIndex((config) => config.propertyName === propertyName)
            if(index > -1){
                //Save the sortType
                var currentSortType = pendingChange[index].sortType;
                //Remove existing config
                pendingChange.splice(index, 1);
                //check if the sort type we saved is descending
                if (currentSortType === SortingType.Descending) {
                    pendingChange = [
                        ...pendingChange,
                        { propertyName: propertyName, sortType: SortingType.Ascending , compareFunction: compareFunction},
                    ];
                }
            } else {
                pendingChange = [
                    ...pendingChange,
                    { propertyName: propertyName, sortType: SortingType.Descending, compareFunction: compareFunction },
                ];
            }
            updateSortConfig([...pendingChange]);
        },
        [sortConfig]
    )
Next, we update our interfaces and define comparators for each of our table columns.
interface SortableHeaderProps {
    sortBy: (string: keyof TableData, compareFunction: TableDataComparable) => void;
    sortConfig: SortingConfiguration[];
}
...
const CompareByEquality = (column: keyof TableData) => (a: TableData, b: TableData) => {
        if(a[column] === b[column]){
            return 0
        } else{
            if (a[column] > b[column]){
                return 1;
            }
            return -1;
        }
    }

    const tableColumn = [
        {   label: 'Name',
            property: 'name',
            compareFunction:
            (a: TableData, b: TableData) => {
                 return a['name'].localeCompare(b['name'] as string)
            }
        },
        {
            label: 'Hours',
            property: 'hours',
            compareFunction: CompareByEquality('hours')
        },
        {   label: 'Date',
            property: 'startDate',
            compareFunction: CompareByEquality('startDate')
        },
        {   label: 'Department',
            property: 'department',
            compareFunction: CompareByEquality('department') }
    ] as TableColumn[];
Here, I just use equality for returning the values, but for more complex objects, you can define your own comparator function. As for the name, I used string’s localCompare as an example of an in-line lambda comparator.
After that, we just add the compareFunction into our onClick, so that our sortBy function has all the correct parameters.
<TableCell key={index}
    		className={headerCell}
   	 	onClick={() => sortBy(column.property, column.compareFunction)}
>
<TableCell key={index}
    		className={headerCell}
   	 	onClick={() => sortBy(column.property, column.compareFunction)}
>
Lastly, we need to change our definition for sortedRows:
const sortedRows = useMemo(() => {
        if(sortConfig.length === 0){
            return [...dataList];
        }
        let sorted = [...dataList].sort(
            (a: TableData, b:TableData) =>{
                 for(const config of sortConfig){
                    const result = (config.compareFunction(a,b))
                    if(result !== 0){
                        if(config.sortType === SortingType.Ascending){
                            return result;
                        }
                        else{
                            return -result;
                        }
                    }
                }
                return 0;
            }
        )
        return(sorted)
    }, [sortConfig, dataList]);
First, we check if there’s a sort configuration and if there isn’t we want to go back to our unsorted state by returning a copy of the data list.
If there is a sort configuration, we make a copy of dataList using the spread operator and sort with a lambda function that goes over our loop of sortConfigs. It then tests each a, and b, TableData against the compareFunction in the sortConfig. If we have an equal match, we try to and apply the subsequent sort config until we have a result that isn’t 0. Next, we check if it’s ascending or descending, and so we flip the result to its opposite value with a negative sign. Lastly, we finish going through our sort configuration and find that all matches, then we know both rows are equal.
That about does it for sorting multiple columns in React.
Learn more about DMC's Application Development expertise.