Tired of having to manually change the color of every button to try out a new color scheme on a VI? Ever wanted to change the colors of your controls or indicators all at once? Or maybe you’re just looking to have a dark theme in your application that doesn’t require a bunch of property nodes. Look no further than the new DMC UI Styles Toolkit! This toolkit will show you how to create modern, sleek-looking UIs without the hassle during development.
The new toolkit allows for edit-time customization and application of color themes for a variety of controls and indicators via a Quick Drop shortcut. Additionally, the toolkit provides an API for runtime application of existing styles.
What’s a Style?
A “style” is a collection of colors to be applied to different properties of controls and indicators. You choose the colors and can apply them to things like button outlines and fills, label text, or graph lines.
Configured styles are stored in a style file (.STYL), which is a text file that contains the data needed to color the front panel elements. It holds your chosen default colors for all supported controls and indicator types, as well as any specific colors picked for each individual VI. You can have multiple style files with various color palettes, and you’re able to change them out as you please.
Quick Drop Plugin
The Quick Drop plugin is your one-stop shop for all things control decorating. With Quick Drop open (CTRL+Space) the plugin defaults to CTRL+J. Entering this combination will pop open the UI Style Configuration Tool, as detailed below.
Style Configuration Tool
The example UI we’ll be customizing looks like this:

While looking at the front panel, enter CTRL+SPACE and then CTRL+J to launch the plugin.
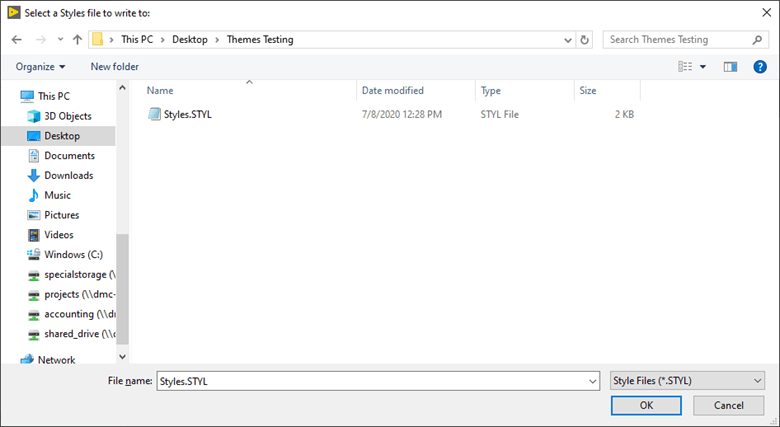
If it’s the first time for a given project that you’ve opened the tool, you’ll be prompted to select a style file. If you already have a style file, select it. If you don’t, feel free to name your file and then click “OK.” This will create a new style file in that directory.
Note: Although the plugin can be used on individual VIs outside of a project, the plugin associates style files with a given project. This means you can have a style filepath saved to the project. This also means that if you’re not in a project, you will be prompted to select a style file every time you run the plugin.
After selecting a file, you get the Style Configuration Tool!
The screenshot above shows the tool populating a style file that contains a "DMC Theme" style, which is present on the new GUI Suite regular and square buttons.
Let’s go over everything in the tool:
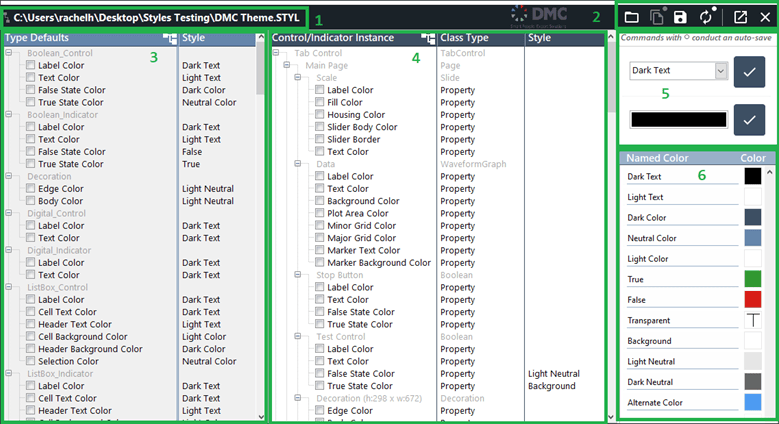
- Style File Name – This filepath is the currently loaded style file
- Toolbar – There are six buttons in the toolbar, as explained below:
- Open Style File – Allows you to select a different style file to load
- Copy Style File – Allows the user to make a copy of the current style file
- Save Style File – Saves any changes made in the configuration to the current style file
- Save and Apply Styles – Saves the style file and applies the styles from the file to the VI from which the tool was opened
- Maximize Window – Maximizes the tool window to full screen
- Close Tool – Closes the tool window
- Type Defaults – This tree contains a list of all supported controls and indicators, as well as their properties. For each item, there is the option to set a type default style. Each kind of control or indicator is listed with selectable properties below it. When a type default style is selected for that property, it will appear in the “Style” column. The default style is used when a style is applied to a VI and there are no specific style settings from the VI Styles tree.
- VI Styles – This tree contains a list of all controls and indicators on the front panel of the VI from which the tool was called. As with Type Defaults, each control and indicator is listed with selectable properties the user can choose a style for. The selected styles are particular to that UI element and override any type defaults for that type of control or indicator for that specific item.
- Color Selection – These two fields allow the user to choose a style for selected properties. The top dropdown shows all Named Colors. The bottom colorbox allows the user to pick a specific color. In both cases, clicking the checkmark button next to the field will select that color for the properties that are currently checked in the Type Defaults or VI Styles tree.
- Named Colors – This list allows the user to name certain colors for reuse, similar to a variable in code. The user can type a name into the list and then click the colorbox to select a corresponding color. The named color will then appear in the Color Selection dropdown menu for application to properties. When the user changes a named color’s value (e.g. changing from blue to pink), the next time the style file is applied to the VI, any properties linked to that named color will be updated with the new color value.
Once you are content with the styles chosen for controls and indicators, clicking the Save and Apply Styles button will refresh your UI with the new look. After that, you can close the tool and save your VI to keep the changes.
There are an incredible amount of customization options, so have fun with it!
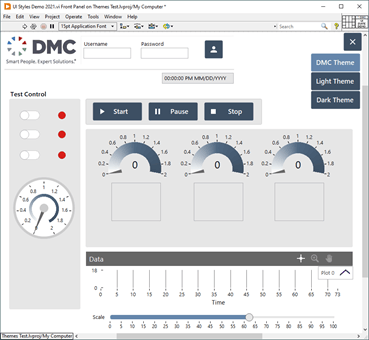
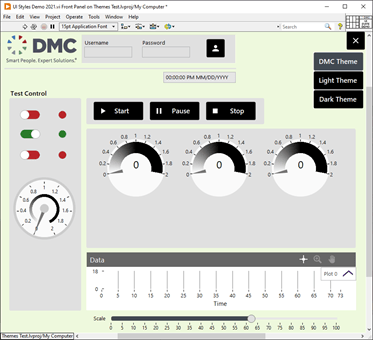

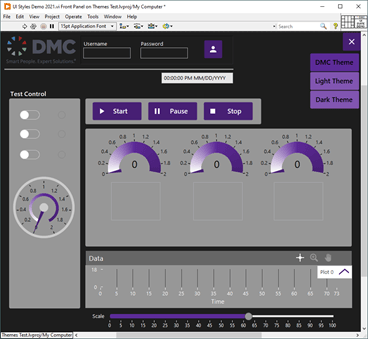
Example UIs with Various Themes
A lot of the time, it will make sense to update the style of a VI during edit time. However, there are cases where updating the style at runtime will be necessary. For example, if you want to switch an application from a dark theme to a light theme at runtime, you would want to use something programmatic instead of the Quick Drop tool. For this reason, the new DMC UI Styles Toolkit palette features APIs for use in your projects:
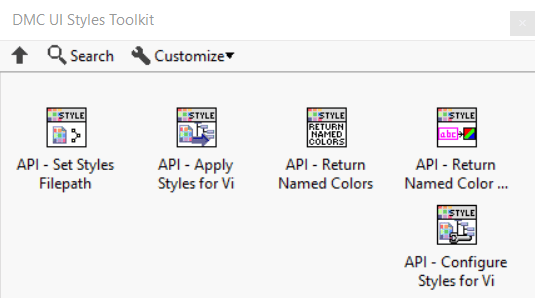
These APIs are designed to perform many of the same operations as the Style Configuration Tool, except programmatically.
Set Style Filepath
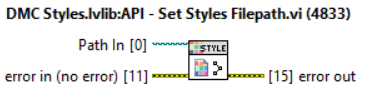
This VI programmatically changes the style file used by the Apply Styles for VI API. This VI performs the same operation as the Open Style File button in the Style Configuration Tool described above. If you’re feeling adventurous, you can change style files at different points in the program.However, it’s recommended to set the file on your application startup so VIs applying styles dynamically know what to reference.
Apply Styles for VI
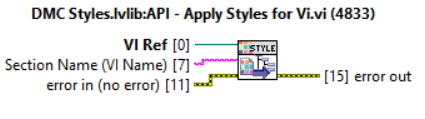
This function refreshes the style for a given VI, which is identical to the Save and Apply Styles button in the tool. It reads the styles from the style file you set via Set Style Filepath, rather than the one you’ve linked to the Quick Drop shortcut. Before placing it, make sure you’ve set the style file somewhere in your program. This function applies styles to whatever VI reference you pass into it.
Return Named Colors

This VI returns an array of all named colors in a style file. If you’re looking for specific color names, this is the way to get them. Additionally, it can be used to look up the actual colors using Return Named Color Value.
Return Named Color Value
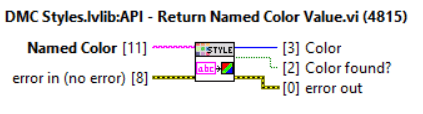
This VI inputs the name of any named color in the style file and determines whether the color exists, and if so, what its actual color value is. This is a way to use the style colors in other UI elements that aren’t covered by the toolkit, or to gain access to the colors directly in your program.
Configure Styles for VI

This VI is the exact same Styles Configuration Tool that’s launched from the Quick Drop toolkit! If you wanted your user to be able to customize the UI at runtime using the tool, this is the way to do it.
How Do I Get It?
The styles toolkit comes in the form of a VI package which you can download right here and install through VI Package Manager! We also recommend installing our DMC GUI Suite, which is used in both the toolkit and the demo UIs shown above.
Happy customizing!
Learn more about DMC's LabVIEW programming expertise and contact us to get started on your next project.