Creating a high-quality user interface that can run on embedded systems is a challenging task, and that’s doubly (or perhaps triply) true if it’s intended for an international user base.
As with any difficult job, however, it becomes much more manageable with the right tools. Read on to learn the basics of one such tool, LVGL, and its associated utilities.
Getting Started with LVGL
In order to develop with LVGL, it will need to be ported to your platform of choice.
First, pull the latest release of LVGL into a project configured for your target and create “lv_conf.h” from the included template. This file contains a variety of parameters for tweaking the library’s behavior, but they can be left at their default values for now. Add a call to lv_init to your program, ensuring it’s in a location where it will occur before any other LVGL functions are called.
Next, you will need to define drivers for the display showing your UI and any input devices used to interact with it. The specifics of these drivers will vary greatly from project to project, and LVGL already has excellent documentation on porting, so only the general structure will be covered here.
In simple cases, you will only need to allocate some memory to act as a draw buffer, define the resolution of the display, and implement a function to send the information LVGL places into the draw buffer to your screen. The example below shows a basic setup, but additional configuration options exist to implement things like double-buffering or screen rotation.
 static lv_color_t draw_buffer[SCREEN_HOR_RES * SCREEN_VER_RES / 10];
static lv_disp_drv_t disp_drv;
static lv_disp_draw_buf_t disp_buf;

void flush_buffer_callback(lv_disp_drv_t* disp_drv, const lv_area_t* area, lv_color_t* color_p);

lv_disp_t* lvgl_display_port_init()
{
    //configure any platform specific peripherals here

    //set up draw buffer
    lv_disp_draw_buf_init(&disp_buf, draw_buffer, NULL, SCREEN_HOR_RES * SCREEN_VER_RES / 10);

    //initialize display driver
    lv_disp_drv_init(&disp_drv);

    //configure display driver
    disp_drv.draw_buf = &disp_buf;
    disp_drv.hor_res = SCREEN_HOR_RES;
    disp_drv.ver_res = SCREEN_VER_RES;
    disp_drv.flush_cb = flush_buffer_callback;

    //set optional fields to customize display driver here

    //finalize driver setup
    return lv_disp_drv_register(&disp_drv);
}

void flush_buffer_callback(lv_disp_drv_t* disp_drv, const lv_area_t* area, lv_color_t* color_p)
{
    /* copy pixels from 'color_p' to the area of the screen described by 'area' */
}
Configuring an input device follows a similar process. Use lv_indev_drv_init to set up the driver, define its type, attach a function for reading its value, and register it using lv_indev_drv_register.
 static lv_indev_drv_t indev_drv;
void input_read(lv_indev_drv_t *indev_drv, lv_indev_data_t *data);

void lvgl_indev_port_init(void);
{
    //configure any necessary platform specific peripherals here

    //set up input device driver
    lv_indev_drv_init(&indev_drv);

    //configure input device driver
    indev_drv.type = LV_INDEV_TYPE_POINTER;
    indev_drv.read_cb = input_read;

    //finalize driver setup
    lv_indev_t* touch_indev = lv_indev_drv_register(&indev_drv);
}

void input_read(lv_indev_drv_t *indev_drv, lv_indev_data_t *data)
{
    /* Read location from input device (i.e. last touch location on a touchscreen) */

    /* Read state from input device (i.e. is a touchscreen currently being touched) */

    /* Store current location (x, y) and state (pressed, released) in 'data' */
}
With the display and input device drivers implemented, the final step is to create an environment for LVGL to run in. In simple applications, this might be an infinite loop at the end of main function, while more complex applications may utilize an RTOS (real-time operating system) and give LVGL its own thread. Many approaches will work as long as lv_tick_inc and lv_timer_handler are called periodically, with lv_tick_inc occurring at least as frequently as lv_timer_handler.
Note that LVGL functions are not inherently thread-safe or interrupt-safe; if using interrupts or an RTOS, utilize synchronization tools like mutexes or take care to limit calls to LVGL such that they cannot overlap.
With all of the above in place, LVGL should be ready to use.
Internationalization Tools
In addition to the base library, LVGL has several supplementary tools to aid in development. When creating a UI for an international user base, two such tools stand out as essential: LVGL’s internationalization library, which provides simple tools for text substitution, and LVGL's font converter, which allows a developer to parse glyphs from several fonts into a single file for use with LVGL.
For both of these tools, you will need node.js (at least version 14) and the package manager it comes bundled with (called npm). You can download them here. Sticking with the default installation options will work for the tools covered here.
After installing, ensure that both node.js and npm are added to your system PATH. Open command prompt, and install the font converter with npm i lv_font_conv -g and the internationalization library with npm i lv_i18n -g. Both tools should now be usable in your project.
lv_i18n
The process described below was adapted from the setup instructions provided with lv_i18n with notes from personal experience. For the original instructions, see the lv_i18n github.
Start off with a simple example, and wrap any text which will be translated in _( ). For strings containing plurals, _p( ) can be used instead to support languages with different pluralization rules from your base language. Include “lv_i18n.h” (this file doesn’t exist yet as it will be generated by the tool later) and, after initializing LVGL, call lv_i18n_init and lv_i18n_set_locale. The locale can be set to any language that you plan to support, and it can be changed any time that it’s safe to call an LVGL API function.
Next, create a folder to store translations, add a .yml file for each language you plan to support (including the language you are developing in), and title the files with language codes. Write the language code, followed by a colon, into the first line of each file (ex: Portuguese would have a file called “pt.yml”, and it’s first line would be “pt:”). Once your example is done, from a command prompt in your project, run the following (without angle brackets):
lv_i18n extract -s ‘<path to your source files>/*.+(c|cpp|h|hpp)’ -t ‘<path to your yml translations>/*.yml’
This will populate the translation files with a list of every string from your project wrapped in _( ). Next to each, add its translation in the language corresponding to the yml file it’s in. To implement these translations, run the following:
lv_i18n compile -t ‘<path to your yml translations>/*.yml’ -o ‘<path where you want lv_i18n.h to go>’
The output location of this command will receive lv_i18n.h and lv_i18n.c, which will contain all of your translations in a form that the tool can reference. It will need to be accessible by any file that calls _( ), so set up its location accordingly.
Now, your example should be ready to run. Any time that code containing a string wrapped in _( ) executes, the current locale will be checked and the string will be substituted for its translation in that locale. This is a simple, literal substitution, so anything referencing the string will be affected, not just LVGL functions. Additionally, if new text is added, you will need to run lv_i18n extract and lv_i18n compile again.
lv_font_conv
If one of your languages uses a script other than the Latin alphabet, you may notice missing characters when its translation is displayed. This is where the font converter comes in. Most fonts don’t describe a glyph for every Unicode character, so you will need to either find one that has all the characters you need or create one by splicing together a few fonts.
First, prepare a list of characters needed, or ranges of characters. Even if you have a font which contains all the characters needed, it’s likely that it also contains many that you don’t, and fonts take up a lot of space (especially physically larger ones; by default, LVGL stores them as byte arrays, and more pixels means more bytes).
Next, parse this list into a font converter call. Broadly, calls to the font converter are structured as a sequential list of font files, which characters to take from them, and then a few parameters to customize the output. Supply a path to the font file with --font, specify which characters to include from it with --range or --symbols, and repeat for each font to be included.
When adding characters, --symbols accepts a list of characters. Duplicates are ignored, so you can freely copy and paste everything from one language’s translation into this argument, but be careful to remove any spaces as they may be treated as the end of the argument. --range accepts a single Unicode value or a contiguous range of Unicode values. See Unicode ranges for reference. You can add as many --range and --symbols arguments as needed. Next, add the font size to generate with --size, the format with --format, the level of detail with --bpp, and a file path to output to with -o. The font converter github page has more details on each of these parameters.
Altogether, a call might look like the following:
lv_font_conv --font ARIALUNI.TTF
--range 0x0000-0x017F
--range 0x0400-0x04FF
--symbols КАСБОЙ
--font NotoSansArabic-Regulat.ttf
--range 0x0600-0x06FF
--range 0xFE70-0xFEFF
--size 10 --format lvgl --bpp 3 -o examplefont.c
Note that newlines and indentation are included for clarity, the only separator should be spaces since this is invoked from a command line. To that end, it’s helpful to store arguments in a text file, then parse them into calls in a script with something like bash’s mapfile command.
Once a font has been generated, it can be included in the project, declared with LV_FONT_DECLARE, and used the same as LVGL’s default fonts.
Common Challenges
What follows is a collection of some common challenges one might encounter when creating internationalized UIs, and some tips as to how they can be handled with the tools discussed here.
Base Direction
Languages vary in their base directions; English, for example, is a left-to-right (LTR) language, while languages using the Arabic script are right-to-left languages (RTL). LVGL has some built-in handling for different base directions, namely the base_dir style property.
When creating an object, it can be given a base direction with lv_obj_set_style_base_dir, or attaching a style with the property already set (by lv_style_set_base_dir). This will work in most cases, but, with strings containing both LTR and RTL languages, you may need to specify text direction manually. For this, one can use Unicode directional indicators. Including the following in your project will allow you to change direction within a string.
#define LRI "\xE2\x81\xA6"
#define RLI "\xE2\x81\xA7"
#define PDI "\xE2\x81\xA9"
LRI indicates left-to-right, RLI the opposite, and PDI (pop directional indicator) undoes the most recent indicator. Wrapping chunks of text in LRI/RLI … PDI can be thought of as splitting the overall string into substrings, with the base direction of the overall string governing the order these substrings will appear. As an example, if the following string were to be placed in a label with RTL base direction:
“<LRI>123<PDI> <RLI>456<PDI> <LRI>789<PDI>”
(note: angle brackets included for clarity), it would appear on screen as
“789 654 123”.
Note also that LVGL may output warnings for missing glyph descriptions when rendering strings containing these characters. They are zero-width characters and function correctly regardless of whether they are included in the font, so these warnings can be safely ignored or suppressed in lv_conf.h (though missing glyph warnings are very helpful when working with custom fonts).
Information Density
Languages vary in information density; three Chinese characters might convey the same information as twenty Latin ones in English or thirty in Spanish. As such, it’s helpful to leave extra space in screen layouts for languages less dense than the one being used for development.
When this isn't possible, however, one can also use LVGL’s long text handling. Calling lv_label_set_long_mode will allow the developer to specify whether a label with text that does not fit in its width scrolls, wraps, or is cut off (optionally ending the displayed text with “…”) . Make sure to set the width of the label after calling this function.
In cases where built-in long modes are not desirable, another option is to decrease font size. Using lv_txt_get_size to check whether a string will fit in a space with a given font, it’s possible to implement automatic font scaling (though the exact process will vary greatly from UI to UI depending on the desired behavior).
Inserting Variables into Translated Text
One common use of text in a UI is to provide context for numerical information, which is complicated by the fact that translations need to be compiled beforehand. Thankfully, there’s a simple solution. As mentioned before, lv_i18n’s translation function _( ) is a simple, direct replacement. This means that the translated string can be used with basic C text functions, namely snprintf. Including “%s” (or other format codes) in both the initial string and its translations will allow values to be inserted into the string by code after translation. When using this method, take care to allocate enough space in the buffer passed to snprintf for your longest translation.
When a string contains multiple variable values, they can appear in different orders from language to language. This can be solved with either clever translation to keep fields in the same order, or by tracking which language is active and supplying arguments to sprintf in the corresponding order.
Duplicate words
Languages often have words that mean several different things. As an example, an English UI might include the string “set” in multiple places, some using the word as a verb, others as a noun. These words don’t necessarily line up between languages, so the string “set” would likely need two translations in other languages. lv_i18n can only attach one translation to each original string per language, so this may initially seem like a significant issue, but the tool is perfectly capable of handling these situations.
lv_i18n creates a lookup table for each language, mapping strings to other strings. The initial, untranslated strings scraped from your file are really just IDs to search translations by, and you can supply corresponding “translations” for them in your base locale (development language) just like any other language.
Returning to the previous example with the word “set”, you can change the strings in your code to “set (v)” and “set (n)” and re-run lv_i18n extract. In the yml files belonging to other languages, fill in the translation for "set" as a noun next to “set (n)” and "set" as a verb next to “set (v)”. In “en.yml”, just place the word “set” next to both.
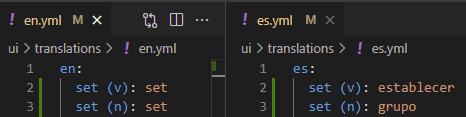
Re-run lv_i18n compile. Running the program in English, you should still see “set” everywhere, but changing the language will now show different translations for different uses of “set”.
Learn More about DMC's Embedded User Interface Design services and contact us today for your next project.