Introduction
In application development, projects require various depths of involvement. Some projects may need you to interconnect a bunch of trendy frameworks and open-source libraries, while other projects will require full-scale development in a lesser-known framework not even designed for the task at hand. A framework that is particularly interesting to work with that occasionally lacks proper documentation is PySide.
I’ve had an opportunity to explore some image rendering capabilities of the framework and would like to share some tips and best practice standards for your custom application.
Image Provider
Before we dive deeper into the topic, I want to note that I am using PySide6, and the image provider lives under PySide6.QtQuick.
Here is a decent, thorough documentation page on the QQuickImageProvider that you may wish to examine to gain a better understanding of the concept.
The primary purpose of the image provider is to allow the application to render images from sources other than the standard files. Good examples of such sources are the in-memory data and dynamically generated images.
If you simply need to render a pre-existing image in a common format, then I highly recommend looking into the native QML Image component capabilities.
Setup
Disclosure: code casing might be inconsistent with what you are used to in Python, but I tried incorporating both QML and Python standards where applicable.
- camelCase – function names (QML/C++ – inherited function override + consistency)
- PascalCase – objects (QML/C++ – inherited base class + consistency)
- snake_case – variables (Python – standard)
To begin custom image provider implementation, you have to instantiate your image provider class that inherits PySide6.QtQuick.QQuickImageProvider.
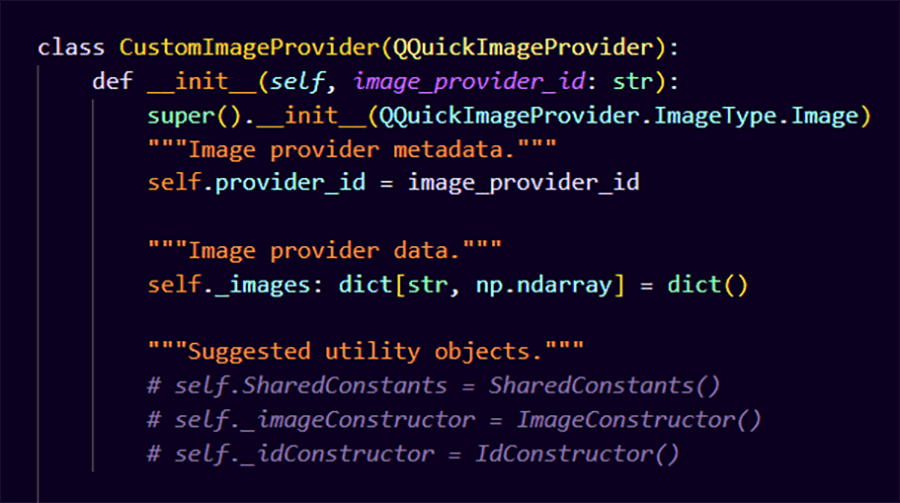
Image 1. custom image provider definition
1 2 3 4 5 6 7 8 9 10 11 12 13 | class CustomImageProvider(QQuickImageProvider):
def __init__(self, image_provider_id: str):
super().__init__(QQuickImageProvider.ImageType.Image)
self.provider_id = image_provider_id
self._images: dict[str, np.ndarray] = dict()
|
Notice that I created a public property provider_id. You do not technically need it, but I highly recommend introducing one, especially if you are anticipating multiple image provider instances. For example, I worked on an app that required multiple tabs to be open in parallel, each with access to an image provider. Since each tab needed its own library of custom images, with image IDs not necessarily globally unique, I had to instantiate a unique image provider per tab to avoid data conflicts. The provider_id really helps identify which image provider to use and, more importantly, which image provider can be cleared out for garbage collection purposes as the tab closes.
You also need to create a data structure to hold your images. A dictionary has the convenience of id-data mapping. QML will always request an image using a string id and mapping hashable string ids to image data sounds like a perfect opportunity to use a dictionary. To avoid any unexpected behavior, I recommend instantiating the data structure as an internal property and, thus, I called it simply _images.
In the comments I am also suggesting the usage of the following objects:
- SharedConstants – implement to store and use constants that are shared across the application. Remember, if anything is used in both QML and Python and is ultimately hardcoded, then you should instantiate it as a shared constant, and that constant could be used by both QML and Python. Otherwise, any change to a hardcoded value will become a living nightmare of chasing down all the instances of that value in the code. Remember, you cannot easily, if at all, debug QML.
- ImageConstructor – use this class to define functions that could be used to construct pixel data that would be stored in the _images data structure.
- IdConstructor – use this class to define functions that could be used to construct ids that would be used to store data in the _images data structure.
Method Override
QQuickImageProvider has requestPixmap, requestImage and requestTexture that you can override to implement your custom functionality. Each method’s signature is similar to the others, so I will focus on the requestImage method as I have worked with it the most.
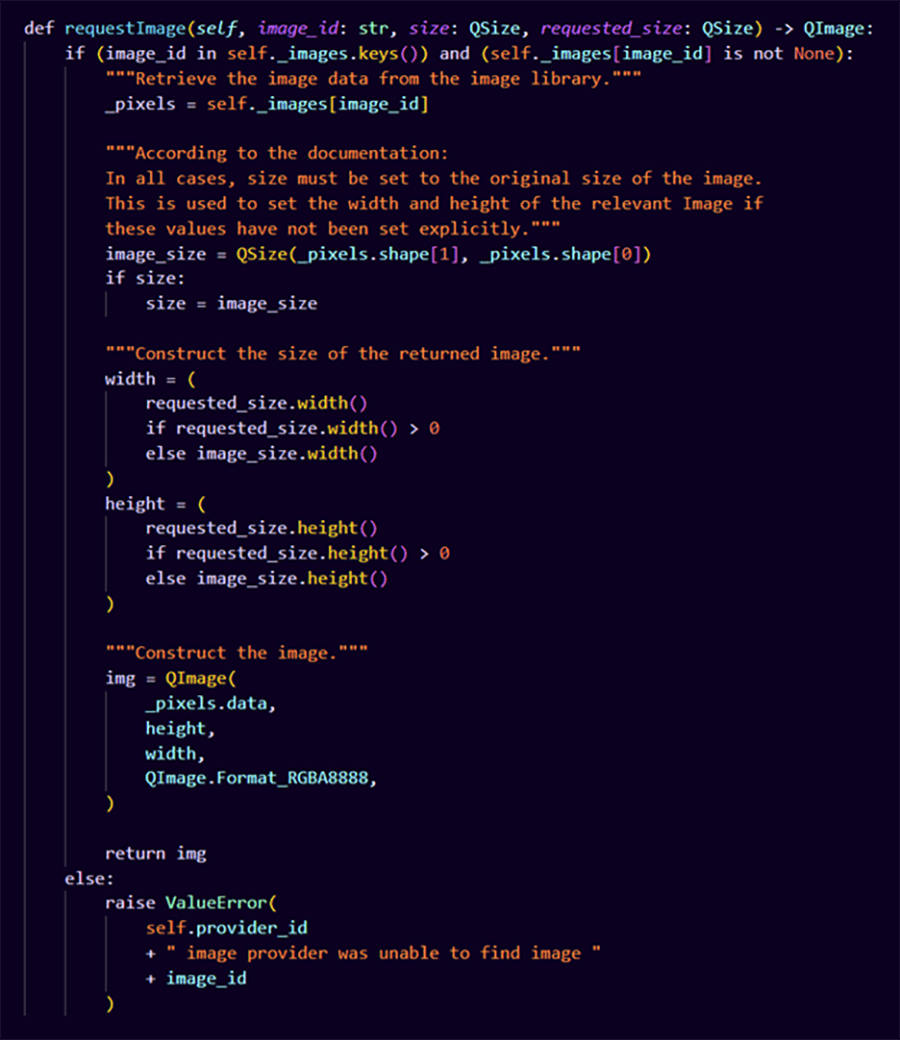
Image 2. requestImage override
1 2 3 4 5 6 7 8 9 10 11 12 13 14 15 16 17 18 19 20 21 22 23 24 25 26 27 28 29 30 31 32 33 34 35 36 37 38 39 40 | def requestImage(self, image_id: str, size: QSize, requested_size: QSize) -> QImage:
if (image_id in self._images.keys()) and (self._images[image_id] is not None):
_pixels = self._images[image_id]
image_size = QSize(_pixels.shape[1], _pixels.shape[0])
if size:
size = image_size
width = (
requested_size.width()
if requested_size.width() > 0
else image_size.width()
)
height = (
requested_size.height()
if requested_size.height() > 0
else image_size.height()
)
img = QImage(
_pixels.data,
height,
width,
QImage.Format_RGBA8888,
)
return img
else:
raise ValueError(
self.provider_id
+ " image provider was unable to find image "
+ image_id
)
|
Each of the three methods requires a signature that includes image_id, size and requested_size. It is okay to rename those input variables, but the typing must remain the same. Nevertheless, I do not recommend changing the names.
- image_id – the string ID of the image by which you will be looking up the pixel data in the defined _images data structure.
- size – is not technically used for anything in the Python implementation of the image provider. According to the official documentation: “In all cases, size must be set to the original size of the image. This is used to set the width and height of the relevant Image if these values have not been set explicitly.” This is a remnant of the C++ framework. This variable is passed into this method by reference and must be updated. Every other input is passed in by value.
- requested_size – the size of the Image component in QML that requested the image from the custom image provider.
The return value of the overridden method must be a properly constructed QImage that QML will be able to display in the application. Notice that the first input for the QImage constructor is a buffer object pointing to the start of the array’s data. This is also a C++ memory management quirk that Python has to deal with. The format also plays a big role in image rendering. The current QImage.Format_RGBA8888 decodes the given data array as though there are four 8-bit unsigned integers for red, green, blue, and alpha channels per pixel. This is crucial, since, if you provide the wrong array type, the displayed image will either be incorrect or won’t show up at all. QML will not throw an error, so you might spend a lot of time trying to figure out why your image is not rendering. A friend of mine told me this, I am certainly not speaking from experience…
The sizing of the image is another topic for discussion. Depending on your implementation, you might want to keep the original size of the image in any rendering case, or, on the contrary, you might always want to resize the image to the window size. Sometimes, you might need to implement the sizing so that it is dynamic and dependent on the window state/size. Basically, what I am saying is that the sizing implementation in the code above is subject to change depending on your application needs; however, you must assign the current image original size to the passed by reference size variable.
Data Management
Now that we’ve implemented the basic image provider functionality, we have to develop data management capabilities. Image data must be somehow stored in the image provider, and, since the data structure _images was defined internally, we have to define functions that will allow insertion of the new data into the dictionary as well as its removal.
It is also important to implement data validation code that could be broken down into helper functions. This is where you make sure that the data provided for addition could be displayed using the defined QImage format.
You can also include some of your data manipulation and ID construction code. Basically, this is the perfect opportunity to get the best use out of your predefined ImageConstructor and IdConstructor objects. You still have to make sure that the data on the output is suitable for the defined QImage format.
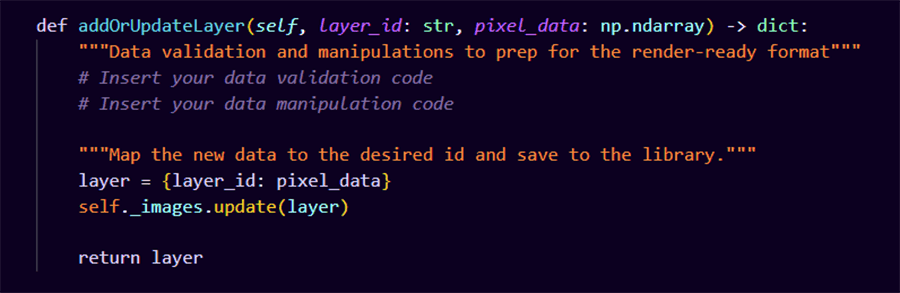
Image 3. main image provider management function
The following implementation is an example of how you can develop the data removal functionality.

Image 4. supplemental management function
1 2 3 4 5 6 7 8 9 10 11 12 13 14 | def addOrUpdateLayer(self, layer_id: str, pixel_data: np.ndarray) -> dict:
layer = {layer_id: pixel_data}
self._images.update(layer)
return layer
def removeLayer(self, layer_id: str) -> None:
del self._images[layer_id]
|
Helper Functionality
I highly recommend keeping your custom image provider as lightweight as possible for scaling and maintainability purposes; however, you may still want to implement some basic helper functions like:
- isIDTaken – to check whether a given ID already exists in the image provider to avoid overriding stored data.
- isImageLoaded – to check whether the data is present in the data structure before querying it.
- clearImageProviderInstance – to manage the memory that the image provider occupies.
Example implementation for each is presented below:
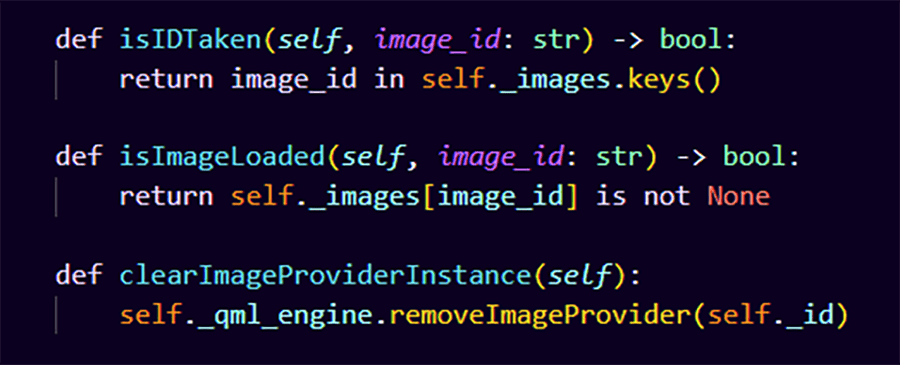
Image 5. supplemental image provider functionality
1 2 3 4 5 6 7 8 | def isIDTaken(self, image_id: str) -> bool:
return image_id in self._images.keys()
def isImageLoaded(self, image_id: str) -> bool:
return self._images[image_id] is not None
def clearImageProviderInstance(self):
self._qml_engine.removeImageProvider(self._id)
|
In Action
The following code snippets do not require much explanation but are a good starting point in learning how to use the custom image provider in the scope of any application. Note, we must add an image provider to the application engine.
Since we defined the image provider class with a unique ID property, you must provide one to each image provider you insert into the application. Keep in mind that QML engine requires you to provide a unique ID in the first place, so you should just store that ID in the image provider itself.
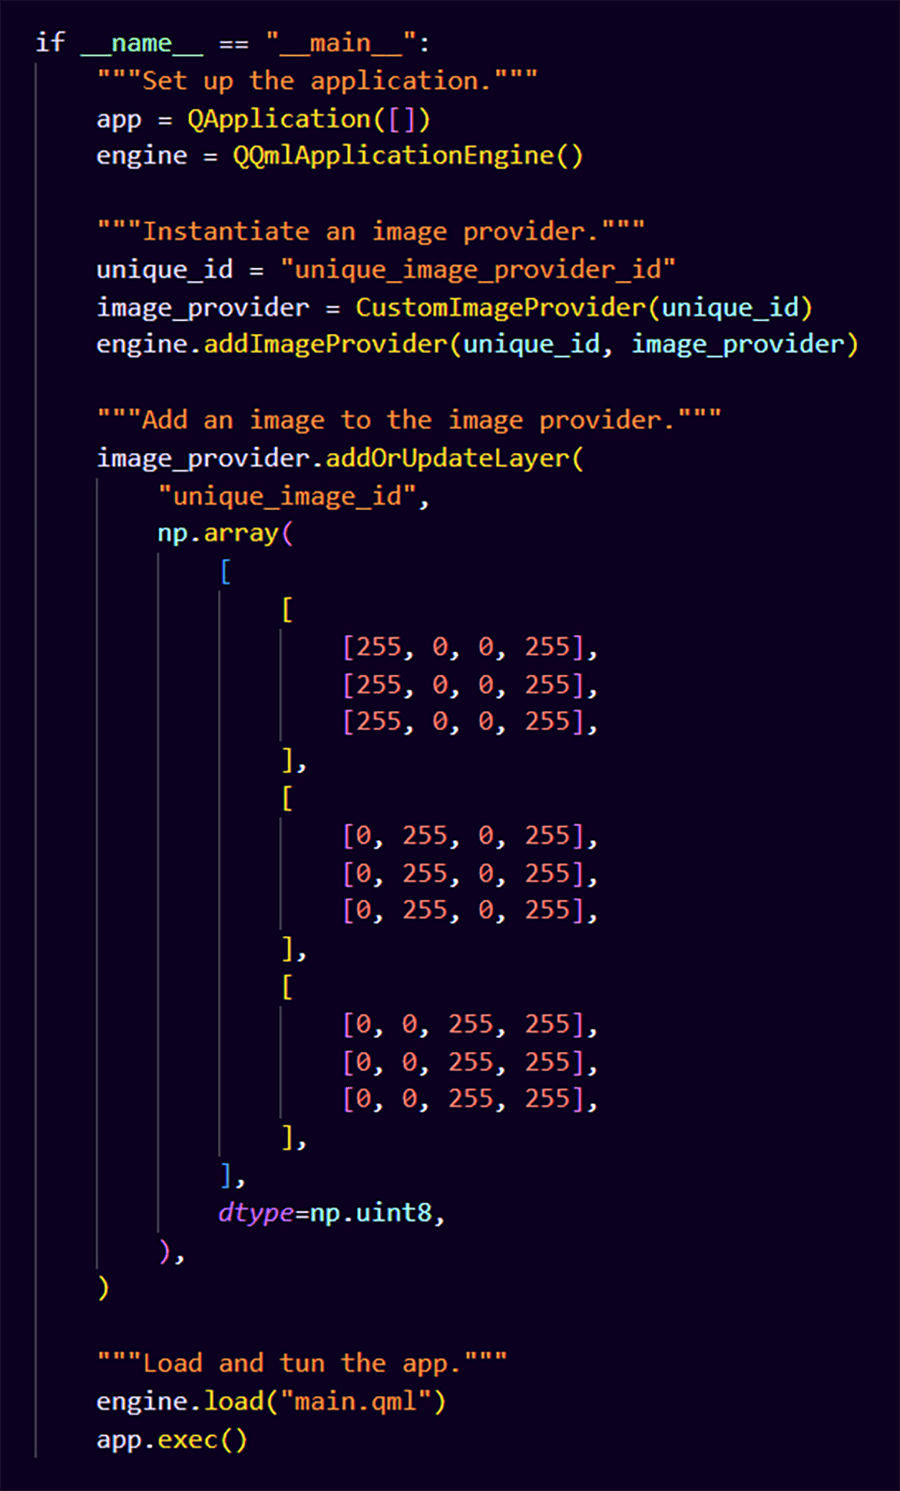
Image 6. image provider usage in an example
1 2 3 4 5 6 7 8 9 10 11 12 13 14 15 16 17 18 19 20 21 22 23 24 25 26 27 28 29 30 31 32 33 34 35 36 37 38 | if __name__ == "__main__":
app = QApplication([])
engine = QQmlApplicationEngine()
unique_id = "unique_image_provider_id"
image_provider = CustomImageProvider(unique_id)
engine.addImageProvider(unique_id, image_provider)
image_provider.addOrUpdateLayer(
"unique_image_id",
np.array(
[
]
[255, 0, 0, 255],
[255, 0, 0, 255],
[255, 0, 0, 255],
[,
]
[0, 255, 0, 255],
[0, 255, 0, 255],
[0, 255, 0, 255],
[,
]
[0, 0, 255, 255],
[0, 0, 255, 255],
[0, 0, 255, 255],
[,
],
dtype=np.uint8,
),
)
engine.load("main.qml")
app.exec()
|
According to the code above, the example image we are defining has a 3-pixel height and a 3-pixel width. It’s a square of three colored stripes: red, green, blue with full opacity (4th alpha channel).
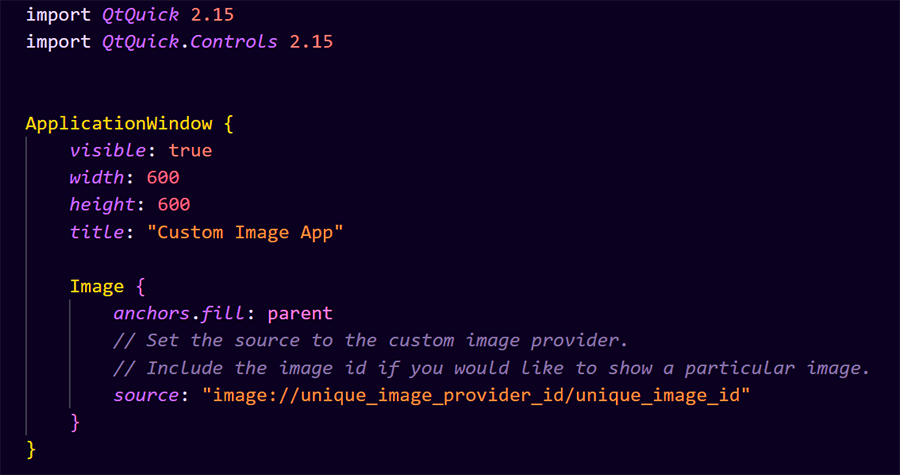
Image 7. example QML code
1 2 3 4 5 6 7 8 9 10 11 12 13 14 15 16 | import QtQuick 2.15
import QtQuick.Controls 2.15
ApplicationWindow {
visible: true
width: 600
height: 600
title: "Custom Image App"
Image {
anchors.fill: parent
// Set the source to the custom image provider.
// Include the image id if you would like to show a particular image.
}
}
|
I am choosing to keep the QML code fairly simple and straightforward. This code snippet does not necessarily follow any coding standards, but rather serves as a quick and dirty playground to show off some custom image provider capabilities.
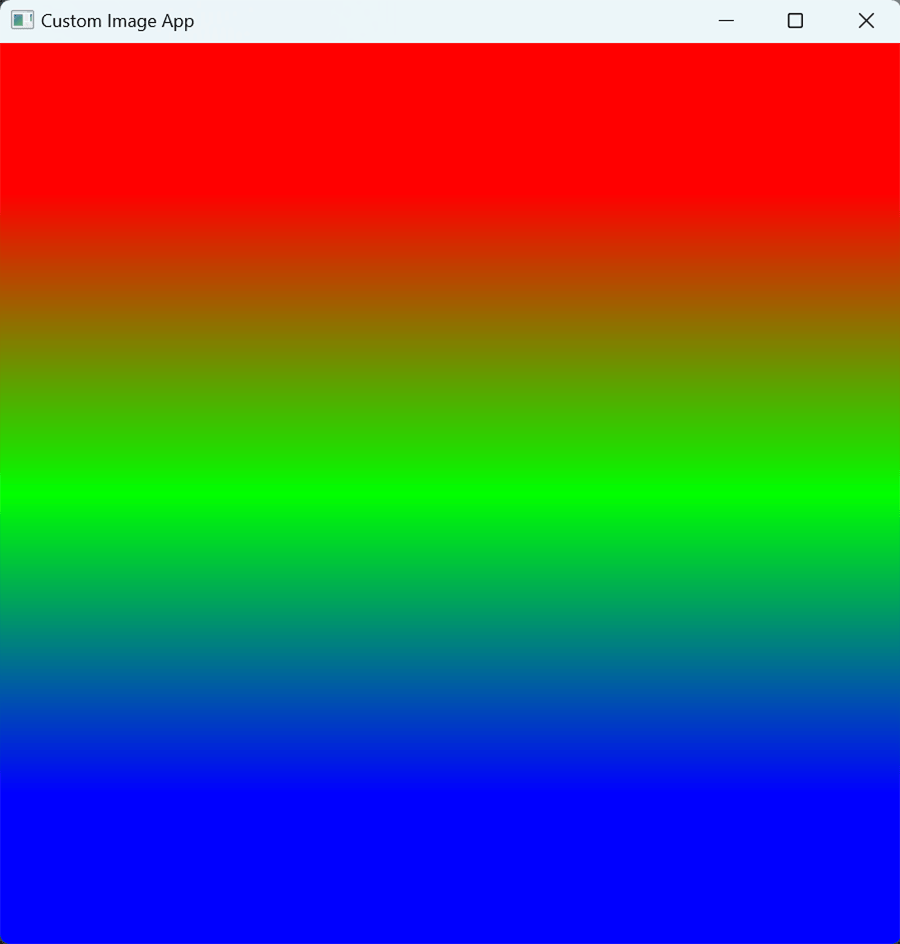
Image 8. produced result
The produced result is just as we expected, a stretched out 3x3 pixel image! Notice that the Image component anchors onto its parent, so the requestedSize will be inherited from the ApplicationWindow component size.
We could also set the requestedSize manually in QML. This way, the size of the constructed image will not change dynamically with the ApplicationWindow.
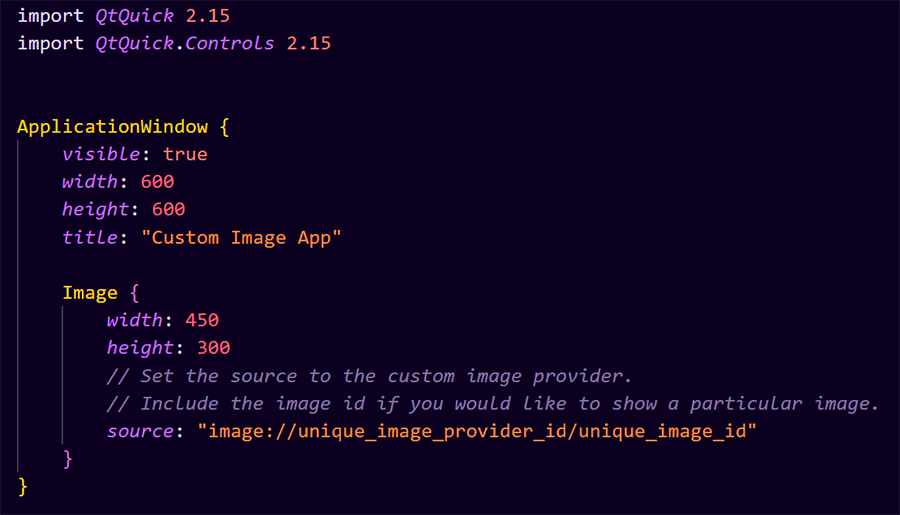
Image 9. example of setting the image size manually
1 2 3 4 5 6 7 8 9 10 11 12 13 14 15 16 17 | import QtQuick 2.15
import QtQuick.Controls 2.15
ApplicationWindow {
visible: true
width: 600
height: 600
title: "Custom Image App"
Image {
width: 450
height: 300
// Set the source to the custom image provider.
// Include the image id if you would like to show a particular image.
}
}
|
Notice the difference in the newly rendered result:
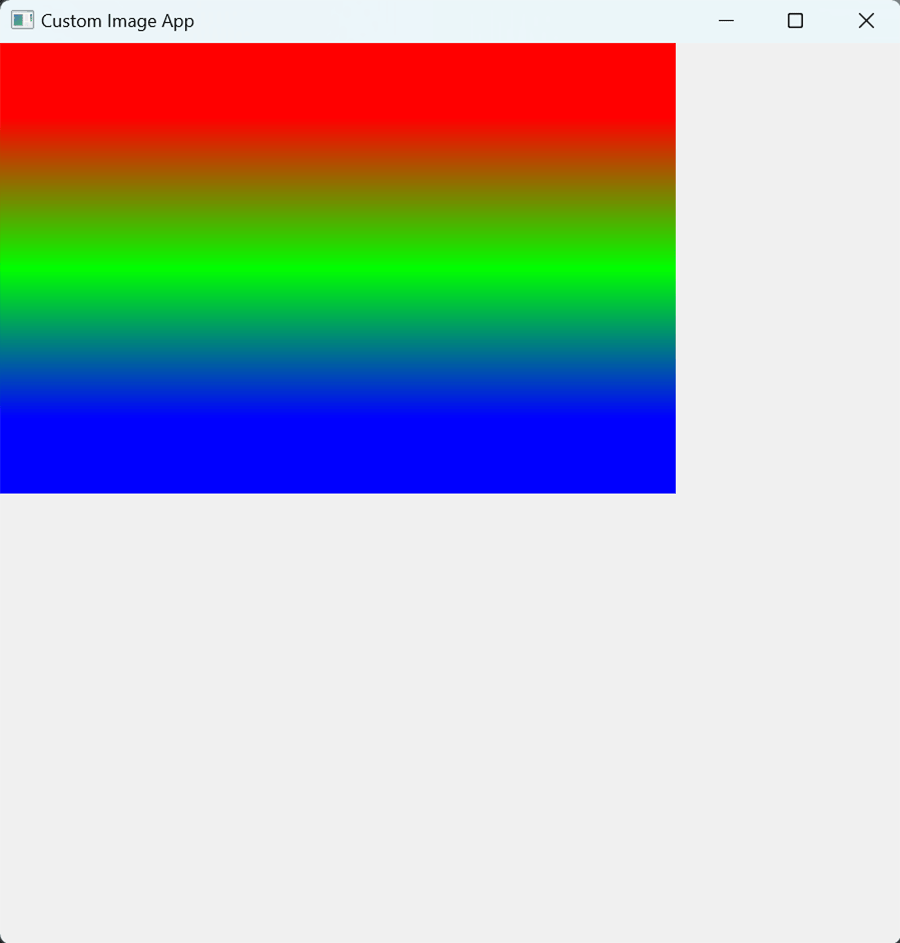
Image 10. result of setting the image size manually
Alternative Setup
A less recommended, but valid nonetheless, implementation is to let the custom image provider insert itself into the application upon instantiation.
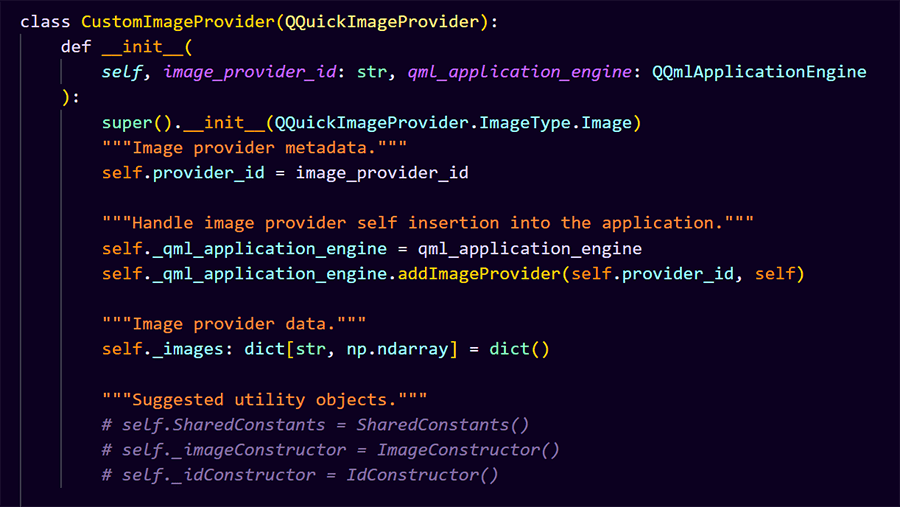
Image 11. alternative custom image provider definition
1 2 3 4 5 6 7 8 9 10 11 12 13 14 15 16 17 18 19 | class CustomImageProvider(QQuickImageProvider):
def __init__(
self, image_provider_id: str, qml_application_engine: QQmlApplicationEngine
):
super().__init__(QQuickImageProvider.ImageType.Image)
self.provider_id = image_provider_id
self._qml_application_engine = qml_application_engine
self._qml_application_engine.addImageProvider(self.provider_id, self)
self._images: dict[str, np.ndarray] = dict()
|
The following is an example of such an image provider in action.
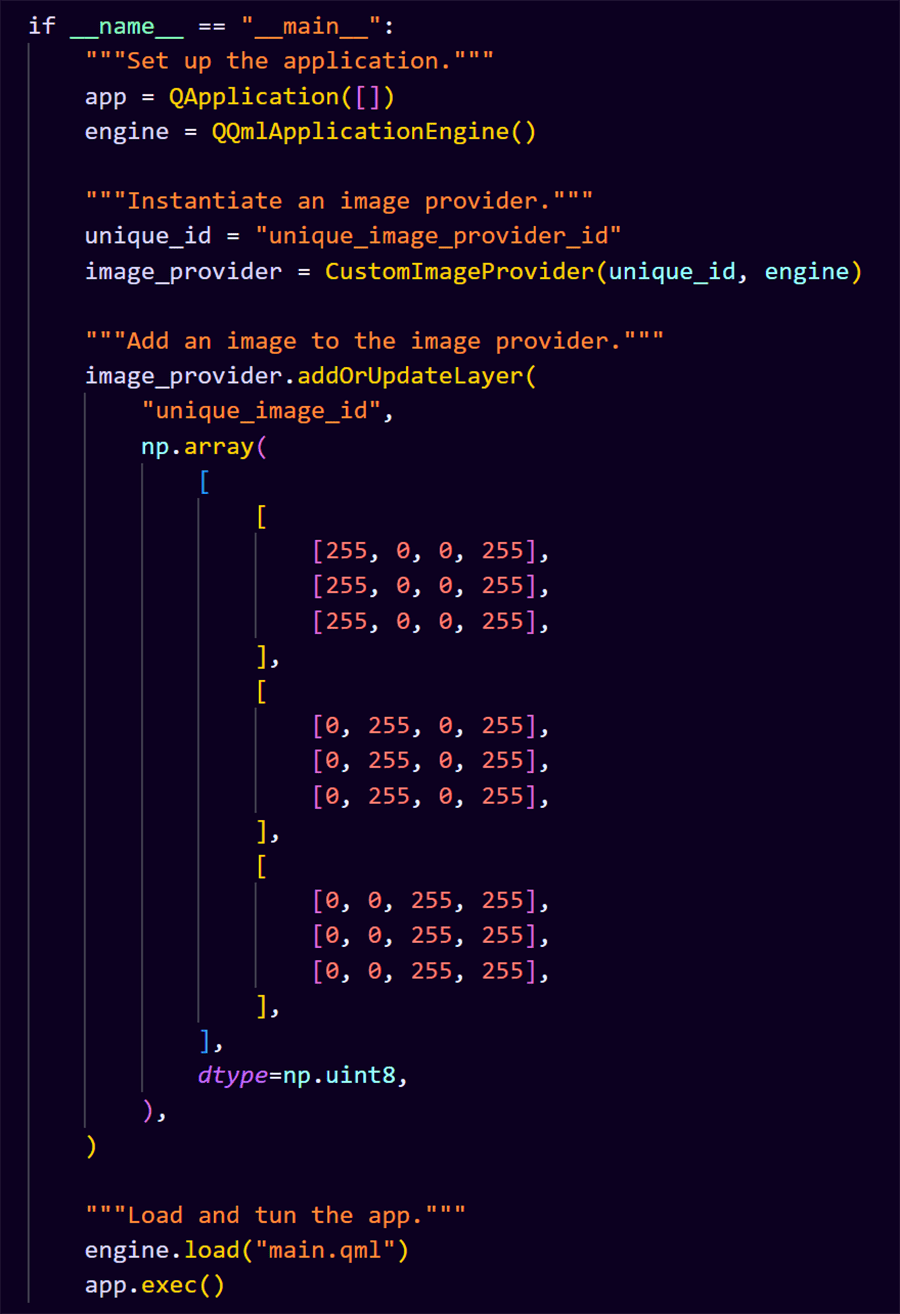
Image 12. example usage of the alternative custom image provider
1 2 3 4 5 6 7 8 9 10 11 12 13 14 15 16 17 18 19 20 21 22 23 24 25 26 27 28 29 30 31 32 33 34 35 36 37 | if __name__ == "__main__":
app = QApplication([])
engine = QQmlApplicationEngine()
unique_id = "unique_image_provider_id"
image_provider = CustomImageProvider(unique_id, engine)
image_provider.addOrUpdateLayer(
"unique_image_id",
np.array(
[
]
[255, 0, 0, 255],
[255, 0, 0, 255],
[255, 0, 0, 255],
[,
]
[0, 255, 0, 255],
[0, 255, 0, 255],
[0, 255, 0, 255],
[,
]
[0, 0, 255, 255],
[0, 0, 255, 255],
[0, 0, 255, 255],
[,
],
dtype=np.uint8,
),
)
engine.load("main.qml")
app.exec()
|
Notes and Tips
- Keep your image provider lightweight. Put all the functionality you think is relevant to it somewhere else, because chances are, it is not. The image provider should really be treated as a data structure that has functionality only to store and remove images.
- Make your image provider usable in every place of your application. Avoid putting select-component/window-only functionality in here.
- This implementation will also likely work in PySide2 since that is where I originally developed it.
Learn more about Resizing UIs with QML Layouts and contact us today for your next project.