How to Configure NextGen Archiving in WinCC OA to use a Microsoft SQL Server
This two-part blog series is intended to be a step-by-step overview on how to set up and utilize an MS SQL Server and WinCC OA’s NextGen Archive (NGA). Information for a general setup exists via the WinCC OA Documentation (see Further Reading/Links), but this walkthrough aims to be more detailed and explicit in the necessary steps.
- How To Create a Microsoft SQL Server Install for NextGen Archiving
- How to Configure NextGen Archiving in WinCC OA to use Microsoft SQL Server
Table of Contents:
- Notes/Prerequisites
- WinCC OA
- 2.1 Project Setup
- 2.2 NGA Configuration
- 2.3 Archive Group Configuration
- 2.4 DPE Archive Configuration
- 2.5 Data Retrieval
- Further Reading/References
1. Notes/Prerequisites
Required programs
This demo was implemented using:
- WinCC OA 3.18 P006
- Microsoft SQL Server 2022 Express
- NOTE: Other versions of MS SQL may work with NGA, but it has not yet been verified by DMC.
- Microsoft SQL Server Management Studio 18
- Windows 11
Assumptions:
- Proper licensing for NGA is configured.
- The OS user has Windows administrator privileges.
2. WinCC OA
Back to Table of Contents
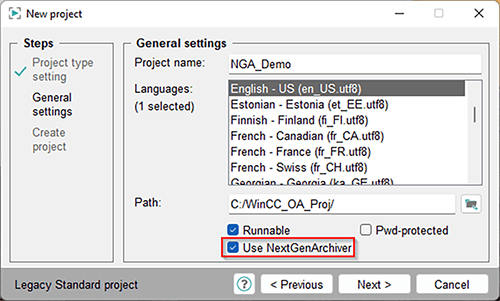
- Create a new project with NGA configured.
- When creating a new project, proceed with the project setup as normal.
- Under the “General Settings” step, ensure that the Use NextGenArchiver option is selected.
- For this demo, I’m creating a project titled NGA_Demo located in the “C:/WinCC_OA_Proj” directory.
If converting an existing project from HDB/RDB to NGA, then follow these steps in the “Converting existing project to NextGen Archiver Project” section: NGA Notes and Restrictions.
Back to Table of Contents
It’s time to fire up OA and open GEDI.
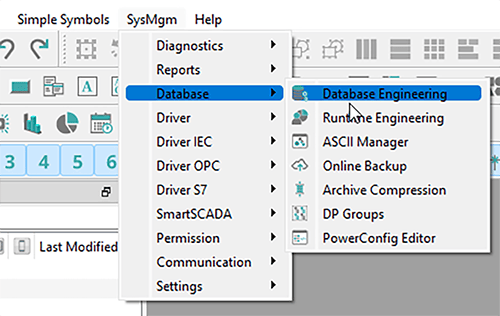
- Create new back-end.
- Navigate to the “Database Engineering” window via “SysMgm/Database/Database Engineering”.
- Under the “Backend list”, click the + icon (Add new backend).
- Name the Backend a user-friendly name.
- I used the title MSSQLEXPRESS.
- NOTE: The Backend name does not need to match the server name, so use a name that makes most sense for your application.
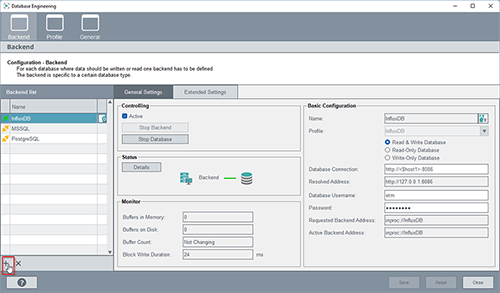
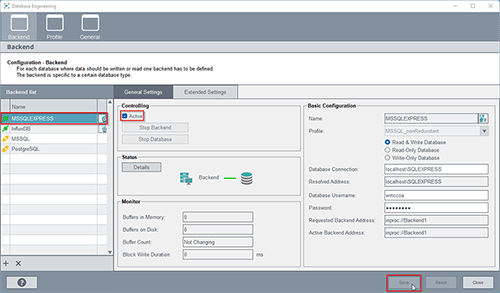
2. Configure the MS SQL Backend “General Settings – Basic Co nfiguration”.
- Specify the following parameters:
|
Parameter
|
Value
|
|
Name
|
<User-friendly backend name>
|
|
Profile
|
MSSQL_nonRedundant
|
|
Database Connection
|
<host>/<SERVER NAME>
|
|
Database Username
|
<winccoaUsername from db.windows.config>
|
- NOTES:
- The Profile option cannot be changed later.
- If using a redundant server, use the MSSQL option for Profile.
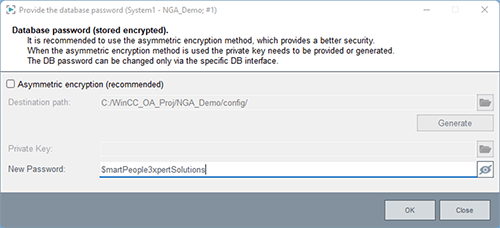
- Don’t worry about specifying the Password, the field will clear upon initial configuration saving.
- Click the Password field, enter the winccoaPassword from db.windows.config, and click OK.

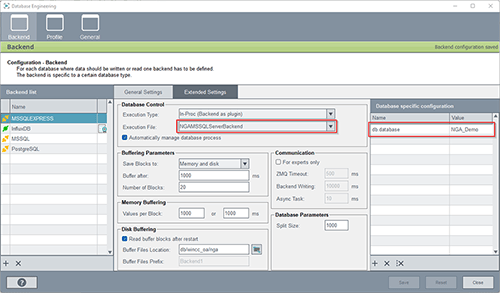
3. Configure the MS SQL Backend “Extended Settings”.
- Specify the following parameters:
|
Parameter
|
Value
|
|
Database Control/ Execution File
|
NGAMSSQLServerBackend
|
|
Database specific configuration/db.database
|
< dbName from db.windows.config>
|
4. Finish MS SQL Backend setup
- Select the Active option.
- Click Save.
Back to Table of Contents
Now that the database connection has been established, we can set up Archive Groups.
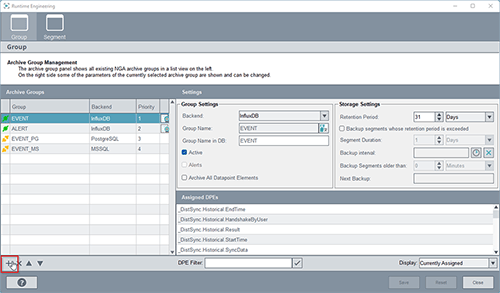
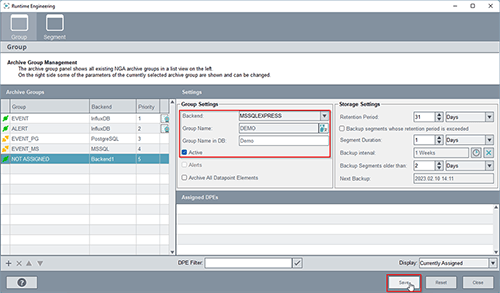
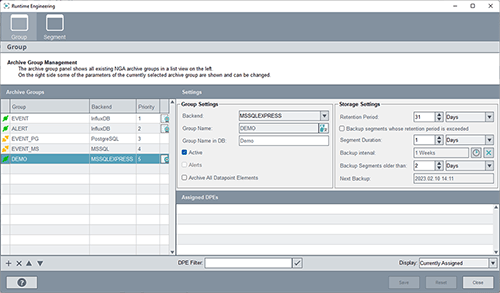
- Create new archi ve group
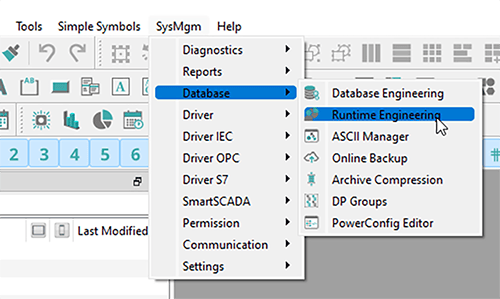
- Navigate to the “Runtime Engineering” window via “SysMgm/Database/Runtime Engineering”.
- Under the “Archive Groups”, click the + icon (Add a new group).
- Name the Archive Group.
- I used the title DEMO.
- Ensure the Active option is selected.
- Configure the “Storage Settings” section as desired.
- Click Save.
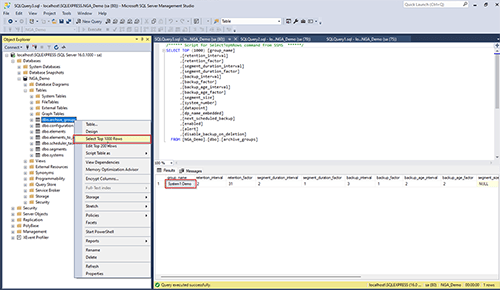
2. Verify SQL Archive Group Creation
- Open Microsoft SQL Server Management Studio.
- Right click dbo.archive_groups and select the Select Top 1000 Rows option.
- The new archive group should be visible in the “Results” section.
Back to Table of Contents
Now that we’ve created an archive group, we can apply the archive group to a DPE so that its historical data can be logged and tracked.
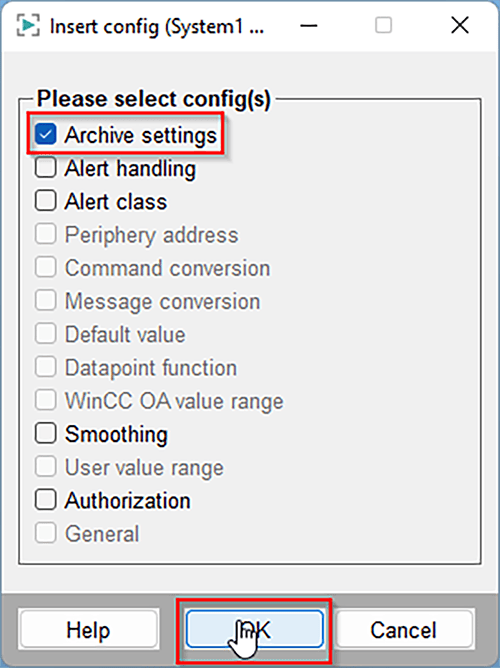
- Insert _archive config
- Within PARA, right click the target DP or DPE and select the Insert config option.
- Select Archive settings.
- Click OK.
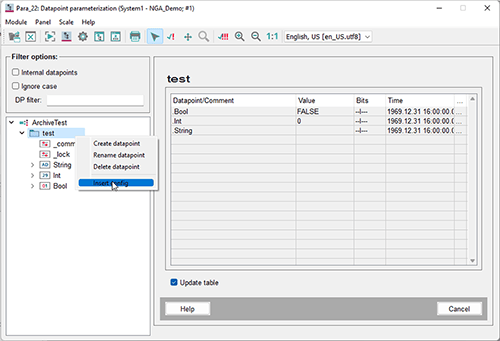
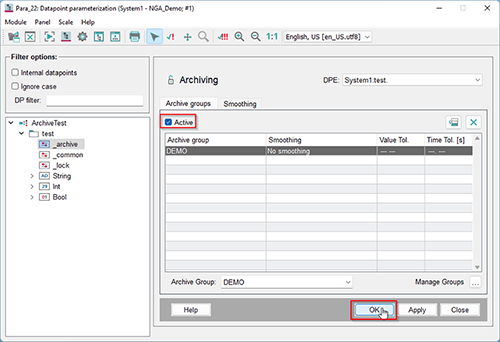
2. Select archive group
- Underneath the target DP/DPE, select the new _archive option.
- Select the desired archive group in the “Archive Group” drop-down.
- Ensure the Active option is selected.
- Click OK.
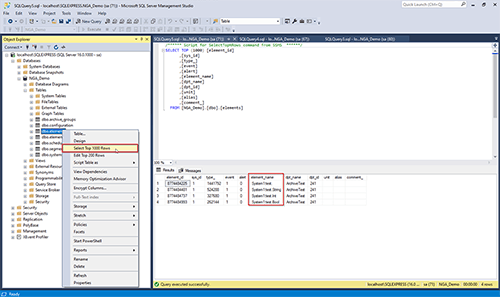
3. Verify SQL Archive Group Application
- Open Microsoft SQL Server Management Studio.
- Right click dbo.elements and select the Select Top 1000 Rows option.
- The newly configured DPE(s) should be visible in the “Results” section.
Back to Table of Contents
Now that DPEs have been configured with archiving capabilities, we can now retrieve DPEs’ historical data.
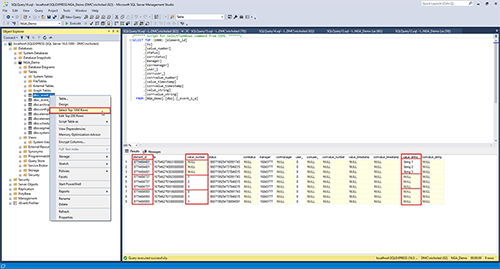
- Verify SQL DPE Archiving.
- Open Micorosft SQL Server Management Studio.
- Right click dbo.event_<segment_id>_a and select Select Top 1000 Rows.
- The segment_id for each archive group can be found in the dbo.segments table.
- If values have been changed since archiving was configured, entries should be visible in the “Results” section.
2. Retrieve historical data.
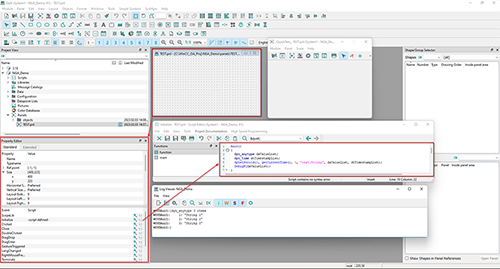
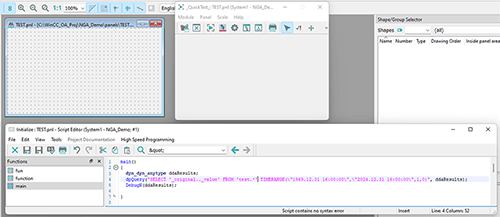
- The WinCC OA functions dpGetPeriod() and dpQuery() can be used to retrieve historical data.
- The two examples below demonstrate a test panel running each of the two aforementioned functions and printing the results to the Log Viewer.
- The returned data should reflect that viewed in the Micorosft SQL Server Management Studio tables.
- Be sure to understand your server’s backup and retention policy to determine what data and how much historical information can be accessed.
NOTE: For help writing SQL queries, use the SQL Panel found in SysMgm/Reports/SQL-Query

3. Further Reading/References
Learn more about our Manufacturing Automation and Intelligence expertise and contact us for your next project.
Comments
There are currently no comments, be the first to post one.