The previous entry in this series went over the Station function block. Stations are excellent at holding movers while an operation is performed on their payload. Stations require a mover to stop at the station before continuing along, but what if we wanted to adjust our mover’s behavior while it’s still moving? That’s what position triggers are for. This blog will go over the PositionTrigger function block that comes with the base starter project. We will see how to configure the position triggers properly and what methods we have at our disposal to use with our system.
This blog will continue to use the Beckhoff XTS_Base GitHub and the large XTS starter kit.
Beckhoff XTS Series
Position Triggers
Position triggers are defined positions along the XTS track that know when movers pass by. This can allow for on-the-fly redirections or changes in velocity.
Declaring a Position Trigger
In MAIN, in the variable declaration we already have an array of position triggers defined with the line
PositionTrigger : ARRAY[0..2] OF PositionTrigger;
This defines 3 position triggers to use. If you want to use more, you can increase the array bounds. It’s also likely worth using a global constant similar to how the stations are defined.
Configuring Position Triggers
The existing starter project already has 3 position triggers configured, shown below.
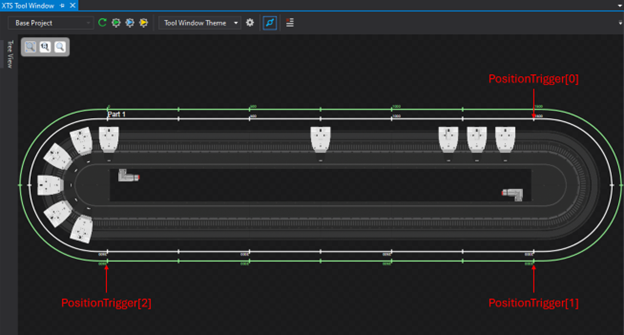
Similarly to the stations, the position definition for these position triggers is in the MS_INTIIALIZING_OBJECTIVES section of the MAIN state machine, which is at line 115.
PositionTrigger[0].Position := 1500;
PositionTrigger[1].Position := 2000;
PositionTrigger[2].Position := 3500;
We can see that the position triggers are given positions (in mm) around the track that line up with the picture above. Changing these positions will change where along the track the position triggers exist.
These position triggers also have CyclicLogic methods that must be called every scan and are already called for us at line 419.
PositionTrigger[0].Cyclic();
PositionTrigger[1].Cyclic();
PositionTrigger[2].Cyclic();
If you add more position triggers, make sure to call their CyclicLogic methods as well.
The stations also make sure to unregister movers on stopping or disabling. This happens on lines 332 and 367 by calling the UnregisterAll method for each position trigger.
FOR i := 0 TO SIZEOF(PositionTrigger) / SIZEOF(PositionTrigger[0]) - 1 DO
PositionTrigger[i].UnregisterAll();
END_FOR
Position Trigger Logic
The existing starter project already has some position trigger logic. The logic for these position triggers is in the MS_RUN section of the MAIN state machine, which starts at line 250. There’s a few methods and properties about the position triggers that are useful to describe to interpret this code:
MoverPassedPosition
MoverPassedPosition is a property of the position trigger object. It goes TRUE when a mover passed the configured position trigger’s position. This will allow for logic based on the position trigger to affect the mover passing by.
MuteCurrent
MuteCurrent is a method of the position trigger object. It will set MoverPassedPosition to FALSE and clear out the mover being tracked by the position trigger. This can be used to indicate the position trigger logic is done and a new mover can be handled.
With these properties and methods, let’s see what the current position triggers are doing.
// Position Trigger 0 Logic
IF PositionTrigger[0].MoverPassedPosition THEN
PositionTrigger[0].CurrentMover.SetVelocity(lowVelocity);
PositionTrigger[0].MuteCurrent();
END_IF

// Position Trigger 1 Logic
IF PositionTrigger[1].MoverPassedPosition THEN
PositionTrigger[1].CurrentMover.SetVelocity(highVelocity);
PositionTrigger[1].MuteCurrent();
END_IF

// Position Trigger 2 Logic
IF PositionTrigger[2].MoverPassedPosition THEN
PositionTrigger[2].CurrentMover.SetVelocity(lowVelocity);
PositionTrigger[2].CurrentMover.MoveToStation(Station[0]);
PositionTrigger[2].MuteCurrent();
Position triggers 0 and 1 are doing similar things. They both wait for a mover to pass their position and then change the velocity of the mover. Position trigger 0 changes to low velocity and position trigger 1 changes to high velocity. They then both call the MuteCurrent methods to clear out the mover from the position trigger. Note that neither of these position triggers are sending a command to the mover, just changing its velocity. The mover is still obeying the MoveVelocity command from station 4.
Position trigger 2 waits for a mover to pass its position, sets the velocity low, and then commands the mover to move to station 0. This will override the move velocity command from station 4 and so the mover will next stop at station 0. The logic then calls MuteCurrent to signal the position trigger has processed the mover.
Now that we’ve reviewed movers, stations, and positions triggers we can not only understand the existing starter project logic but also write our own custom logic. In the next entry in this blog series, we will go over writing some custom logic for our XTS application.
If you’d like help with the next steps for your XTS system, DMC is proud to be a Beckhoff System Integrator and has worked on multiple XTS projects and applications. Learn more about our Beckhoff partnership and contact us for your next project.
Ready to take your Automation project to the next level? Contact us today to learn more about our solutions and how we can help you achieve your goals.