In previous entries of this blog series, we went over the Mover, Station, and PositionTrigger function blocks. Now that we understand these function blocks better, let's use them to write our own custom logic.
This blog will continue to use the Beckhoff XTS_Base GitHub and the large XTS starter kit.
Beckhoff XTS Series
Customizing the Logic
Let’s update this logic to customize our system a bit more. For my system, I’m going to have stations and position triggers at the following places:
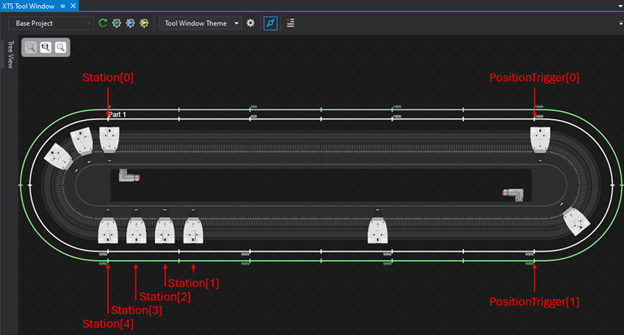
Update the Station and Position Trigger Positions
Remove the existing station and position trigger definitions on lines 108-117 and replace it with the following:
// Initialize station positions
Station[0].Position := 5;
Station[1].Position := 3200;
Station[2].Position := 3300;
Station[3].Position := 3400;
Station[4].Position := 3500;

PositionTrigger[0].Position := 1500;
PositionTrigger[1].Position := 2000;
This will define the stations and position triggers as shown above.
Updating the Station and Position Trigger Logic
Next, we need to update the logic of these stations and position triggers to get them to behave as we want. For this application, let’s have the mover run at high velocity across the top rail, then go down to the low velocity around the bend. Once it clears the bend, it can go back up to the medium velocity until it reaches the next station. Once we have a mover in each of the four bottom left stations, send them all back to station 0. Replacing lines 210-265 with the following code will do that:
// Station 0 Logic
IF Station[0].MoverInPosition THEN
    StationTimer[0](IN := TRUE, PT := T#1000MS);
    IF StationTimer[0].Q THEN
        Station[0].CurrentMover.MoveVelocity(highVelocity);
    END_IF
ELSE
    StationTimer[0](IN := FALSE);
END_IF
    // Position Trigger 0 Logic
IF PositionTrigger[0].MoverPassedPosition THEN
    PositionTrigger[0].CurrentMover.SetVelocity(lowVelocity);
    PositionTrigger[0].MuteCurrent();
END_IF
    // Position Trigger 1 Logic
IF PositionTrigger[1].MoverPassedPosition THEN
    PositionTrigger[1].CurrentMover.SetVelocity(mediumVelocity);
    PositionTrigger[1].CurrentMover.MoveToStation(Station[nextStation]);
    nextStation := nextStation - 1;
    IF nextStation = 0 THEN
        nextStation := 4;
    END_IF
    PositionTrigger[1].MuteCurrent();
END_IF

// Group of Stations 1, 2, 3, and 4 Logic
IF Station[1].MoverInPosition AND Station[2].MoverInPosition AND Station[3].MoverInPosition AND Station[4].MoverInPosition THEN
    StationTimer[1](IN := TRUE, PT := T#750MS);
    IF StationTimer[1].Q THEN
        StationTimer[1](IN := FALSE);
        Station[1].CurrentMover.MoveToStation(Station[0]);
        Station[2].CurrentMover.MoveToStation(Station[0]);
        Station[3].CurrentMover.MoveToStation(Station[0]);
        Station[4].CurrentMover.MoveToStation(Station[0]);
    END_IF
END_IF
Execute the New Code
Save the new code and activate the configuration. After logging in, you should be able to open the Controls visualization, press the Enable button, and then the Start button to start seeing the movers follow the new logic.
This is just an example of the many customizations you can make to your XTS system. There’s even more functionality that comes with this starter project, though. In the next entry in this blog series, we will go over zones and add those to our custom logic.
If you’d like help with the next steps for your XTS system, DMC is proud to be a Beckhoff System Integrator and has worked on multiple XTS projects and applications. Learn more about our Beckhoff partnership and contact us for your next project.
Ready to take your Automation project to the next level? Contact us today to learn more about our solutions and how we can help you achieve your goals.