For anyone who has spent much time working with the SIMATIC S7-400H, it becomes quickly apparent that the devil is often in the details. You find that there are many small settings and 'tricks' that you uncover while setting up redundancy, redundant Modbus communication, redundant communication interfaces for I/O, configuring hardware, etc., that you need to get things running. Sometimes those small details are hard to catch. In the words of my wise colleague Lillian Walker, "The redundant thing about redundancy is that I have to read all of the documentation twice." Oh, so true.
Oftentimes, I will find those settings and tricks in a great blog, application example or help file. Over the years, I've built up a personal library of links and documents that I reference whenever I come back to an issue that I know I've seen before and have forgotten how we fixed it in the past. Today I'd like to share one of these examples that I've relied upon several times when working with the S7-400H and programming HMI's in WinCC Advanced or WinCC Comfort configuring automatic connection fail-over.
If you've worked with TIA Portal and the 400H CPUs in the past, you probably know that Portal does not have any automatic fail-over mechanisms built in for WinCC Advanced or WinCC Comfort. Hopefully, when the S7-1500H is released, this functionality will be added as well. But for now, programming of the 400H system is completed in Step 7 v5.5, the station must be imported into Portal as a Proxy, and any connection fail-over must be manually added. Luckily, Siemens provides a great Application Example to make the process easier. Nothing I'm sharing below is secret, you can easily read the information from this link. Yet for anyone who already found this blog, I'll walk you through configuring WinCC Advanced or WinCC Comfort to work with a redundant pair of S7-400H CPUs and automatically handle connection failover.
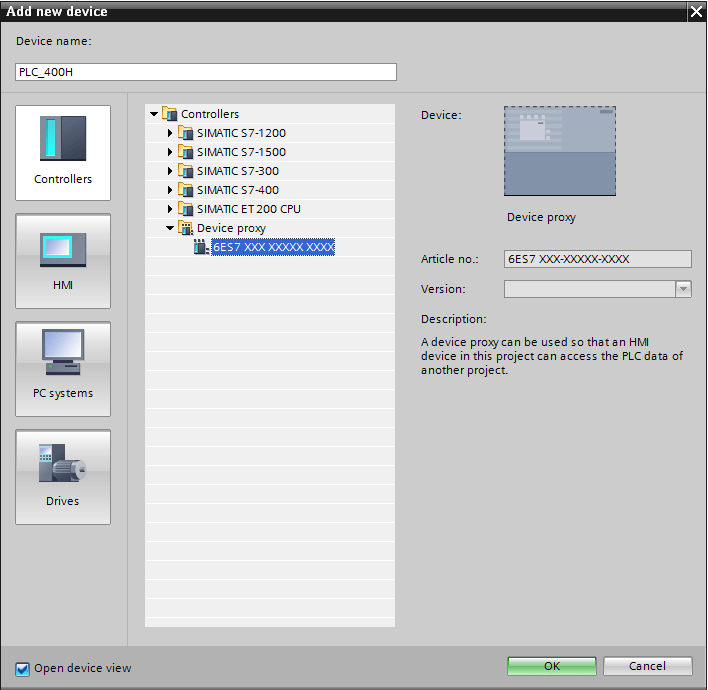
Step 1: Import your 400H system into TIA Portal
TIA Portal does not support programming of the 400H inside the Portal, but you can easily import a station from a Step7 v5.5 project into Portal to make things easier. To do so, choose "Add a New Device", select the type as "Controller" and pick "Device Proxy."
After the new station has been added to the Project, right click the station in the project tree (or from Device View) and choose "Initialize Device Proxy." Navigate to and select your Step7 v5.5 project and it will open a new dialog to allow you to choose which source device and what data you would like to add to your Proxy Station.

Step 2: Add your HMI
For the purpose of this demo, I will add a Comfort Panel to my project. But you can do the same with an Advanced Runtime application.
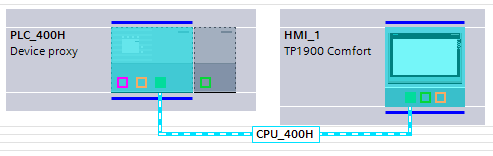
Step 3: Create a Connection to the PLC Station
Open up the hardware configuration (network view) and add an HMI connection from your Proxy Station to the Comfort Panel. If you open up the Connections Editor from the HMI Project (in the Project Tree) you will see that a connection has automatically been created for you. I've renamed this Connection to "CPU_400H" and this will be the connection that we configure to switch been CPU's (failover). This is the connection that will be used for all tags used for visualization and control on the HMI.
What we will do, in order to provide automatic fail-over, is create three primary connections. The first will be a dynamic connection, capable of pointing to either processor in the redundant pair. We will use scripting and the control function "ChangeConnection" to switch the connection when a loss of communication is detected. All tags used for display on the HMI will use this connection. The other two connections will be static connections to each CPU for monitoring connection status.
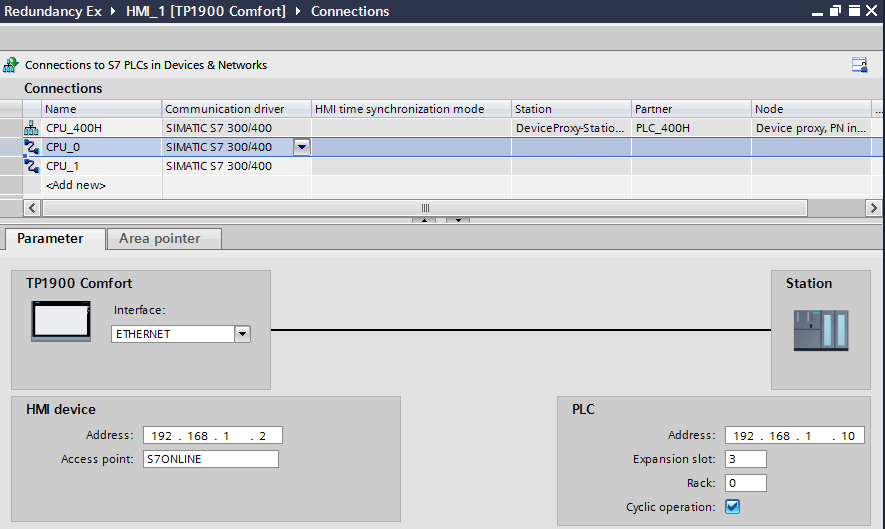
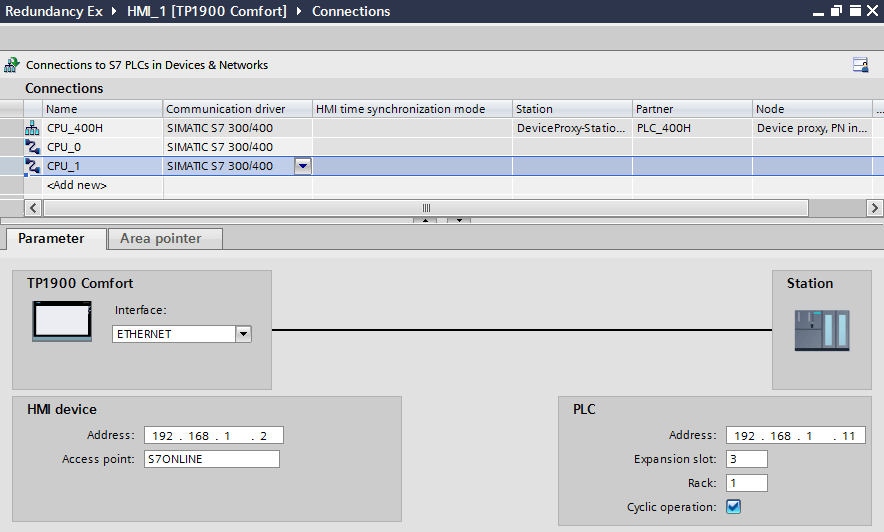
Step 4: Create Additional Connections to Each CPU
Next, we will create dedicated connections to each CPU. These connections will each be looking at a different CPU. Note that the two connections are configured for different CPU's in the redundant pair (IP Address, Slot, Rack).
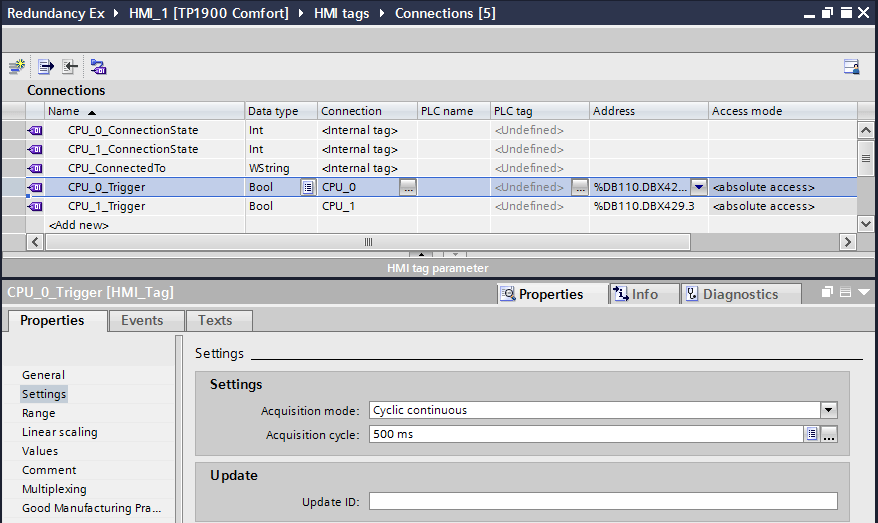
Step 5: Create Connection Monitoring Tags
We will create two heartbeat tags, 'CPU_0_Trigger' and 'CPU_1_Trigger' - one for each CPU - and monitor them through the dedicated connections to the CPUs. Note that both trigger tags are looking at the same tag (in this case at DB110.DBX429.3), but on different CPUs. That tag on the PLC is a heartbeat tied to the Clock Byte (1 Hz). Also, note that we've changed the tag acquisition mode to be Cyclic Continuous so that it will be constantly monitored for changes.
Additionally, create three internal tags: 'CPU_0_ConnectionState' and 'CPU_1_ConnectionState' (both Integer tags used to keep and store an internal connection state) and 'CPU_ConnectedTo' (a WString tag used to track which CPU we're using for our active connection and can be displayed on the HMI).
Step 6: Add Connection Monitoring Scripts
Create three new scrips: (1) CPU_O_Trigger, (2) CPU_1_Trigger, and (3) CPU_Connection. You can grab the scripts from the Siemens application example and edit as needed. But these scripts will do the following:
- CPU_0_Trigger: Will be triggered on a tag change of 'CPU_0_Trigger.' On a heartbeat signal from CPU_0, it will reset 'CPU_0_ConnectionState' to 1, and will increment 'CPU_1_ConnectionState'. If 'CPU_1_ConnectionState' ever exceeds our connection fault limit and our HMI Connection CPU_400H is currently assigned to connect to CPU_1, it will swap the connection to CPU_0.
Sub CPU_0_Trigger()

'***************************
'****	Initialization	****
'***************************

Const IP_Address = "192.168.1.10"

'During initialization the default connection is
'saved into the memory of connections (CPU_ConnectedTo).
If SmartTags("CPU_ConnectedTo") = "" Then
	SmartTags("CPU_ConnectedTo") = "CPU-0"
End If


'*******************
'****   Reset   ****
'*******************
'Reset of connection brake detection for CPU-0
SmartTags("CPU_0_ConnectionState") = 1


'*****************************
'****   Fault detection   ****
'*****************************
'Incrementation of the brake detection value for the connection to CPU-1
If SmartTags("CPU_1_ConnectionState") <= 10 Then
	SmartTags("CPU_1_ConnectionState") = SmartTags("CPU_1_ConnectionState") + 1
End If


'**************************
'****   Switch over    ****
'**************************
'is the limit of the status tag for the connection to CPU-1 reached, the connection to CPU-0 will
'switch the data connection.
If SmartTags("CPU_1_ConnectionState") >= 11 Then
	If SmartTags("CPU_ConnectedTo") = "CPU-1" Then
		ChangeConnection "CPU_400H", IP_Address, 3, 0
		SmartTags("CPU_1_ConnectionState") = 100
		SmartTags("CPU_ConnectedTo") = "CPU-0"
	ElseIf SmartTags("CPU_ConnectedTo") = "CPU-0" Then
		SmartTags("CPU_1_ConnectionState") = 100
	End If
End If


'***************************
'****   Reintegration   ****
'***************************
'after a full connection brake the first repaired connection will activate the data connection
If SmartTags("CPU_ConnectedTo") = "Connection Lost" Then
	ChangeConnection "CPU_400H", IP_Address, 3, 0
	SmartTags("CPU_1_ConnectionState") = 100
	SmartTags("CPU_ConnectedTo") = "CPU-0"
End If

End Sub
- CPU_1_Trigger: Will be triggered on a tag change of 'CPU_1_Trigger.' On a heartbeat signal from CPU_1, it will reset 'CPU_1_ConnectionState' to 1, and will increment 'CPU_0_ConnectionState'. If 'CPU_0_ConnectionState' ever exceeds our connection fault limit and our HMI Connection CPU_400H is currently assigned to connect to CPU_0, it will swap the connection to CPU_1.
Sub CPU_1_Trigger()

'***************************
'****	Initialization	****
'***************************

Const IP_Address = "192.168.1.11"

'During initialization the default connection is
'saved into the memory of connections (CPU_ConnectedTo).
If SmartTags("CPU_ConnectedTo") = "" Then
	SmartTags("CPU_ConnectedTo") = "CPU-0"
End If


'*******************
'****   Reset   ****
'*******************
'Reset of connection brake detection for CPU-0
SmartTags("CPU_1_ConnectionState") = 1


'*****************************
'****   Fault detection   ****
'*****************************
'Incrementation of the brake detection value for the connection to CPU-1
If SmartTags("CPU_0_ConnectionState") <= 10 Then
	SmartTags("CPU_0_ConnectionState") = SmartTags("CPU_0_ConnectionState") + 1
End If


'**************************
'****   Switch over    ****
'**************************
'is the limit of the status tag for the connection to CPU-1 reached, the connection to CPU-0 will
'switch the data connection.
If SmartTags("CPU_0_ConnectionState") >= 11 Then
	If SmartTags("CPU_ConnectedTo") = "CPU-0" Then
		ChangeConnection "CPU_400H", IP_Address, 3, 1
		SmartTags("CPU_0_ConnectionState") = 100
		SmartTags("CPU_ConnectedTo") = "CPU-1"
	ElseIf SmartTags("CPU_ConnectedTo") = "CPU-1" Then
		SmartTags("CPU_0_ConnectionState") = 100
	End If
End If


'***************************
'****   Reintegration   ****
'***************************
'after a full connection brake the first repaired connection will activate the data connection
If SmartTags("CPU_ConnectedTo") = "Connection Lost" Then
	ChangeConnection "CPU_400H", IP_Address, 3, 1
	SmartTags("CPU_0_ConnectionState") = 100
	SmartTags("CPU_ConnectedTo") = "CPU-1"
End If
End Sub
- CPU_Connection: This script will be configured to run as a scheduled task. It's purpose is a backup of the heartbeat/triggers. If no heartbeat triggers have been received from a CPU, it will disable the connection. If both connections are disabled, it will set the Connected CPU to "Connection Lost."
Sub ConnectionCheck()

'***************************
'****   Deactivation    ****
'***************************
'If the connections are not able to reset there status tag back to "1" they will be marked with 100 (disabled).
If SmartTags("CPU_0_ConnectionState") >= 5 Then
	SmartTags("CPU_0_ConnectionState") = 100
End If

If SmartTags("CPU_1_ConnectionState") >= 5 Then
	SmartTags("CPU_1_ConnectionState") = 100
End If

'If both connections are marked with "disabled", the connection memory will be set to "connection_lost"
If SmartTags("CPU_0_ConnectionState") = 100 And SmartTags("CPU_1_ConnectionState") = 100 Then
	SmartTags("CPU_ConnectedTo") = "Connection Lost"
End If


'********************************
'****   Setting fault flag   ****
'********************************
'In each cycle of 1 minute the status tags of the connections will be set to 5.
If SmartTags("CPU_0_ConnectionState") < 5 Then
	SmartTags("CPU_0_ConnectionState") = 5
End If

If SmartTags("CPU_1_ConnectionState") < 5 Then
	SmartTags("CPU_1_ConnectionState") = 5
End If

End Sub
Step 7: Configure Scripts to be Executed
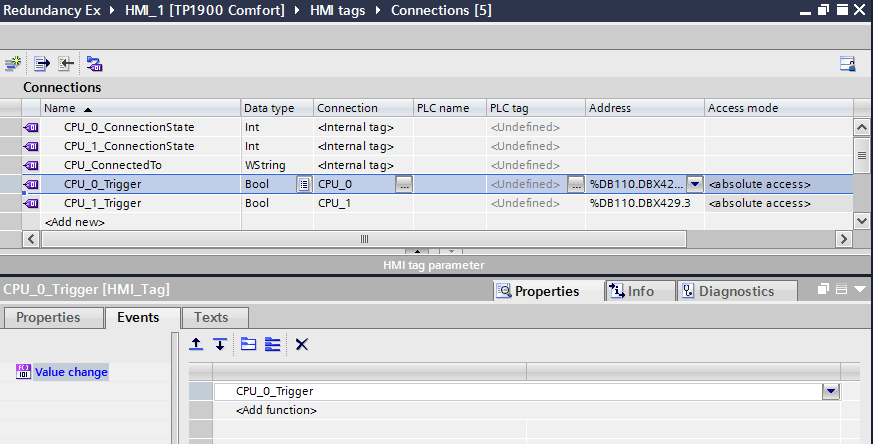
The CPU_0_Trigger script will be executed off of a value change event of the tag 'CPU_0_Trigger'. In the properties of the tag, configure a Value Change event to call the script CPU_0_Trigger. For the tag 'CPU_1_Trigger,' add the same Value Change event to call the script CPU_1_Trigger.
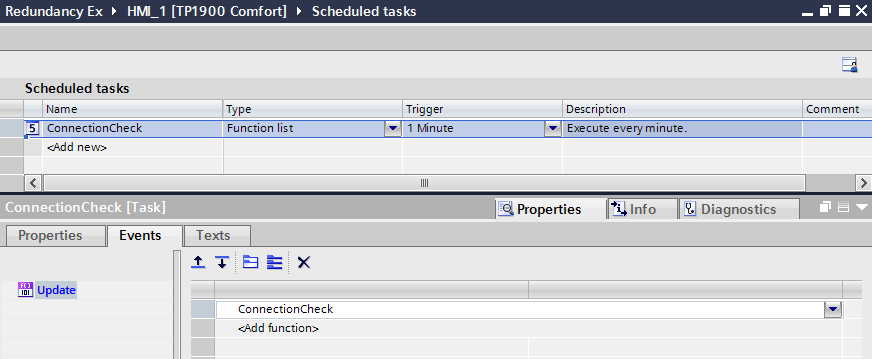
For the ConnectionTest script, add a new Scheduled Task to run once per minute.
That's it. Now if a CPU goes down, the lost heartbeat will cause the connection to fail-over to a working connection. These scripts are fairly generic. If you need a faster response rate you can change the heartbeat speed, the tag acquisition cycle, and the limits allowed before fail-over. It's not a hardware solution and it is not instantaneous, but it will allow a Comfort Panel or WinCC Advanced HMI to work with a redundant 400H PLC system!
Thanks!