A common gripe about using LabVIEW is that the user-interface (UI) is not very attractive. Well, that is only true if you do not know how to customize LabVIEW controls to make them look truly modern and visually appealing.
Fortunately, there is a way to change the default LabVIEW controls!
While National Instruments and many other LabVIEW developers have documented this process before, for completeness, I will go through the basics with lots of screenshots before posting some of my tips for more advanced control customization techniques.
Customizing Controls
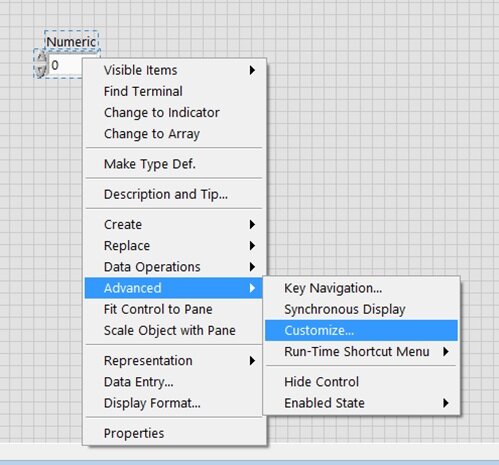
To customize any control, just right-click and then select Customize… in the Advanced menu.
The Control editing window will pop up with just the control you selected.
There is a decent amount to discuss in this view, but the most important thing is the Wrench button in the Toolbar.
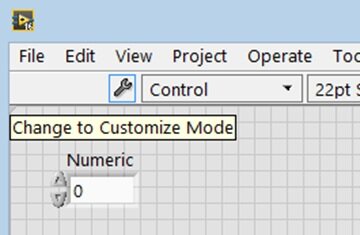
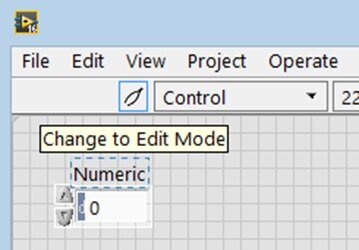
You will notice that by clicking the Wrench, you can enter Customize Mode. Entering this mode exposes all the "parts" of the control so you can edit each individually.
The wrench also changes to Tweezers, which symbolize how you can manipulate each individual part of the control. With the Tweezers, you have the power to customize just about anything to do with the Control or Indicator.
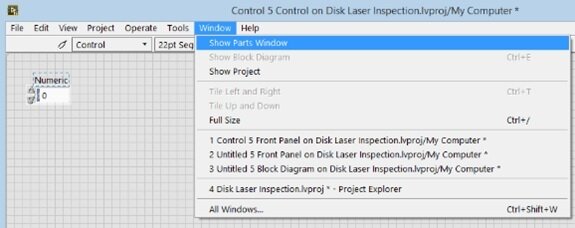
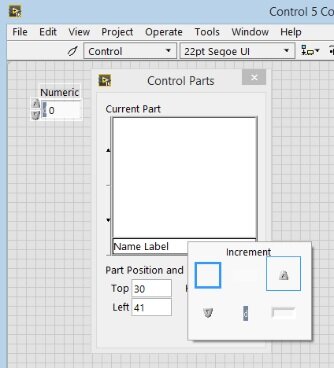
Once in this view, the easiest way to see all the different parts is to open the Parts Window, which is an option under the Window menu bar.
As you can see in the image below, the modern Numeric Control has 6 parts:
- Name Label
- Numeric Text
- Increment
- Decrement
- Radix
- Frame
You can do simple operations such as Resizing and Recoloring each part in this window, but the real customization comes from replacing individual parts.
Replacing Individual Parts
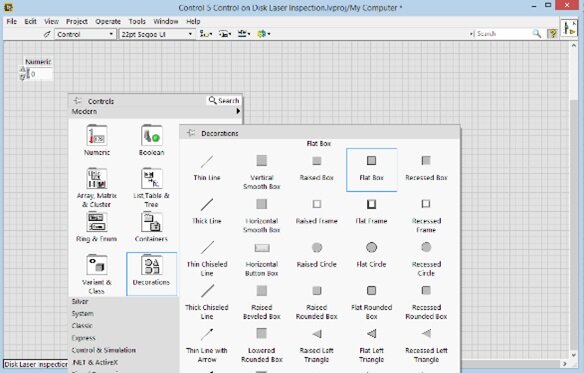
Let’s say I want to replace the 3D frame with a flat box for a more modern appearance. Luckily, a Flat Box decoration already exists in the Modern Decorations palette.
- Drop a Flat Box onto the Control Editing Interface.
- Size the Flat Box decoration to the same size as the frame.
- Copy the decoration.
- Paste it over the frame.
The decoration has now become the frame!
Finish modernizing the frame by:
- Make the Numeric Text part transparent.
- Recolor the new frame to better colors. Remember, colors are very important to the overall look of a UI.
You will already notice how much nicer this control looks.
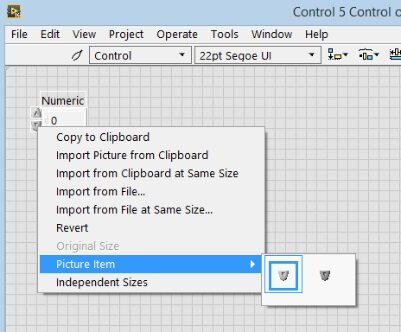
You can do the same thing with the other control parts, most notably the Increment and Decrement buttons.
What you will notice when you right-click on the Increment or Decrement button is that it is really just a two state Boolean. It has two picture images: one for the pressed state and one from the depressed state. You will also notice that in that popup menu, there is an option to import a picture from file.
All you have to do to replace the default increment/decrement images is:
- Select the picture item you want to change.
- Click the Import Picture from File… option in the popup menu.
You might also want to Import Picture from File at Same Size… if you are worried about resizing issues. Note that LabVIEW does not always scale your images the way you want, so it’s best to create the image to import at the proper size. For true Vector Image rescaling, we will have to wait for LabVIEW NextGen.
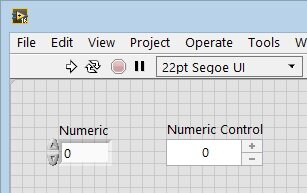
After importing the image that I created for the increment and decrement buttons, I have a new and improved Numeric Contro! Compare the two and see how we were able to do to customize the original Numeric Control.
It now looks modern, has a flat appearance, and the Increment and Decrement buttons are much more attractive than what we started with. Now, I’ll never have to customize that control again since I can always re-use this one!
The Numeric Control is just an example, but you can apply these customization and replacement techniques for all kinds of controls!
For more, explore our 6 Tips for LabVIEW UI and UX Design.
Learn more about DMC's LabVIEW programming expertise.