Certain control systems require operation 24/7, 365. That is: these systems should always be in action! In such applications, a fault in the controller or computer could prove disastrous. Therefore, redundant systems are introduced to handle automatic fail-over in the case of a primary system fault.
SCADA (Supervisory Control and Data Acquisition) systems are a prime candidate for redundant applications, as they monitor and control the status of the entire operation. DMC has worked with several redundant SCADA systems over the years. Additionally, we have seen an increasing number of redundant WinCC 7 SCADA systems.
Therefore, in this blog, I want to walk through the steps of configuring and maintaining a redundant WinCC 7 SCADA system, as well as a few “gotchas.” Furthermore, Siemens’ Process Historian (PH) is a separate server used for centralized, long-term, time-sequenced data storage.
As a bonus, I will show how to connect the redundant system to a pre-configured PH. Note: if you do not have a PH in your project, just ignore the PH steps.
Before we begin, there is one crucial aspect that I should note. There are two different ways to configure and maintain a redundant WinCC 7 SCADA system: locally on the redundant server pair or through an Engineering Station (ES). The latter allows the project to be managed on a third computer, where edits can be made and tested without interrupting the operation of the redundant server pair.
This configuration also supports Online Loading of the changes (see notes below on supported changes), so the redundant pair can remain active in runtime.
Because of these benefits from hosting the project on an ES, this blog will focus on the steps for this configuration. However, for those of you interested in the former, local hosting configuration, I will provide one hint: use the WinCC Project Duplicator tool after making edits on one project to duplicate the project for the redundant partner.
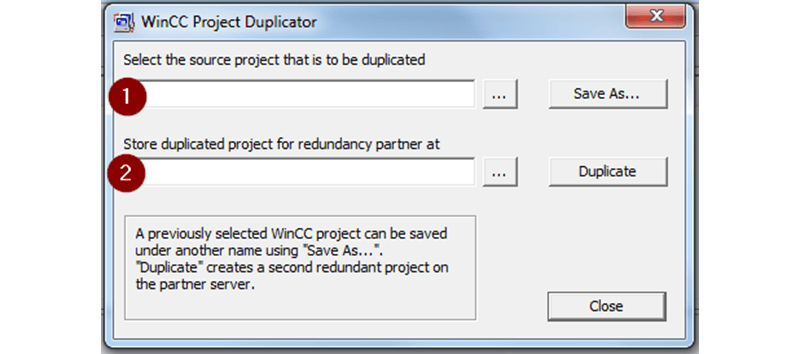 Locally Managed Configuration: Project Duplicator
Configure an Engineering Station (ES) managed Redundant WinCC 7 Project
We will use SIMATIC Manager to host the redundant server WinCC 7 project on the ES. SIMATIC Manager comes in two varieties: full-blown STEP 7 (ex. used if you’re programming S7-300s and S7-400s) or SIMATIC NCM Manager (a shell used to host WinCC projects without the PLC programming aspect). SIMATIC NCM Manager is an install option when you download WinCC 7, so if you’re not already using the STEP7 variant then use NCM.
SIMATIC Manager Project Creation
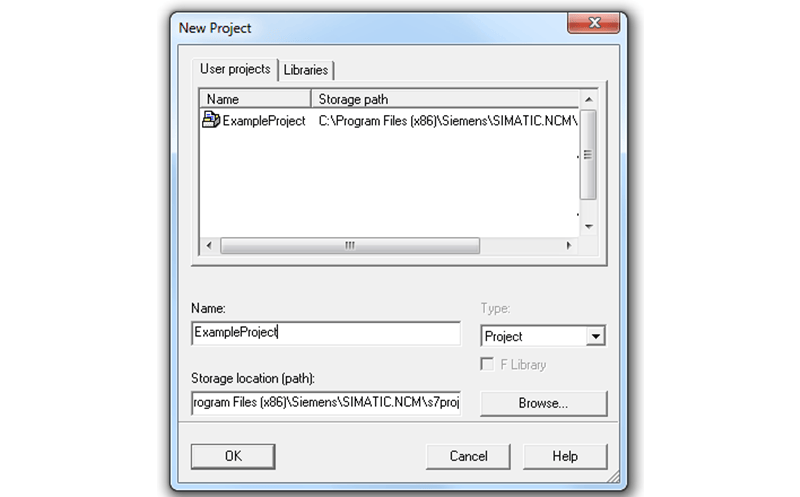
Now, let’s configure our SIMATIC Manager project! Follow these steps to set it up:
- Create a new project: name it and specify the storage location
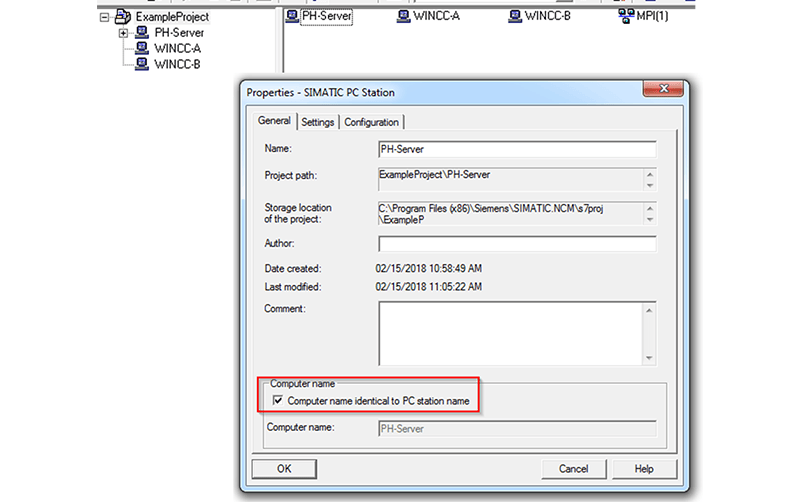
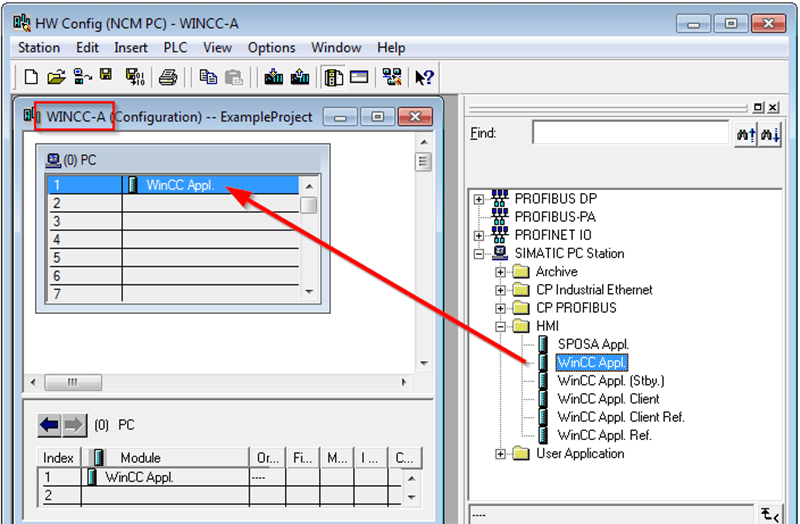
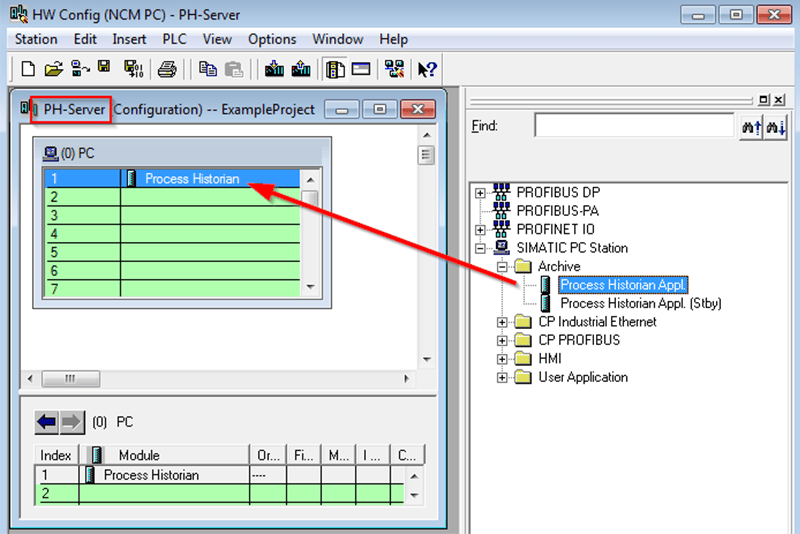
- Add the SIMATIC PC Stations to the project by right-clicking either on ExampleProject in the left-hand navigation area or anywhere in the right-hand window. We will add 3 Stations: 2 for our redundant servers (WINCC-A and WINCC-B) and 1 for the PH (PH-Server).
- Then, right click on each PC station and open the Object Properties
- If you named these according to the actual computer names, select Computer name identical to PC station name. Otherwise, specify the actual computer name.
- Right click on the master server and select Open Object. Add “WinCC Appl.” to the first slot in the PC Station. Save and close the window.
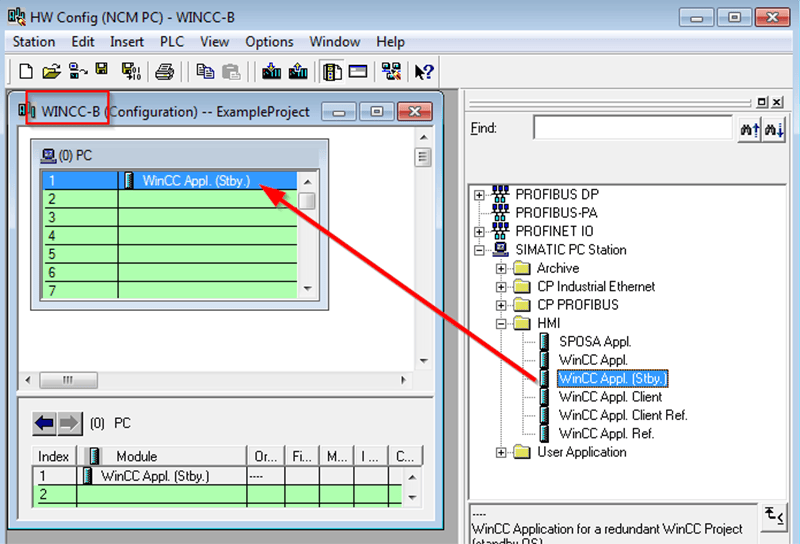
- Similarly, add “WinCC Appl. (Stby)” to the standby server and “Process Historian Appl.” to the PH server
- Configure the WinCC Application name and link the standby OS
- Rename the WinCC Appl OS of Server A to the desired application name
- Set the path to the computer
- \\<servername>\Users\Public\Documents\Siemens\WinCCProjects\<projectname>\<projectname>.mcp
- Select the Server B WinCC Appl OS as the standby OS
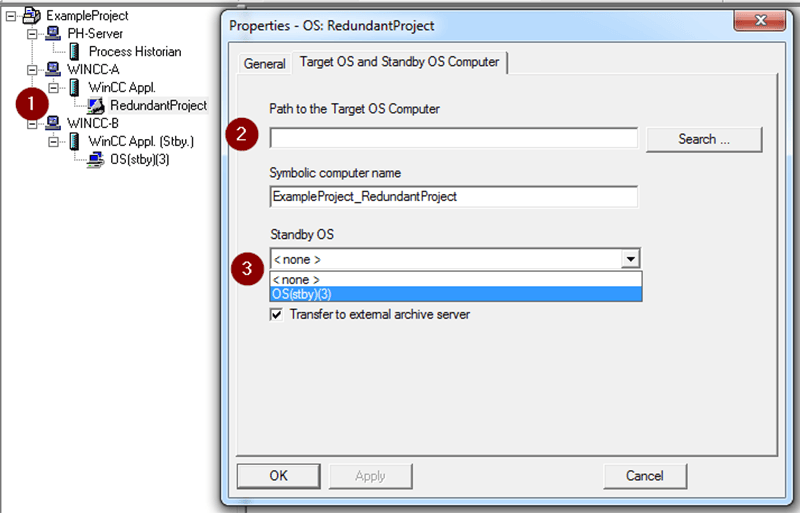
- Select to recompile on the popup. It will update the standby project’s name to <projectname>_StBy
- Set the path on the standby computer

WinCC 7 Project Configuration
After completing the SIMATIC Manager project creation steps, we are now ready to open up the WinCC 7 project to configure the redundancy and PH connections.
- Open the master server’s WinCC 7 project by right-clicking on the project RedundantProject and selecting Open Object.

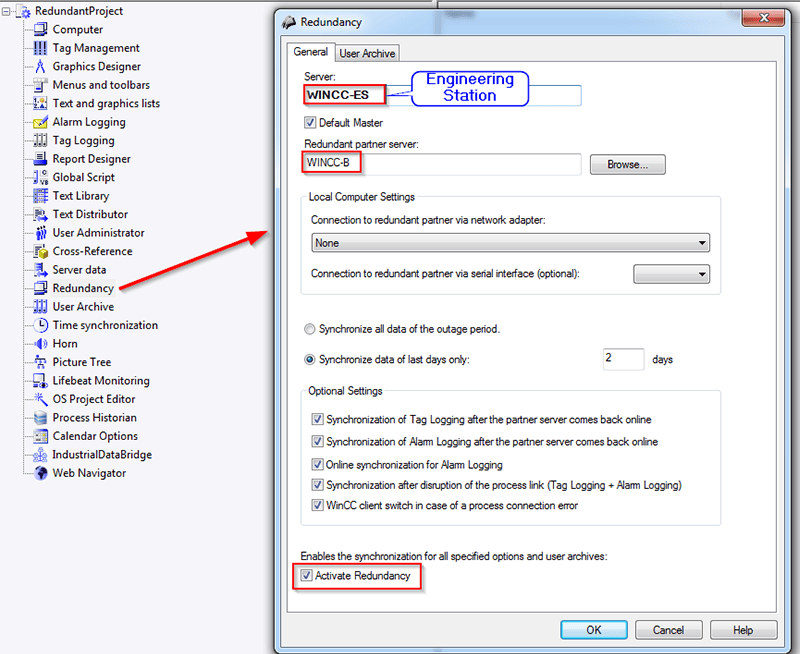
- Inside WinCC Explorer, open to the Redundancy editor by double-clicking Redundancy in the left-hand navigation tree.
- Activate redundancy by selecting the checkbox at the bottom of the pop-up
- Select the standby server as the redundant partner (enter manually or browse if connected on the network)
- The ES computer name should automatically populate the Server field. Don’t worry - this is correct.
- Configure the optional settings according to your preferences
- Hit OK to save and close
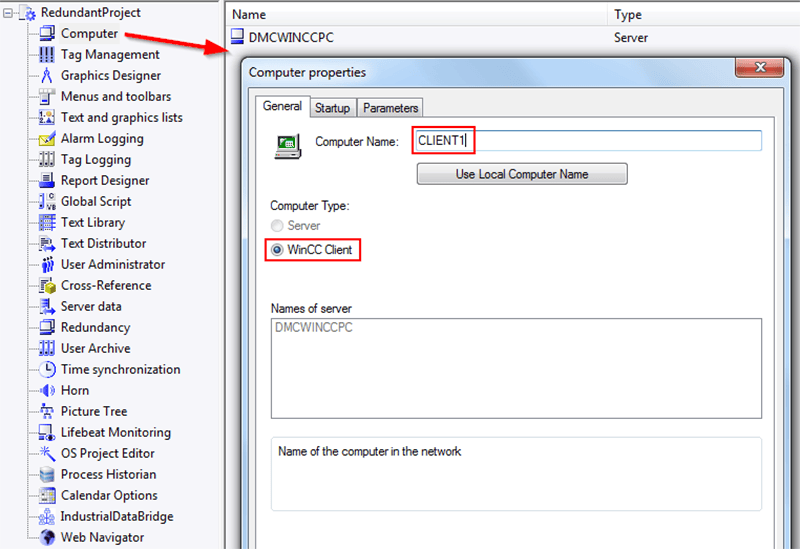
- If applicable, add and configure the clients
- Right-click on the Computer field and select to add a new computer
- Specify the client computer name
- You can also set up different startup elements and parameters in this window
- Hit OK to save and close
- Repeat for all clients that will be communicating to this server
- Connect the PH within WinCC
- Similarly, open the Process Historian editor by double-clicking it in the WinCC Explorer tree
- Enter the name of the PH in the Server 1 entry field. (If you have a redundant PH, you can enter the name of the secondary server in the Server 2 field)
- Hit OK to save and close

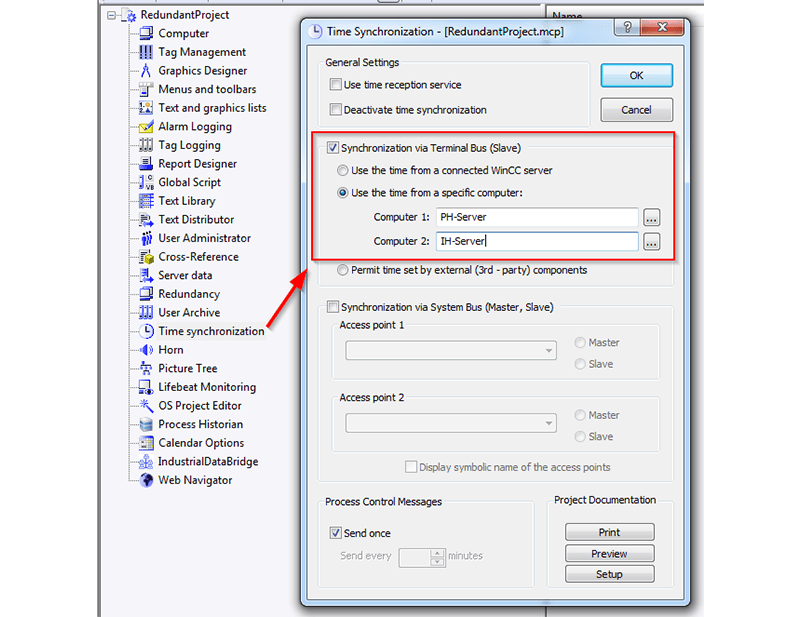
- Configure Time Synchronization of the redundant servers
- Open the Time Synchronization editor
- Select Synchronization via Terminal Bus (Slave) and use the time from a specific computer
- Enter the PH server name as computer 1 – this will specify the PH as the master timekeeper
- (Optional) Enter another as computer 2, to set it as a backup timekeeper. For example, we have set the second computer as the Information Server (IS) server name
- Hit OK to save and close
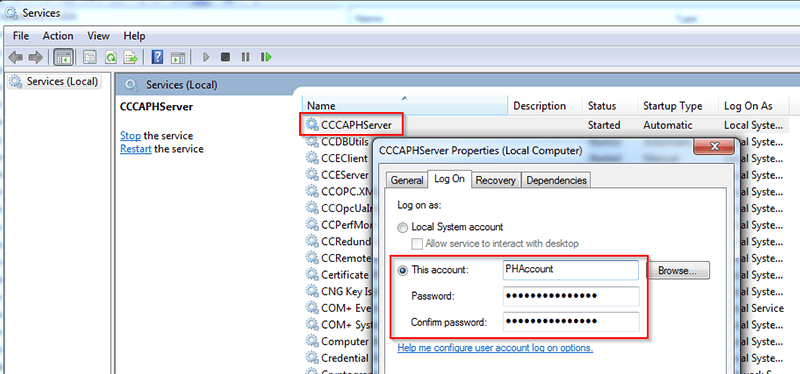
- Finally, to connect to the PH, each WinCC server must run the PH communication service “CCCAPHServer” under the PH’s credentials. This process must be done ON EACH of the WinCC redundant servers.
- Open Services by searching for it in Windows
- Right-click “CCCAPHServer” in the list and open up Properties
- Under the Log On tab, select This Account, and enter the PH account’s credentials
- Select Apply and then OK to save and close.
Downloading, Runtime Activation, and Project Management
Full Download
After the development of the project, you must perform an initial full download to EACH server. To do this, follow the steps below:
- Ensure that the redundant servers are networked to the ES are turned on.
- On the ES, ensure that WinCC is closed
- If WinCC Explorer is open, close it and choose Close Project When Exiting
- You can also right-click the WinCC icon in the Windows Taskbar System Tray at the bottom-right of your screen. Then select Close Project if a project is open

- In SIMATIC Manager on the ES, download the project to the Master Server by right-clicking the WinCC project under the master server and selecting PLC -> Download. Note: this can take a little bit of time.
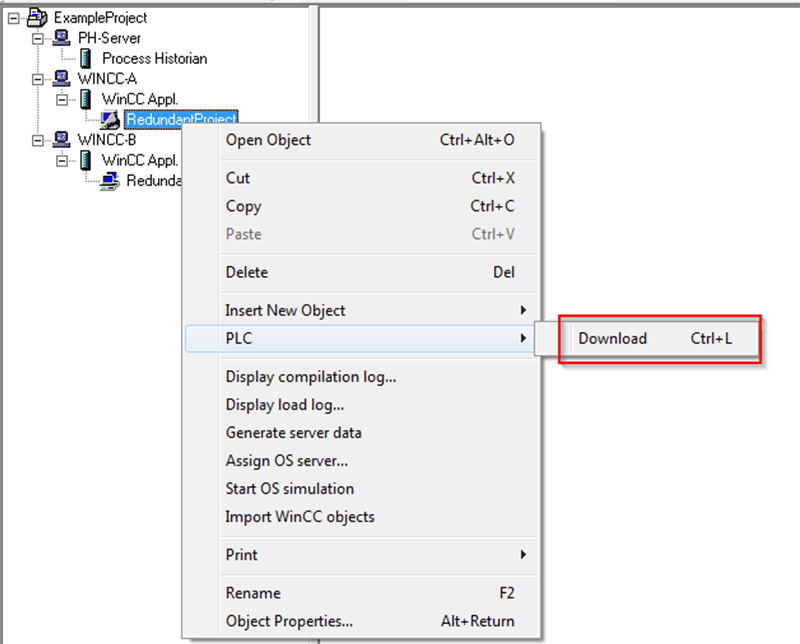
- Once the master loading finishes, load the project to the standby server by right-clicking on the standby project and PLC -> Download.
- Process Historian Note: Make sure the PH server is on and networked with the redundant servers. Also, make sure the PH Management Console application is running with the status as Active BEFORE activating the runtime application on the servers. Otherwise, the PH can have sync issues.
- Server Startup
- Start the master server project by opening WinCC Explorer on the master server and activating the runtime
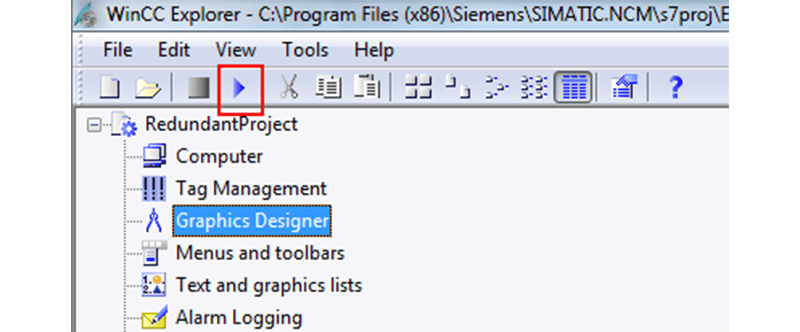
- Wait a few moments for the master server project to finish starting up
- Then activate runtime on the standby server. Note: do NOT start them at the same time or the servers may have a difficult time synchronizing.
- At this point, you can check the status of the redundant servers by clicking the WinCC icon in the Windows Taskbar System Tray

- Check the sync status
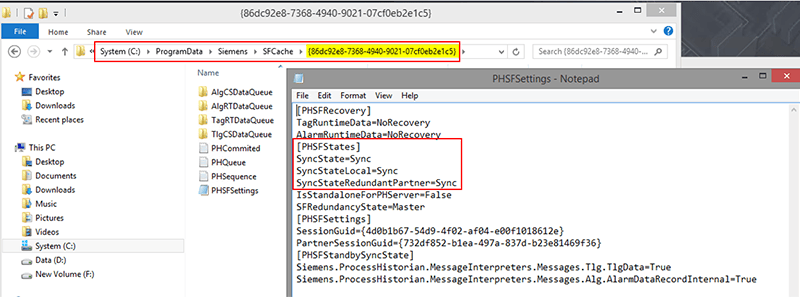
- Opening the PHSFSettings file with Notepad will show the sync state of the redundant server with its partner. Note: It can take up to several minutes for the sync state to update to Sync
- The PHSFSettings file is located at the following path: C:\ProgramData\Siemens\SFCache\<variable string of characters>
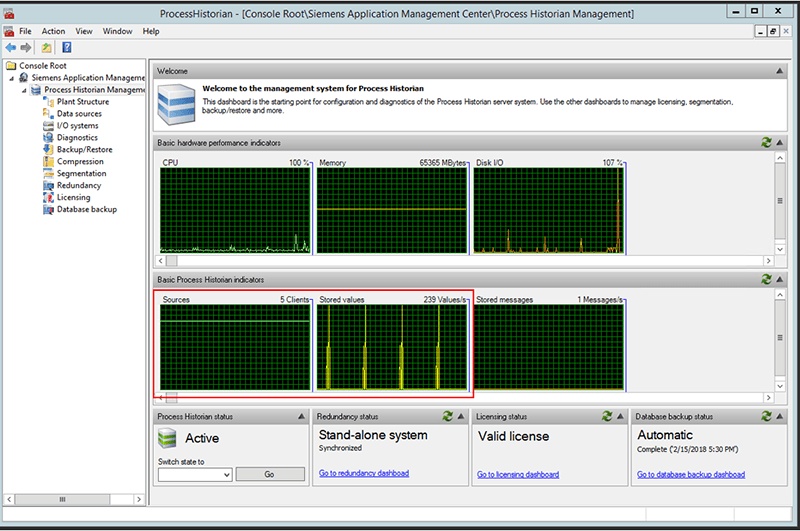
- Once the servers show that they are synchronized, you can check the PH dashboard to ensure that the clients are listed as connected, and that tag information is being archived.
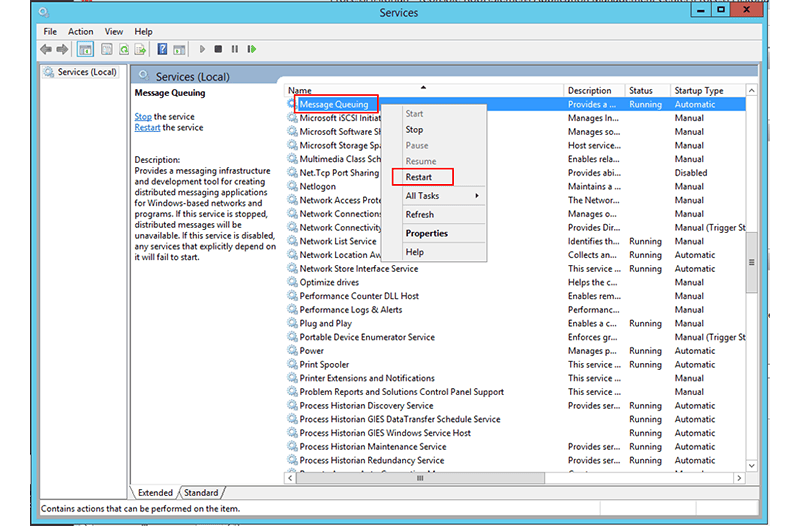
- An in-depth guide to troubleshooting a connection between the PH and redundant servers is beyond the scope of this blog, but I will provide one pointer: if the clients are showing up under Sources, but no tag information is coming in under Stored Values, try restarting the Microsoft Message Queuing service.
Client Connection
After deployment of the application, the server project may connect clients. Assuming these clients will only connect to the redundant servers (not multiple distributed servers), they will not need their own Client project. Therefore, we can connect the clients to the server project.
To do this, we will setup AutoStart Configuration, allowing the client to connect to the server and launch the runtime application on startup. Once set up, the client can be restarted to connect to the server project anytime at least one of the server projects are in runtime.
- Ensure that the client computer and servers are on and networked together
- On the client computer, right-click the WinCC icon in the Windows Taskbar System Tray and select Runtime Start Options

- AutoStart Configuration
- Specify the client computer name (it should fill in by default if you perform these steps on the client computer)
- Navigate to the master server’s project on the network
- Select Autostart Active. The other two options will start WinCC upon bootup and allow you to cancel activation.
- Hit Apply and OK to save and close
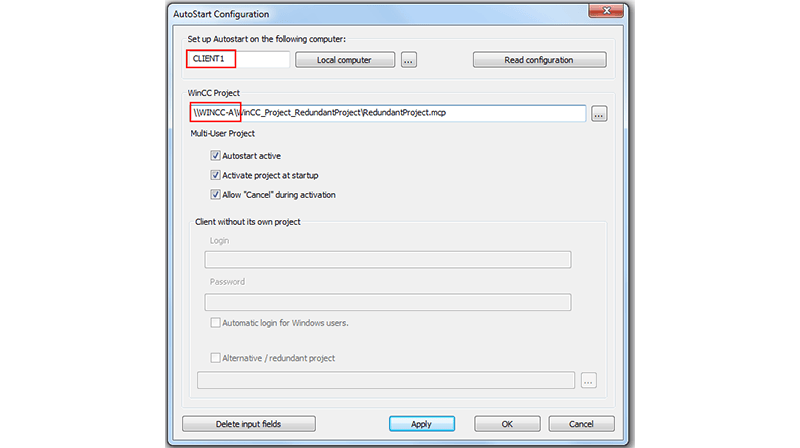
- On a reboot of the client computer, the client will launch the WinCC runtime application and connect to the server’s project (as long as the server has runtime activated). Note: Launching the runtime application upon reboot of the client computer can take a few minutes depending on the client computer, so do not get discouraged if it does not come up immediately when you see the Windows background.
Project Edits
With the servers activated, clients connected, and the PH logging data, the application is up and running! But what happens when we need to make a change, you ask? Easy! We go back to the ES to open our WinCC project through SIMATIC Manager again and make changes just as we had done during the development phase.
If you want to test those changes before downloading to the redundant servers, you can run an OS simulation on the ES.
- In SIMATIC Manager, with WinCC closed, right-click on the project and select Start OS Simulation
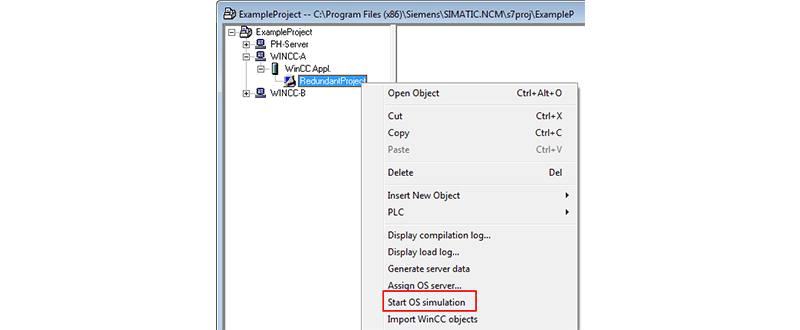
- The WinCC Runtime will activate, and you will be able to test the application. When finished, simply right-click the WinCC icon in the Windows Taskbar System Tray and select Close Project to deactivate the runtime and close the simulation project.
Online Loading
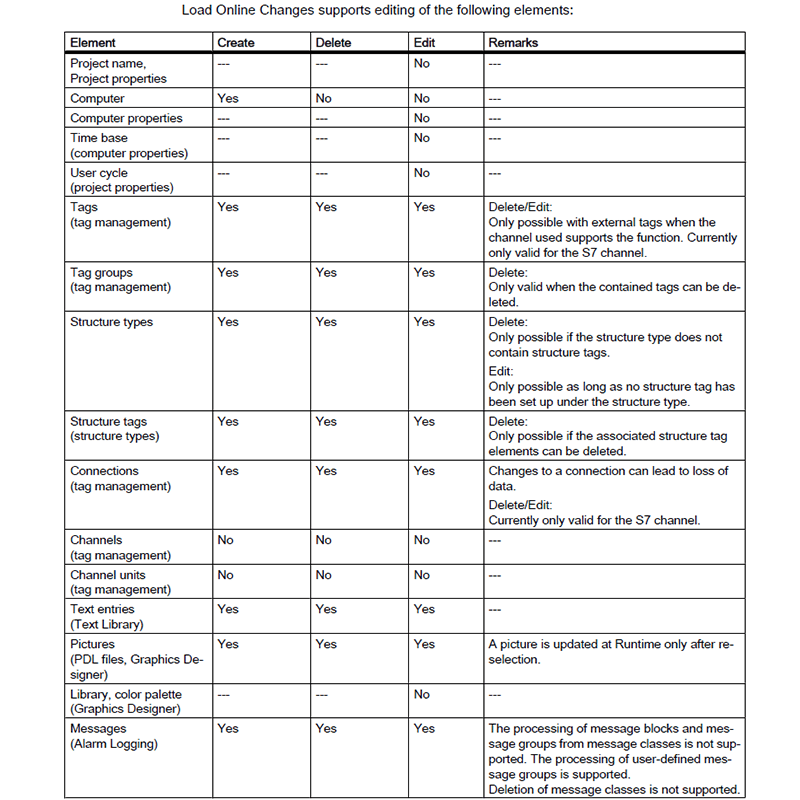
Once you have tested out the edits that you wanted to make, you can perform an Online Load of the changes, where the runtime remains active on both redundant servers. See the Online Loading supported changes at the end of the steps below.
- On the ES, ensure that WinCC is closed
- If WinCC Explorer is open, close it and choose Close Project When Exiting
- You can also right-click the WinCC icon in the Windows Taskbar System Tray at the bottom-right of your screen. Then select Close Project if a project is open

- Just as with a full download, in SIMATIC Manager on the ES, download the project to the Master Server by right-clicking the WinCC project under the master server and selecting PLC -> Download.
- Except this time instead of selecting Full Download, select Online Load.
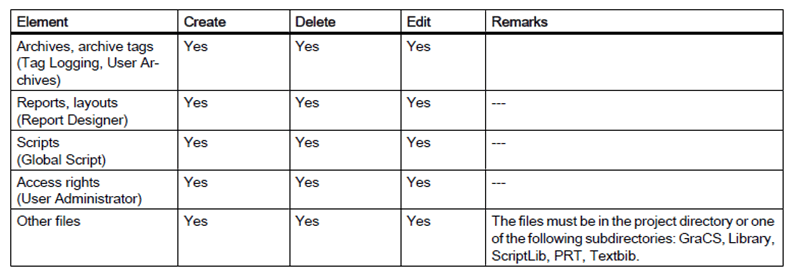
- Note: Online Loading does not support all changes. If the only option is “full download,” then an unsupported edit has been made, and you must perform a full download which WILL bring down the servers momentarily. See the list below shows which changes are supported.
- After selecting Online Load, the load dialog will pop up where it will load the project to the standby server first. When that finishes, select OK, and it will load on the master server. Select OK when that completes as well.
- After the project is loaded to the redundant servers, the project will be updated on all clients as well. If any screens were changed, you must reload those pages to see the changes (i.e. navigate away from the screen and then back to it)
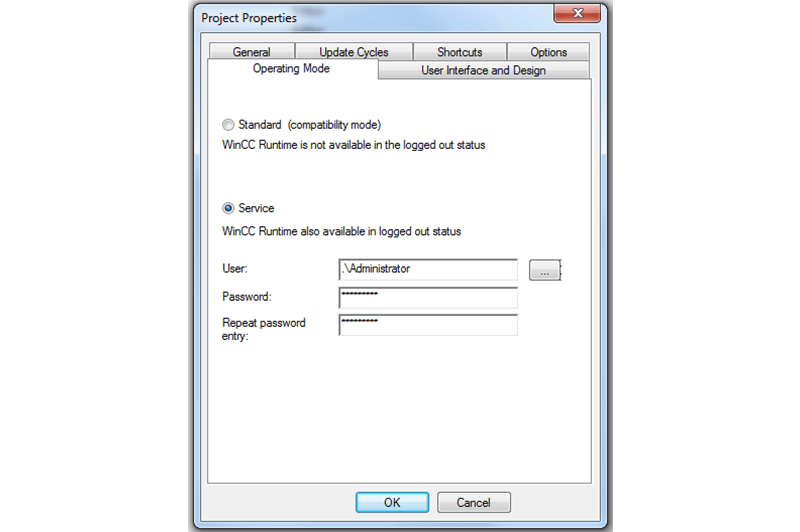
Operating Mode
One final note concerning the operation of the redundant servers is the operating mode. Operating mode is found within the computer properties of WinCC Explorer, under the Operating Mode tab. By default, the project will run as the Standard operating mode, meaning the user must be logged into the computer. However, you can also run WinCC as a service.
Running WinCC as a service is important if multiple users will be logging in and out of the computer, but the application should not be stopped. This is especially applicable if a user is using Remote Desktop to access the computers running WinCC. Therefore, the redundant WinCC servers should run as a service if they need to run headless in the server rack. A user can access them and start the project via Remote Desktop without affecting Runtime.