Allen Bradley PLC’s, both in RSLogix5000 and Studio5000, use a text-based language to assemble their ladder code. Each rung of contacts and coils can be translated to a line of code. This is a unique feature that gives the user several benefits. One of these is that each part of the project can be exported into a simple text file and then reimported into another project. This eliminates the issues of version numbers of code compatibility.
Beyond just allowing for code to be exported and imported between projects or Rockwell editors, it also allows for external code generation. In fact, a whole project could be created using a text editor and then imported into RSLogix5000 or Studio5000. While this might not be a practical method of creating an entire project, the ability to generate text-based code has several benefits.
In a recent project, DMC used an Excel Macro to generate the buffering routines for an Allen Bradley project. Rather than manually creating an input routine for each of the hundreds of tags, in one click, a simple Macro generated files that could be imported into Rockwell.
In the following example, we will work with a simple program that has three inputs and outputs as shown in Figure1. This information can easily be compiled from the wiring info or electrical schematics.
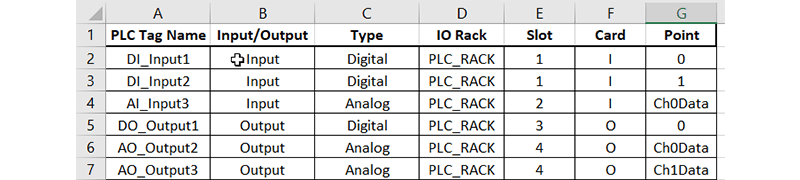 Figure 1: List of IO Information
Rockwell’s text-based code is saved in a file format with an L5X extension. However, this is just a .txt file with a different extension. From Rockwell, you can export a routine, and if you open the L5X file with a text editor, you can see how the code translates to text.
Generating the Text File
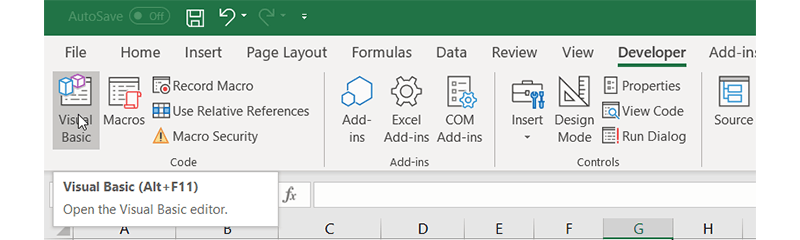
One of the easiest ways to generate a text file from Excel is to use a Macro written in VBScript. Open the Visual Basic editor from the Developer tab to bring up the VBScript editor.
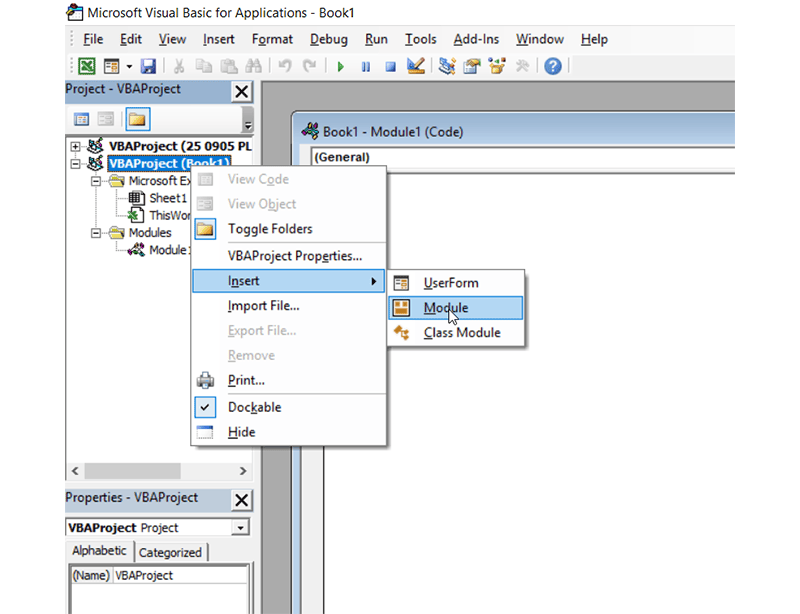
In the Visual Basics editor, we will create a new module. Right click on the excel document that you are using and insert a new module. Each module acts like a function.
As your code gets more complicated, subfunctions can be separated to make the code more modular. For our purpose, the code is simple enough that we will only need one module.
Sub CreateBufferingFiles()

End Sub
As mentioned, the first thing to do in our macro is to generate our files. VBScript uses a helper object to create the actual file. Next, we create our file through our file path string. This can be changed to whatever location you want the file to end up. Then, we create our file as a text file.
'Create File
Dim fso As Object
    	Set fso = CreateObject("Scripting.FileSystemObject")


Dim myInputFilePath As String
	myInputFilePath = "C:\Documents\ExampleProject\MapInputs.L5X"
Dim myInputFile As Object
Set myInputFile = fso.createTextFile(myInputFilePath)

Dim myOutputFilePath As String
    	myOutputFilePath = "C:\Docuements\ExampleProject\MapOutputs.L5X"
	Dim myOutputFile As Object
	Set myOutputFile = fso.createTextFile(myOutputFilePath)
Creating Lines of Code
Once we have created our file, we can use the writeLine command to create lines of code. The first thing we need to create is the header information for the device. This specifies the version number, PLC name, and scope of things in the project. This information doesn’t need to match exactly since we can import directly to a program, but the formatting needs to be consistent.
The easiest way is to export a file and then copy the header lines into our VBScript, add the object.writeLine command and then format it to be a string. The program below would be an example of a way to create header information. This would need to be done for both the input and output mapping routines.
‘======================================== Input ===============================
‘Input Mapping Header
'Create Header Information
myInputFile.writeLine "<?xml version=""1.0"" encoding=""UTF-8"" standalone=""yes""?>"
myInputFile.writeLine "<RSLogix5000Content SchemaRevision=""1.0"" SoftwareRevision=""31.00"" TargetName=""State_RunOut"" TargetType=""Routine"" TargetSubType=""RLL"" ContainsContext=""true"" Owner=""AB-Rockwell, DMC"" ExportDate=""Thu Dec 06 14:42:07 2018"" ExportOptions=""References NoRawData L5KData DecoratedData Context Dependencies ForceProtectedEncoding AllProjDocTrans"">"
myInputFile.writeLine "<Controller Use=""Context"" Name=""TigrisThermalSystems"">"

 'Begin Controller scope rungs and tags
 myInputFile.writeLine "<Programs Use=""Context"">"
 myInputFile.writeLine "<Program Use=""Context"" Name=""HydronicLoop"">"

 'Create Controller Tags

 'Create rungs
 myInputFile.writeLine "<Routines Use=""Context"">"
 myInputFile.writeLine "<Routine Use=""Target"" Name=""MapInputs"" Type=""RLL"">"
 myInputFile.writeLine "<RLLContent>"
And for the Output:
	‘======================================== Output ===============================
‘Output Mapping Header
'Create Header Information
myOutputFile.writeLine "<?xml version=""1.0"" encoding=""UTF-8"" standalone=""yes""?>"
myOutputFile.writeLine "<RSLogix5000Content SchemaRevision=""1.0"" SoftwareRevision=""31.00"" TargetName=""State_RunOut"" TargetType=""Routine"" TargetSubType=""RLL"" ContainsContext=""true"" Owner=""AB-Rockwell, DMC"" ExportDate=""Thu Dec 06 14:42:07 2018"" ExportOptions=""References NoRawData L5KData DecoratedData Context Dependencies ForceProtectedEncoding AllProjDocTrans"">"
myOutputFile.writeLine "<Controller Use=""Context"" Name=""TigrisThermalSystems"">"

 'Begin Controller scope rungs and tags
 myOutputFile.writeLine "<Programs Use=""Context"">"
 myOutputFile.writeLine "<Program Use=""Context"" Name=""HydronicLoop"">"

 'Create Controller Tags

 'Create rungs
 myOutputFile.writeLine "<Routines Use=""Context"">"
 myOutputFile.writeLine "<Routine Use=""Target"" Name=""MapOutputs"" Type=""RLL"">"
 myOutputFile.writeLine "<RLLContent>"
Setting Up the Worksheet
Once we have created the header info, we can set up the information that will go through the worksheet and create a rung for each tag. This loop looks at the value of the first column and continues until it finds a blank cell upon which it ends the loop. We also need to keep track of how many rungs we have created to number our rungs correctly.
'loop through input tags to create rungs

Dim i As Integer
i = 2 'Set at the row value of the first tag

Dim inputRungNumber, outputRungNumber As Integer
inputRungNumber = 1
outputRungNumber = 1

'check the contents of the first cell
Dim tagName As Range
Set tagName = Worksheets("Sheet1").Cells(i, 1)
Do While Not IsEmpty(tagName.Value)
Creating Rungs
Finally, we can create our rungs. By looking at the tag type column, we determine whether it is an input or output and whether it is analog or digital. For a digital value, we use an open contact and coil. These are the XIC and OTE instructions. For an analog value, we use the move function, MOV.
'Read Tag Type
        Dim tagType As String
        tagType = Worksheets("Sheet1").Cells(i, 2).Value

        'Read Module info
        Dim module, slot, channel, point As Range
        Set module = Worksheets("Sheet1").Cells(i, 3)
        Set slot = Worksheets("Sheet1").Cells(i, 4)
        Set channel = Worksheets("Sheet1").Cells(i, 5)
        Set point = Worksheets("Sheet1").Cells(i, 6)

        'Create Digital Input Rung
        If tagType = "DI" Then
            inputRungNumber = inputRungNumber + 1
            myInputFile.writeLine "<Rung Number=""" & inputRungNumber & """ Type=""N"">"
            myInputFile.writeLine "<Text>"
            myInputFile.writeLine "<![CDATA]XIC(" & module.Value & ":" & slot.Value & ":" & channel.Value & "." & point.Value & ")OTE(" & tagName.Value & ");[]>"
            myInputFile.writeLine "</Text>"
            myInputFile.writeLine "</Rung>"

        'Create Digital Output Rung
        ElseIf tagType = "DO" Then
            outputRungNumber = outputRungNumber + 1
            myOutputFile.writeLine "<Rung Number=""" & outputRungNumber & """ Type=""N"">"
            myOutputFile.writeLine "<Text>"
            myOutputFile.writeLine "<![CDATA]XIC(" & tagName.Value & ")OTE(" & module.Value & ":" & slot.Value & ":" & channel.Value & "." & point.Value & ");[]>"
            myOutputFile.writeLine "</Text>"
            myOutputFile.writeLine "</Rung>"

        'Create Analog Input Rung
        ElseIf tagType = "AI" Then
            inputRungNumber = inputRungNumber + 1
            myInputFile.writeLine "<Rung Number=""" & inputRungNumber & """ Type=""N"">"
            myInputFile.writeLine "<Text>"
            myInputFile.writeLine "<![CDATA]MOV(" & module.Value & ":" & slot.Value & ":" & channel.Value & "." & point.Value & "," & tagName.Value & ");[]>"
            myInputFile.writeLine "</Text>"
            myInputFile.writeLine "</Rung>"

        'Create Analog Output Rung
        ElseIf tagType = "AO" Then
            outputRungNumber = outputRungNumber + 1
            myOutputFile.writeLine "<Rung Number=""" & outputRungNumber & """ Type=""N"">"
            myOutputFile.writeLine "<Text>"
            myOutputFile.writeLine "<![CDATA]MOV(" & tagName.Value & "," & module.Value & ":" & slot.Value & ":" & channel.Value & "." & point.Value & ");[]>"
            myOutputFile.writeLine "</Text>"
            myOutputFile.writeLine "</Rung>"
        End If

        i = i + 1
        Set tagName = Worksheets("Sheet1").Cells(i + 1, 1)
Closing the Files
Once we have looped through all our values, we can end the loop and create the footer information. The final step is to close the files and release the files by setting our variables to nothing.
Loop

    '=============INPUT==============
    'Close the routine and program
    myInputFile.writeLine "</RLLContent>"
    myInputFile.writeLine "</Routine>"
    myInputFile.writeLine "</Routines>"
    myInputFile.writeLine "</Program>"
    myInputFile.writeLine "</Programs>"

    'Create footer information
    myInputFile.writeLine "</Controller>"
    myInputFile.writeLine "</RSLogix5000Content>"

    '=============OUTPUT==============
    'Close the routine and program
    myOutputFile.writeLine "</RLLContent>"
    myOutputFile.writeLine "</Routine>"
    myOutputFile.writeLine "</Routines>"
    myOutputFile.writeLine "</Program>"
    myOutputFile.writeLine "</Programs>"

    'Create footer information
    myOutputFile.writeLine "</Controller>"
    myOutputFile.writeLine "</RSLogix5000Content>"

    'Close File and set to nothing
    myInputFile.Close
    Set myInputFile = Nothing
    myOutputFile.Close
    Set myOutputFile = Nothing
	End Sub
This method of creating buffering routines requires some overhead to set up, but once the macro is created, it will generate the routines for any number of tabs. If massive changes need to be made, this workbook can be edited and then the routine can be reimported. This type of macro has advantages beyond buffering and can be used to generate any amount of code with repetition.
Leveraging tools like these is one of the ways that DMC makes our programming more efficient and robust. Using Excel Macros in Rockwell programming can save time from writing tedious code and will allow the programmer to focus on more important issues.
Learn more about DMC's Allen Bradley PLC Programming expertise.
Learn more about DMC's Manufacturing Automation & Intelligence Services and contact us for any project inquiries.