How to Commission an Allen Bradley PowerFlex VFD
PowerFlex VFDs are very adept drives capable of interfacing with a lot of options for control, configuration, and monitoring. However, this range of capabilities can be daunting and confusing for those unfamiliar with industrial VFDs, or new to PowerFlex drives.
This tutorial will demonstrate how to set the IP address of a PowerFlex VFD drive and how to uses Logix Designer to configure drive and motor parameters needed for commissioning.
Setting the IP Address Using BootP
Perhaps the simplest way to configure the IP address of a new PowerFlex drive is to uses BootP. BootP is a free DHCP tool that allows you to quickly set the IP address of a device using the device’s MAC address. Each PowerFlex drive will have a unique MAC address that can be found somewhere on the physical drive. For PowerFlex 523, 525, and 527s it’s located under the drive’s terminal cover on the left side of the case.
- Once you have the MAC address for the drive you want to configure, open BootP. If prompted, select the network interface that’s connected to the same network as the drive.
- Once BootP has found the drive, you should see the drive’s MAC address in BootP. Double click the MAC address and enter the desired IP address. (It may be a good idea first to try and ping the IP address to confirm that no other devices are already using the IP address.)
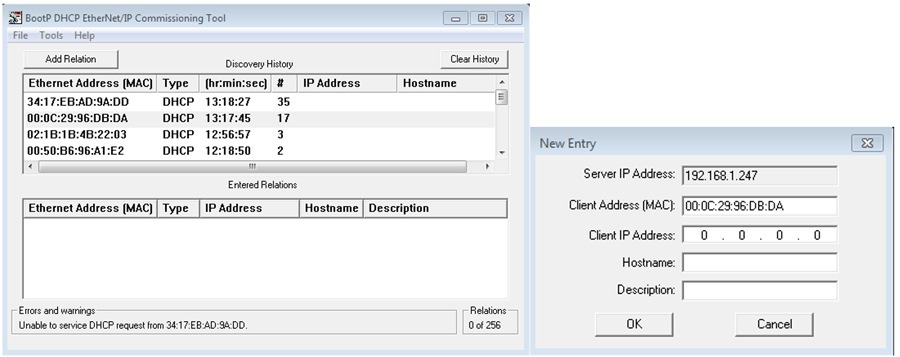
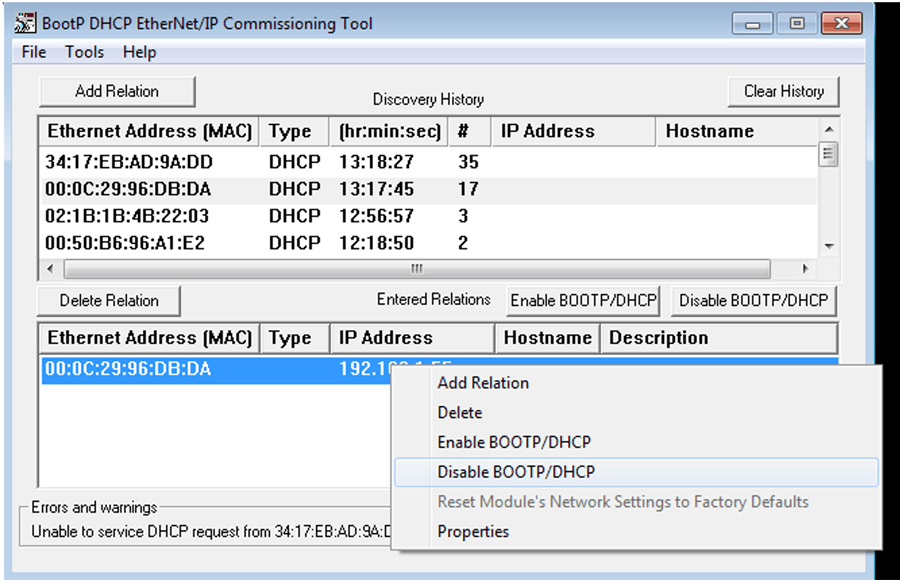
- Now, right-click on the device and select Disable BootP/DHCP. If this does not work you may have to open RSLinx Classic and choose Disable DHCP on the drive.
Setting the IP Address on the Drive’s Faceplate
You can also set the IP address of a drive using the keypad. This process is useful if DHCP mode is disabled, and you don’t know the drive’s IP address, or you are having trouble connecting to the drive over the network due to an IP conflict or similar problem.
Note: these parameter numbers are for PowerFlex 520s (523, 525, 527) drives and may differ for other PowerFlex drives. Check your drive’s manual for parameter numbers.
- Starting on the main speed display on the drive press enter, and then press up until you see the letter C followed by a three-digit number.
- Press enter as well as 'up and down' until you arrive at C128, and press enter again. (C stands for communications, and 128 is the start of the IP address configuration we need to set to configure the drive for Ethernet IP communication)

- By default, C128 is set to 2, which enables DHCP and disables Ethernet IP, press down to set C128 to 1 and then enter and escape.
- Now set C129 to the first octet of the desired IP address and C130-C132 to the second, third and fourth octet. For example, 192.168.1.55
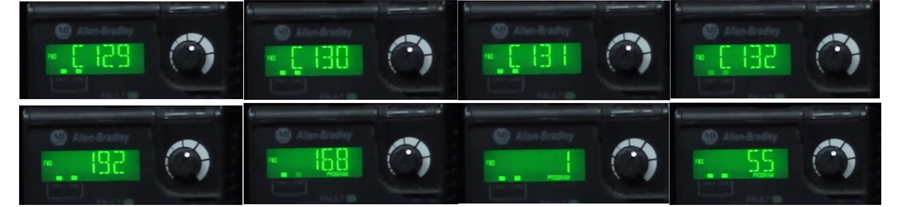
- Set C133-C136 with the desired subnet mask, typically 255.255.255.0.
- Set C137-C140 with the default gateway, typically whatever the IP address was with the last octet replaced with 1.
- Now power cycle the drive and check that the IP address is accessible. (The easiest way to open the command line and type “ping xxx.xxx.xxx.xxx”, substituting in the drives IP address.)
Configuring Drive Parameters from Logix Designer
Drive parameters are stored in both the VFD and Logix Designer and can be changed directly on the drive or through Logix Designer. This makes it quick and easy to upload or download parameters between drives. The one exception to this is that there must first be a known ethernet IP address for the drive before Logix Designer can connect to the drive.
- To add a VFD drive to Logix Designer, under I/O Configuration right click your network interface and select add module, then find the catalog number matching your drive and double click it.
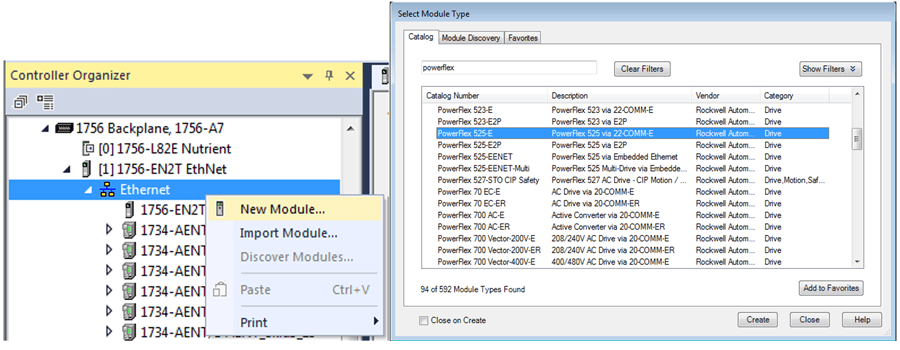
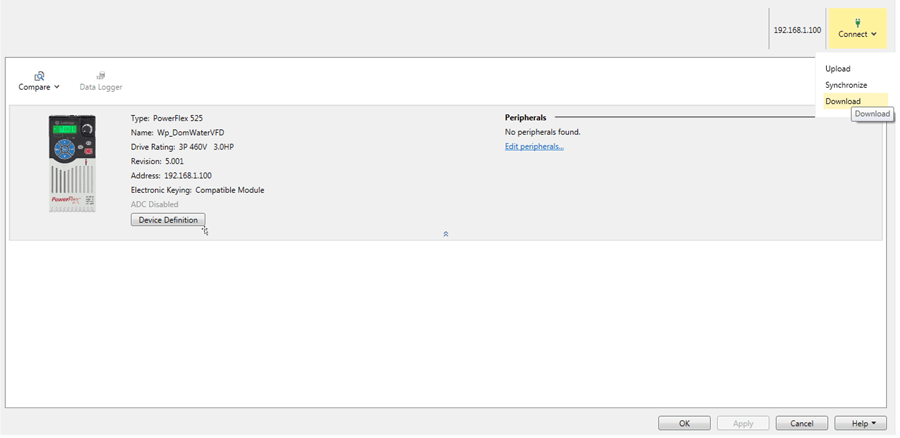
- Now enter the drives name, IP address, rating, and other parameters. Click 'Ok.' The drive should be added to the I/O Configuration.
- Under I/O Configuration, double click on the drive and select parameters. Here you can enter all the motor and drive parameters including motor speed, current, voltage, fault signaling, and control.
- Once all the parameters are correct, click on connect in the top right corner and hit download. This will download the project parameters onto the drive. (If prompted select the drive from the list of devices.)
PowerFlex VFDs are very capable drives that with a little know-how can quickly be set up and commissioned. I hope this information helps you understand the process of commissioning a PowerFlex drive and some of the options for the setup that PowerFlex drives offer.
Learn more about DMC's Allen Bradley PLC Programming services and contact us to get started on your next project.
Comments
There are currently no comments, be the first to post one.