Many people and/or companies have computers running that they would be very upset if it were to fail. There are tons of examples where the failure of hardware or loss of software install files can be devastating to recover a computer or bigger system it is connected to.
Luckily there is a way to preserve a computer without having to keep the physical hardware in solid running condition forever. VMware offers a free tool called VMware vCenter Converter that allows the user to take a physical machine and create a virtual version of it while it is powered on and running!
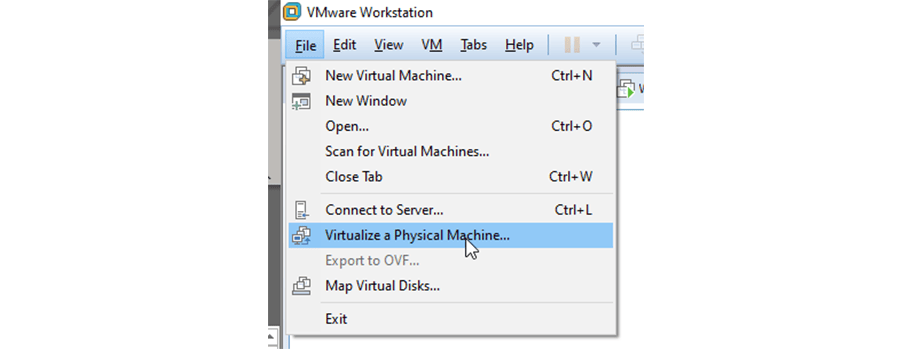
Virtualize a Physical Machine
In VMware workstation you can find an option to virtualize a physical machine:
This will prompt you to download the latest version of VMware vCenter Converter Standalone.

On VMware’s website, you can create a free account and download the software here.
You will have to create a FREE account to do this, accept the end-user license agreement, then the software download will begin.
When the download is complete you should have a .exe file available in your downloads folder. Run this executable and the software install will begin. For this example, I have installed the standard installation of the software on the local machine. The software can then be run on the host machine from either the shortcut created on the desktop or through the newly added program path where it was installed.
Once the application opens you will see a Convert Machine button near the top left corner, which will prompt with a wizard to start the conversion. You can also start this from File -> New -> Convert Machine, or simply pressing Ctrl+M.

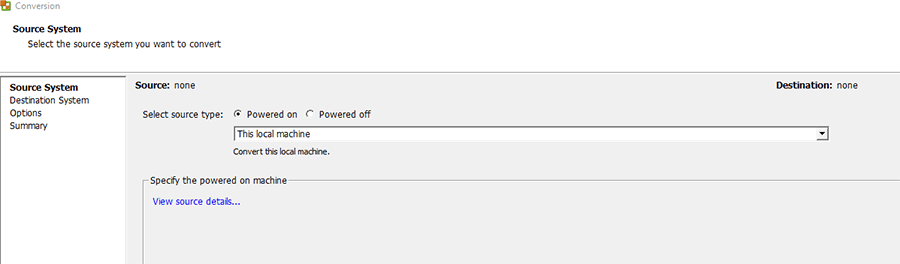
The first page in the wizard is where you pick the source computer. In this example, we want to use the host machine to clone so we leave the drop-down as local machine and select the radio button for ‘Powered On’. Click Next.
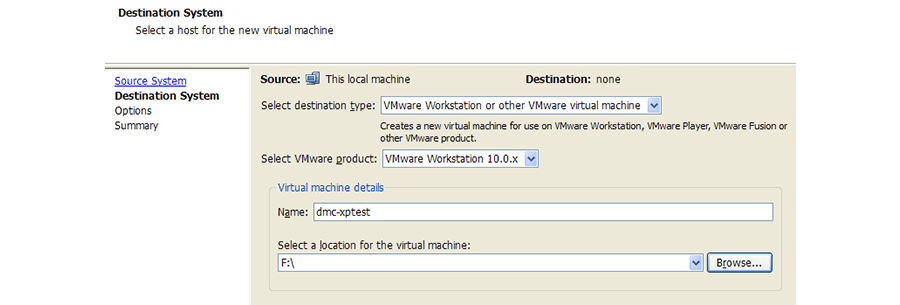
The next screen is Destination System. Here you can select the Destination type, which affects the other options available. For a ‘VMware Workstation or other VMware virtual Machine’, you can select which software/version you will be using after the VM is created.
The VM details allow you to change the computer name for the VM and the destination path for where the application will save the files. Depending on the size of the host being used, this could be quite large, so make sure you have a destination that has plenty of storage.
For instance, my local machine has several virtual machines already saved on the hard drive which can take up a very significant amount of storage, so it is recommended to save files on external drives or networks then move them back to the VM later if needed using the shared folders options in VMware Workstation.
Configuring The VM
As a better example, I will go through the process using a bare-bones Windows machine that has very little stored on the hard drive.
You can see the destination was set to use a removable disk mounted on the F drive. The next page has several options the user can choose from. These options include the size of the virtual hard drive, memory allocated for the processor, number of cores for the CPU, etc.
The size of the hard drive has multiple options: Maintain Size (keeps the full size of the physical hard drive), Min Size (uses the minimum amount possible), or type in size (any value above the Min Size requirement). Depending on how much you plan on adding to the VM after creation, select your size accordingly. Also, the size of the hard drive will affect the size of the VM file so make sure your destination storage device can handle this.
Memory allocation and Number of processors can be adjusted in the VM settings later in VMware using the VM -> Settings. Then, navigate to the hardware tab and select the Memory and Processors to change their values.

Adding the VMware Tools Option
A useful tool that is recommended for install is VMware Tools. This install is great for using the auto fit and adjustment for the guest operating system so it will match the screen resolution to better fit the environment it is running in. The option to install VMware Tools on the VM can be found here:

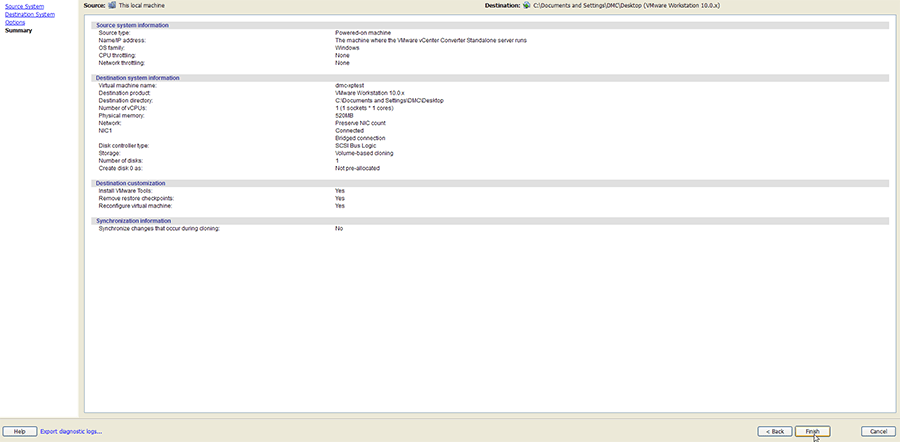
Clicking to the next page will bring you to the summary. Here you can review all the options selected from the wizard and if anything looks wrong you can navigate back to change the options.
Creating the VM
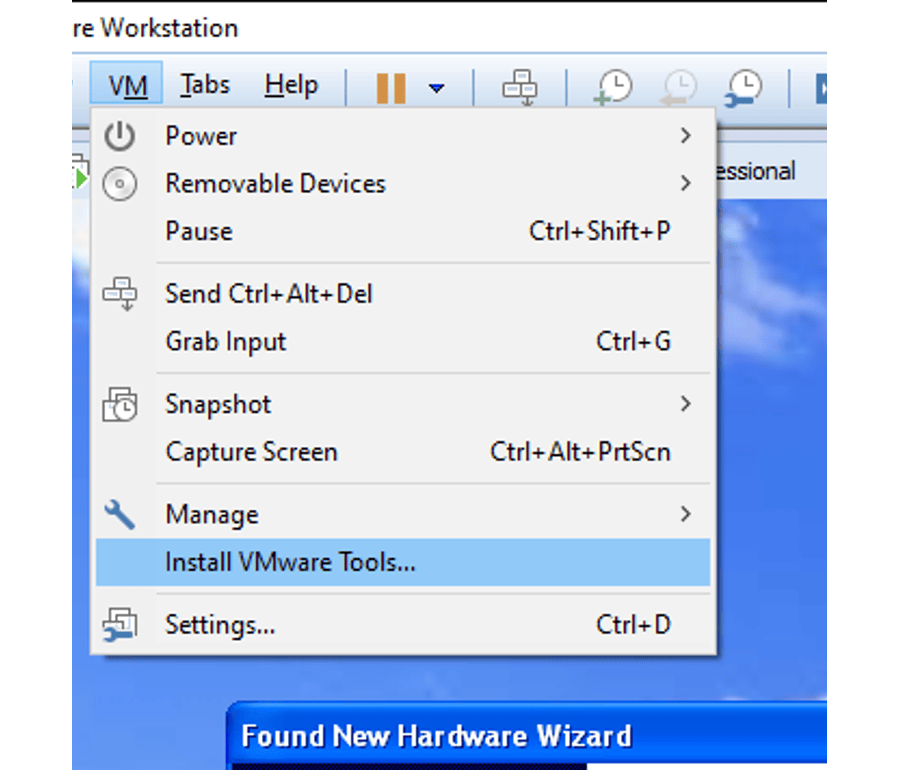
Clicking finish in the bottom right corner will start the conversion process. If you choose not to do this, you can install VMware tools later in VMware Workstation through the top menu bar VM -> Install VMware Tools… selection.
Depending on the size and specs of the host computer, the conversion process can take a while. The conversion screen will give you estimated time and total percentage complete while it is running, so you will have good feedback on where it is at in the process.

Once the process is complete. You will see the status change to ‘Completed’ and you now have the VM file that you can start in VMware.

Opening the VM
In the destination folder selected in the Wizard, you will find the ‘.vmx’ and ‘.vdmk’ files created from the converter application. The ‘.vmx’ file is what you select to power up the machine in the VMware workstation. In the picture below you can see the two files generated from the conversion process.

Before opening the VM, it is best practice to save a copy of the files on the host machine’s hard drive. A good idea is to make a Virtual PC folder on the C:\ drive to store all the VMs. As you can see below here is the location where this example VM will be stored.

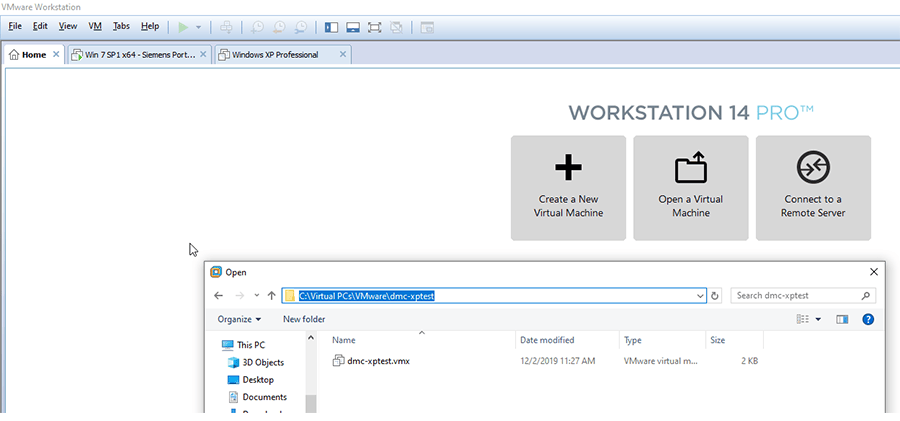
In VMware Workstation, click the ‘Open a Virtual Machine’ button, and navigate to the path where the VM is saved. Select the .vmx file and click ‘Open’.
Now you can run the VM by opening the .vmx file in VMware, and if the VM is backed up it can live forever, even with a failure in the VM or the host computer. Make sure to save your VM in a safe place in case of something tragic happening!
If you chose not to install VMware tools earlier, you can still install it using VMware Workstation. It will prompt on screen how to start the installation. It may require a manual start from the start menu.
Once the installation is complete the VM will need to restart. Now you can run the VM with auto size adjustment for the monitor connected to the host machine, plus more seamless transitions from VM to host windows if working with multiple monitors.
With this short procedure, you can now enjoy the same machine running in a virtual environment!
Contact DMC with any questions and learn more about our Manufacturing Automation services.