One of the many advantages to using Beckhoff TwinCAT 3 is that it stores project files and code in text-based file formats — making it a great candidate for use with version control software.
When setting up a project, there are a few steps you can take to make full use of the change-tracking and merging benefits that most modern version control software provide. This blog lays out these steps as a guide for setting up your new TwinCAT projects.
Be sure to also check out my companion blog on Version Control and Multi-user Development with Beckhoff TwinCAT 3 for a more detailed discussion of the settings here and other tips. If you have any thoughts or tips of your own, please leave them in the comments below! DMC is always committed to improving our workflow, so we’d love to hear your thoughts.
Table of Contents
1. Separate Project Components into Individual Files
Back to Table of Contents
Storing project components in individual files rather than all lumped into common files can help better track and merge changes in a VCS. By default, TwinCAT stores POUs, DUTs, and other code elements in their own individual files.
On the contrary, other project elements such as hardware configuration or variable mapping usually default to being lumped together into project files. Many elements can instead be separated out into their own individual files.
1.1 Enabling the Option/Setting
Back to Table of Contents
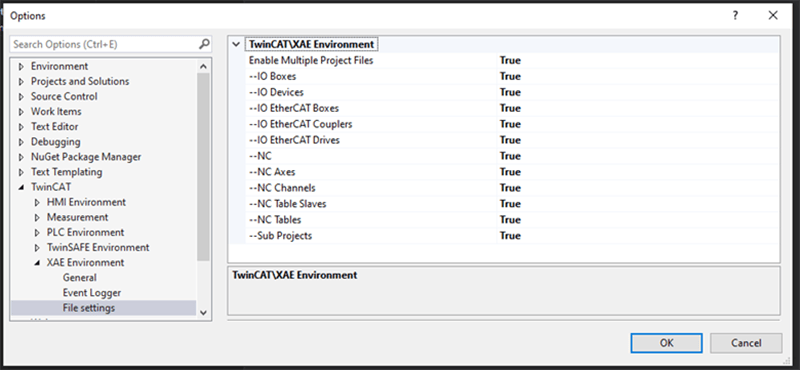
To enable this setting, go to Tools > Options > TwinCAT > XAE Environment > File settings. Set the Enable Multiple Project Files option to True. You’ll have to restart XAE for this to take effect.
In this menu you can also set XAE to save different types of elements in their own file by default (the True option for each element). Much like the in creation of this article, it is DMC’s best practice to save as many elements as possible in separate files to better track and merge changes with them.
1.2 Manually Enabling Individual File Storage
Back to Table of Contents
Alternatively, we can manually set individual components to be saved in separate files through the project tree.
For example, we might want to create an individual XTI file for servo hardware, so we can better track any changes to servo parameters. To do this, just click on the Servo in the solution explorer and set the Save in own File option to True in the Properties window (View > Properties Window if it’s not already open).
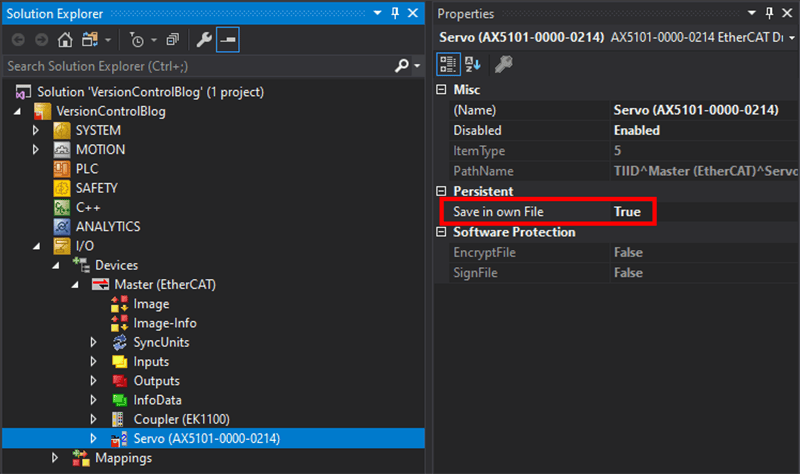
If a solution explorer element is saved in its own file, a floppy disk will appear in the bottom left corner of the icon (red if unsaved, black if saved).


2. Keep Unrestored Links
Back to Table of Contents
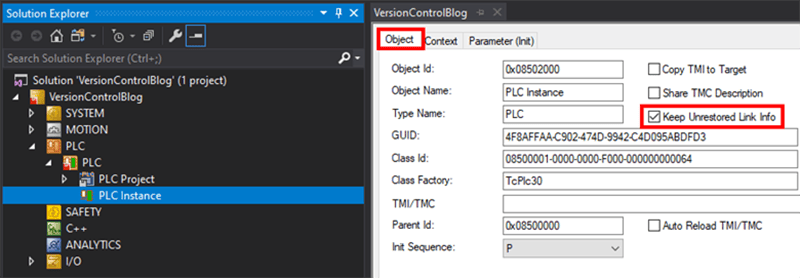
By default, TwinCAT will delete variable links that are found to be invalid in the process image. This might cause problems when merging branches.
To prevent variable links from being deleted during merges, the Keep Unrestored Link Info option can be selected in the Object tab of the PLC project’s PLC instance.
2.1 Importing and Exporting Mappings (Optional)
Back to Table of Contents
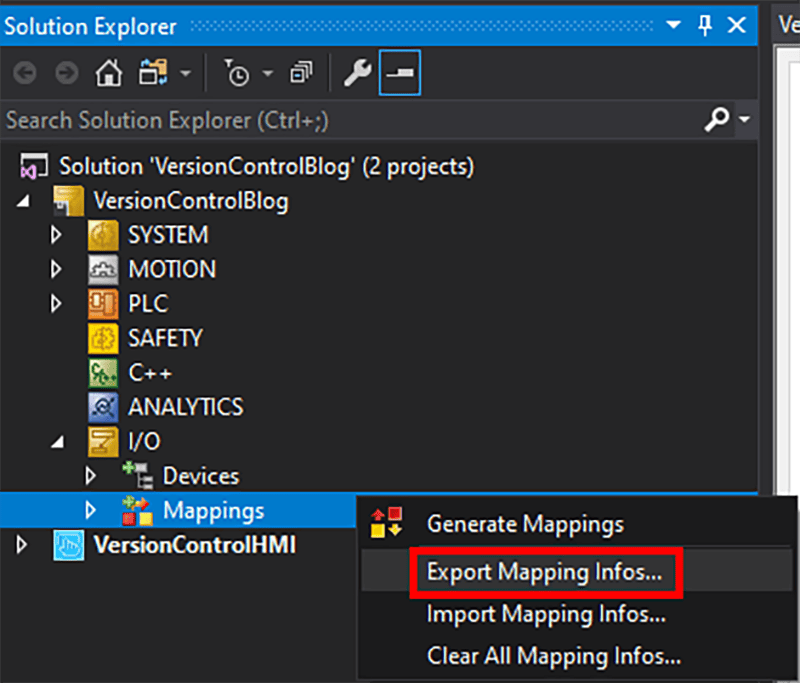
While the above option does help, it may not always keep links from being deleted during merges. Another option is to export and store mappings in your repository whenever you make hardware changes.
To do so, simply right click on I/O > Mappings and select Export Mapping Infos.
The output XML file is human-readable and easily trackable with a version control system:
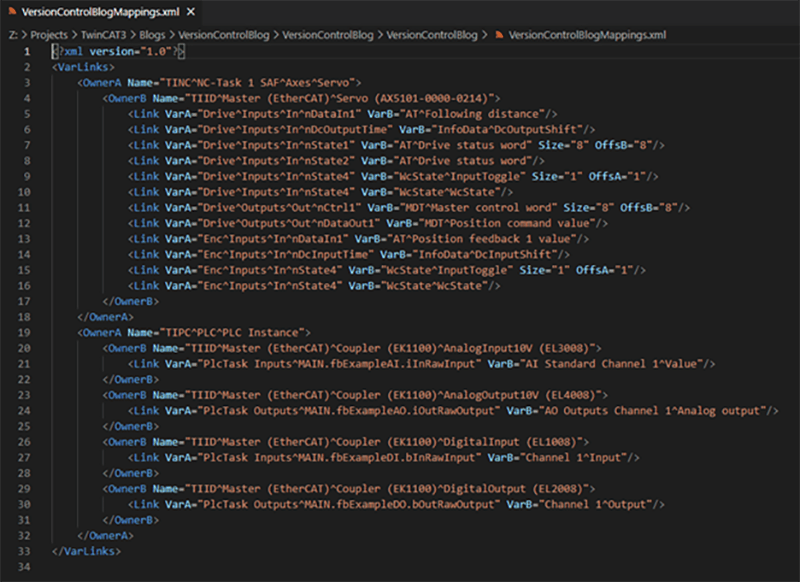
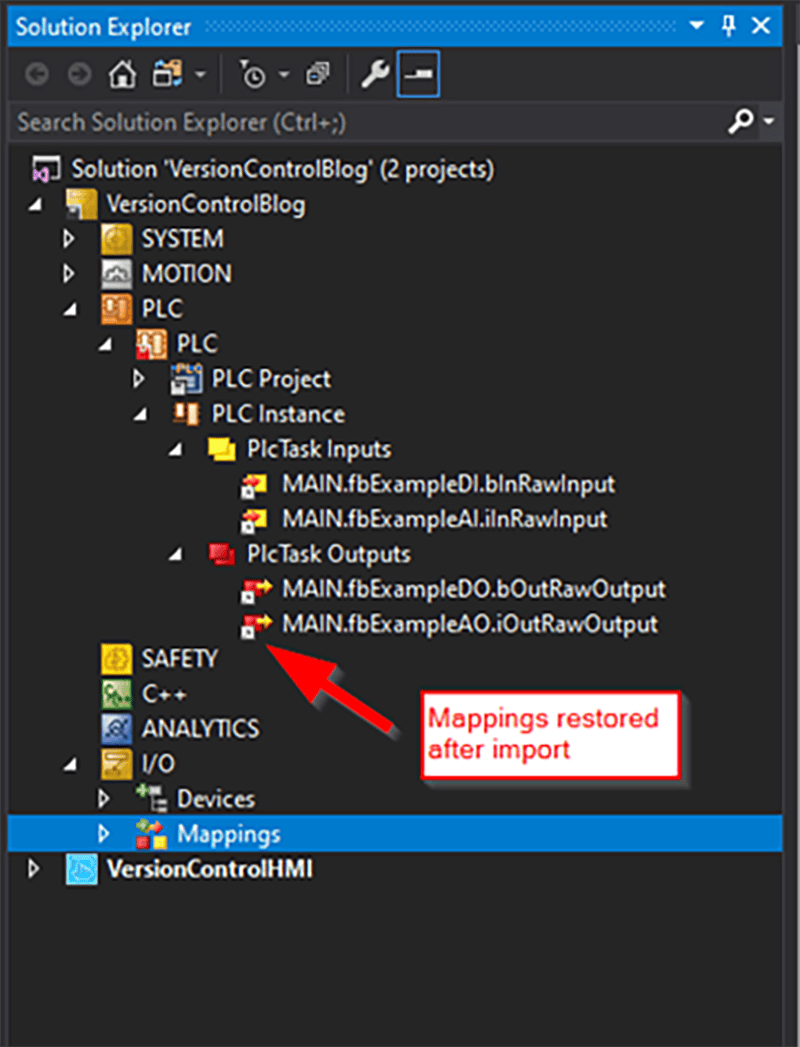
After making hardware mapping changes, simply export this file, save it in your repository, and commit it. Then, if you lose hardware mappings in the future, you can simply right click on I/O > Mappings and select Import Mapping Infos.
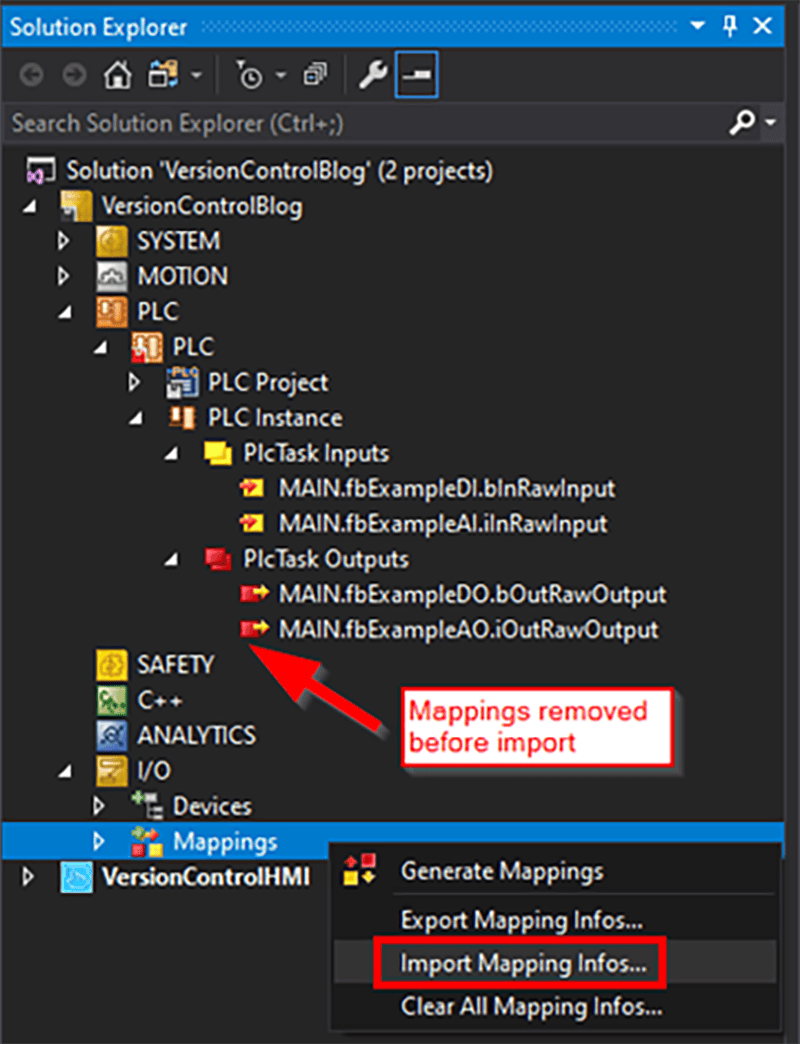
DMC has found that this is not a perfect method, but it may be a helpful practice to retain mappings through version control operations like merging.
3. Pin the Project Version
Back to Table of Contents
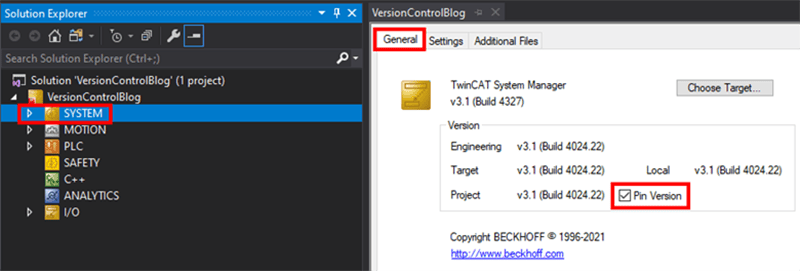
For the TwinCAT XAE Project, it’s helpful to pin the project version under SYSTEM > General > Pin Version. This will ensure the project is not accidentally upgraded by developers with different versions of TwinCAT installed on their computers.
4. Pin Library Effective Versions
Back to Table of Contents
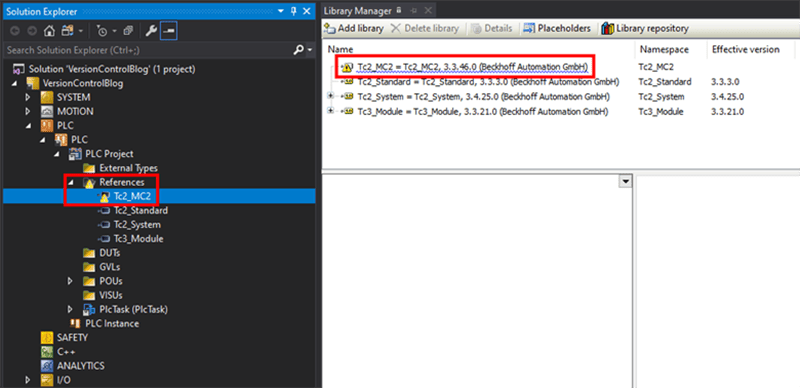
Libraries in TwinCAT PLC projects are set to use the newest version available by default (indicated by an asterisk after the name in the Library Manager). You can open the library manager by double clicking on the libraries in PLC > {PLC_Project_Name} > {PLC_Project_Name} Project > References.
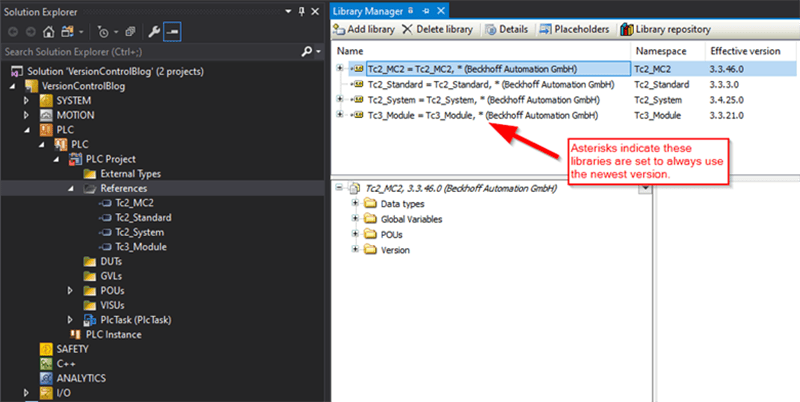
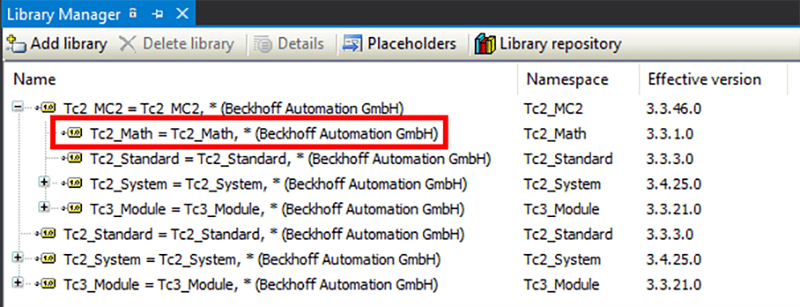
However, this view may not give us the full picture of every library used in the project. If we expand libraries, we can see that they have dependencies to other libraries — which may not appear in the top-level library manager list.
The best place to find all the libraries used in the project and their version status is by opening the Placeholders menu.
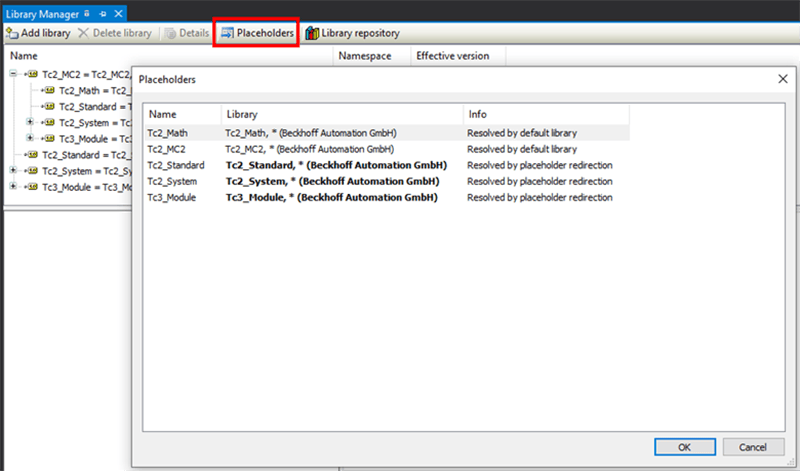
Here, we can use the asterisks to see which libraries are set to always use the newest version. This setting can cause problems for a multi-developer team if code was downloaded with a certain set of newest library versions, and a developer with different newest library versions tries to go online with that PLC.
4.1 Placeholder Redirection to a Specific Version
Back to Table of Contents
The solution to this problem is to pin the libraries’ versions. It doesn’t matter greatly which library version is picked for each library (unless newer versions have bugfixes that are necessary), so we usually pick the newest library version available at the time of project creation or deployment.
The best way to pin a library is, again, through the Placeholder menu, since here you can pin all libraries used in the project. Simply click on the Library column for each library and select a version. The asterisk will disappear and is replaced by the explicit version of the library used.
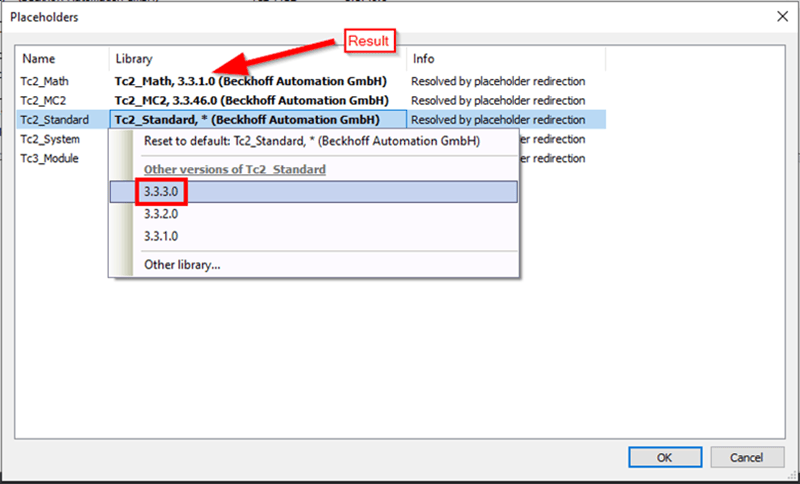
Do this for all libraries in the project.
4.2 Installing Missing Libraries
Back to Table of Contents
Completing the previous step will create a new problem (especially when supporting older projects) if team members do not have the proper library versions available on their computers. If libraries are missing, a yellow hazard symbol will appear on both the library in the solution explorer and the library manager.
To install a library, click on Library repository and select Install.
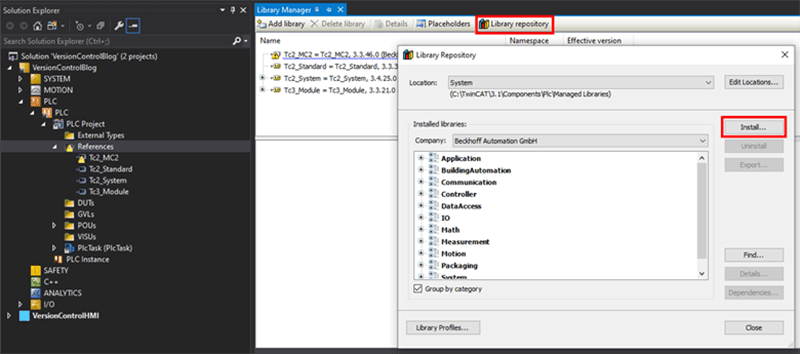
Navigate to where the library is located and select the library file. It may be necessary to change the filter to All files to get the library to appear.

4.3 Obtaining Missing Libraries
Back to Table of Contents
Of course, you will need to actually have the library file to install it. Different versions of default TwinCAT libraries come with different versions of TwinCAT, so find out what version your project was originally made with.
If you have a computer or virtual machine with your desired version of TwinCAT installed, you should be able to find libraries in C:\TwinCAT\3.1\Components\Plc\Managed Libraries (or whatever path your installation is under).
Alternatively, if you have the installer for your desired version of TwinCAT handy, you can install it on a computer or virtual machine and find the libraries there. Then, copy these libraries to your development environment and install them through the above method.
5. Separating LineIDs (Optional)
Back to Table of Contents
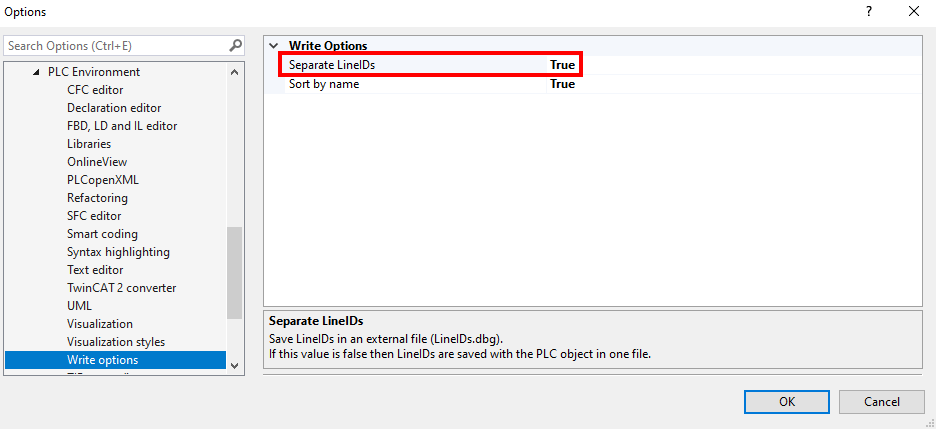
By default, TwinCAT XAE includes LineIDs - which are used for breakpoint handling and to assign code lines to machine code instructions - with the source code files in the project. While these generally don't cause a lot of trouble, they can be a nuisance by causing conflicts when merging branches in source control. Fortunately, they can be saved in a separate file, LineIDs.dbg, which can then be safely ignored in source control. This will prevent those merge conflicts and tracking of the LineIDs altogether.
To enable this setting, go to Tools > Options > TwinCAT > PLC Environment > Write options. Set the Separate LineIDs option to True.
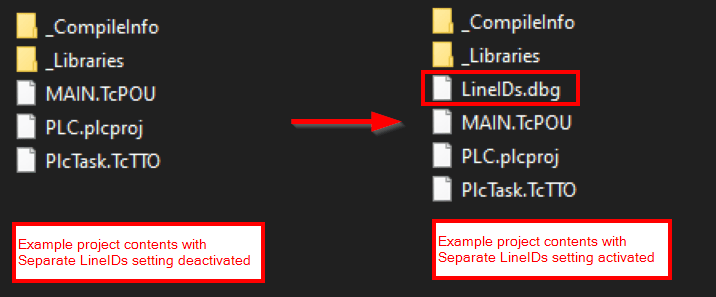
After saving items in the project, the LineIDs.dbg file should be created, and the LineIDs should be removed from source code files.

A word of caution - if you plan to use this setting with a multi-developer team, you'll need to make sure all developers have the same value for this setting in their development environments. Otherwise you may wreak havoc on your source control, with some developers constantly saving their files with separate LineIDs and others constantly saving their files with included LineIDs.
And this should be it! Your TwinCAT 3 project should now be configured to make better use of the advantages that version control systems offer.
Further Reference
For more information on version control with TwinCAT, please see the following links:
Thanks to Stephen Shull for contributing to the creation of this article.
Learn more about DMC's TwinCAT3 programming expertise and contact us for your next project.