Virtualizing a DCS in PCS7
Before applying changes to your PCS7 control system, it’s always good practice to simulate on a virtual processor.
While PLCSIM makes the process of simulating changes to the DCS nearly effortless, it’s a bit more complicated to simulate your entire DCS on a VM. This blog will guide you through configuring virtual AS/OS communication in your PCS7 Multiproject.
Getting Started
The first step to getting your virtual DCS configured is to configure your VM’s NICs. If you're not working in a VM, you can follow along on your host machine.
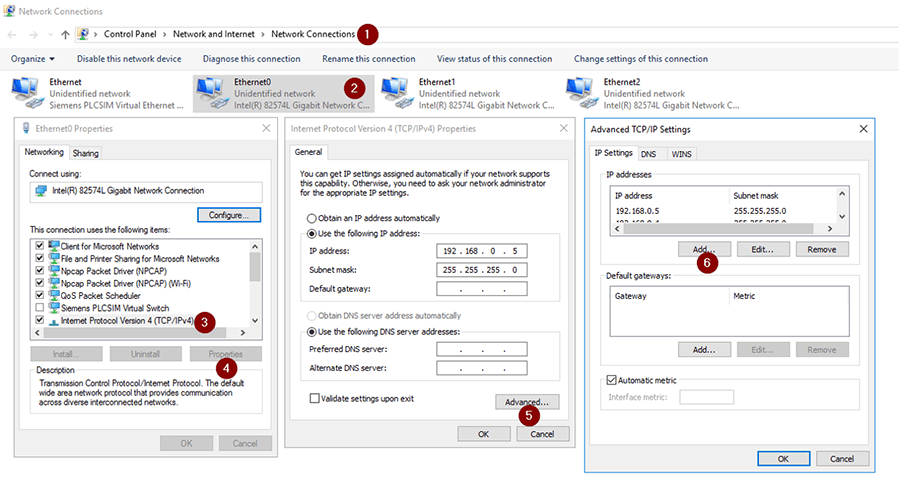
- Open your Windows OS’s Network Adapters panel.
- Assign static IP addresses to one of your VM’s NICs.
- Hit the ‘Advanced’ button to assign more than one IP to the NIC.
- I threw the range 192.168.0.3-, .4, and .5 at the adapter to mimic the assignments on my multiproject’s physical AS, as well as the changes we’re about to make.
Editing the Multiproject
Next, we’ll make some changes to your Multiproject. Open up a copy of your multiproject in Simatic Manager – you probably don’t want to do this directly on your ES because the hardware and network configurations will change.
- In HW Config, add a new communications processor to the PLC rack you’re going to simulate. This will be the path that the simulated OS will use to browse to the AS.
- Make it easy on yourself and search for the CP card by catalog number. I added the 6GK7 443-1EX30-0XE1, version 3.0.
- Drag the CP card to an open slot on your DCS chassis.
- Next, assign the CP card to an existing subnet and give it an IP address from the range you created above.
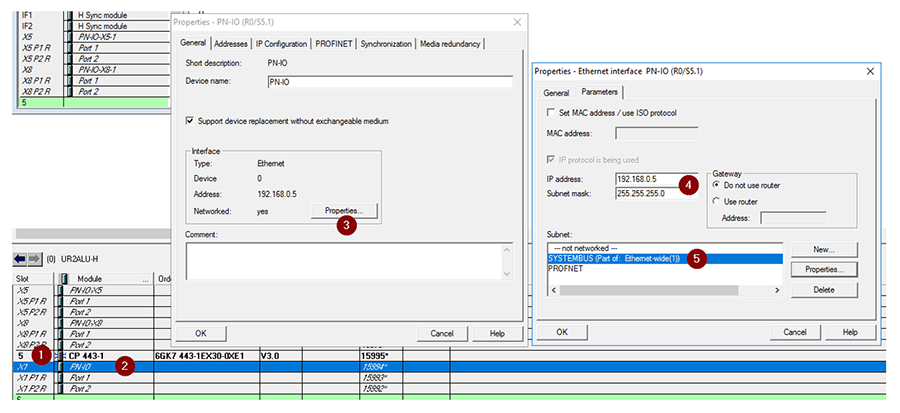
- Right click on the PN-IO module under the CP 443-1 and open the Object Properties.
- Open the Interface Properties and assign it an IP address and subnet mask. My PN-IO X5 and X5-1 adapters are assigned to 192.168.0.3 and .4 respectively, so this CP card will take the last IP we added (192.168.0.5).
- Make sure to click on the project-wide subnet you want to assign the card to – for me, this was called SYSTEMBUS. Confirm your settings with OK.
WinCC Explorer
Next, we’ll make some changes to the OS application in WinCC Explorer.
- In the Project Properties, tick the box to ‘Allow activation on ES’ (right click on the project in the tree > properties > Options).
- In the Computer properties (left click on ‘Computer’ in the tree, right click on the computer listed > Properties), take the following steps:
- Replace the given name with your Local Computer Name (on General tab).
- On the Startup tab, disable Alarm Logging and Tag Logging.
- Confirm with OK.
- Optionally, add user credentials.
- Delete the server data (right click on Server Data > Delete).
Head back to Simatic Manager and find the WinCC application in your OS project. Double click on the Connections item to open the NetPro project file.
- Right click on the CP card in your project’s OS server and select Properties.
- On the Options tab, throw in an NDIS IP address – this is just a placeholder so that it doesn’t get flagged as an error later. I used a dummy address of 192.168.0.222.
- Confirm it with OK.
- Next, select the WinCC Application.
- Delete the existing connection.
- Create a new TCP connection by right clicking in an empty field > Insert New Connection.
- Expand the ‘In the multiproject’ item, and browse to your AS.
- Select ‘TCP connection’ as your Type, and ensure the tick box to Display Properties is ticked. Hit Apply to confirm.
- Untick the ‘Active connection establishment’ option and confirm with OK.
Simulating the Multiproject
We’re done configuring your multiproject – now it’s time to simulate!
- Open PLCSIM, and compile and download to the simulated processor.
- After downloading, verify that you can open a chart in Test mode. If you can’t, perform a full download from within CFC editor and you should be able to go online.
- Perform a full compile on your OS.
- Open WinCC Explorer and activate your runtime. It might take a minute or more, but, you should find that, after it activates, you can move data between the simulated AS and your new simulated OS.
- After virtualizing your AS and OS, you can simulate changes to your DCS in a development environment prior to deploying them to your production equipment.
Learn more about DMC's Siemens S7 PLC Programming expertise and contact us today for your next project!
Comments
There are currently no comments, be the first to post one.