Table of contents
1. Introduction
OPC UA (short for Open Platform Communications United Architecture) is a client/server technology used for data exchange in industrial applications — commonly used for machine-to-machine and PC-to-machine communication. Because of its versatility, OPC UA was adopted in a variety of industries such as the automotive, food and beverage, gas and oil, energy and utilities, and packaging industries. It can also be used in applications ranging from embedded components to cloud servers.
Setting up an OPC UA server in Beckhoff is very simple and can allow you to connect your Beckhoff project to other software, like Ignition and other SCADA platforms. This guide will teach you how to setup an OPC UA server on your programming PC or your Beckhoff IPC and setup your TwinCAT project to display tags from that server.
For this demonstration, we will be connecting to an OPC UA server on our local Windows 10 machine, but the process should be similar for connecting to an OPC UA server on a remote machine like a Beckhoff IPC, with just a few additional steps to allow that server to be accessed on whichever network you’re using.
2. Things You’ll Need to Download and Install
-
2.1 TwinCAT
-
2.1.1. TwinCAT XAE Shell
This is where the PLC will be setup, code will be written, and other settings will be chosen. If you’re looking for this guide, you most likely have TwinCAT installed. Otherwise, you can download it on Beckhoff’s Website.
-
2.1.2. TwinCAT XAR Runtime
XAR is used to run TwinCAT on a Beckhof IPC, and we'll need to install it on the end PLC if we're not installing XAE on that machine. This means that this download is only necessary if you intend on hosting your OPC server in a different machine than your programming PC. You will still need to get TwinCAT XAE in your programming PC. XAR can also be downloaded from the Beckhoff’s Website.
-
2.2. TF6100 | TwinCAT 3 OPC UA Server and Configurator
These are necessary to actually create the OPC UA Server and initialize it. The OPC UA Server is the actual runtime program, while the OPC UA Configurator is only needed to initialize the server. TF6100 includes 2 other products that are not actually required to set up the server (OPC UA Gateway, OPC UA Client). They won’t be used in this guide, but can be installed to facilitate the use of the OPC UA server depending on the application. These applications need a license, but they do have a trial you can activate from TwinCAT. These applications can also be found on the Beckhoff Website.
This is useful to test that our tags created in TwinCAT are actually findable in the OPC Server. You can use UaExpert, Ignition or Beckhoff’s OPC UA Client. Anything that can connect to an OPC Server and see its contents will be enough.
3. Step by Step Procedure
First, install the above software in the following locations:
Programming Computer – the computer you’ll do your programming on.
- TwinCAT XAE
- OPC UA Configurator
- OPC UA Test Client (optional)
Runtime Device – the device you’ll be running the OPC UA server on. It could be your programming computer (for testing), or it could be a Beckhoff IPC.
- TwinCAT XAR (if this runtime device does not have TwinCAT XAE installed on it)
- OPC UA Server
- OPC UA Test Client (optional)
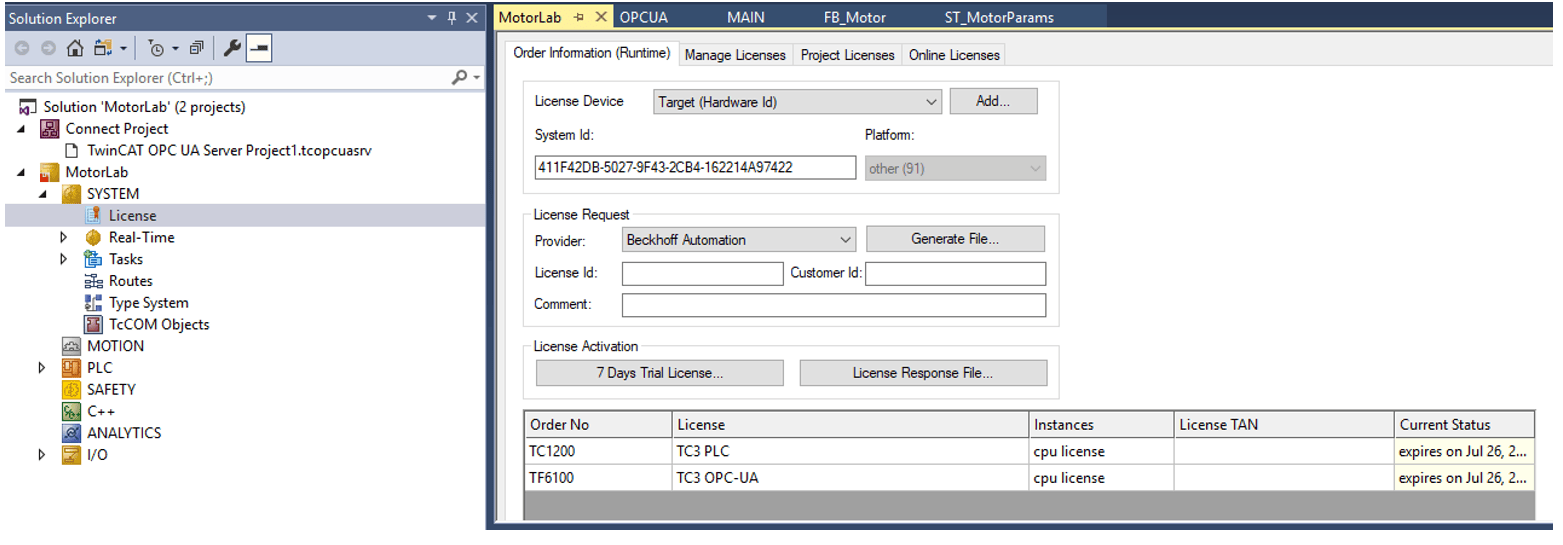
Next, open TwinCAT XAE, and either load an existing project with a PLC, or start a new TwinCAT Project. Under SYSTEM, double click License. If you have a license for the TF6100, it will be shown as the picture below.
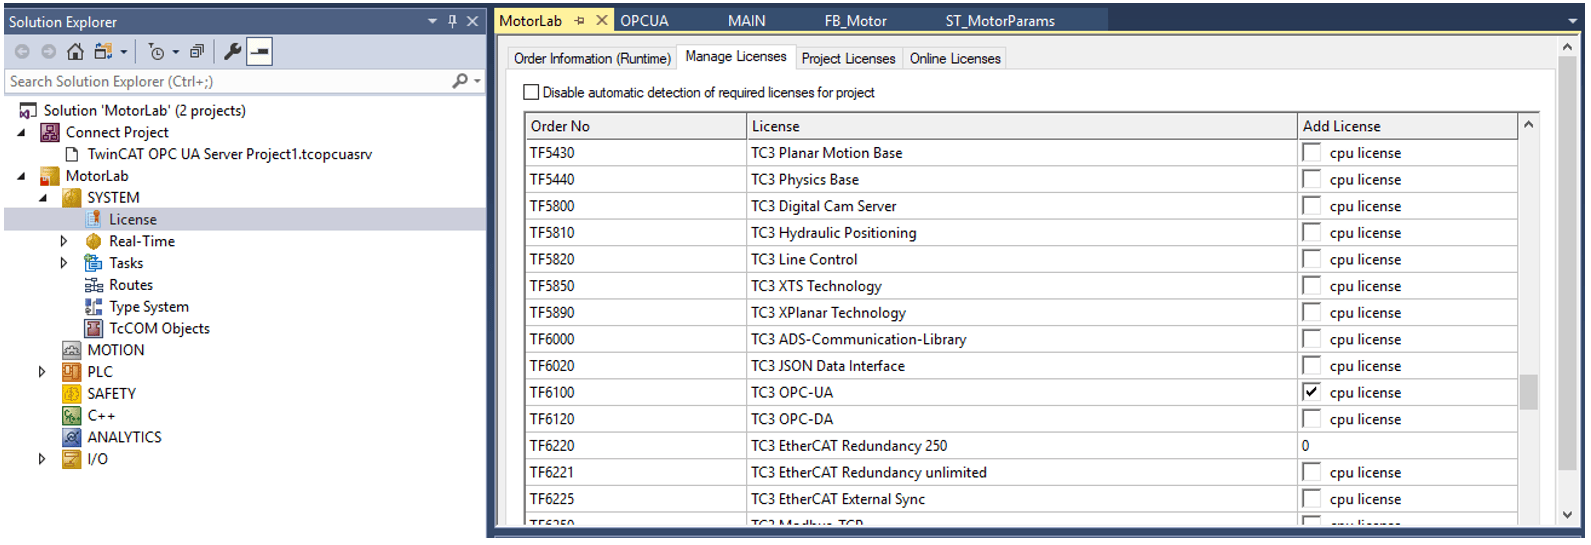
If you don’t have a license, you can go to the Manage Licenses tab and check the cpu license checkmark for the TF6100. Go back to the Order information tab and select 7 Days Trial License.
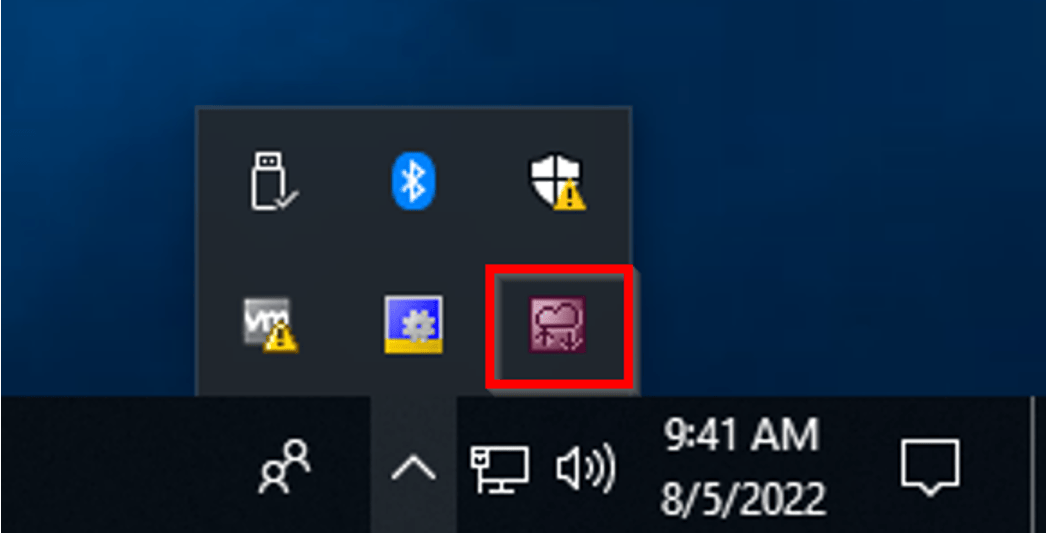
Once this is done, save your project, close TwinCAT, and then RESART YOUR PC/VM. The OPC UA Server software won’t work until after a restart. You can tell that the OPC UA server is running by an icon in the bottom right of the Windows tray.
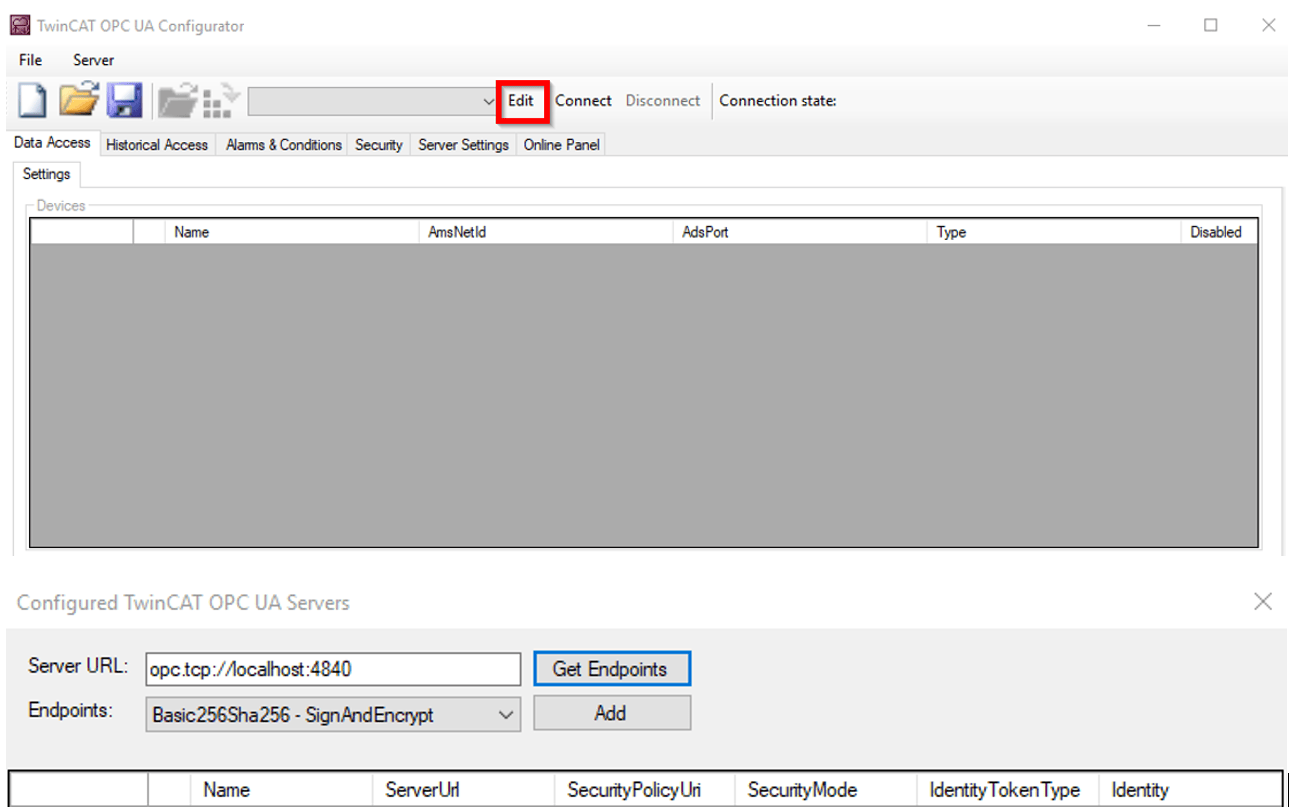
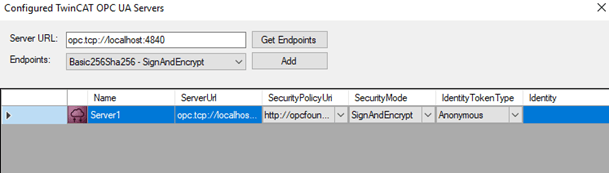
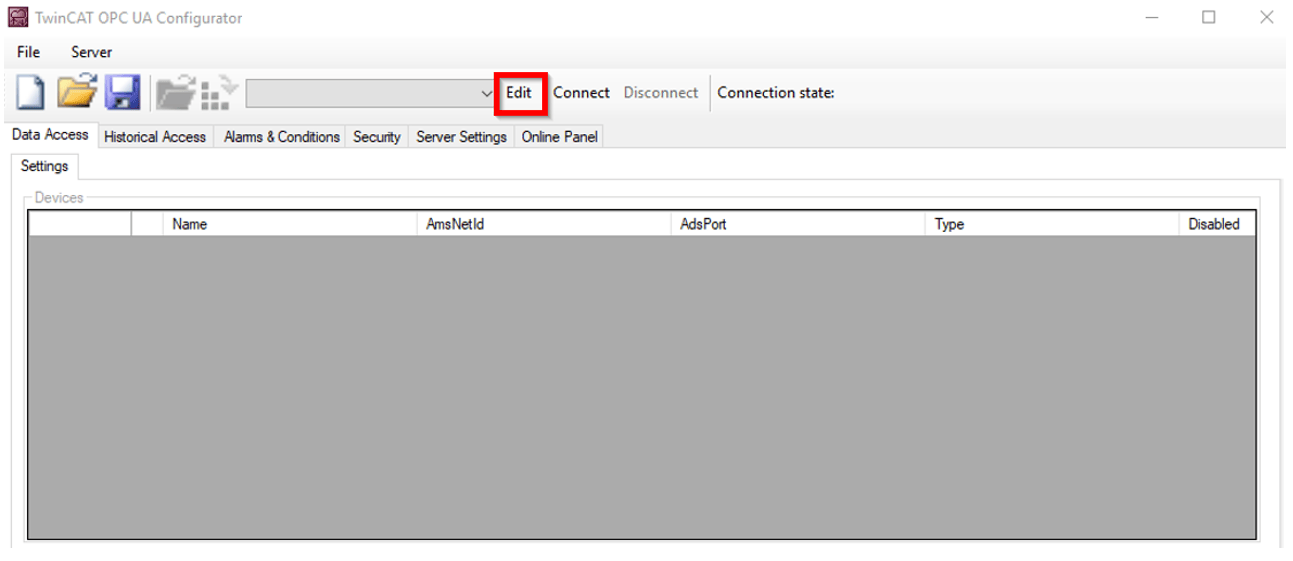
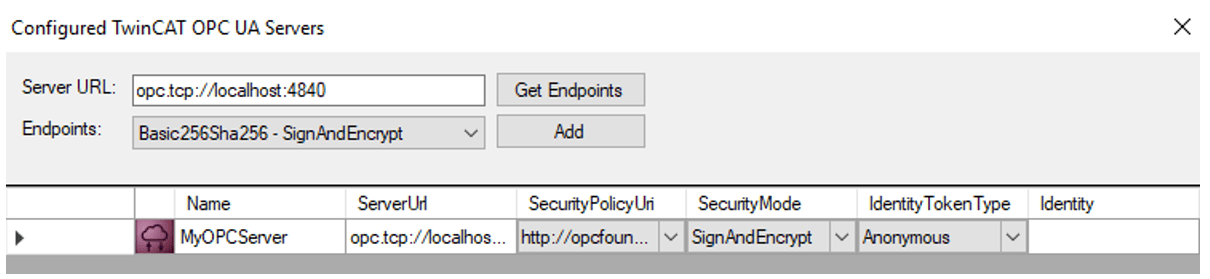
Once you make sure the OPC UA Server is running, you will need to initialize the server. Open the OPC UA configurator and click Edit>Get Endpoints followed by Add once the configurator has found the endpoints. If you’re doing this step from the same machine the server is in, you can use opc.tcp://localhost:4840 as the server URL.

Once you add the server, it should look something like this. If the configurator can’t find the endpoints, you should verify that the server is running by checking the Windows tray bar.
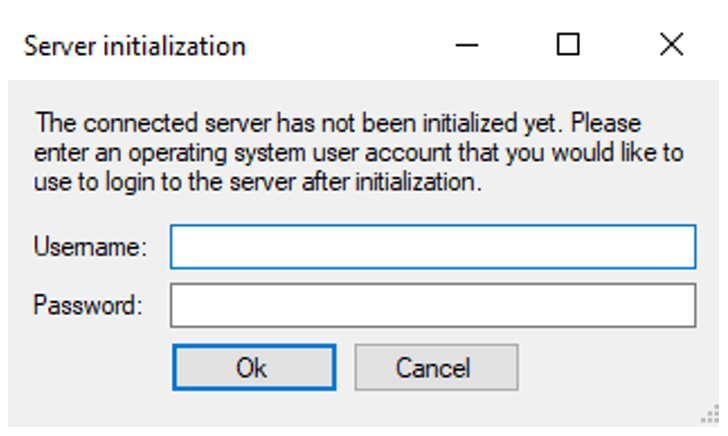
Go back to the main page of the configurator and click Connect. This should cause a pop-up to choose an Operating system user account for the server. For now, fill in the OS credentials for your IPC or VM. You’ll be able to add more users later. Once you fill those out, the server should initialize. Click Connect once more to make sure you can connect to the server
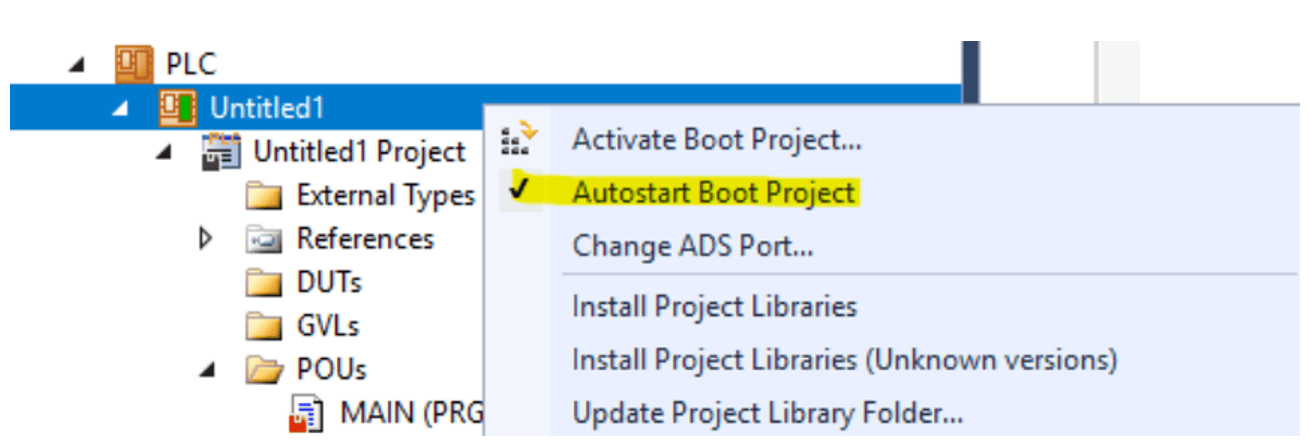
Next, open TwinCAT again, right click you PLC project, and check the “Autostart Boot Project.” This will avoid some pop-ups and ensure the PLC runs smoothly once it starts.
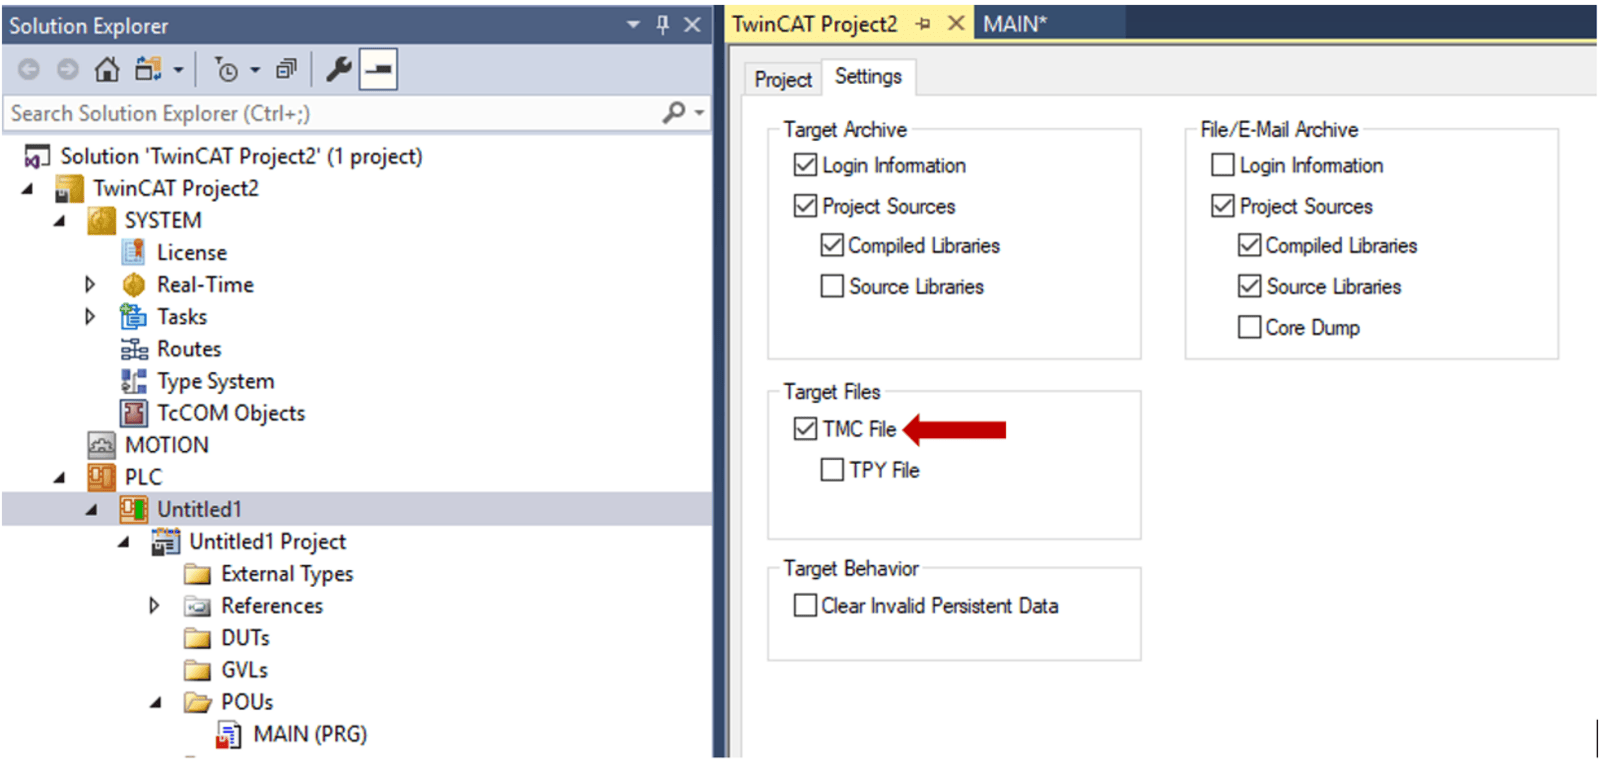
Next, double click the PLC project (Untitled1 in the example) and go to the “Settings” tab. CHECK THE “TMC FILE” OPTION. TwinCAT Module Class (.tmc files) contains the symbol information necessary for the our tags to be accessible via the OPC Server.
Next, inside your MAIN program, make the changes you want. If you just want to test the OPC UA server, you can test it using the program below — which should flip the test variable from TRUE to FALSE every second.
PROGRAM MAIN
VAR
	{attribute 'OPC.UA.DA' := '1'}
	hi:BOOL;
	timer: ton;
END_VAR
timer(IN := NOT timer.Q, PT := T#1S) ;
IF timer.Q THEN
	hi := NOT hi;
END_IF
Notice the line {attribute 'OPC.UA.DA' := '1'}. This line is necessary to expose any variables to the OPC UA Server. If you would like to specify read/write permissions, you can use the following line: {attribute 'OPC.UA.DA.Access' := 'x'}, where x = 1 will be read-only, x = 2 will be write access only, and x = 3 will be read and write access (the default option if this attribute is not specified).
Once you’re done writing your code, activate the configuration with the button shown in the image below. Your project/tags will not show up in the server otherwise. You’ll want to activate the configuration every time you add new tags that are exposed to OPC UA. This will both download your code and restart the OPC UA Server, which must be done for new tags to show up. Alternatively, you can download/make online changes to your code and restart the OPC UA server using the server’s Windows tray icon.

Once this is done, login, and run your code.


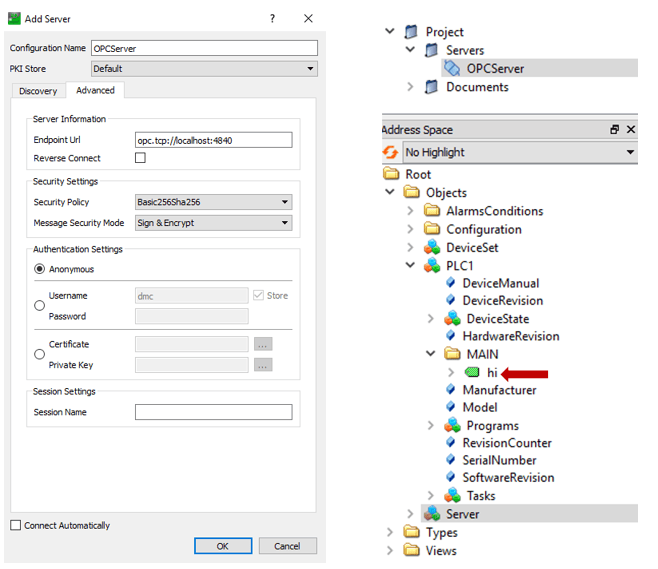
After this, the server should be up and running, and your tags should be visible. If you are using UaExpert (or your program of choice) in the same machine the server is running, you can connect to it using opc.tcp://localhost:4840 as the endpoint URL. If you’re prompted from credentials, use the ones you chose when initializing the server. After that, click connect to verify that that your tags show up in the server.
If you need to access your tags from a different device in your network (for example, if you’re hosting your OPC Server on your IPC, but would like to browse tags via your programming PC), you’ll need to first create a firewall rule to allow for inbound traffic through port 4840 on the device hosting the OPC server. 4840 is the default port for this, but, if you’ve configured another port for your OPC UA server to use, you’ll have to open that port instead. Go to Settings>Windows Security>Firewall & Network Setting>Advanced Settings>Inbound Rules and add a rule like the images below.
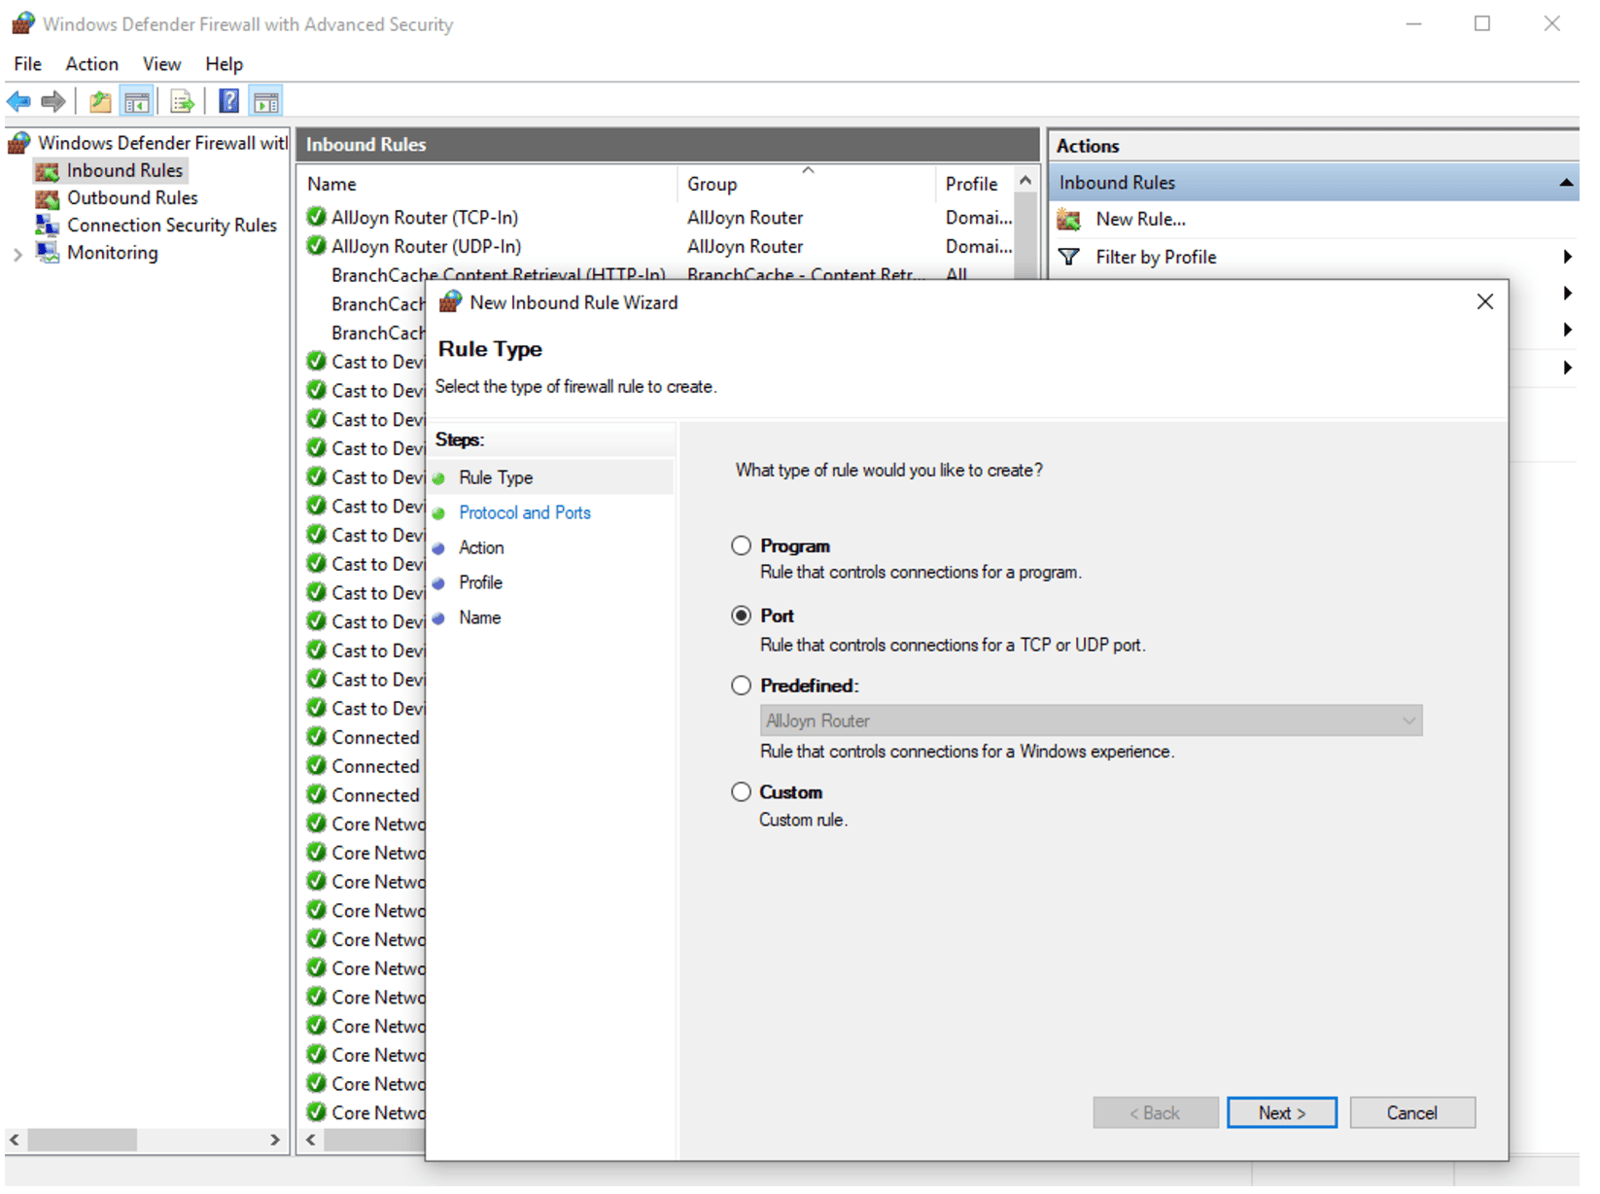
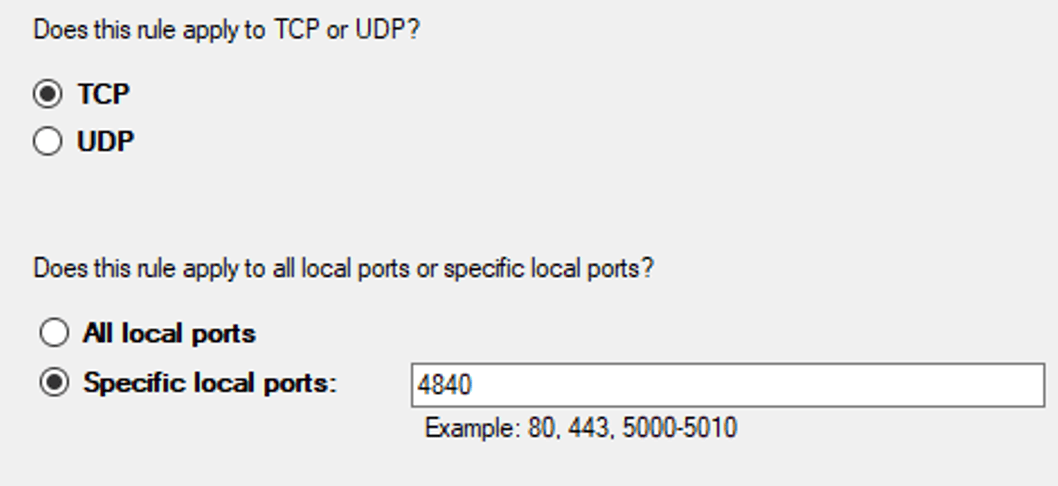
Select port and then TCP, add local port 4840, allow connection, and give it a name.
Once this is is done, open UaExpert (or your program of choice) and add a server using opc.tcp://*OPC Host IP Adress*:4840 as the endpoint URL; the tags should be visible. If this is not the case, restart the computer hosting the server.
4. Notes on Security
This section will briefly touch on how to alter the security settings of your OPC UA server — including adding/removing users, editing current user passwords, changing security policies, and choosing the desired server port. This will all be done through the TF6100 TwinCAT OPC UA Configurator, the same application you used to the initialize server.
Open the configurator and select Edit on the toolbar.
Click Get Endpoints followed by Add, which should add your server to the list. The result should look something like this
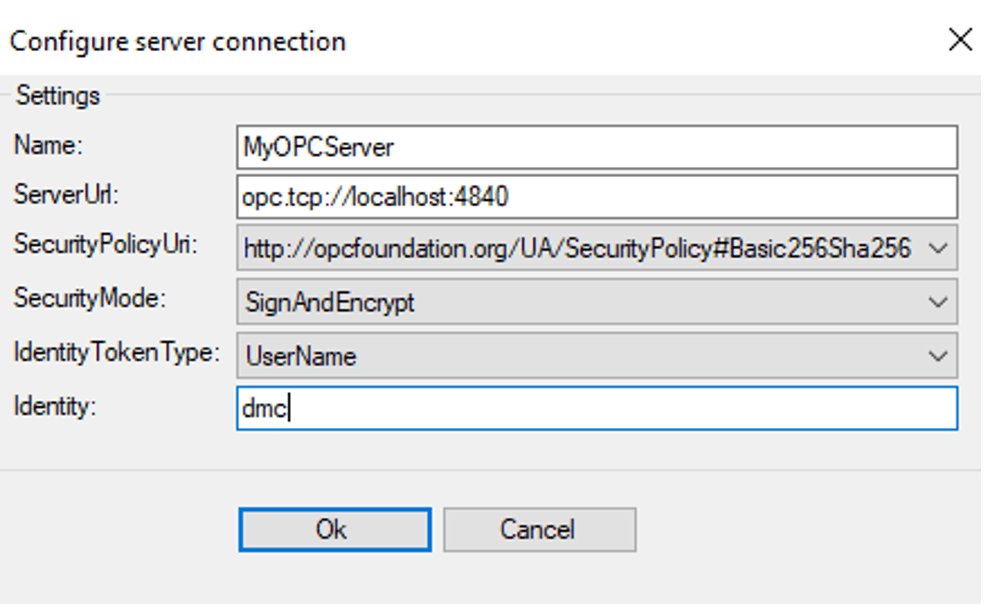
Double click the name of the server to configure the server connection. Alter the information in the setting to match the ones at your server. If you didn’t change any of these when setting up the server, just fill in your identity (these are the credentials you chose when initializing the server). Click OK.
Click Connect. This will prompt a user authentication pop-up. Fill in the password you chose when you initialized the server.
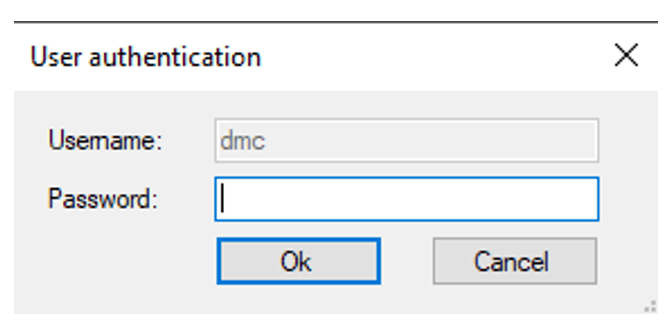
Now you should be connected to the server. If the connection fails, double check that the OPC Server is running by checking for its icon in the Windows tray. If you get an error similar to [BadUserAcessDenied] or [BadIdentityAcessDenied], that means your credentials are not correct.
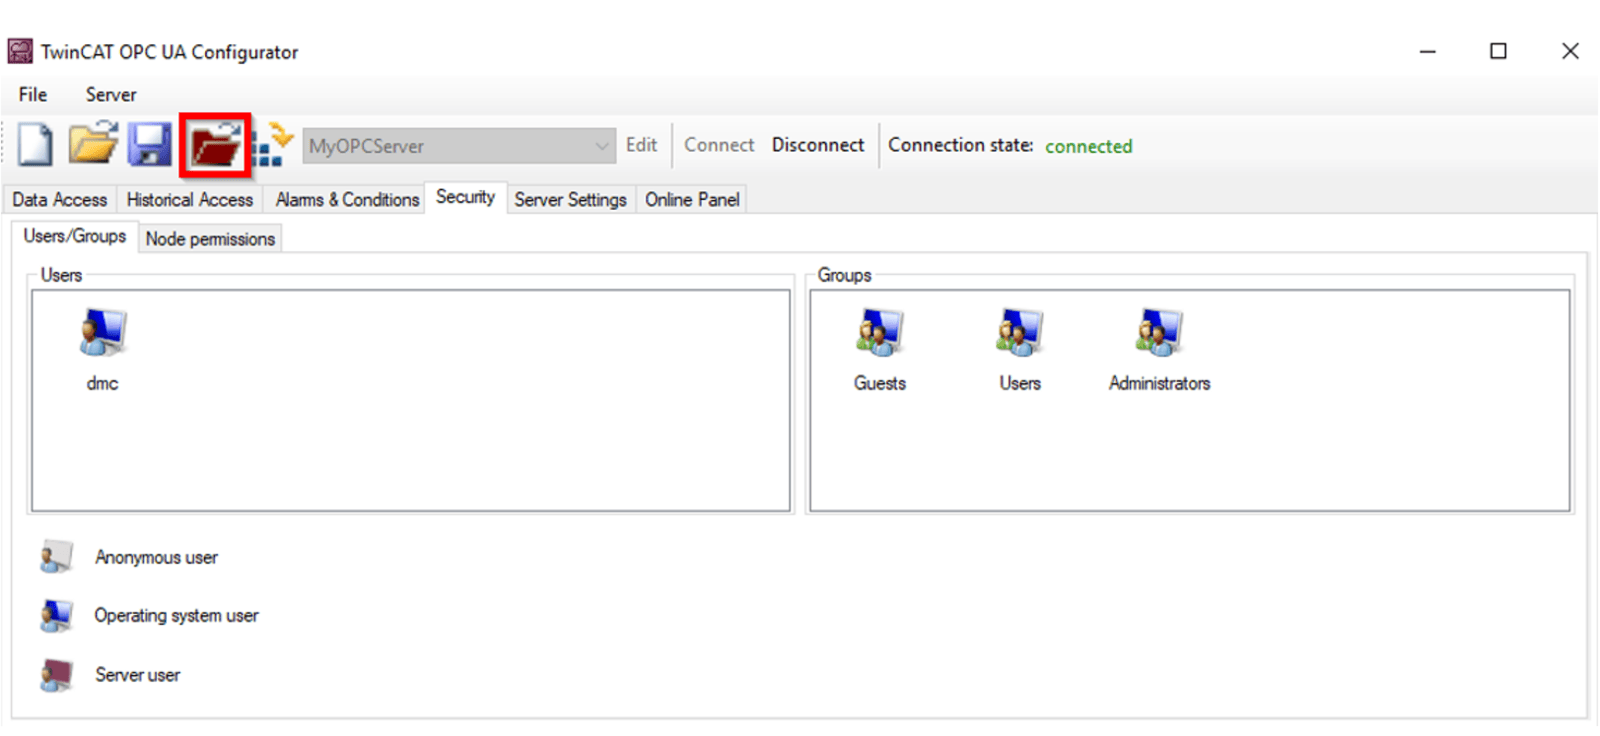
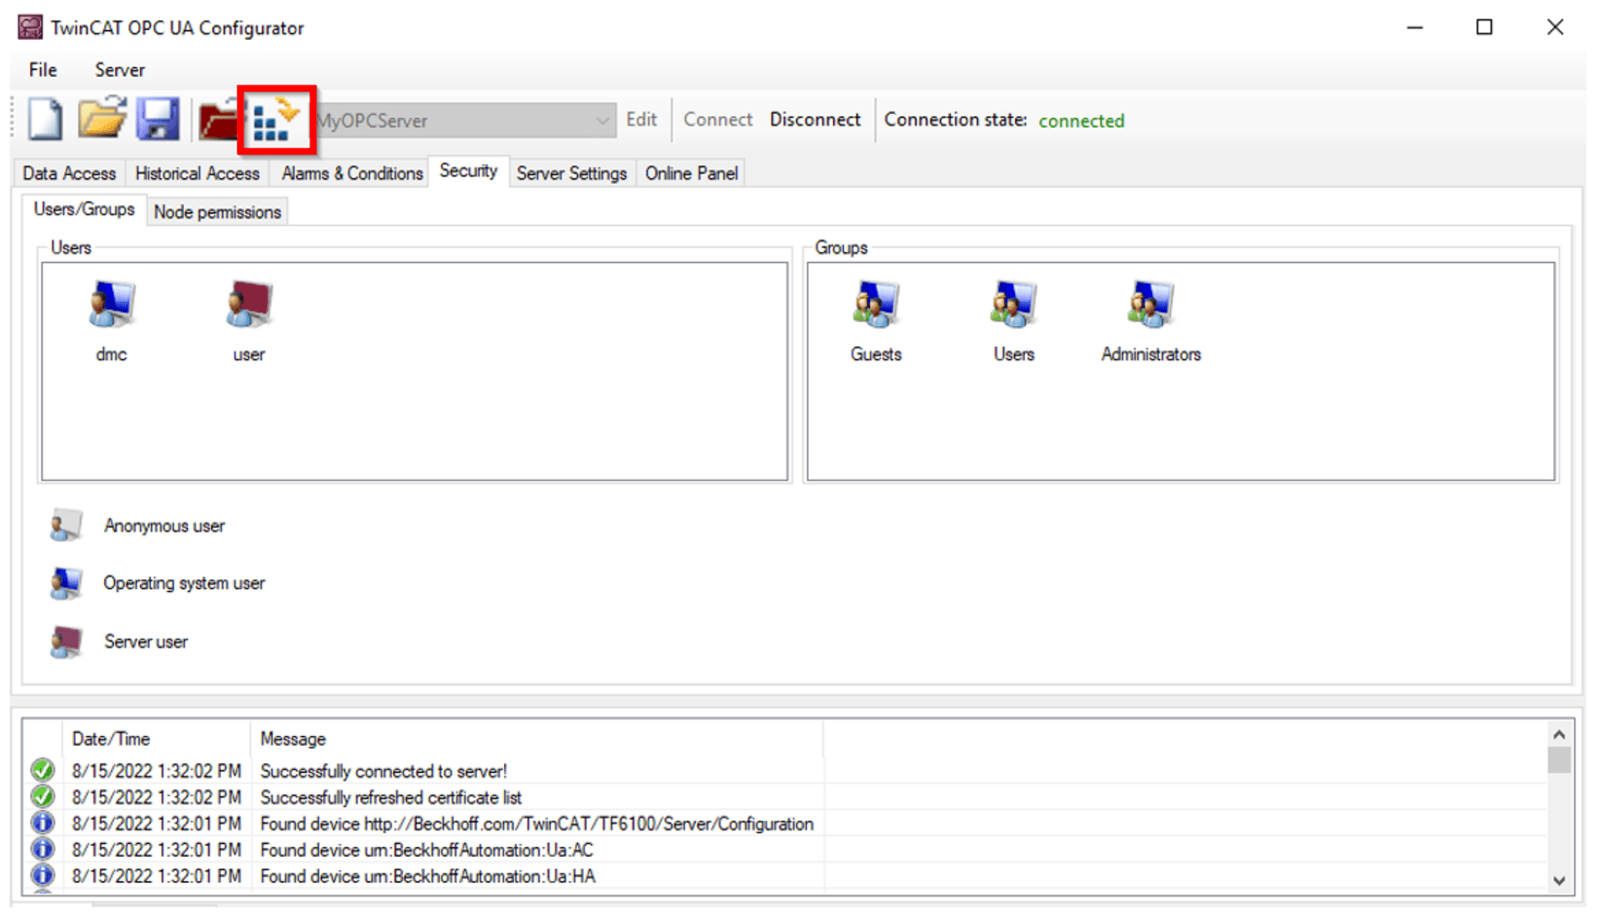
If you intend to add, remove, or edit users, click on the security tab, and then click the Open From Target Icon on the tooldbar. Your screen should look something like the image below. Right click on the users box, and select from Add, Remove, or Edit. In this example, we will be adding a new user.
A user detail pop-up should appear. On this pop-up you can select the authentication provider from Server (choose any UserName and Password), OS (matches an user and password from your computer), and Anonymous (provides no credentials). When applicable, you can also select the username, password, and the member groups: which this user is part of.
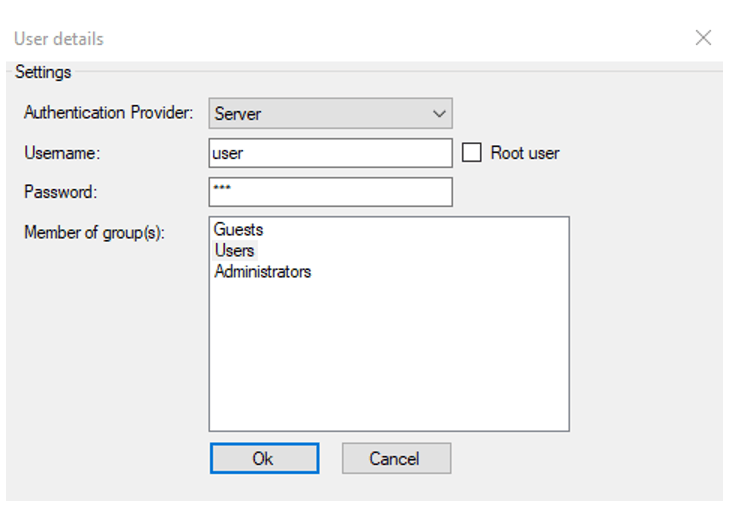
Once you add the users you desire, click Activate on Target, and the new user should be added to the server.
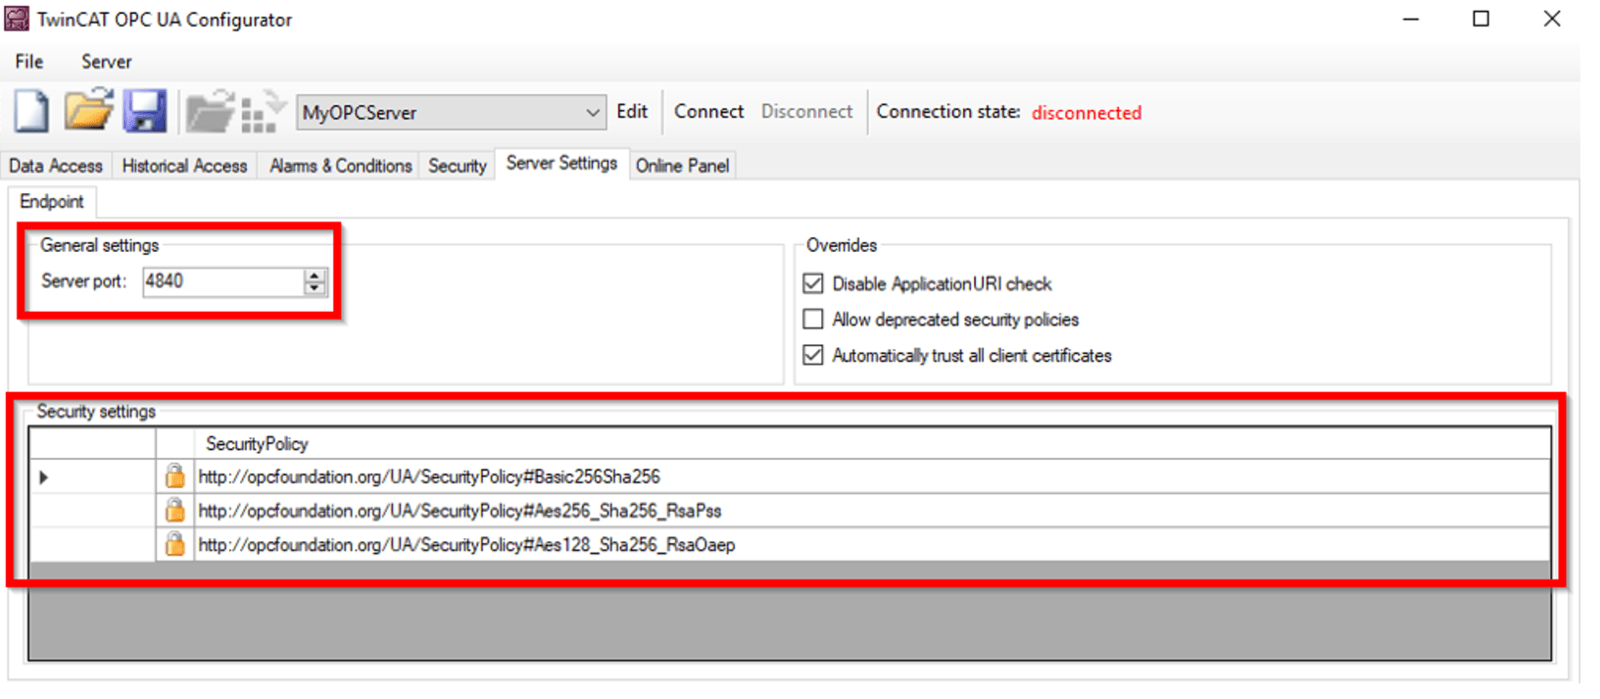
If you want to change the server port or the security policy of your server, click on the Server Settings tab where both options should be visible, like the image below. Make sure to Activate on Target once you finish making your changes.
Read more about DMC’s Beckhoff and TwinCAT 3 Programming, and contact us today for your next project!