Beckhoff PLCs are one of the few industrial PLCs that allow you to run real-time C++ directly on the PLC hardware. This allows for C++ code to run cyclically on a separate system task, or as a TcCOM object allowing for function calls from structured text.
This guide will cover how to create the external interface and how to make C++ function calls and algorithms within your PLC program.
- Setting up the TwinCAT C++ IDE
- Creating your C++ and PLC programs.
- Adding a Test Signature Certificate.
Back to Steps List
While structured text development on TwinCAT can be done within the TwinCAT XAE Shell, TwinCAT C++ development must be done within Visual Studio 2019 with the TwinCAT extensions installed. If a TwinCAT solution with a C++ project is opened in XAE shell, you will be unable to view or edit the C++ code. TwinCAT integration will support Visual Studio 2022 in build 4026.
If XAE Shell was installed before Visual Studio 2019, XAE shell must be uninstalled before installing Visual Studio, then XAE Shell can be reinstalled with the integration added.
You can follow TwinCAT’s guide on integrating with Visual Studio here.
Back to Steps List
The C++ integration can be added to a new or existing PLC program. A series of DMC guides on how to set up and connect to a TwinCAT PLC can be found here.
To add or create the C++ project:
- Under the C++ node of the solution, right click and select “Add New Item…”
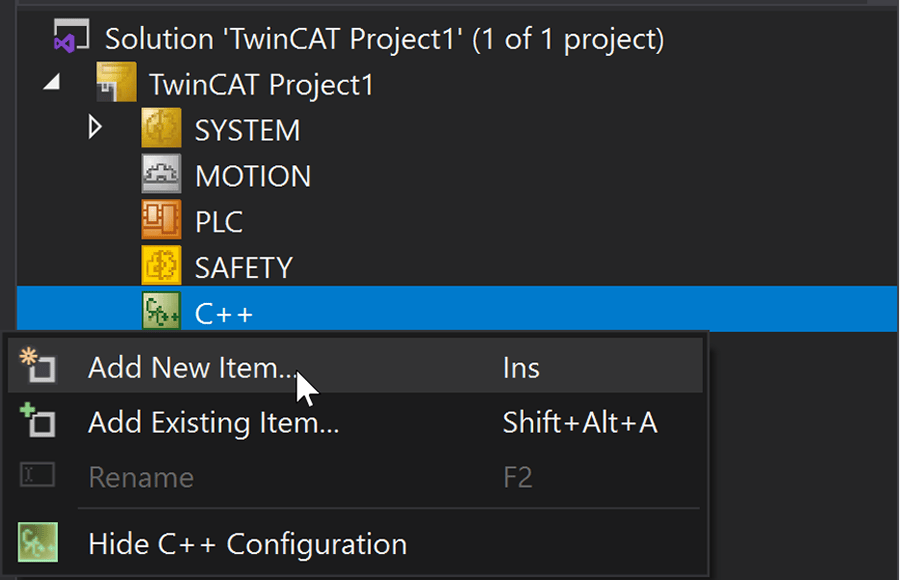
- A popup will appear displaying the different types of TwinCAT C++ Projects.
- Select “Versioned C++ Project” to create an interface accessible by structured text.
- “Driver projects” are no longer recommended by TwinCAT and have fewer features compared to “Versioned C++ Projects”.
- “Static Library Projects” create static libraries that create functions and classes that can be accessed from other C++ projects; however, they cannot create an interface accessible from structured text code.
- For this external interface, I will select "Versioned C++ Project".
- A popup will appear asking what type of Module Class to add a preset configuration.
- To create a project that provides functions to call from structured text, select “TwinCAT Module Class for RT Context”.
- The Cyclic Caller, Cyclic IO, and Data Pointer options all create a CyclicUpdate() function that can be attached to a task and have C++ run cyclically. This will run C++ code every scan.
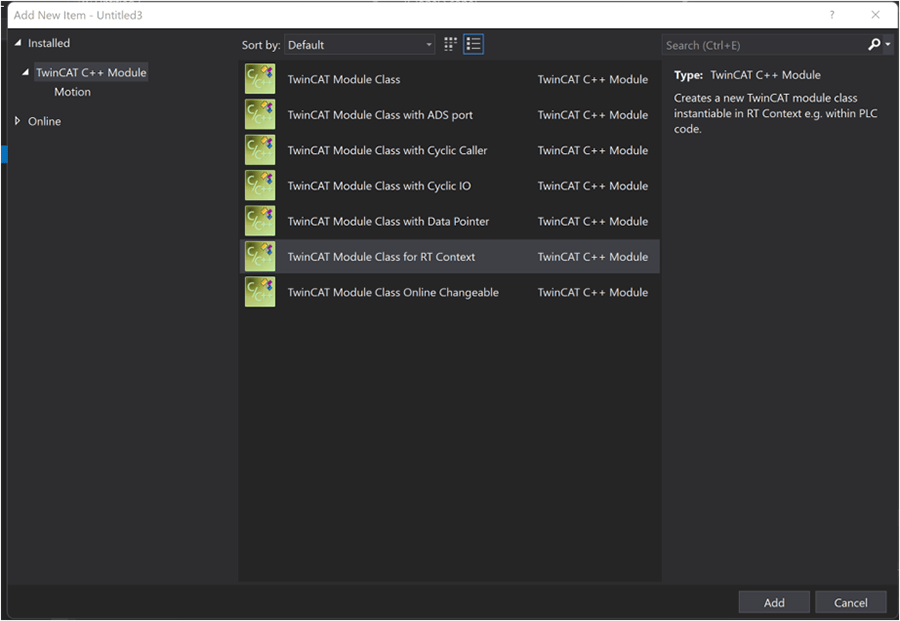
- Enter a name and click OK.
Back to Steps List
To run C++ programs on the PLC, a certificate must be added to ensure all C++ code is verified. TwinCAT allows for officially signed certificates, but a test certificate is sufficient for developing and testing code. TwinCAT recommends that all new projects use Versioned C++ projects, which requires the new TwinCAT Certificate. If developing software that uses the older "Driver Project", then an Operating System certificate is needed instead.
For more information about Driver signing, reference the Beckhoff Information System.
To add a new test certificate for a C++ Versioned Project:
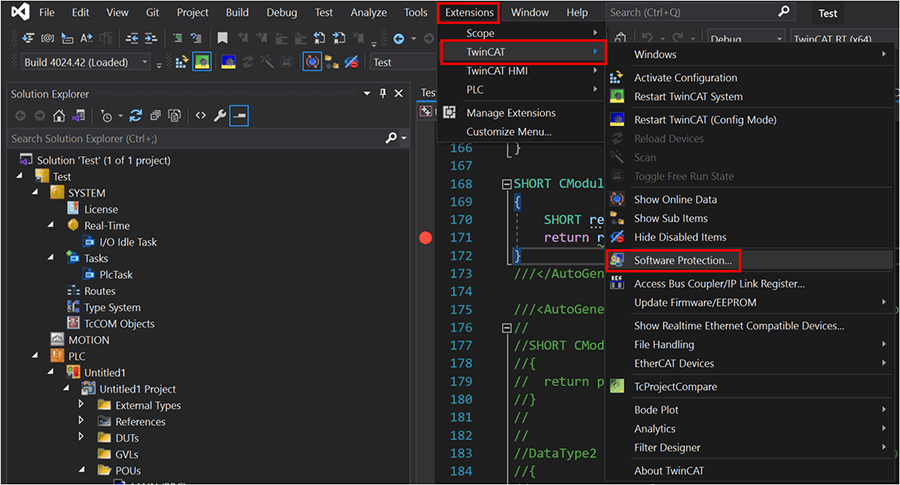
- In Visual Studio 2019, go to Extensions/TwinCAT/Software Protection. In XAE Shell, go to TwinCAT/Software Protection.
- In the wizard, click “Create New…” and fill out the OEM name, Unique Name, and select the checkbox for “Sign TwinCAT C++ Executables (.tmx). Click "Yes" on the popup that appears.

- Click “Start” and save the file in the default location (C:/TwinCAT/3.1/CustomConfig/Certificates/).
- Enter a password.
- It is recommended to use the TcSignTool to create the test signature password as TwinCAT will store the password in plaintext in the project file which can be easily shared.
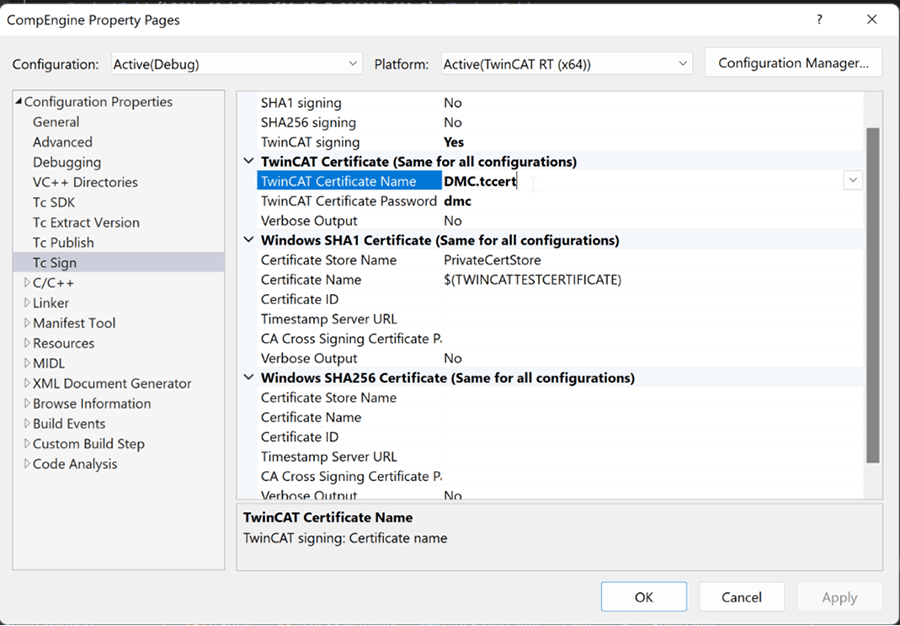
- Once the certificate has been created, it needs to be added to the C++ project. Right click the C++ Project and click "Properties." Under the “Tc Sign” tab, select "Yes" for TwinCAT signing, and enter the certificate name and password.
- Because these test certificates are not countersigned by Beckhoff, the target PLC must be put into test mode to run the C++ code. Once the certificates have been countersigned by Beckhoff, your target PLC will not need to be in test mode.
- On your Target PLC, open Command Prompt with Administrator privileges.
- Run “bcdedit /set testsigning yes” in Command Prompt (Admin).
- Restart your computer/PLC.
- The Target PLC will now allow test certificate-signed C++ code to run on the PLC.
- Right click the C++ Project and click “Publish Modules”. It should create an error that says the certificate is not valid or ADS has failed.
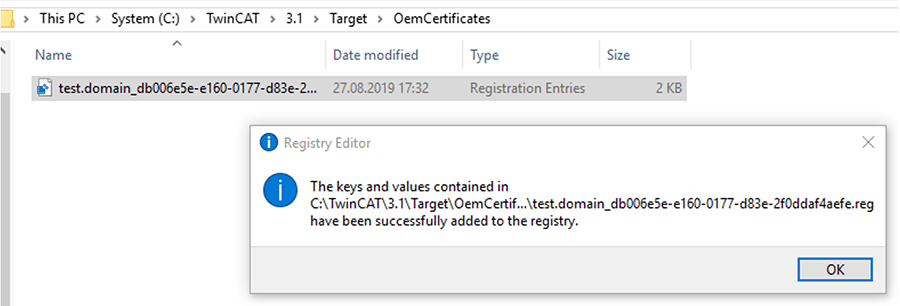
- Open (C:/TwinCAT/3.1/Target/OemCertificates) on the target PLC and locate the file with the same name as the certificate’s “Unique Name”.
- Double click the file to add the certificate to Window’s certificate registry. The "Publish Modules" button should now work, and the C++ project can build and run on your machine.
Now that the IDE and test certificate have been configured, the C++ project can be configured with the desired functions and interfaces and linked to a structured text function block, which will be covered in part two of this blog series.
Learn more about our Beckhoff and TwinCAT 3 Programming expertise and contact us for your next project.