SuperTrak is a smart conveyance system that uses electromagnets to move pallets around a track with very fine precision. The nature of SuperTrak’s magnet-based controls offers several benefits over a more typical conveyance system by allowing each pallet to move independently of the rest of the pallets and providing real-time, precise location data for each pallet on the track.
In this blog we will walk through the basics of configuring a SuperTrak system.
Step 1: TrakMaster and SuperTrak Simulation
To begin working with SuperTrak, you will need to get the TrakMaster and SuperTrak Simulation tools from SuperTrak support.
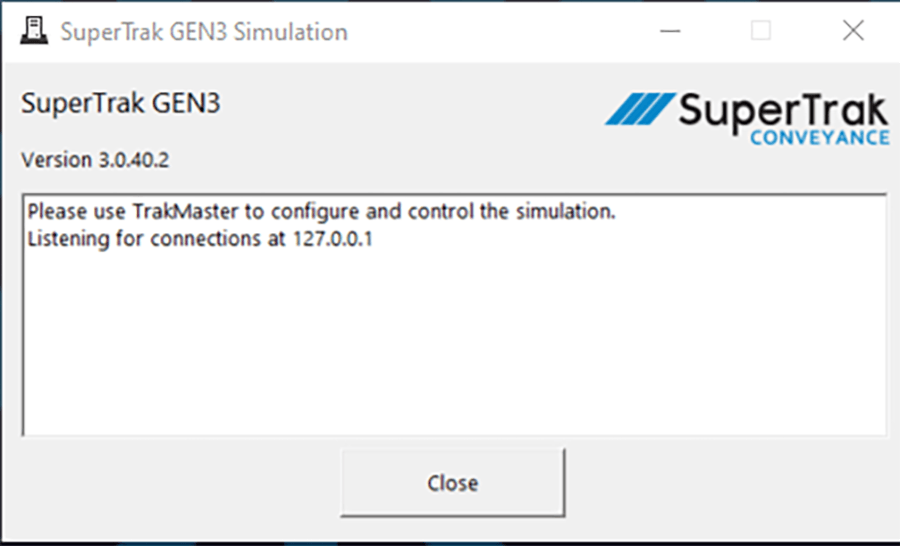
To run the SuperTrak Simulation, simply run the program after installing. The simulation will start running and you should see this window.
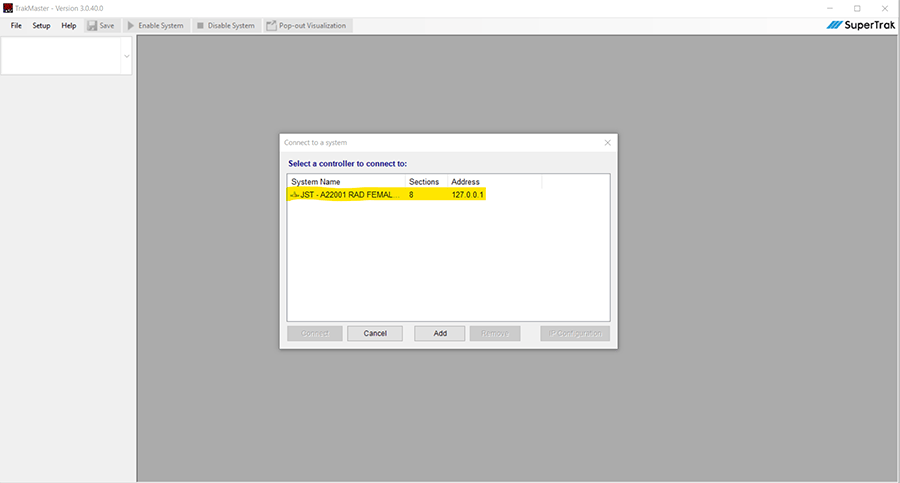
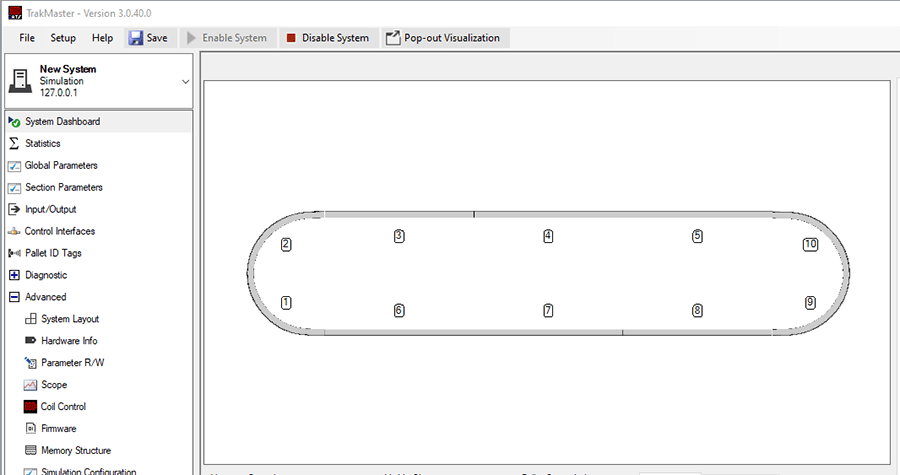
After installing and running the TrakMaster software, you should see an option to connect to a system with the IP address used by the simulator (127.0.0.1). Click on the system and hit “Connect” to get to TrakMaster’s main window.
TrakMaster will ask you if you want to get started with a tutorial. For now, click “close” to continue to TrakMaster.
Note: if you want more information on SuperTrak configuration after reading this blog, you can return to the default tutorial the next time you connect to the simulator with TrakMaster.
From TrakMaster, go to “Setup” > “Quick Start” to initialize your system to a common default loop.
To provide a more thorough understanding of the process, we’re going to start our track from scratch.
Step 2: Define the Track Layout
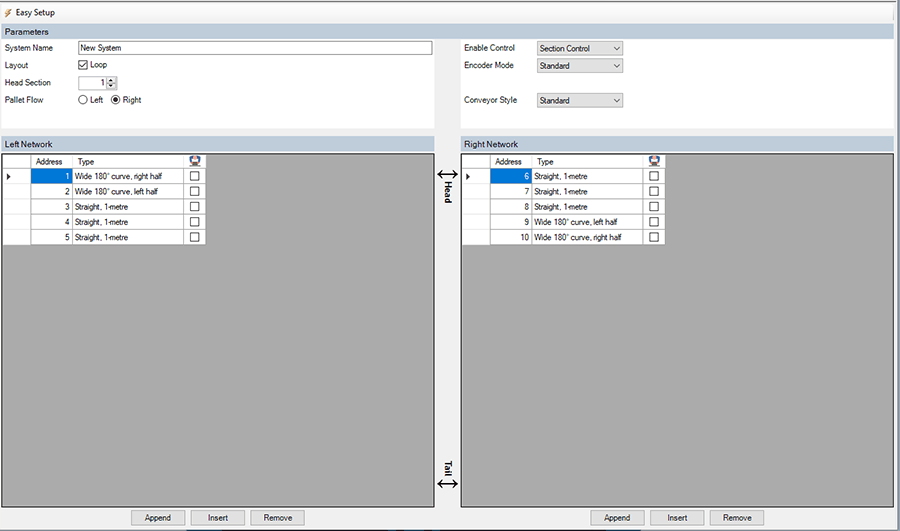
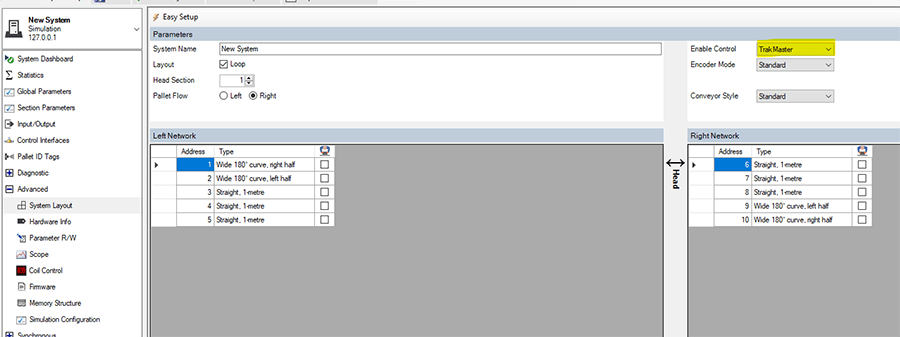
In TrakMaster, expand the “Advanced” tab and go to system layout. Here you can define the layout of your track.
For this example, we are using a 3-meter-long loop with wide curves, but you can add/remove additional track to fit your system using the Append/Insert/Remove buttons at the bottom of the screen. You can also select* if your track is a loop or not and determine the standard flow of direction.
Note: For loop tracks, the direction “Right” means that pallets will move to the right on the bottom half of the loop, a counterclockwise movement if you are looking at the track from above.
Next, hit the “Save” button at the top of the screen. You will get a prompt about what you want to save. Make sure at minimum “System Layout” is checked, but also feel free to select all and then hit ok.
Next, you’ll be asked if you want to reset the syste. Feel free to hit “Yes”.
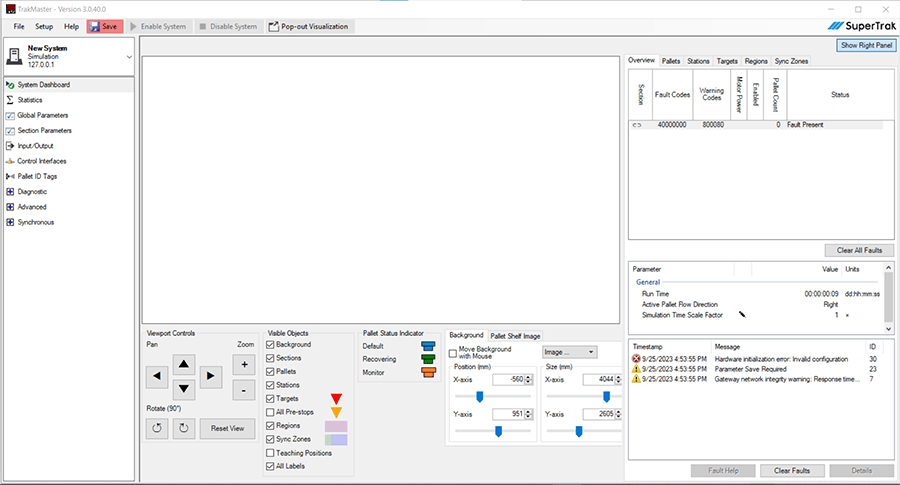
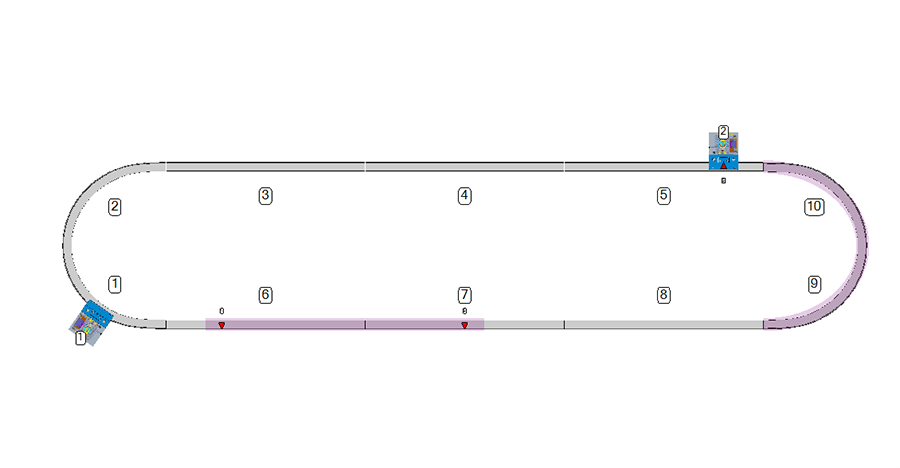
Now if you go back to the “System Dashboard” window you should be able to see your track layout.
Step 3: Configure Track Parameters
Now that your track layout is configured, it is time to define the details of your track motion.
Navigate to the “Global Parameters” section and look through the various details listed.
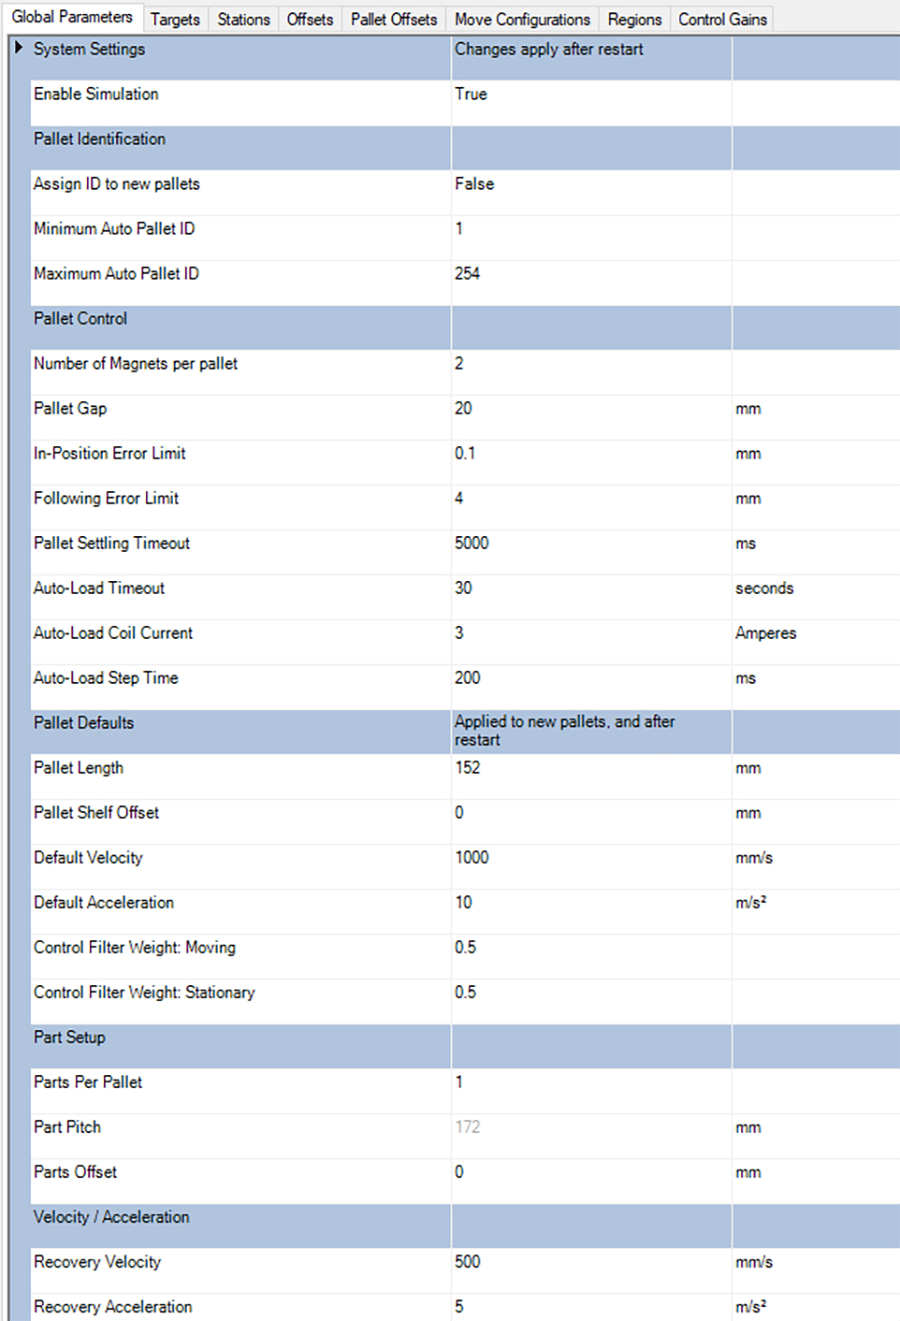
These parameters affect all sorts of things about the track but, most importantly, set the basic motion parameters for how pallets will move.
Note: We won’t go into every parameter listed but make sure you adjust the maximum velocity and acceleration for your system to an appropriate level. Also, set the pallet length and pallet shelf offset to match the tooling you are going to install on your pallets.
It is often a good idea to lower maximum velocity and acceleration during commissioning while the status of the track/system is still in flux.
Step 4: Define Regions
One of the most versatile tools that SuperTrak has is its regions.
Regions are defined sections of track where the parameters of the track are changed.
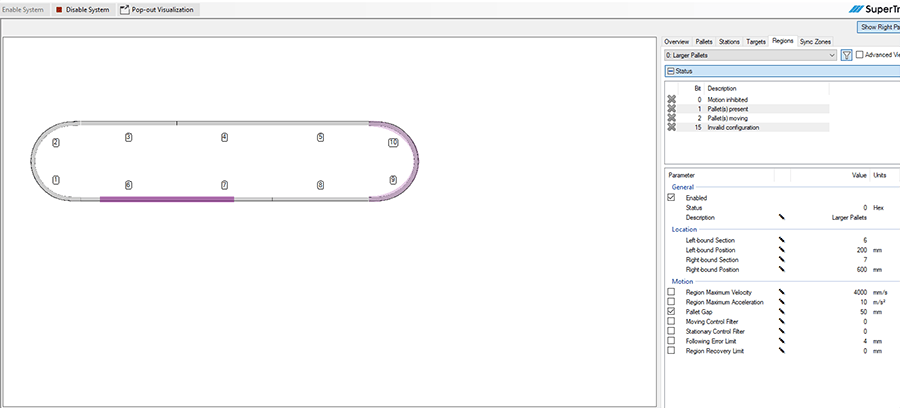
To begin making regions, go to the “Global Parameters” section and navigate to the “Regions” tab. Here, double click on an empty region ID to begin configuring.
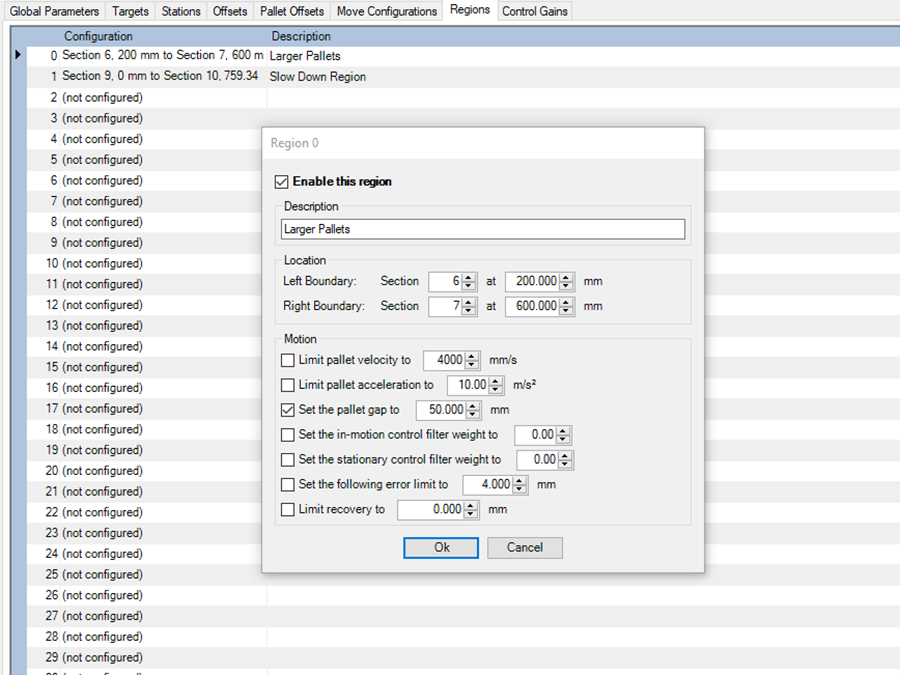
In the above example I created a region with a larger pallet gap than the rest of the track.
Regions like this can be useful if you are loading large objects onto your pallets that would collide if the pallet gap distance was not increased.
Take some time to think about what regions your system might need. A common region type requires you to define an area where pallets must move more slowly to allow something to interact with the pallet. Such as a burst of air that might clean the pallet of any lingering dust.
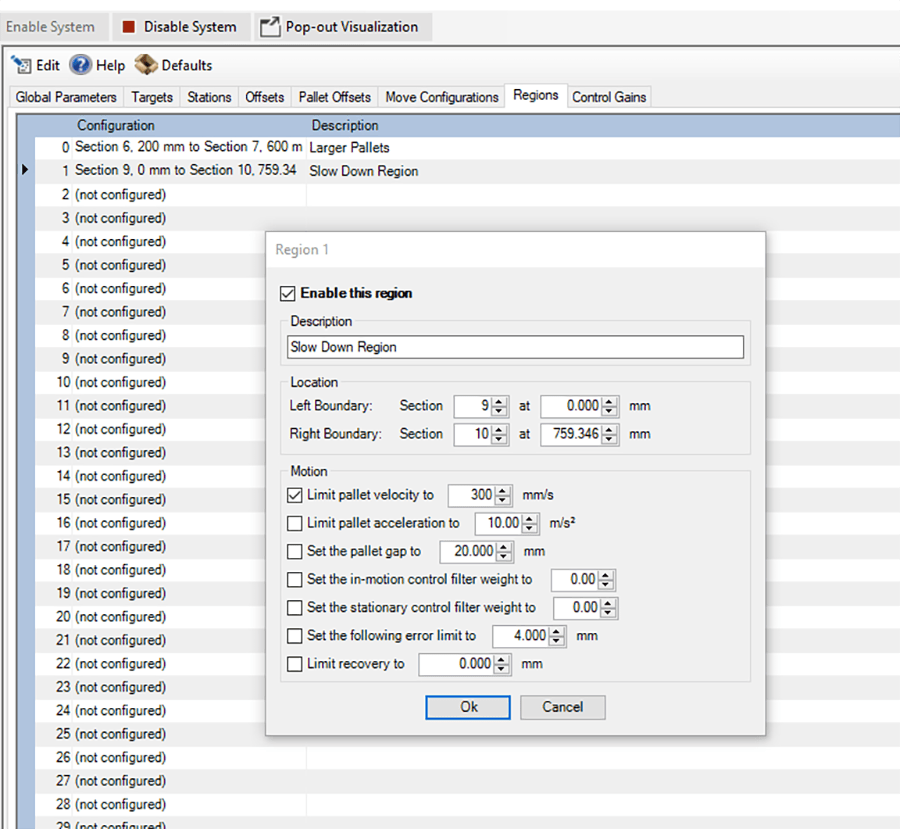
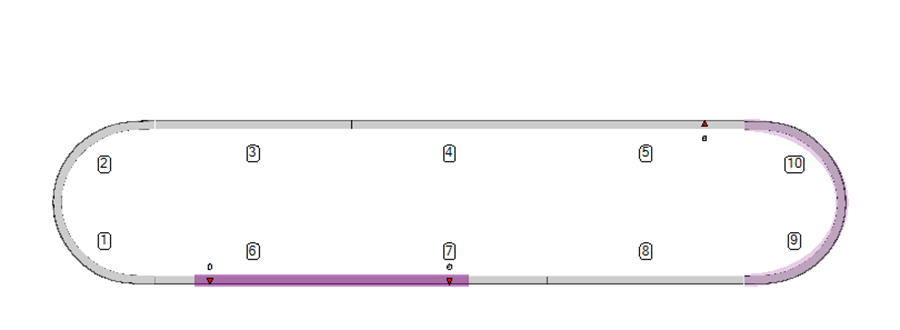
Once you have created your regions you can go back to the “System Dashboard” to see them laid out on the track.
From the “Regions” tab on the right, you can also adjust the positions of any regions to ensure they match up with the desired region locations for your system.
Note: Regions cannot overlap, if you need to create overlapping region effects, you will need to divide your regions into pieces and set them all up independently of each other.
Step 5: Setup Targets
Targets are the primary way SuperTrak controls which pallets go where. Typically, when a pallet needs to move from one location to another, the target it is located at is told to forward its pallet to the next target.
A target should be placed at each location that a pallet will need to stop. To create targets, go to the“Targets” tab under the “Global Parameters” section. Here, you can enter the section and position you want each target to be in.
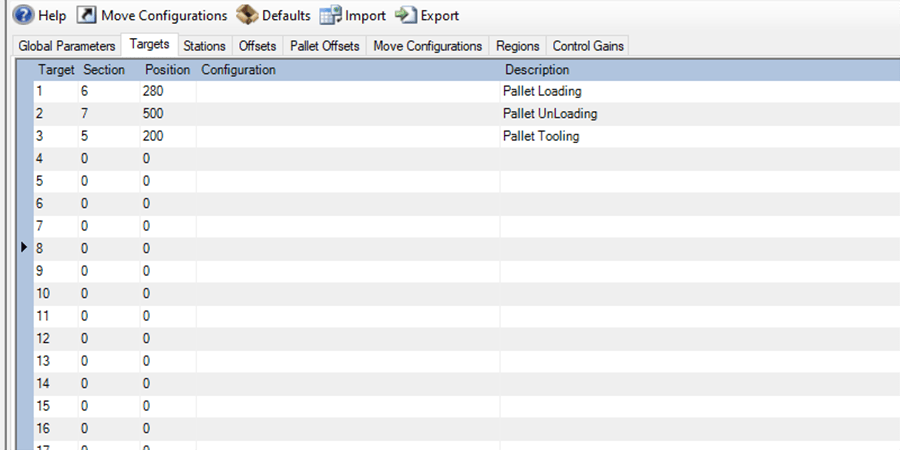
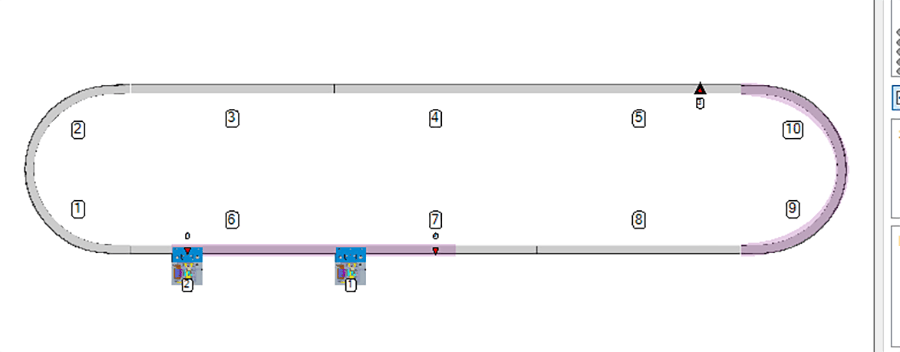
Here I’ve created a few targets around my track and given them some basic descriptions to make it clear which target is which.
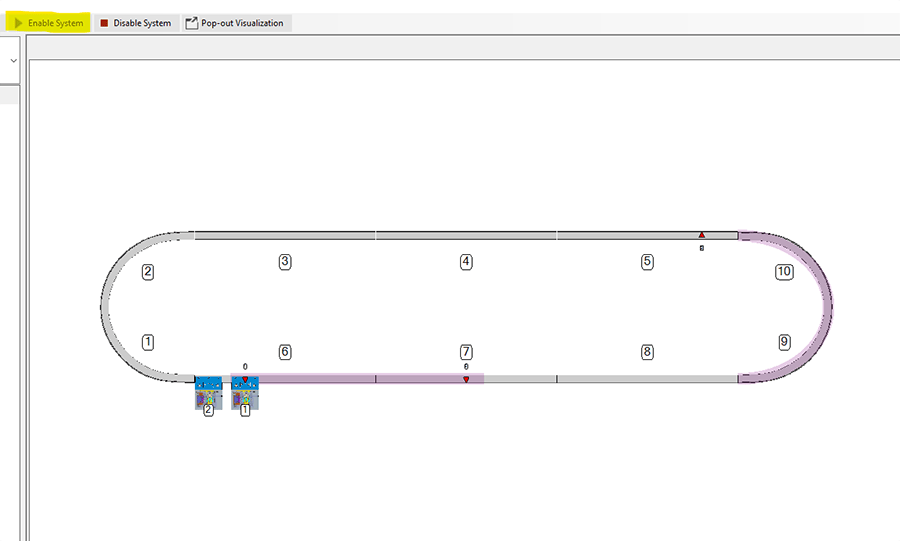
Notice that when you go back to the System dashboard, you will see your targets represented on the screen.
Step 6: Simulate Your Track
Now that we have our track set up, we can start simulating the track. Simulation will not only allow us to verify that we’ve set up the system correctly, but will also allow us to begin running tests on our system to determine roughly how long it will take for pallets to cross our track.
Step 6-a: Change Track Settings for Simulation
There are a few settings we’ll need to adjust to get your track running in Simulation properly.
First, go to the “System Layout” page under the “Advanced” section. From there, set the “Enable Control” option to “TrakMaster”
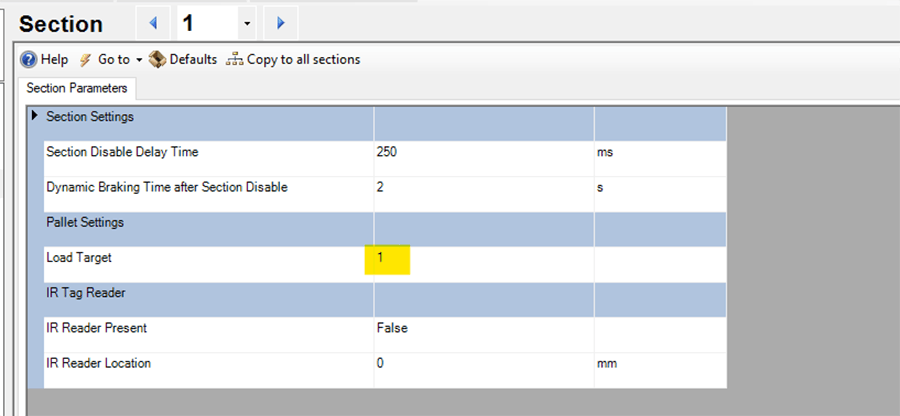
Next, go to the “Sections” tab and set the “Load Target” for each section.
The “Load Target” is the target ID that pallets on each section will head to on system startup. You can select “Copy to all Sections” to give all sections the same load target, or you can set it individually for each section.
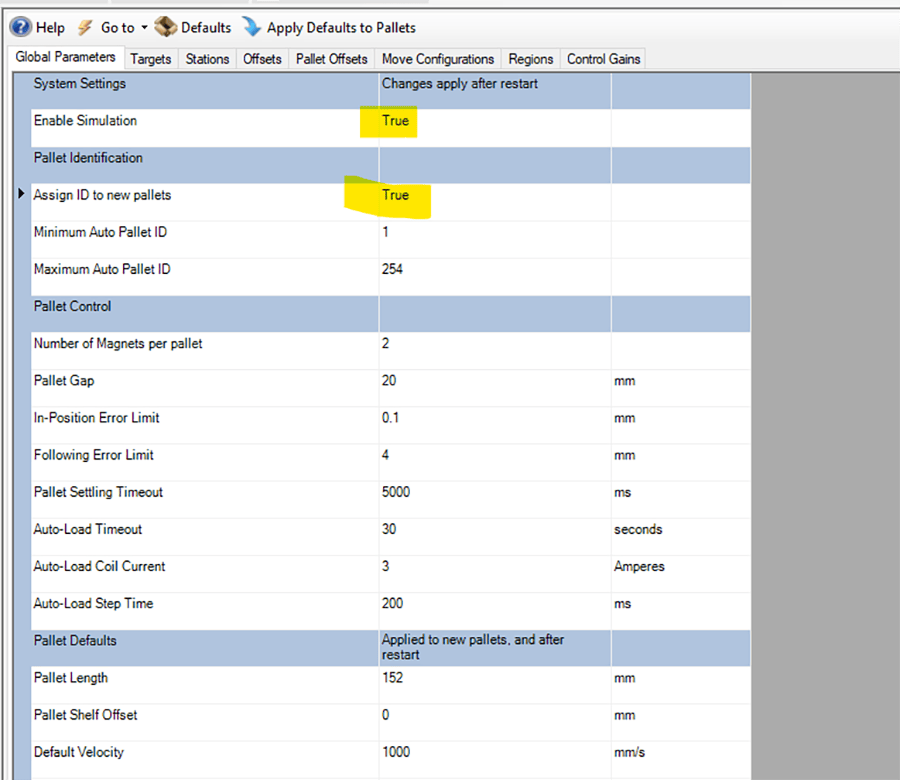
Now go back to “Global Parameters” and set “Assign ID to new pallets” to true. This will cause SuperTrak to assign a number to each pallet to help you keep track of them as they move around the system.
If your system uses an IR reader to assign pallet IDs you will want to change this later, but for simulation, you will want this feature. Also make sure the “Enabled Simulation” box is set to true.
Finally, in the “Advanced” section, go to “Simulation Configuration” and define the positions you will want vehicles to start in for Simulation.
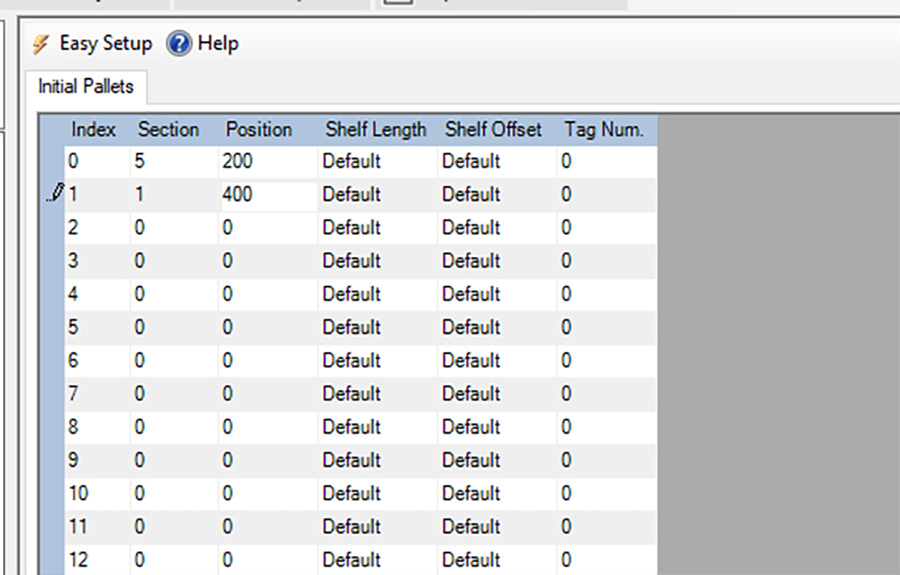
Here, I’ve just created two pallets in random spots of the track.
Step 6-b: Run your Simulation
To begin running your Simulation press the “Save” button at the top and confirm the parameters you want to save.
Then, when prompted, specify that you do want to restart the system. If you go to the systems dashboard, you should see the pallets you defined earlier appear on the track.
Now, when you press the “Enable System” button at the top of the screen the pallets should be directed to whatever you set as your load target.
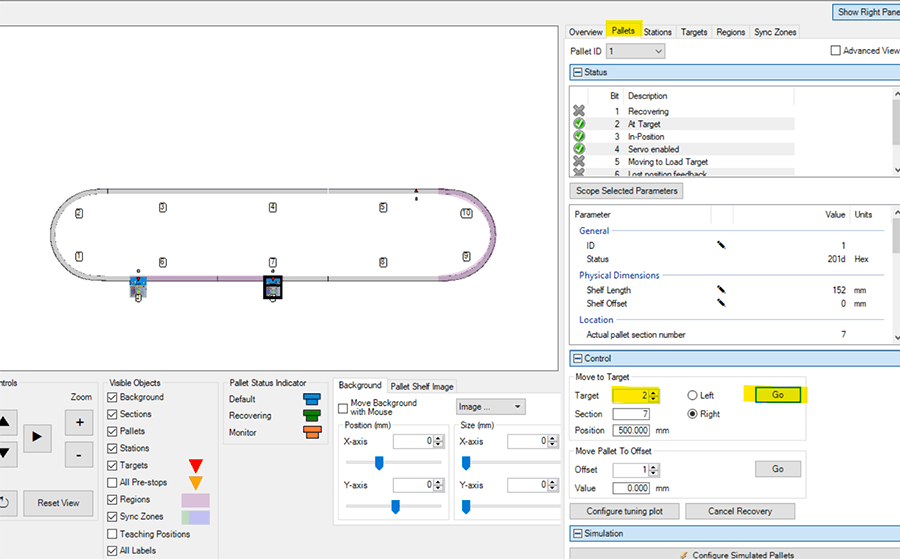
Now, you can select a pallet in the “Pallets” tab on the right and direct it to a target by giving it a target ID and pressing “Go”.
Note: Make sure you watch the pallets as they cross targets to ensure that they’re reacting appropriately.
Step 6-c: Auto Release Pallets
Now that you have your simulation moving pallets around the track, you can take advantage of another SuperTrak feature. This feature allows to have your pallets move around the track using simple automation.
Simply go to the “Targets” section in the left-hand tab and expand the “Auto-release” section.
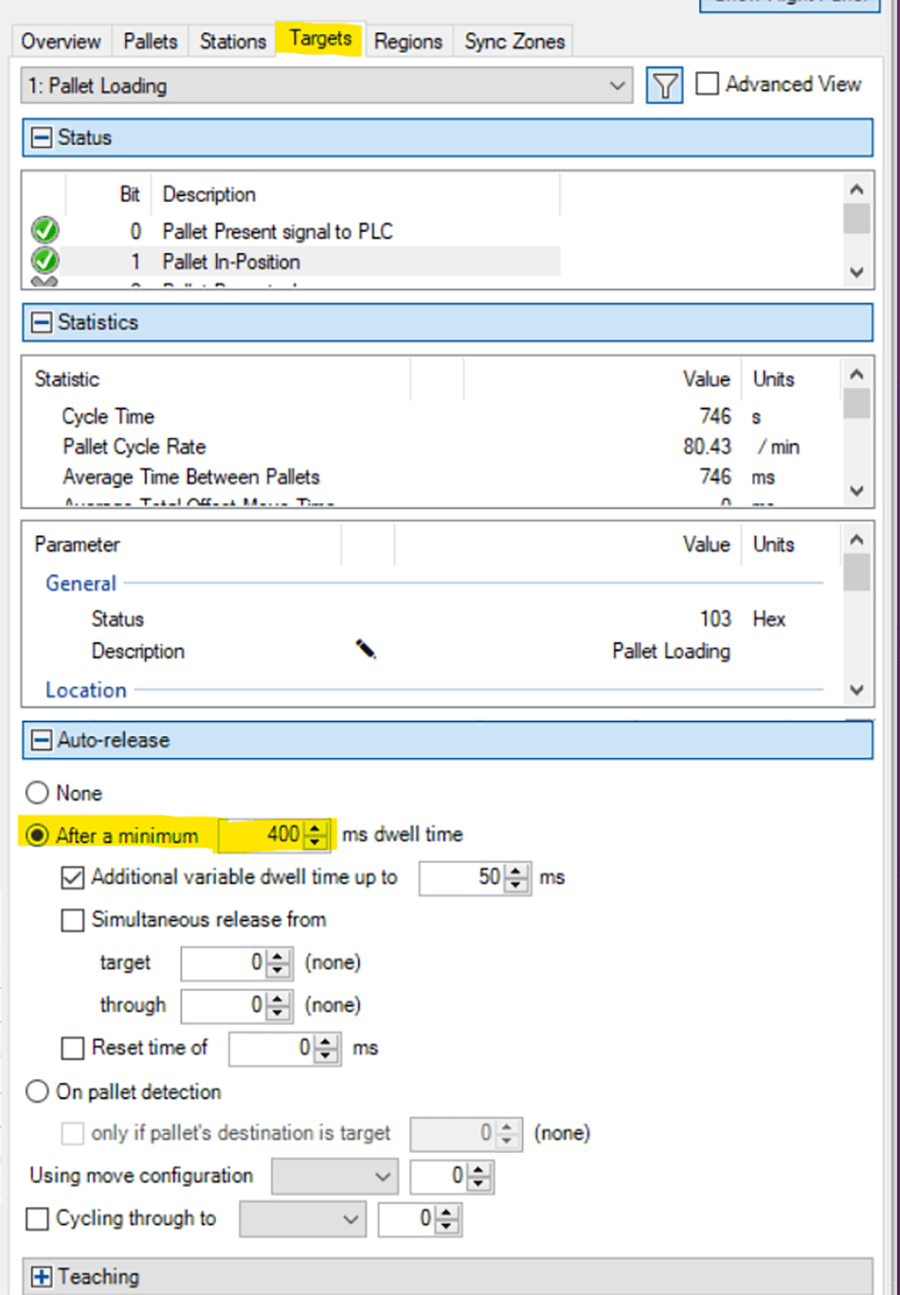
Note: Here you can set a target to auto release a pallet by selecting “After a minimum” and inputting a time in milliseconds that the target will wait before sending the pallet.
On its own though that won’t do anything, you still need to tell the target where to send the pallet to.
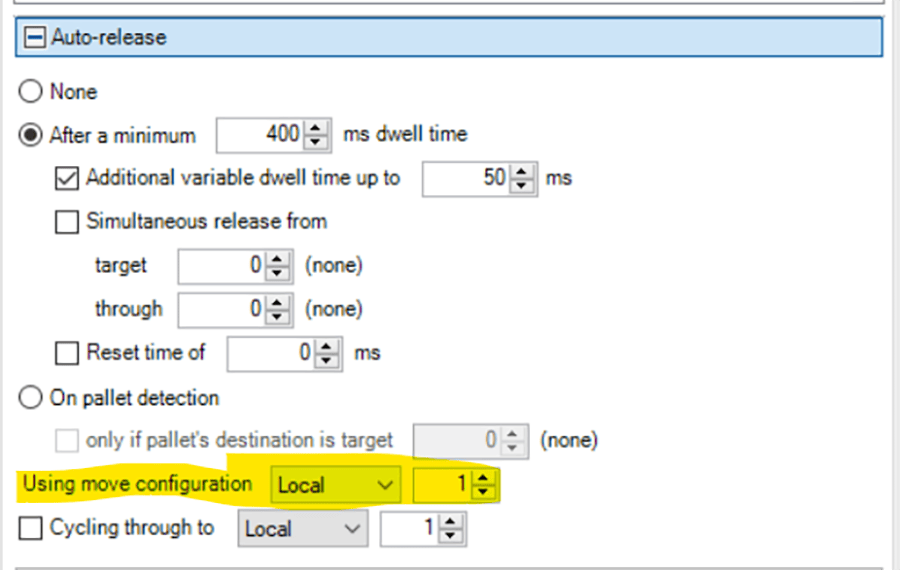
Further down in the auto release tab set the “Use move configuration” option to “Local” and set the ID to 1.
Now go back to the “Global Parameters” section and under the “Move Configurations” tab, scroll down to the bottom where you should see options to create “Move Configurations” for each target.
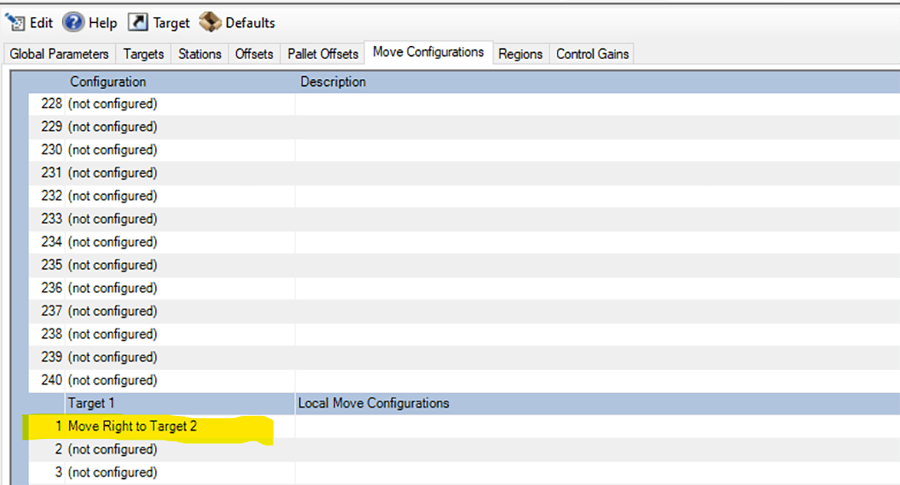
Create a configuration in Target 1 to move to Target 2.
Now when your track is running, Target 1 will wait 400ms and then automatically forward its pallet to Target 2.
Redo this process so that each Target in your system forwards pallets to the next target and press the “Save” button. Now you should be able to go back to the “System Dashboard” and monitor your pallets as they continuously circle around the track.
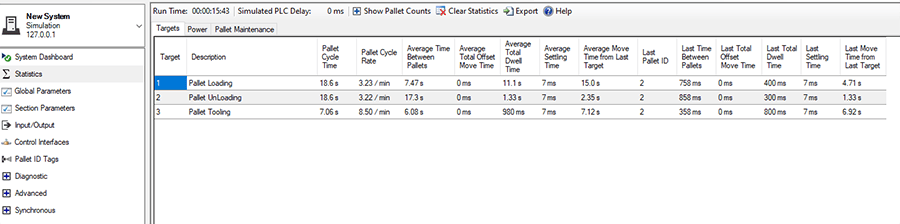
This automatic releasing of pallets can be a useful tool for estimating the throughput of your system if you know roughly how long each process on your track will take.
If you go to the “Statistics” page, you can even see useful information about the time spent heading to each target.
Step 7: Setup your System for PLC Control
While controlling your track through TrakMaster is useful for setting up and testing your configuration, typically, systems will ultimately want their SuperTrak system controlled by a PLC.
SuperTrak has built-in functions for communicating with a variety of PLCs. For this blog we’re going to go through configuring the system to talk to a Rockwell PLC over Ethernet/IP, but much of the process for connecting to other PLCs is similar.
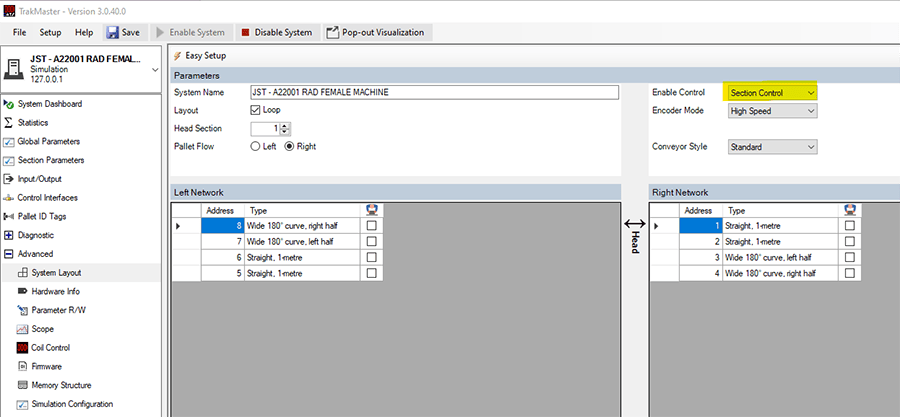
First, go to the “System Layout” page under “Advanced” and from “Enable Control” select either “Section Control” or “System Control”. These are both for controlling from an external system. The difference is whether you enable sections individually or all at once.
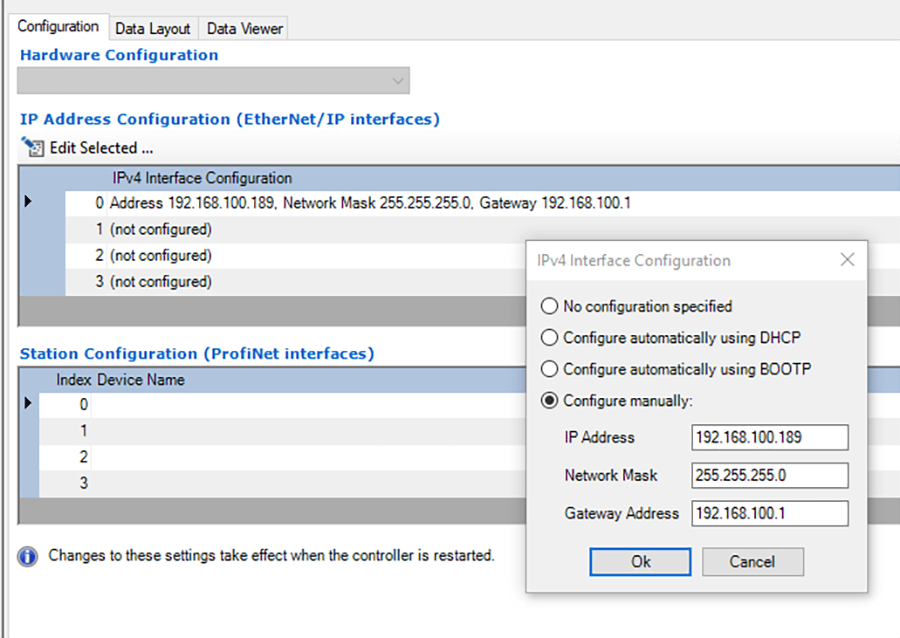
Now go to the “Control Interfaces” section. Here you can configure an EtherNet/IP interface.
Modify one of the configurations by entering its IP settings. Note that these settings are not the IP address of your PLC, they are for the network card in the SuperTrak system that the PLC communicates with. This is also a different IP address than the one you connect to via TrakMaster.
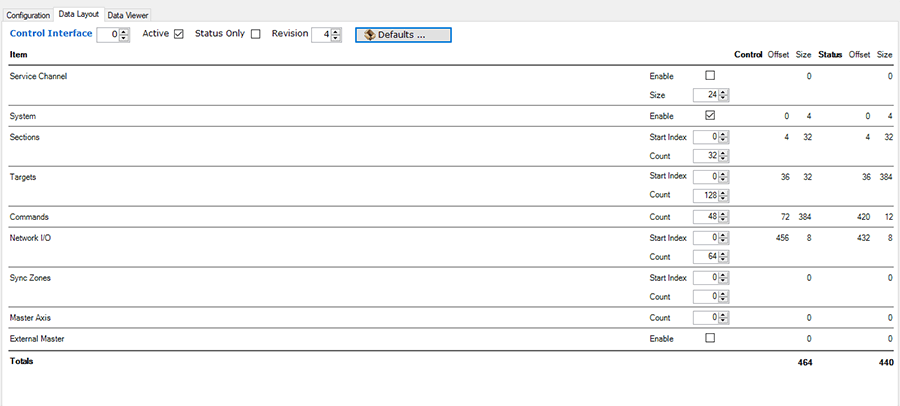
Next, go to the “Data Layout” tab. Here you can set up what data gets sent to/from the PLC.
Feel free to select “Defaults” > “Ethernet/IP” to use the recommended default values. But if your system uses a lot of targets or network IO, you can increase/decrease the amount of space used by each type of message.
Now select “Save”, restart your system, and you should be all set to start setting up your PLC to control the SuperTrak system!
Learn more about our Manufacturing Automation and Intelligence expertise and our open positions!