The ability to access a SQL database in real time from WinCC runtime can be beneficial for manufacturing processes. It can be used to determine what should be run on a line, log parameters of a process, or provide tracking of products in real time. This tutorial will go through some of the steps necessary to access data from an SQL database with WinCC advanced.
An important note is that SQL access is not allowed through scripting from a Siemens Comfort Panel. One way to work around this is to have WinCC Advanced runtime running somewhere on your network to handle communication with the database. You can then access the database from WinCC Advanced, pass its values to the PLC, and then access them on the PLC from the comfort panel.
Database Settings
I will not go through the entire setup of an SQL database here. However, the user must update several essential settings for access from WinCC.
In SQL Server Management Studio
1. Open SQL Server Management Studio and connect to the server where the database you wish to access from WinCC resides.
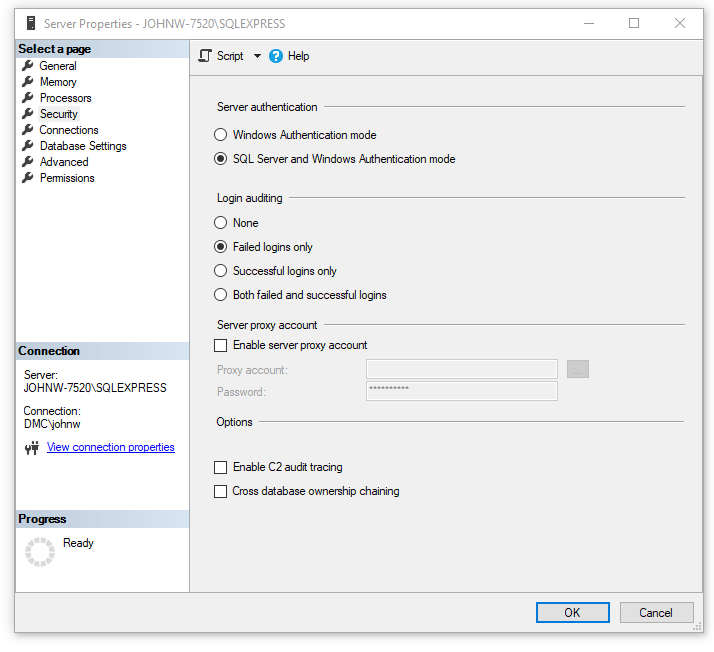
Right-click that server and open its properties. In the Security tab choose SQL Server and Windows Authentication Mode for Server Authentication. This allows access to the server with a username and password instead of a standard windows login.
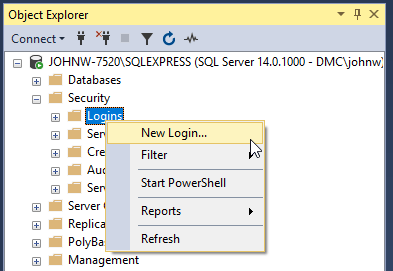
2. In the connection explorer, open the Security folder and right click Logins. Then choose New Login.
This step adds a user to this server.
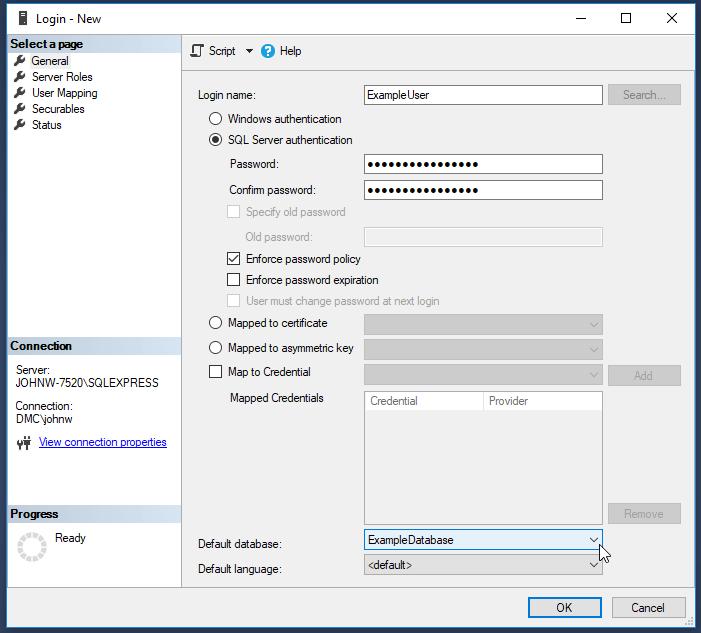
3. Add a user, choose SQL Server Authentication, and set the default database to the database you wish to access from WinCC.
In SQL Server Configuration Manager
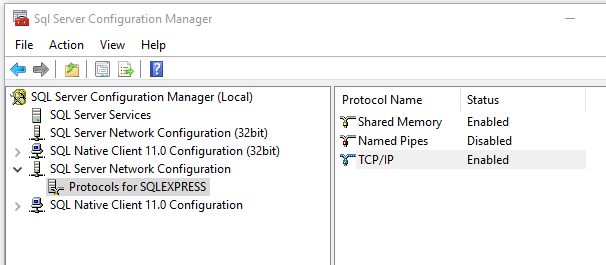
1. Open SQL Server Configuration Manager. If you are having trouble finding it, try browsing to the locations seen on this site. Under SQL Server Network Configuration then Protocols for SQLEXPRESS, enable TCP/IP.
2. Under SQL Server Services, change the start mode of SQL Server Browser to Automatic and ensure it’s running.
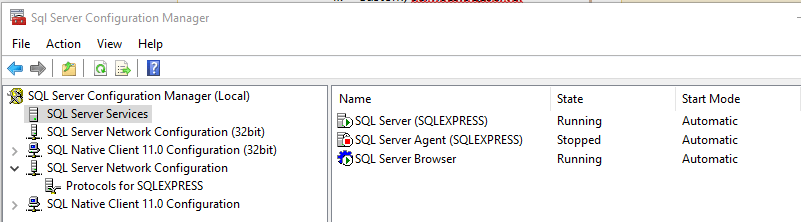
3. Right click on SQL Server and SQL Server Browser and restart them.
In Windows Firewall with Advanced Features
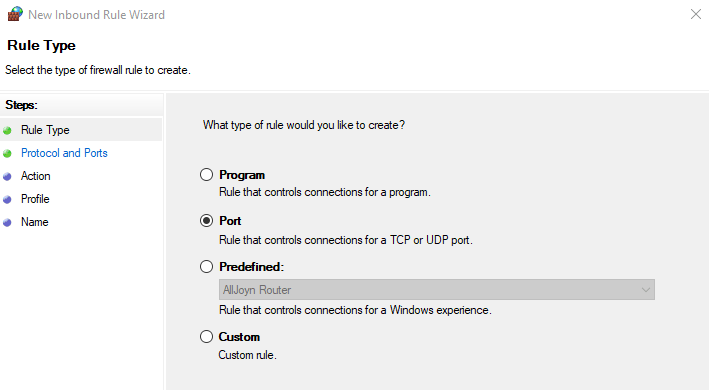
1. Open Windows Firewall with Advanced Features. Choose Inbound Rules from the bar on the left, then New Rule… on the right.
2. Make the rule with the following features:
Rule type: Port
Protocol and Ports: UPD type, port number 1434
Action: Allow the connection
Profile: Choose all
Name: SQLExpressBrowser
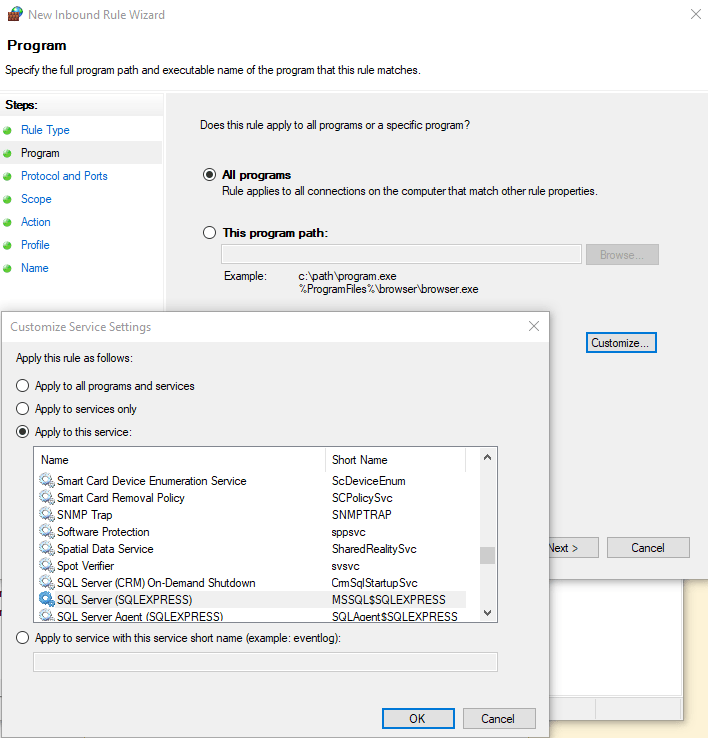
3. Add another incoming rule. This time choose a custom type.
Rule Type: Custom
Program: Select Customize next to services and apply the rule to the service SQL Server (SQLEXPRESS).
Protocol and Ports: Protocol type Any
Scope: Any IP address local or remote
Action: Allow the connection
Profile: Apply to all
Name: SQL Server Database Engine Service
Script Setup
Now that we have the settings for the database nailed down it’s time to get into the fun part, the actual scripting!
Below, I will go through the lines of my code and explain what’s happening at each part. In this example, I’m calling a stored procedure from the database that takes inputs of integers and strings from the PLC and outputs to an array of UDTs on the PLC.
Sub SQLQuery()
'Keep running script if error occurs
On Error Resume Next

'Declare Variables
Dim i, index, test, row, iType, sFirstInput, iSecondInput, offset
Dim connection, recordset, record, connectionstring, query
Dim continue

continue = True
Line 3 ensures that if the script encounters an error, it keeps running. This line allows us to record the error we’re getting and set status tags for the script. Then declare all the variables being used and set the continue variable to true. This variable will do error handling.
If Not SmartTags("bCallScript") Then
	Exit Sub
End If
Now, trigger the script on the PLC tag bCallScript. This tag has a continuous cyclic acquisition and calls ExampleScript on a value change. Lines 12-14 ensure that we only run the SQL logic on a positive value change of bCallScript.
'Create connection string and database object
connectionstring = "Provider=SQLOLEDB.1;Persist Security Info=True;"&_
					"User ID=ExampleUser;Password=ExamplePassword;"&_
					"Initial Catalog=ExampleDatabase;"&_
                    "Data Source=192.168.0.1\SQLEXPRESS;"
Set connection = CreateObject("ADODB.Connection")
'Open connection to database
connection.Open connectionstring
Make a connection string for the database using the password and User ID created earlier. The data source is the IP address of the computer that hosts the database.
Line 24 creates a database object and line 27 tries to connect to the database. The connection string will vary based on the type of database you’re using, the username and ID created, and other factors.
If Err.Number <> 0 Then
    SmartTags("ErrorTag") = "Opening Connection: " & Err.Description
    Err.Clear
    connection.close
    Set connection = Nothing
    continue = False
End If
Put in the first error handling block. If an error has occurred trying to connect to the database, write Opening Connection: actual text of error to the tag dbSQL_sError.
Then, close the connection to the database and set the continue variable to false. This is useful in troubleshooting, as you can check the tag dbSQL_sError to help diagnose connection problems.
If continue = True Then
    'Convert inputs to strings
    sFirstInput = CStr(SmartTags("dbPLC_sFirstInput"))
    iSecondInput = Cstr(SmartTags("dbPLC_iSecondInput"))

    'Create query text
    query = "EXECUTE dbo.ExampleStoredProcedure" & sFirstInput & "," & iSecondInput

    'Execcute query and create recordset object
    Set recordset = connection.Execute(query)

    'Error routine
    If Err.Number <> 0 Then SmartTags("ErrorTag") = "Database query: " & Err.Description
        Err.Clear
        connection.close
        Set connection = Nothing
        Set recordset = Nothing
        continue = False
    End If
End If
Now that the database connection is open, run the first query. First, check whether the continue variable is true. There is no use trying to run this logic if we had an error connecting to the database earlier.
For this example, I am running a query that calls a stored procedure in our database dbo.ExampleStoredProcedure. This procedure takes two inputs. The first is a string, the second is an integer and returns a table of results.
I take two PLC tags, convert/ensure they are strings, and combine them with another string to create the SQL query EXECUTE dbo.ExampleStoreProcedure sFirstInput, iSecondInput that is passed to the database.
The query can be any valid SQL query. However, I found that it’s easier to create stored procedures in the database than to write long queries in the VBA editor in TIA Portal. This makes the scripting in portal simpler and easier to troubleshoot.
We store the result of the query as the variable recordset, which is a recordset object. This makes it easy to manipulate the data later.
Once again, there is an error routine here that sets the continue variable to false, records the error text, and closes the database connections in the case of an error.
If continue = True Then
    'Make sure we're at the start of the record
    recordset.MoveFirst

    'Determine how many rows to offset
    offset = (SmartTags("dbPLC_iPageNumber")-1)*10

    'Move to desired row
    recordset.Move(offset)

    'Error routine
    If Err.Number <> 0 Then SmartTags("ErrorTag") = "Page offset: " & Err.Description
        Err.Clear
        connection.close
        Set connection = Nothing
        Set recordset = Nothing
        continue = False
    End If
End If
In this example, the goal was to display ten rows of the table produced by our stored procedure on an HMI screen.
This code is only run if our continue flag is true. The first line does the MoveFirst command on the recordset object we created earlier. Think of the recordset object like a big table with one row highlighted. The MoveFirst command ensures highlighting of the first row. Then calculate how many rows we need to offset to display entries 1-10 on page 1, 11-20 on page 2, 21-30 on page 3, etc.
This offset will always be a 0 or some multiple of 10. Use the recordset.Move(offset) command next to move our highlighted row down however many rows required. The move command moves down the table for positive numbers and up the table for negative numbers.
For example, if we move to row 1 using the MoveFirst command, then offset 10 with the move command, we end up highlighting row 11. This would start the second page of entries.
There is now an error routine again. This command catches errors such as the stored procedure returning an empty table or trying to move to a second page when there are less than ten entries.
If continue = True Then
    For i = 0 to 9
        If Not recordset.EOF Then
            SmartTags("dbPLC_Data{"&CStr(i)&"}.iOutputOne") = CInt(recordset.Fields("OutputOne").Value)
            SmartTags("dbPLC_Data{"&CStr(i)&"}.sOutputTwo") = CInt(recordset.Fields("OutputTwo").Value)
            SmartTags("dbPLC_Data{"&CStr(i)&"}.bExists") = True
        Else
            SmartTags("dbPLC_Data{"&CStr(i)&"}.bExists") = False
        End If

        'Error routine
        If Err.Number <> 0 Then SmartTags("ErrorTag") = "Retrieve Data: " & Err.Description
            Err.Clear
            connection.close
            Set connection = Nothing
            Set recordset = Nothing
            continue = False
        End If
    Next
End If
This block moves data into an array of UDTs on the PLC. The UDT has three elements: iOutputOne, sOutputTwo, and bExists. The array has ten elements and is called dbSQL_Data. Loop from 0 to 9 to fill each element of the array.
Within the for loop, there is an if statement that checks recordset.EOF. This is a property of the recordset object which tells whether you have moved past the last row of the table. In this case, use it to ensure that we don’t attempt to read data from an empty row.
If recordset.EOF is false, then read data from the recordset object using the .Field and .Value properties. Each field corresponds to the name of a column from the database table returned by the stored procedure. The .Value property returns the value in that column from the row that is currently selected.
Wrap the recordset.Fields.().Value commands in Cstr and Cint to ensure the correct data types are in the PLC. We write to the dbSQL_bExists bit if we are not at the end of the file, as this means we successfully populated this entry in the array with information. This is useful for deciding whether or not to display info on a screen or use it in the PLC.
After writing the data to the PLC, use the .MoveNext method to move down one row in the data table.
If at the end of the file (recordset.EOF = true), do not read any data, and set the dbSQL_bExists bit to false.
Finish with another error routine for this part of the code.
If continue = False Then
    SmartTags("dbPLC_bErrorExists") = True
    For i = 0 to 9
        SmartTags("dbPLC_Data{"&CStr(i)&"}.bExists") = False
    Next
End If

SmartTags("dbPLC_bScriptComplete") = True
SmartTags("dbPLC_bCallSCript") = False

connection.close
connection = Nothing
recordset = Nothing
End Sub
This is the end of the script. At this point, if the continue flag is false, write to a dbSQL_ErrorExists status bit on the PLC. Furthermore, set the “bSQL_bExists bit to false for all Data array elements to make it clear something went wrong while trying to access the database.
Line 122 sets a PLC tag indicating that the script has completed running to True, signaling to the PLC it can continue with other logic. Reset the dbSQL¬_CallScript tag here so that the script can be called again.
Conclusion
This is a relatively simple implementation of SQL access, but it shows some of the key features and methods you need to read data successfully to your PLC. I hope it can be of use to you in future projects.
Learn more about DMC's WinCC programming expertise.