Siemens introduced Sinema Remote Connect to allow secure connectivity between systems and devices that may not be installed on the same physical network. There are a variety of uses for SRC, but one common application is remote operator access to a network, which is particularly relevant when travel between locations is prohibited for any reason (cost, natural disasters, etc.).
A Sinema RC system is comprised of a single server (either a dedicated server PC or potentially a virtual machine) and at least one device (known as a ‘Client’) on the distributed network. DMC recently implemented a Sinema RC system to allow remote communication between an operator computer and a series of remote skids that were expected to regularly migrate across the continental United States.
Configuration
Sinema RC Server can easily be located behind a third-party internet router (for example, the one connecting your office computer to the internet), which is a fairly standard configuration. For this system, we used two Siemens M876-4 modems with Verizon SIM cards, in order to provide additional flexibility to the end user, who may be moving the server station to a new location. Using a separate router allows for movement of the system without any additional configuration of the system. Additionally, introducing a separate router meant there was no need to edit router settings or access the client’s internal network, which could be an important factor for end-users concerned with network or data security.
All SRC-enabled network devices in the system (in this case, the M876-4 modems) establish a VPN connection to the server, which effectively tricks each individual device into performing as if they’re connected, while maintaining the security of the network. Additionally, we configured a remote user connection, which will allow a maintenance technician to access the system remotely and provide any necessary support or maintenance.
For this setup, you’ll need:
- An operator PC
- A wiped PC (without an operating system)
- Compatible remote devices (in this example, the remote M876-4)
- Note that an additional Key Plug is required to allow a Scalance device to act as a Sinema RC client
- Many Scalance switches are SRC-compatible, as long as the model is VPN-capable (models in the S, M and CP lines usually are)
- Reliable internet access for the server and any client devices
Basic Settings on the Server PC
Setup
- Insert boot CD/USB into the appropriate slot on server PC
- Start server PC, choose "Install/Update SINEMA Remote Connect Server". "Load from medium"
- Follow instructions, using whatever settings fit your network configuration. For this example, we're using the following addresses:
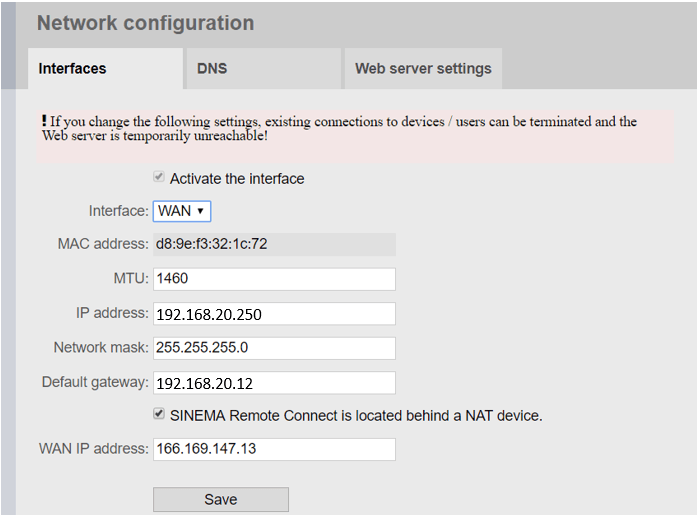
Eth0 address - 192.168.20.250
Subnet - 255.255.255.0
Gateway IP - 192.168.20.12 (LAN IP of router)
External IP of the server: 166.169.147.13
Note: if you’re trying to use a SIM card for internet access, make sure you contact your service provider to confirm that your card is set with a static WAN IP address (most SIM cards default to a dynamic WAN IP, which changes upon every power cycle of the device)- ideally, the Sinema RC Server should have a static external IP address, which gives the Client devices a reliable address at which they can consistently find the Server. If you're configuring SIM access for your Client devices as well, they'll be perfectly happy with dynamic IPs and no additional configuration is necessary.
Bonus Note: there are a few detailed steps to setting up SIM cards with Scalance modems, and in DMC's experience this has caused a bit of a headache. Recently, Siemens has introduced a new offering in which they provide an M-876 devices with a Verizon or AT&T SIM card installed and activated; if you're looking for a quicker and easier implementation, make sure to reach out to your distributor for more information!
Web-Based Management
- Open an internet browser in the Operator PC and enter the Eth0 address of the server (in this case, 192.168.20.250). Note that the Operator PC must be addressed in the same subnet as the server.
- Log in
- If this is your first time, use the default "admin"/"admin" login. You'll be prompted to change the username and password
- Otherwise, use the login credentials you configured at setup
- Server Configuration
- Under the "Security" > "Network" tab, confirm that the "Activate Interface" checkbox is ticked, and that the port type is "WAN"
- Check the box labeled "Sinema RC is behind a NAT device", and enter the external IP of the router (in this example, 166.169.147.13)
- Confirm that the HTTPS port under "Web server settings" is set to 443, and Fallback port is 6220
- Save these settings
Groups
Create a communication group for Skid1.
- Under Remote Connections --> Participant groups, click "Create" and name the group "Skid1"
- Repeat, creating group "Service"
- Define group communication
- Click the arrow button in the "Actions" column for the Service group

- Enable Skid1 and click "Save"
- Within the settings for each group, we can define limits to regulate which groups can communicate with others. For example, we can adjust settings such that the ‘Service’ group can communicate with every other group, but we’ll restrict the ‘Skid 1’ group from communicating with anyone other than a member of the ‘Service’ group. This adds another layer of removal between our remote devices, which may be desirable for security purposes.
Configure Devices on the Server
For this example, we’ll create the device manually, but we could also create a .csv file (useful if you have a lot of devices to configure) and import them through the same page using the ‘Import’ button.
- Create Devices: the M876-4 (Skid1)
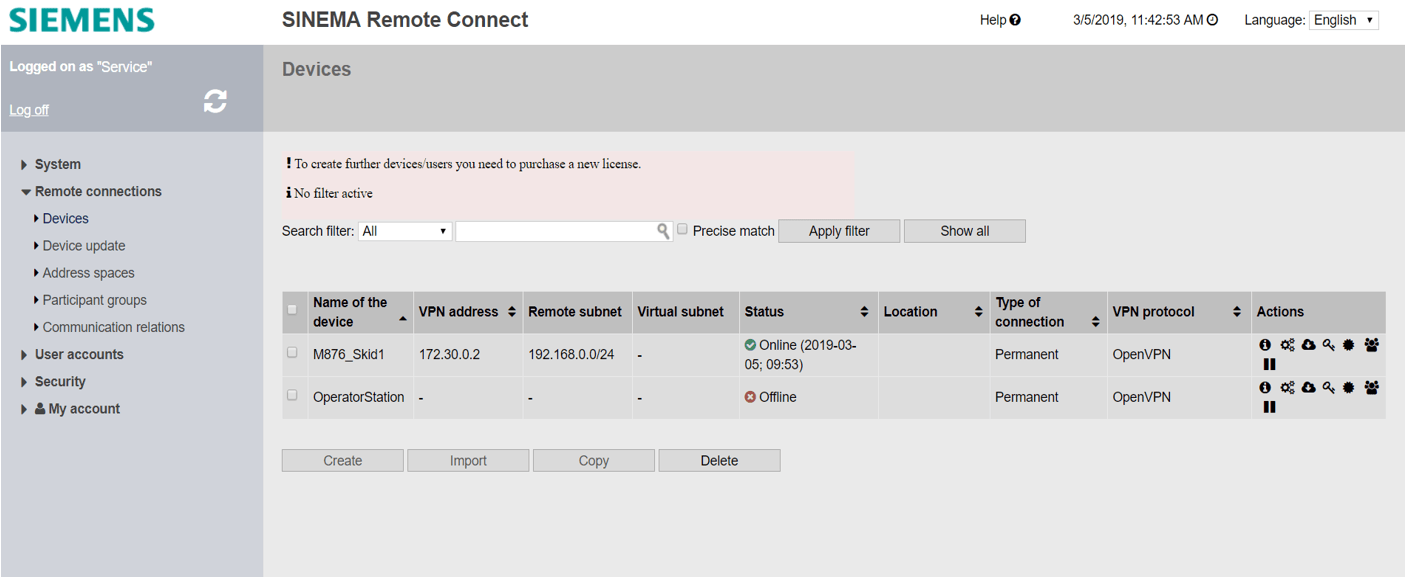
- Under Remote Connections --> Devices, click "Create" and name the M876 device. The basic Sinema RC package from Siemens allows for up to four (4) clients connected to the server, but extension options are available if needed.
- Enable the option "Connected Local Subnets" and use the following settings
- Local LAN IP: 192.168.0.15
- Network mask: 255.255.255.0
- Enable group "Skid1”
- For later use: click the info button (
 ) and make note of the ‘Device ID’ and give the device a password. There is also a display of the device ‘Fingerprint’ – copy this down for later when we set up the remote device.
A Note on Server Router Settings
At a minimum, Sinema RC requires TCP ports 443 and 5443 and UDP port 1194 enabled on the server internet gateway (in this case, the M876-4) to communicate between the server and client devices. If your server PC is located behind a managed router, such as most standard corporate internet routers, a network administrator may need to actively enable these ports for communication to your server.
Basic Settings for Each Individual Device
- For standard setup, Siemens provides a built-in device wizard to help with the initial configuration of the device; follow these instructions by filling out as much information as possible. If you’re using a SIM card, the wizard should walk you through configuring your SIM provider and other information. One important point is that most major providers require advance registration of a SIM card with its corresponding device (via IMEI code). Please call your provider if this is relevant to you.
- For a Siemens modem (in this case, the M876-4, but also the S600 series and others), a Sinema RC Key Plug is needed to allow Sinema RC connection. The purpose of the Key Plug is to store SRC-relevant data such as the WAN IP address of the router or user data. Once the Key Plug is inserted into the modem, additional settings are available.
- If you didn’t enable Sinema RC using the device wizard (or if you’re taking a preconfigured Scalance device and updating for SRC access), navigate to “System” à “Sinema RC” and check the box to enable Sinema RC. Here, you’ll also point the device toward the WAN IP of your server PC (the WAN IP of your router), as well as the corresponding gateway (the LAN IP address of the modem).
- For verification, you can copy the ‘fingerprint’ of your server from the server PC over to your client. Paste in the fingerprint copied during server configuration and populate the ‘Device ID’ and password fields with the settings defined earlier.
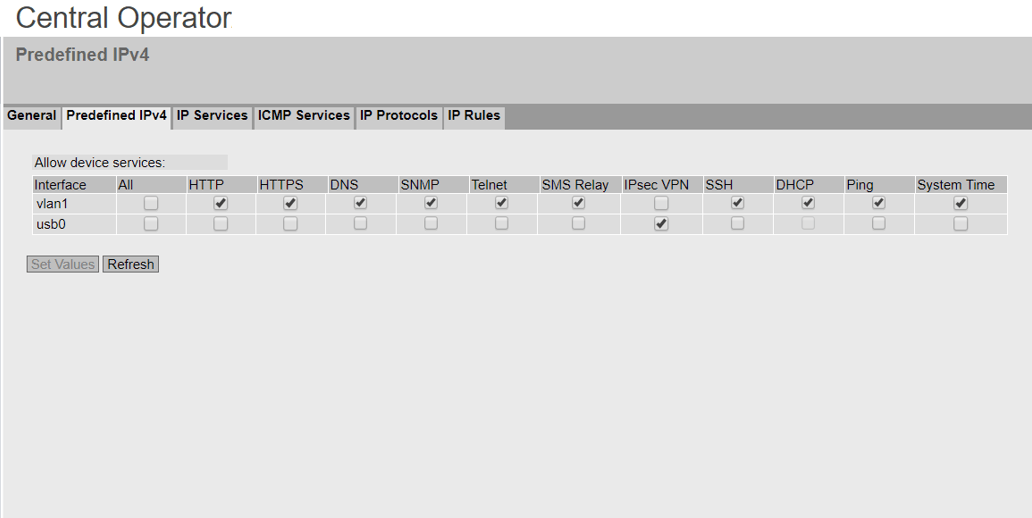
- Next, we’ll adjust our server settings to allow necessary communication to the server. Navigate to ‘Security’ → ‘Firewall’ → the ‘IPv4 tab’ and enable communication between all ports on the device.
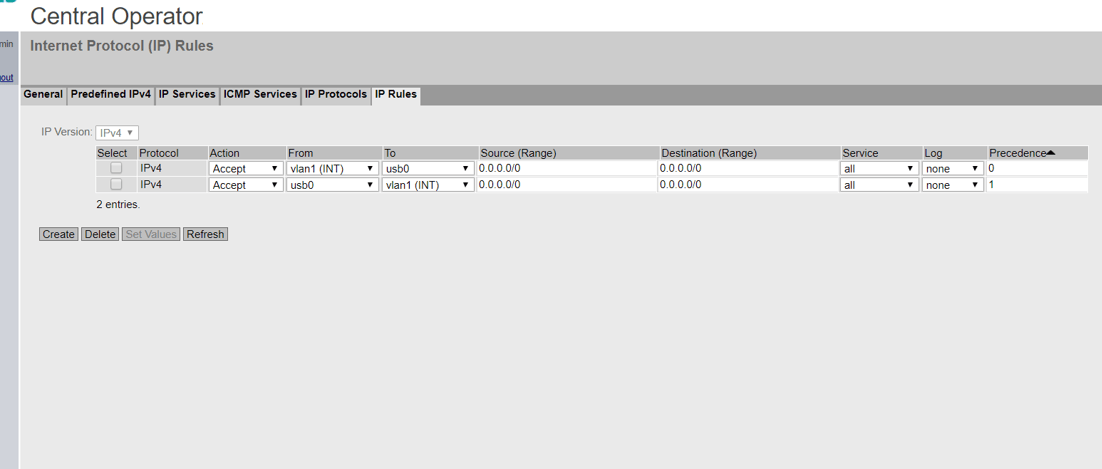
- We also need to create some additional settings in the IP Rules tab, to tell our modem to accept and allow all communication through its ports. You could minimize the scope of these rules for increased security, but that requires a defined list of all IP addresses communicating in the system (not possible for this scenario). For this example, we’re going to accept and send all packets from any IP address through our modem.
From here, you should be able to access the server from your remote device. With internet connection, your modem should automatically connect (unless you’ve configured additional restrictions). You can also run the Sinema RC client, assuming you’ve configured client login credentials, to test the connection from an operator computer.
When the server and clients are connected to the internet, they can be connected via secure VPN tunnels to allow any and all communication between configured devices, including remote access by an operator with Sinema RC Client software installed on his or her PC.
Learn more about DMC's partnership with Siemens.