Closed-loop position control in TIA Portal is typically achieved using tech objects. While tech objects are a great way to quickly configure and commission servo axes, they require hardware that is Profinet or Profibus compatible and capable of communicating via a specific set of Telegrams.
Recently, a customer asked me to set up a closed-loop position axis in TIA Portal using an S7-1500 PLC, a G120C VFD, and an external encoder. Patrick Smith wrote a great blog explaining how to gear a drive to an external encoder using native Siemens hardware. For me, however, I needed a more generic solution because my encoder communicates over IO-Link instead of Profinet or Profibus. Furthermore, the G120C drive I was using natively supported speed axis control via Telegram 1, but did not support any of the more complex Telegrams required for position control.
To interface my setup with a Position Axis tech object, I repackaged the drive and encoder data into a simulated Telegram that the Siemens tech object could understand. I decided to use Telegram 3: which is used to package status info and control setpoints for one drive and one encoder. You can simulate Telegram 3 using the following steps:
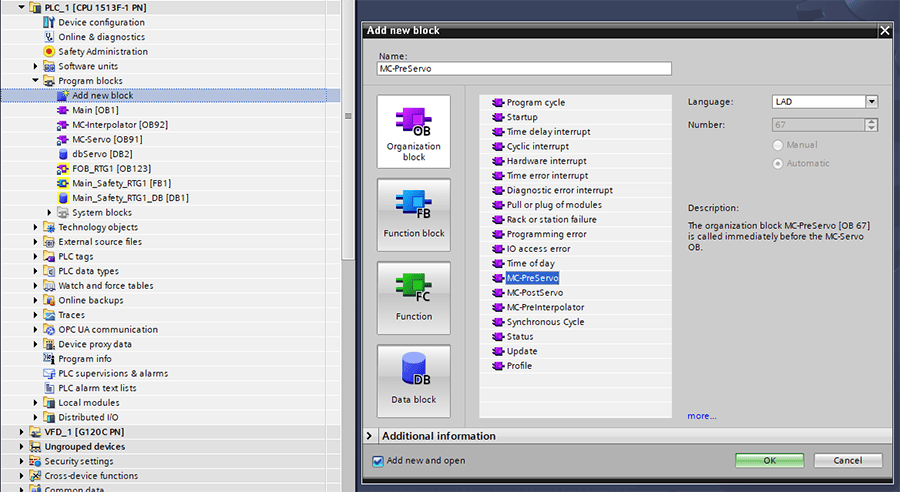
Step 1: Create Servo Organization Blocks
The servo tech object is called in TIA Portal using an organization block (OB) called “MC-Servo.” All the logic required to simulate the Telegram communication should be placed in “MC-PreServo” and “MC-PostServo” (OBs). Doing so ensures that the MC-Servo OB has all the data it needs from your hardware to operate the tech object logic correctly.
Select “Add new block” in the project tree, select the MC-Servo block, and press “OK.” We’ll repeat this process to add the “MC-PreServo” and “MC-PostServo” OBs.
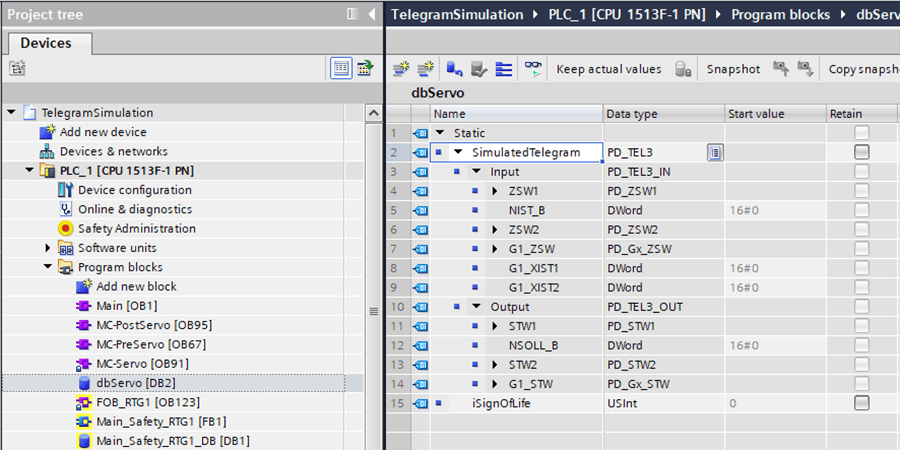
Step 2: Create a Virtual Telegram
Next, we need to set up a data block where our virtual Telegram will be stored. Create a new data block called “dbServo” and add a new object of type “PD_TEL3.” Portal will automatically generate the data structures required for Telegram 3 communication.
Step 3: Set up Telegram data in “MC-PreServo”
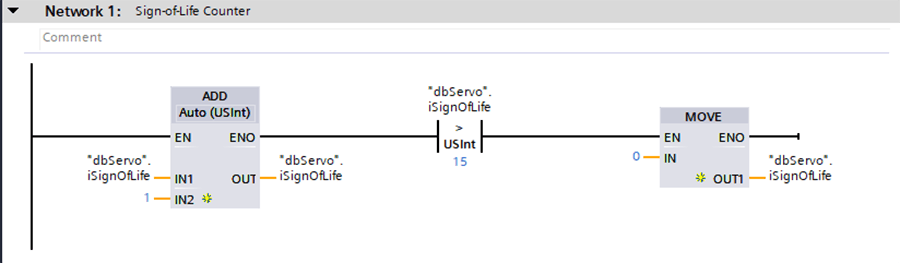
Simulate Sign-of-Life Signals
The Telegram 3 communication protocol maintains a “sign-of-life” signature between master and slave devices. The Profinet master device uses 4 bits in Status Word 2 (STW2) of the Telegram to count from 0 to 15 cyclically. The slave device simply echoes those bits back to the master to prove that the communication between these devices is active.
Because our Telegram is virtual, we need to simulate the sign-of-life communication between its input and output structures. This logic should exist in the “MC-PreServo” OB, so our tech object doesn’t throw a communication error when it is called in “MC-Servo.”
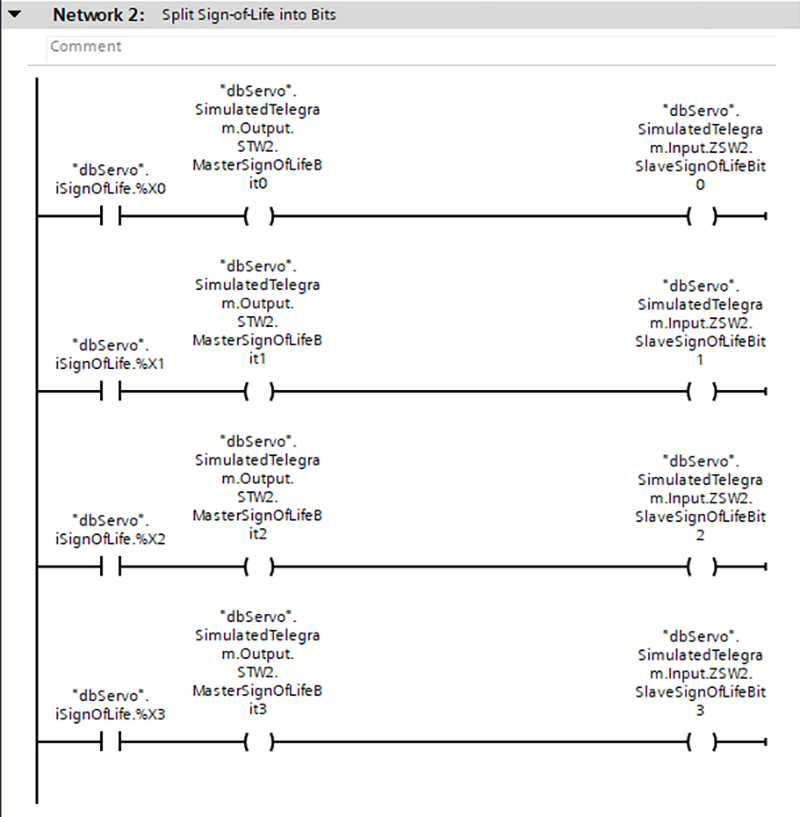
We can simulate the sign-of-life signals by implementing a counter that executes continuously and is reset back to 0 once it reaches a value of 15. We’ll split the value of the counter into binary representation by addressing individual bits of the integer, from %X0 to %X3.
These counter bits will be used to control both the master and slave sign-of-life bits in our virtual Telegram, so it will look like our virtual slave device is always responding to its virtual master:
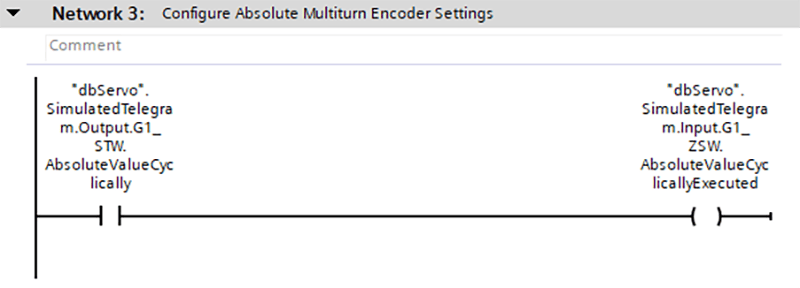
Configure Encoder Settings
For the tech object to correctly read data from the encoder, the master and slave “devices” in our virtual Telegram must agree on the type of encoder used. The following rung ensures both the input and output structures of our Telegram recognize the encoder settings that we will eventually set up in our tech object:
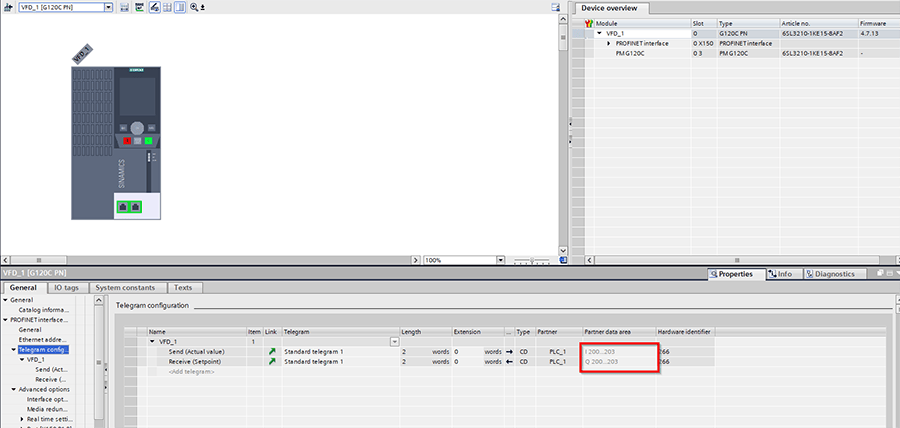
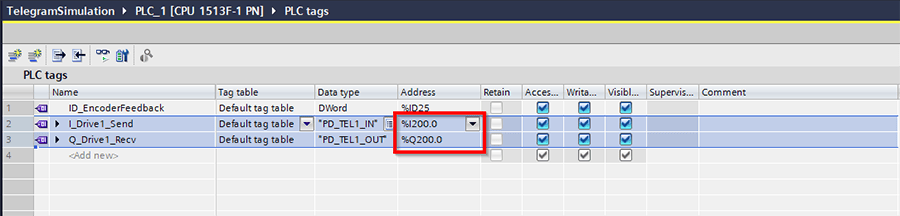
Configure VFD Telegram tags
In our project’s PLC tags, we’ll make two tags that correspond to the Telegram 1 data being passed between the PLC and our G120C. These Send and Receive tags should be of datatypes “PD_TEL1_IN” and “PD_TEL1_OUT,” respectively, and should have the same address as the G120C’s Telegram as shown in the hardware configuration:
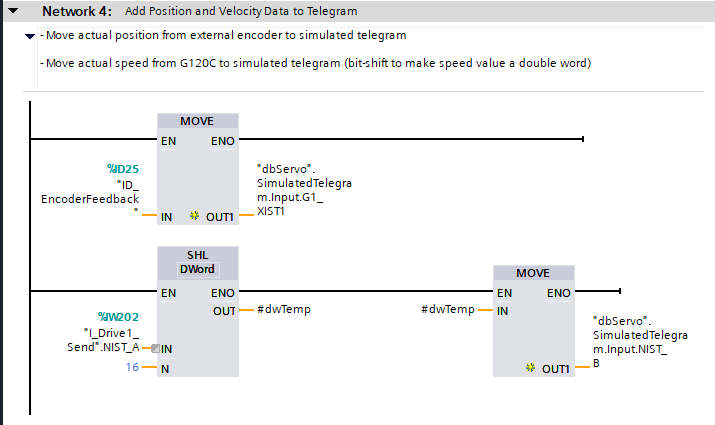
Move Encoder and Drive Data into Telegram
Here’s where the magic happens! We need to take the incoming Telegram data from the G120C and external encoder and pack it into the input structure of our virtual Telegram. In Telegram 3, the velocity feedback is stored in “NIST_B” while the encoder position is stored in “G1_XIST1.”
Please note that both of these variables are double words (DWord) in Telegram 3. If your hardware returns data in a different numerical format, you may need to do some data manipulation to make sure your feedback values are correctly represented in the tech object.
In my project, the external encoder already sent data in DWord format so I could move that directly into the virtual Telegram. The G120C was a little trickier – since Telegram 1 returns velocity feedback as a single Word, I had to do some bit-shifting to pack the data into the Telegram input in DWord format.
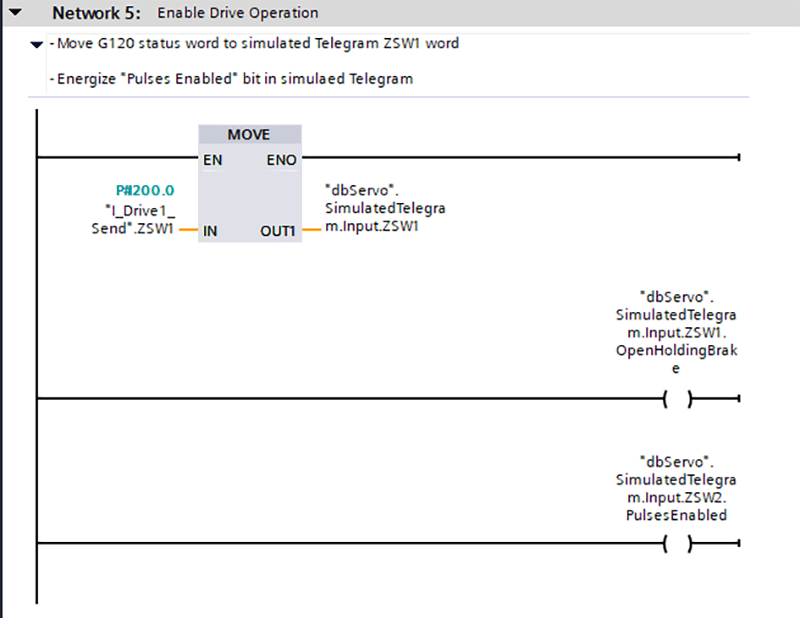
Enable Drive Operation
The final setup step required in the “MC-PreServo” OB is to energize all the status bits that enable the drive to run. If the tech object does not receive all these status bits correctly, it will not be possible to operate the axis.
Step 4: Unpack Telegram Data in “MC-PostServo”
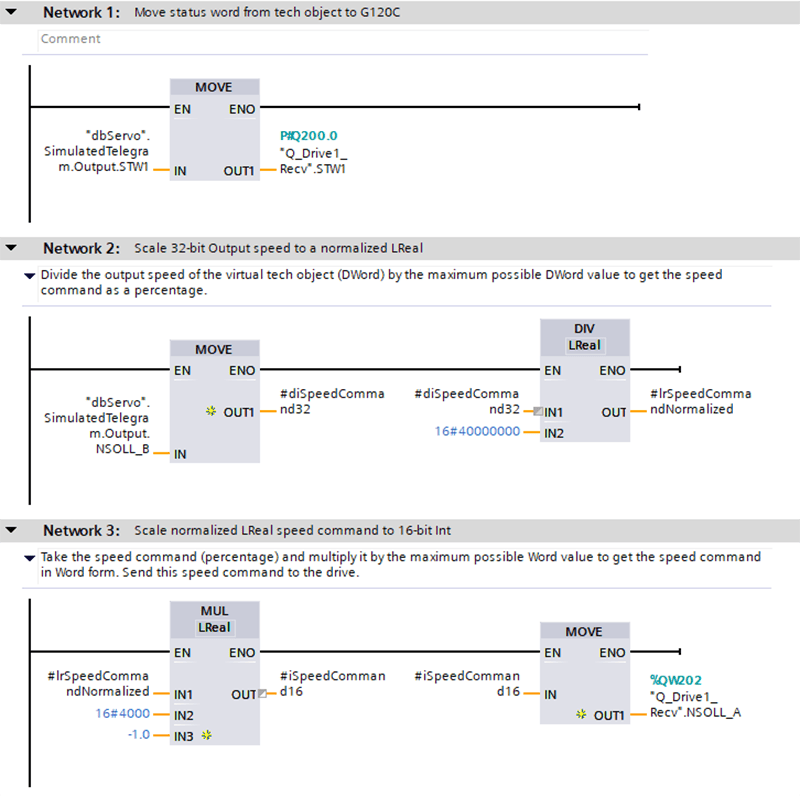
Once our tech object has been called in the PLC program, we need to send our newly calculated speed setpoint and control bits to our physical drive. The hardware outputs required will depend on the make and model of your drive. However, the rungs below demonstrate the basic process of unpacking Telegram 3 data.
The first rung sends the status word from the virtual tech object directly to the G120C. Since the first status word (STW1) structure is the same between Telegram 1 and Telegram 3, a direct MOVE command worked just fine here.
When sending setpoint data, just remember – depending on how your drive interprets setpoints – you may need to do some operation to get the Telegram data to a format that the drive can understand. In my case, the drive expects the setpoint as a single Word, but the virtual tech object outputs a speed command in DWord format.
In order to maintain as much data resolution as possible, I normalized the DWord speed command as a percentage of its maximum possible value in DWord format, then, I multiplied this normalized value by the maximum possible Word value to get the appropriate speed command for my drive.
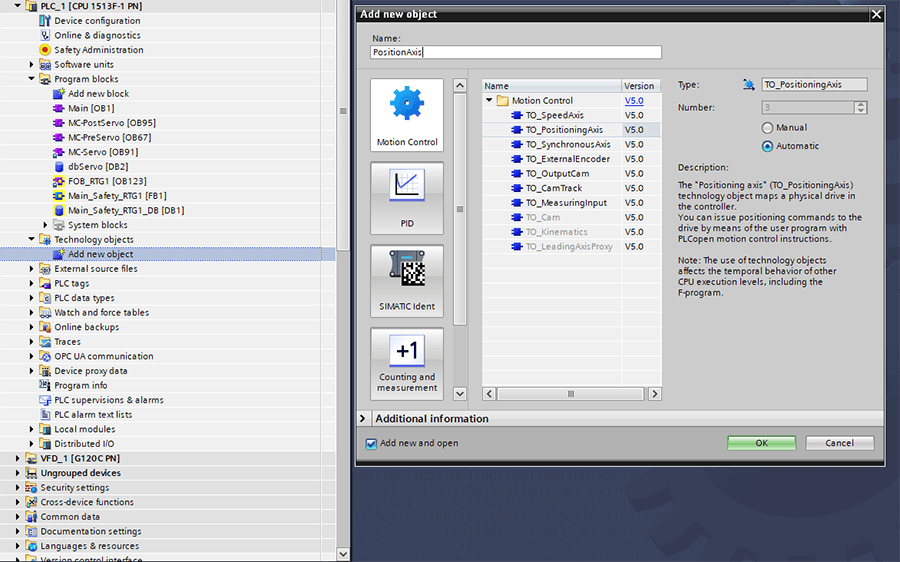
Step 5: Add a Position Axis Tech Object to the Project
Now that all of our signals into and out of our virtual Telegram have been taken care of, we’re ready to add the position axis tech object to our Portal project. In the Project Tree of TIA Portal, find the Tech Objects folder and select “Add New Object.” Then, select a Positioning Axis object, give it a name, and press “OK.”
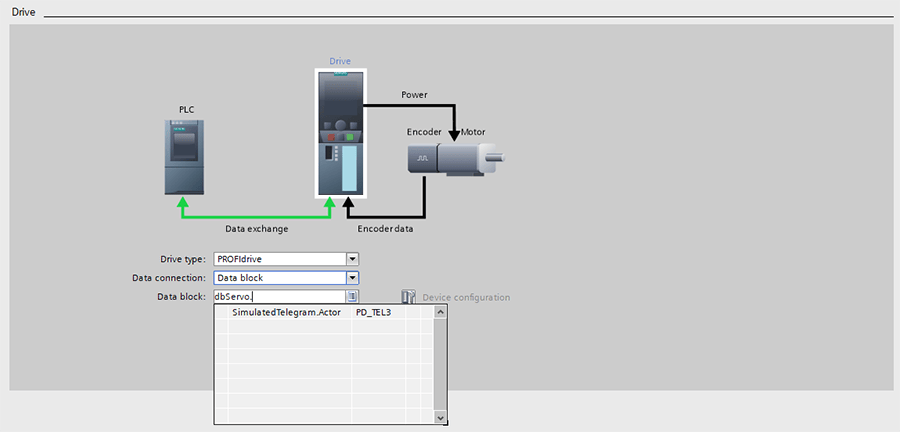
In the Configuration window of your new tech object, navigate to the Drive hardware interface page. Change the data connection from “Drive” to “Data block” – this setting is what allows us to connect the tech object to our virtual Telegram. We’ll point our data block connection to our virtual Telegram, and we’re done!
Portal automatically assumes that the encoder connection will match the configuration of the drive connection, so it already set up encoder parameters for us. Just be sure to check that the encoder type in the tech object matches your physical hardware. From this point, you can configure the rest of the tech object as normal.
Learn more about DMC’s Siemens Solutions Partnership and contact us for your next project.