Welcome back to “Getting Started with WinCC OA!” If you aren’t familiar with the series’ previous topics, it’s recommended that you read the respective installments before proceeding:
What is a Module?
As noted in Part 11 of “Getting Started with WinCC OA”:
“Modules represent their own program window, meaning that the child panel is disjointed from the calling panel and its respective calling module. If the calling panel is changed/closed, the child panel/module will remain opened.”
Modules can be hidden, minimized, maximized, zoomed, and much more. While these topics aren’t pertinent to get started with WinCC OA, they’re still helpful to note. With that said, we’ll now focus on embedded modules and their applications.
Embedded Modules
Like child panels, embedded modules are used to display sub-panels in conjunction with a main panel. On the contrary, while a child panel opens in front of the calling panel, an embedded module exists within an allocated space on the main panel itself.
These embedded modules are helpful for presenting dashboards, portioning out screen real estate, displaying alarm buffers, and more.
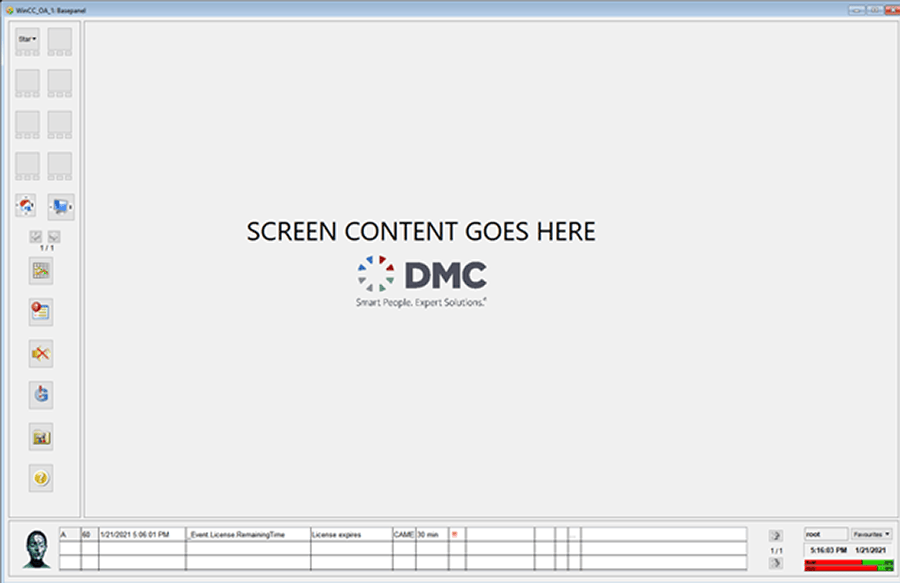
For example, one of the default templates located in the base project (Panels/para/PanelTopology/templates/TEMPLATE3/basePanel_1024_768) uses embedded modules to divide the screen into three functional areas. The template contains three primary embedded modules with names that dictate their general purposes:
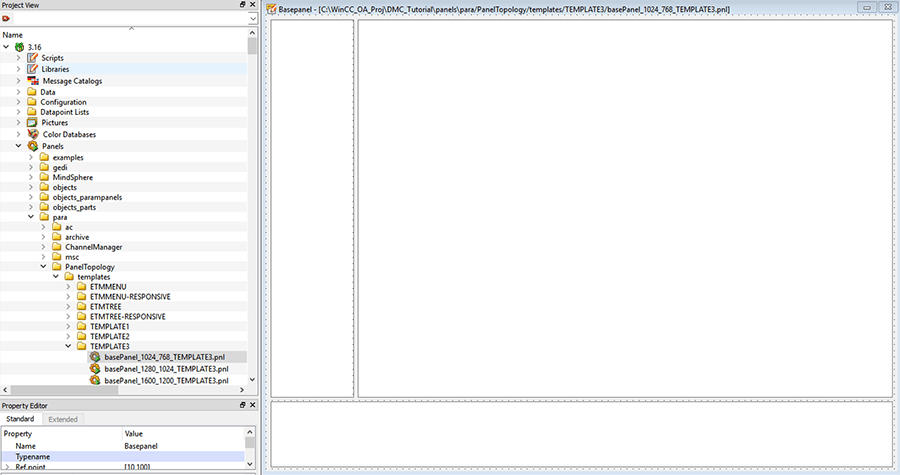
While we won’t go into too much detail on templates here, it’s important to note that when implemented during runtime, the embedded modules allocate a certain quantity of real estate and present certain sub-panels on the overall display.
- mainModule: Displays the general user-defined screens
- naviModule: Displays the UI's navigation controls
- infoModule: Displays pertinent information (alarms buffer, date/time, user, etc.)
During runtime, the naviModule and infoModule continuously display their respective content while the mainModule displays the main panels, as defined in the project’s Panel Topology (Panel Topology will be discussed in a later blog installment).
Embedded Module Functions
The most relevant embedded module functions are as follows:
- RootPanelOnModule()
- Opens a panel in a specified module.
- Arguments include:
- FileName – File within the “panels” folder to open.
- PanelName – Name given to panel.
- ModuleName
- Name of module in which the panel will open.
- Parameters
- Panel $-Parameters; see Part 10 for information on $-Parameters and Part 11 for how to pass them into panels from calling functions.
- PanelOffModule()
- Closes the panel in a specified module.
- Arguments include:
- PanelName – Name of panel to close.
- ModuleName – Name of module in which the specified panel is open.
- rootPanel()
- Returns the name of the panel open in the given module.
- Arguments include:
- ModuleName – Name of the root panel open in the specified module.
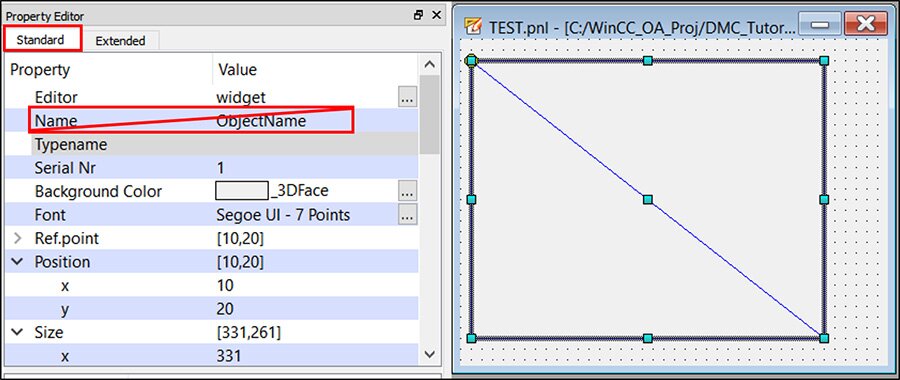
Fortunately, embedded modules are relatively straightforward to work with. One item to note, however, is that the argument “ModuleName” for relevant functions pertains to the “ModuleName” property (located under the “Extended” properties tab) rather than the embedded module object’s “Name” (located under the “Standard” properties tab).
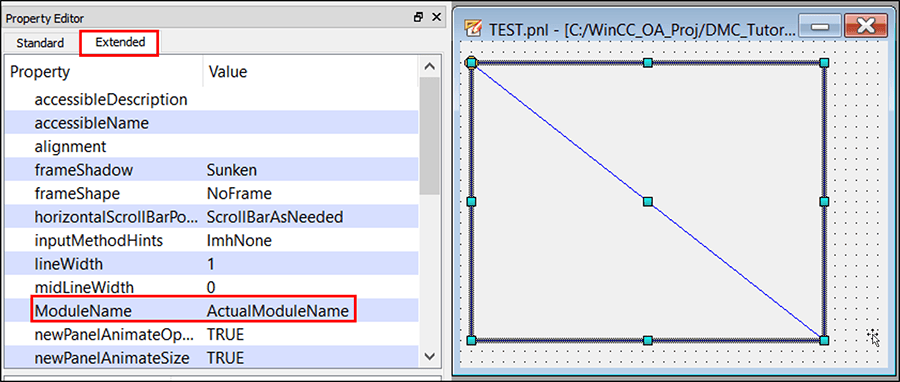
In addition to its explicit string value, the “ModuleName” can be referenced in scripting using the notation:
<object name>.ModuleName
Example
We’ll continue working with our evolving example from prior blogs to create a dashboard using embedded modules.
Better Naming Practices
First, we’ll do a brief rename of our current panels/DPTs, since names like “TestPanel” and “ChildPanel” are not very descriptive. Please make the following panel changes:
- Rename: ChildPanel.pnl → SetSpeedLimitPopup.pnl
- Rename: TestPanel.pnl → MotorInfoPanel.pnl
- Delete: ParentPanel.pnl (it will not be needed anymore)
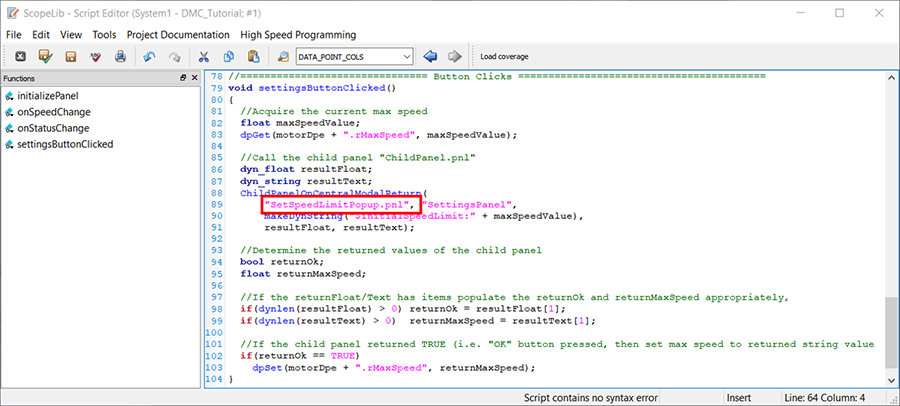
Note: the “ChildPanel.pnl” string in the MotorInfoPanel’s “settingsButtonClicked()” function will need to be changed as well.
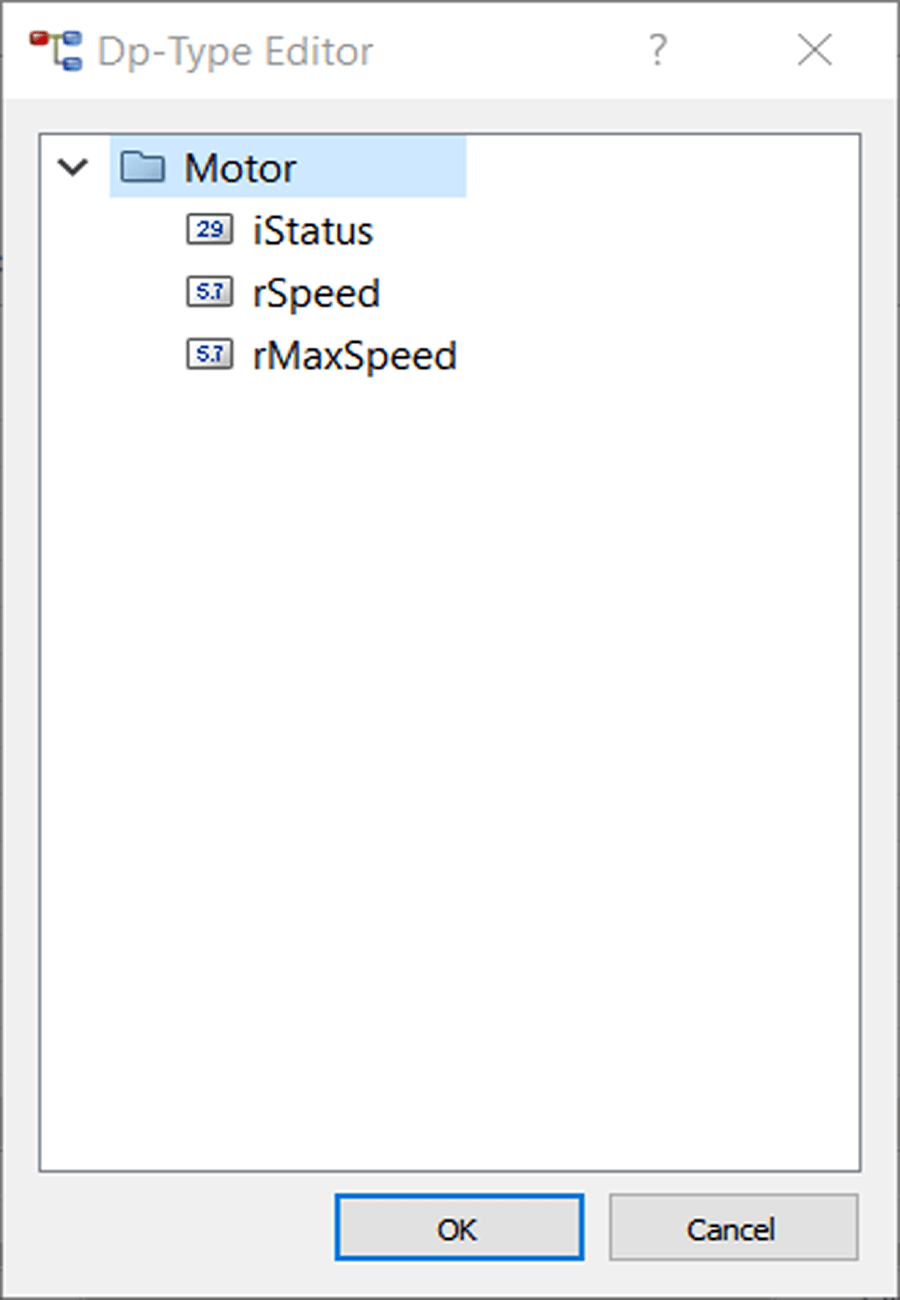
In addition, we’ll change the DPT name “myDatapointType” to “Motor” by right-clicking on the DPT in Para and selecting “Edit Datapoint Type.”
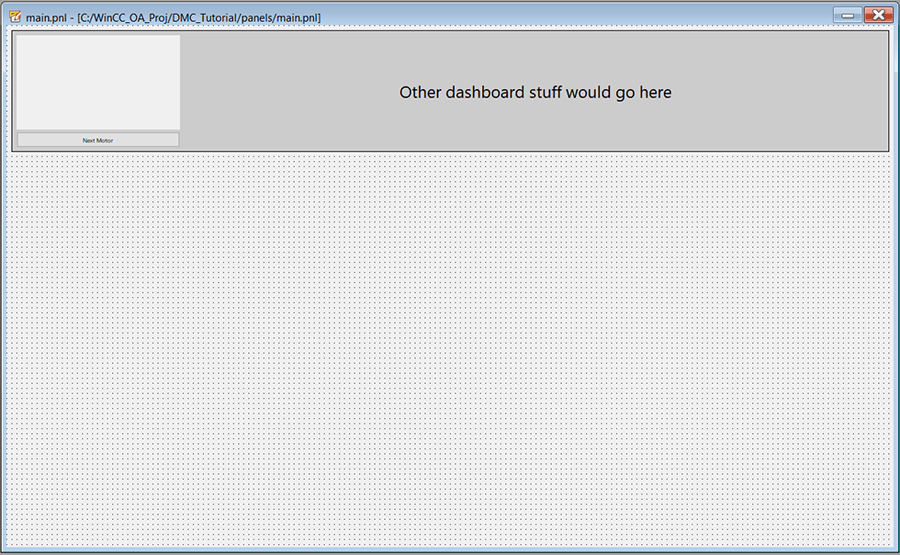
Dashboard
Create a new panel called “main.pnl.” This will represent a main/home screen on a SCADA system. Please adjust your panel dimensions according to your screen resolution:
| Resolution |
main.pnl size (x, y) |
| 1024 x 768 |
856 x 604 |
| 1280 x 1024 |
1110 x 860 |
| 1600 x 1200 |
1430 x 1036 |
| 1680 x 1050 |
1510 x 918 |
| 1920 x 1200 |
1760 x 1036 |
At the top of the panel, we’ll add three objects with the following specified properties:
- A simple border for our “dashboard”:
- Object: Rectangle
- Name: “dashboardBackground”
- An embedded module frame for one of our dashboard items:
- Object: Embedded module
- Name: “motorInfoDashboard”
- ModuleName: “motorInfoEmbeddedModule”
- Size: Make identical to the “MotorInfoPanel.pnl” panel size
- An object to use in embedded module interaction:
- Object: Button
- Name: "nextMotorButton"
- Button text: "Next Motor"
Within our panel’s scopeLib, we’ll have a few constants and variables defined.
Constants:
- MOTOR_INFO_PANEL = name of the motor info panel to open.
- DP_MOTOR_LIST = list of all DPs of type “Motor”.
- NUM_MOTORS = number of motor DPs.
Variables:
- _dpCurrentMotorInfo – panel-scoped variable keeps track of the currently displayed motor DP.
Functions:
- motorInfoDashboardInitialized() – called by the panel’s “Initialize” event; establishes the first motor displayed by calling “displayNextMorotInfoPanel()”.
- nextMotorButtonClicked() – called by the “nextMotorButton” button’s “Ckicked” event; calls the “displayNextMotorInfoPanel()”.
- displayNextMotorInfoPanel() – Displays the next motor DP defined in the DP_MOTOR_LIST into the motor info panel.
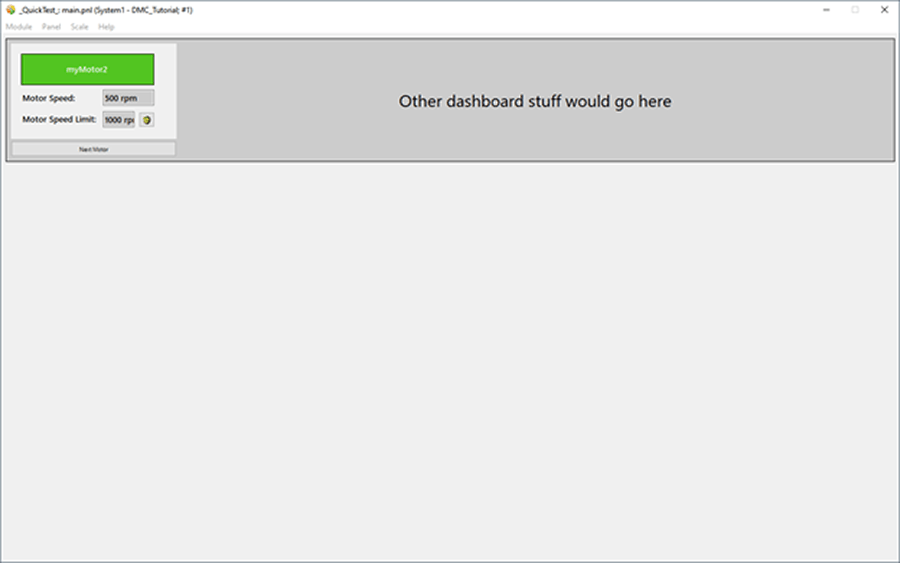
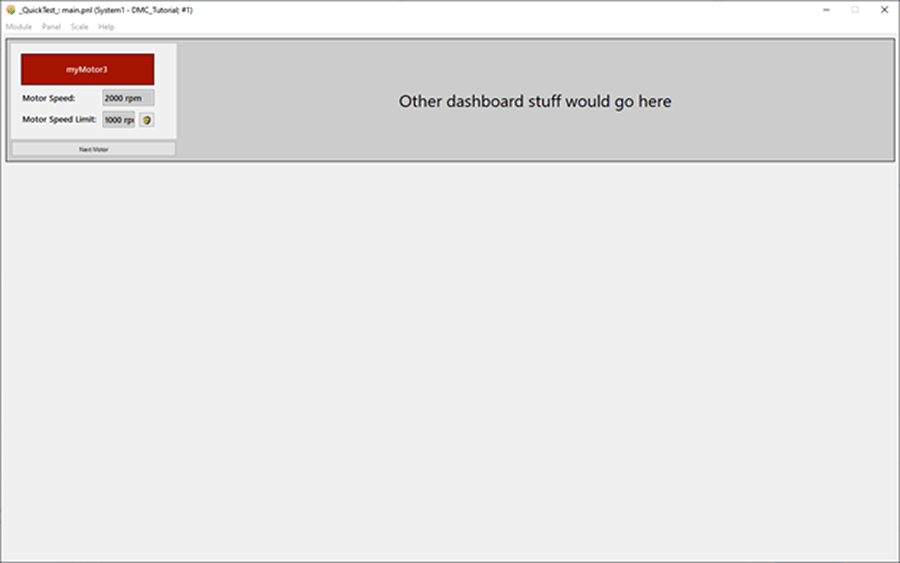
//Display the "next" motor in the Motor Info Dashboard
displayNextMotorInfoPanel()
{
  //Only attempt to display a dashboard if motor DPs exist to display
  if(NUM_MOTORS > 0)
  {
    //Determine the next motor in the list of motor DPs
    int iNextMotorIndex = (dynContains(DP_MOTOR_LIST, _dpCurrentMotorInfo)%NUM_MOTORS) + 1;
    _dpCurrentMotorInfo = DP_MOTOR_LIST[iNextMotorIndex];
    //Open the motor info panel with the selected motor DPE onto the embedded module.
    RootPanelOnModule(
        MOTOR_INFO_PANEL,
        "MotorInfoPanel" + _dpCurrentMotorInfo,
        motorInfoDashboard.ModuleName,
        "$motorDpe:" + dpSubStr(_dpCurrentMotorInfo, DPSUB_DP));
  }
}
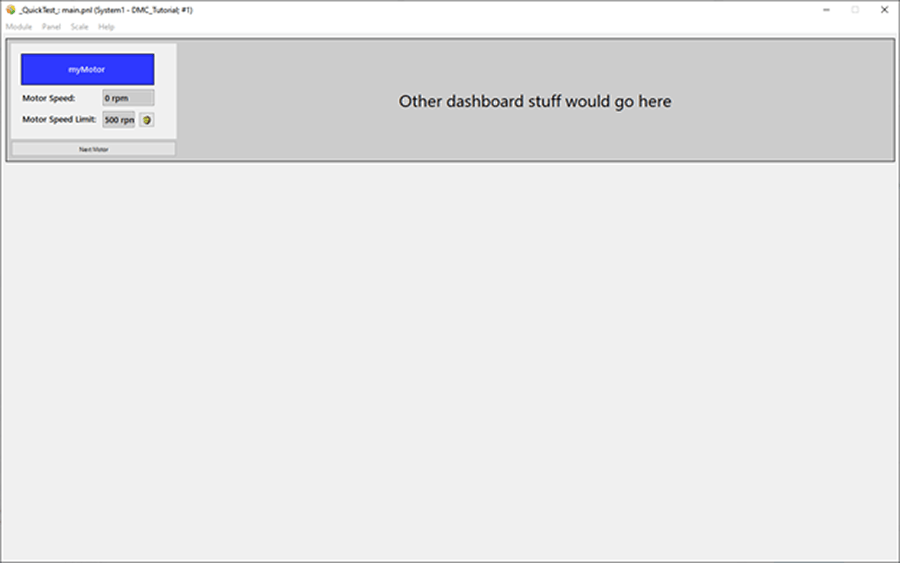
When running the main.pnl panel in QuickTest, we can iterate through the relevant motor DPs by clicking the “Next Motor” button.
So far, we’ve worked with panels of static widths and heights; however, developers can adjust panel reference dimensions, and users can sometimes resize a given window. OA provides functionality to accommodate for the positioning of objects within a panel when the overall panel dimensions shift.
In the next edition of “Getting Started with WinCC OA,” we’ll take a brief look at panel layouts and how we can use them to dictate the real estate of a panel.
Topics to look forward to in this series:
Contact DMC to get started on your next WinCC project and learn more about our Siemens SIMATIC WinCC Programmingas well as our WinCC Open Architecture Development.