Other Installments in This Series:
The second part of this series on how to run C++ real-time on a Beckhoff PLC will cover creating the interface that will host the C++ code, creating methods and data types within that interface, and how to access that interface from the structured text code.
The C++ Interface is the same concept as interfaces in structured text programming on Beckhoff PLCs, however the interface is implemented through the C++ TMC file (TwinCAT Module Class Editor) instead of a POU.
The interface will specify method declarations, return types, and the parameters needed, while the C++ file will provide the method definitions.
- Creating the C++ Interface
- Static Link to C++ Module
- Creating the C++ TcCOM Module
- Connect the C++ Interface to Structured Text
- Dynamic Link to C++ Module
- Tips and Tricks
Back to Table of Contents
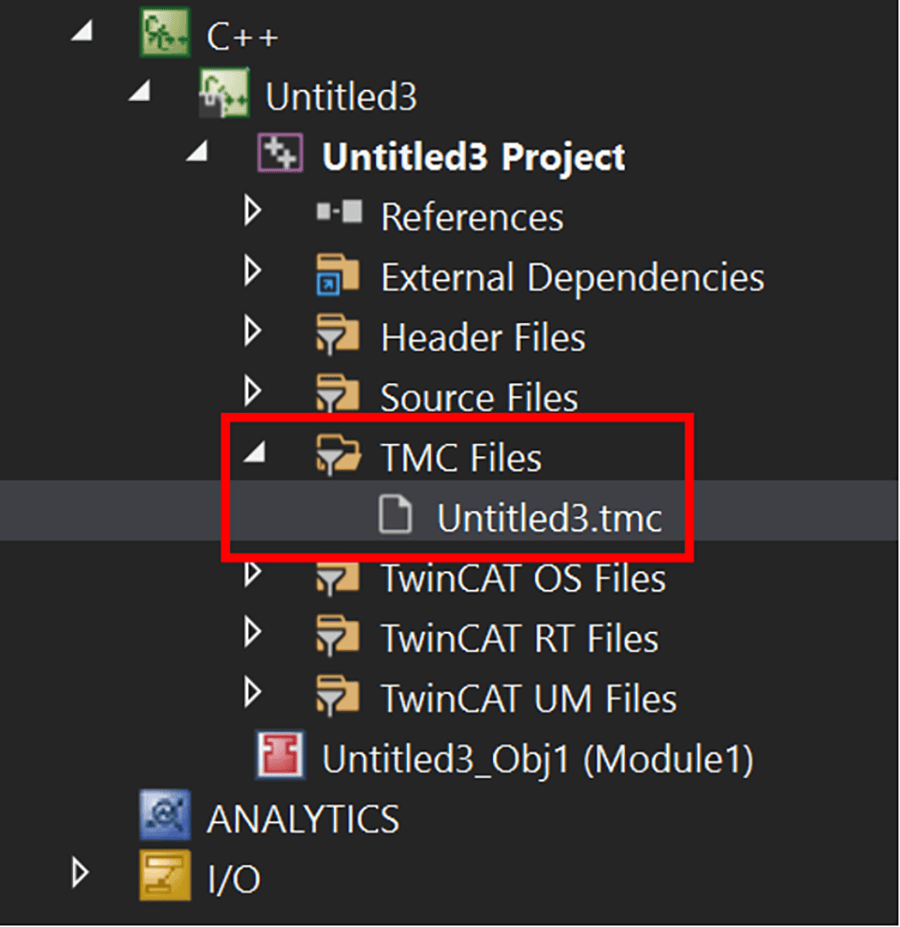
- To create the interface, open the .tmc file in the C++ project.
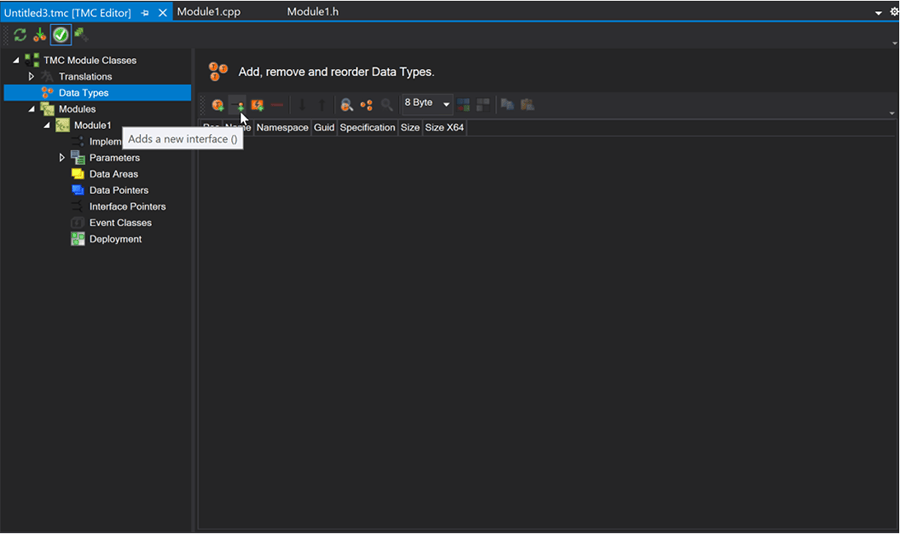
- In the TMC editor, click Data Types and click “Adds a new interface ()”.
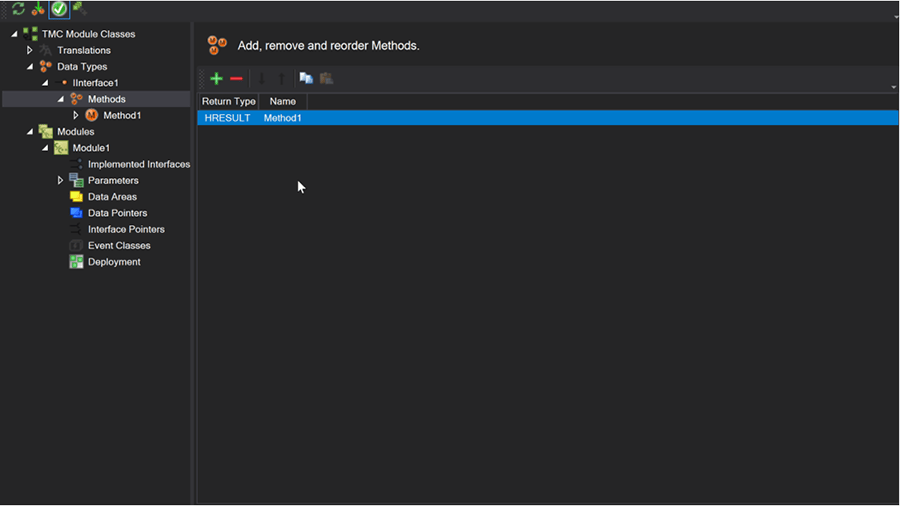
- This interface will contain all the methods that will be made accessible. To add new methods, click the drop-down icon to the left of the interface and select “Methods”. The buttons in the ribbon can create, remove, reorganize, or copy and paste methods.
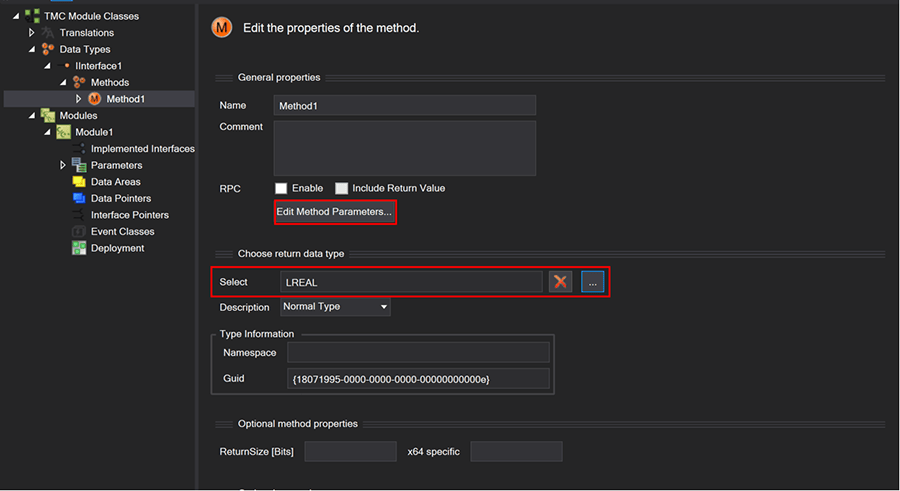
- Once a method has been created, double click it to edit its parameters and return type.
Note about custom data types:
- While the TMC editor allows you to create structs in the module and set the interface method’s return data type to a struct, TwinCAT does not allow structs as a return data type in the structured text / C++ interface. Doing so will cause a Structured return value not allowed in external function calls error.
- Additionally, structs cannot be used as parameters in method calls either. This will cause a Structured value types not allowed in external function calls error.
- Because of this limitation, to return multiple values from a method, it is recommended to use pointers or references to your desired return values as parameters of the method. TwinCAT will pass these values by reference.
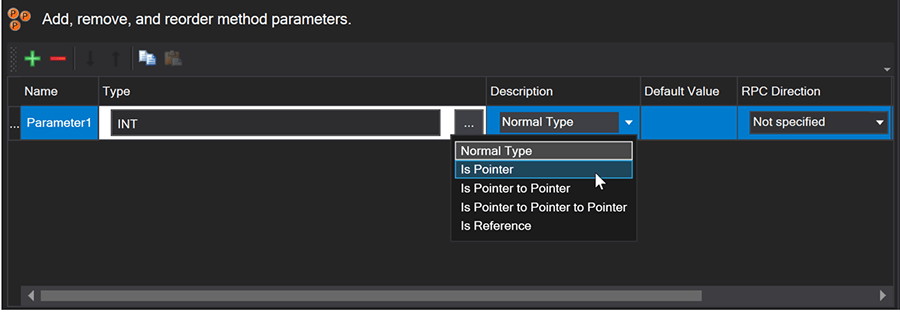
5. When editing Method Parameters, TwinCAT allows you to specify parameters as pointers, pointer to pointer, pointer to pointer to pointers, or a reference.
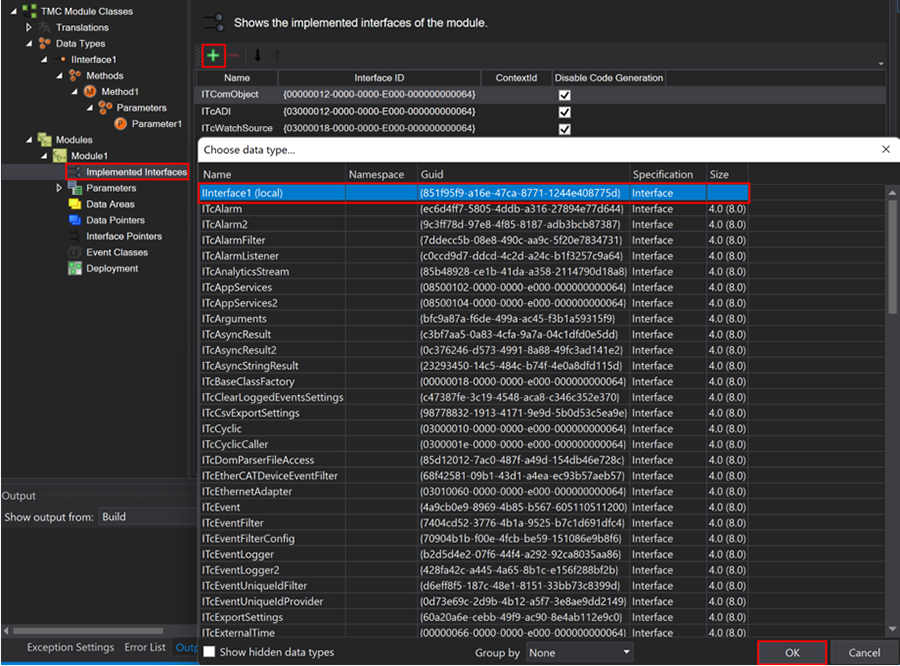
- Add all methods with return types and parameters to the interface.
- Once all methods are added, add the new interface to the TMC’s Implemented Interfaces section. This specifies that we are implementing the code for the interface within the C++ module. The interface created should appear in the list next to “(local)”.
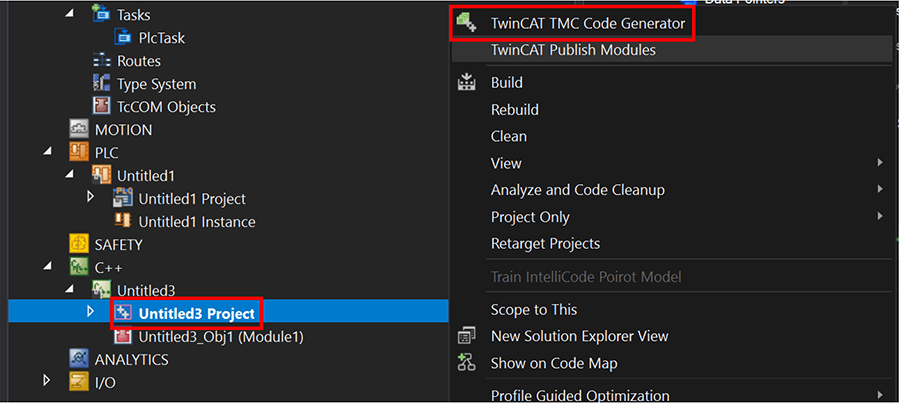
- Click the “Run TMC Code Generator” button and TwinCAT will automatically create function definitions and declarations in the .cpp file. The “Run TMC Code Generator” can be run by clicking the button.
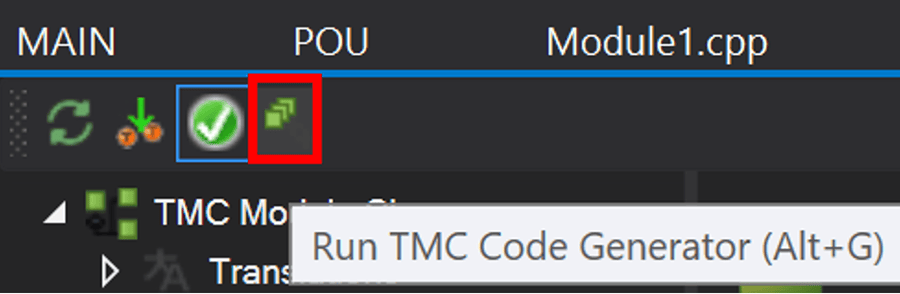
- The TMC Code Generator must be run any time you make changes to the TMC file (editing method parameters, return types, adding new methods, etc).
- If a previously generated method’s parameters or return type were edited, TwinCAT will move the program to the bottom of the .cpp file under an <AutoGeneratedContent id="Obsolete_ImplementationOf_IInterface1"> tag, and provide an empty function implementation. You can copy the previous code and make any edits as necessary.
- Add the C++ code into the function definitions.
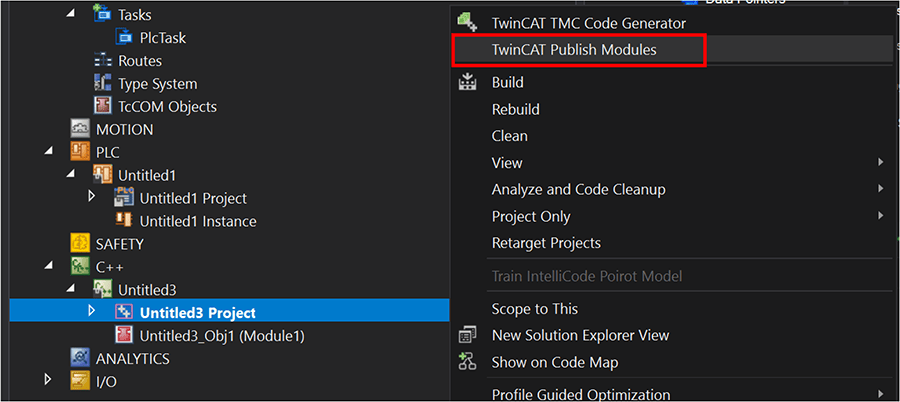
- Once all functions are added, compile the C++ code into a TMX file by right clicking the C++ Project and selecting “Publish Modules”. The Build Output of Visual Studio will show if the C++ project compiled successfully.
After creating the C++ interface, it must be linked to the structured text by creating a proxy function block. The structured text function block will host an interface pointer to the C++ memory which will expose the methods defined in the TMC file and allow the function block to call the C++ functions.
This can be done by creating a TcCOM object that is linked to a structured text FB (Section B) or can be dynamically created from within the structured text. (Section C).
Back to Table of Contents
The static link will create individual proxy function blocks for each instance of the C++ module. This is done by creating TcCOM modules for each instance desired. All instances must be created before runtime and cannot be created/deleted during runtime.
- Creating the C++ TcCOM Module
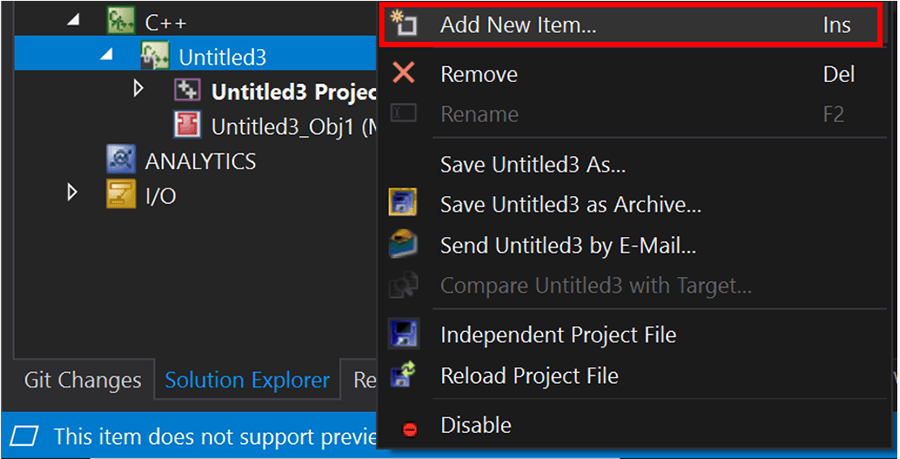
- After compiling the code, a C++ Module instance must be created. This can be added in the C++ project, or under System/TcCOM Objects.
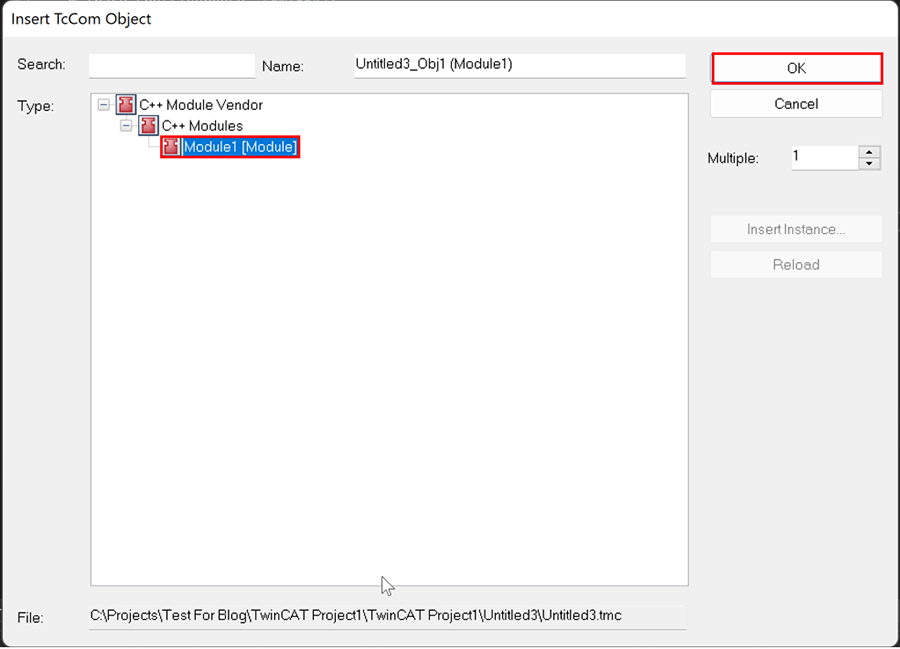
- In the C++ Project, right click the C++ project and click “Add new Item”. In the Insert TcCom Object popup, it will search the local project for the module’s TMC file. Select the module created and click OK.
- If adding under System/TcCOM, TwinCAT will search your development PC (not target PC) for the TMC file. Search for the module and verify that the file path is correct, then click OK.
2. Double click the Module Instance and select “Interfaces”. You should see your created interface in the list. This verifies that you have created your C++ interface and instance correctly.
- The TcCOM allows a system task to be assigned to the module in the “Context” tab, however that is only necessary if you have cyclic code. If you are only providing interface methods, it is not required.
B. Connect the C++ Interface to Structured Text
Once a TcCOM module has been created for the C++ code, it must be linked to a structured text function block through an interface pointer. The function FW_ObjMgr_GetObjectInstance can be used to create an interface pointer to an object instance upon function block initialization: FB_Init().
Upon function block deletion, FB_Exit() is called which runs FW_SafeRelease which releases the interface pointer memory. Note: this does not delete the C++ memory and any internal variables will be stored.
- Create a PLC Project if one does not exist.
- Add a new POU for the C++ Interface.
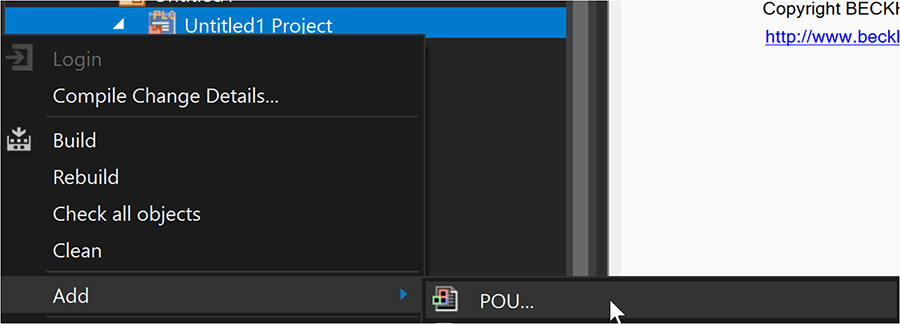
- A popup should appear allowing you to input a name for the POU.
- Add the following vars and methods to the function block in the main FB:
1 2 3 4 5 6 7 8 | VAR
{attribute
oidInstance : OTCID;
//ipInterface is the name of the interface pointer. You can provide any name.
ipInterface : IInterface1;
hrInit : HRESULT;
END_VAR
}
|
A. FB_Init() – This code connects the object specified at oidInstance with the interface specified at iid (in step 10.) and provides the pointer to the interface in pipUnk.
1 2 3 4 5 6 7 8 9 10 11 12 13 14 | METHOD FB_init : BOOL
VAR_INPUT
bInitRetains : BOOL; // if TRUE, the retain variables are initialized (warm start / cold start)
bInCopyCode : BOOL; // if TRUE, the instance afterwards gets moved into the copy code (online change)
END_VAR
//Implementation
IF NOT bInCopyCode THEN
IF ipInterface1 = 0 THEN
hrInit := FW_ObjMgr_GetObjectInstance ( oid:=oidInstance,
iid:=TC_GLOBAL_IID_LIST.IID_IInterface1,
pipUnk:=ADR(ipInterface1) );
END_IF
END_IF
}
|
B. FB_Exit() – This code deletes the interface pointer.
1 2 3 4 5 6 7 8 9 | METHOD FB_exit : BOOL
VAR_INPUT
bInCopyCode : BOOL; // if TRUE, the exit method is called for exiting an instance that is copied afterwards (online change).
END_VAR
//Implementation
IF NOT bInCopyCode THEN
FW_SafeRelease(ADR(ipInterface1));
END_IF
}
|
5. The C++ Methods can now be called the interface pointer’s methods. These method calls can be made in the FB’s main implementation or any FB method or action.
IF ipInterface <> 0 THEN
    // ipInterface is the interface pointer.
    getPrivInt := ipInterface.SetPrivInt(5);
END_IF
6. Add an instance of the FB to MAIN or any other POUs. Once all methods are added, click “Build” and see if the project compiles successfully. Once built, click the PLC instance and there will be a tab called “Symbol Initialization”. Select the oidInstance for the C++ object instance in the drop-down list.
7. Click “Apply to config” to download the structured text and C++ code to the PLC.
Back to Table of Contents
Instead of creating a TcCOM object that is an instance of the C++ code, the structured text function block can also dynamically create the TcCOM module during initialization: FB_Init(), or any method. This can be done using Twincat’s function FW_ObjMgr_CreateAndInitInstance.
Upon function block deletion, FB_Exit() is called which will run FW_ObjMgr_DeleteInstance.
1. Click the “TcCOM Objects” and select “Class Factories”. This list displays all C++ drivers on the computer. Ensure that the C++ driver you wish to implement has “Load” checked. 
2. Create a structured text function block. This function block is what will create the C++ interface instance.
3. Add the Tc2_Utilities library to your project references. This library is needed for the “STRING_TO_GUID” function used in FB_Init().
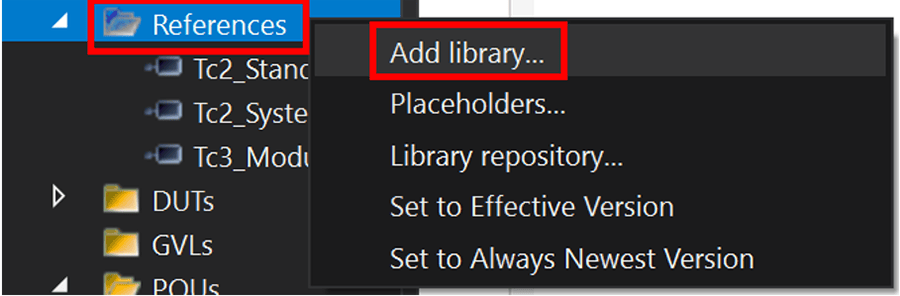
a. Under References, right click and select “Add library”.
b. Search “Utilities” at the top and add Tc2_Utilities.
4. Next, get the GUID and Library ID of the interface. This can be done by creating a TcCOM object and copying the GUID and Class ID. (instructions on how to create a TcCOM object can be found in part B).
5. Add the following functions and code to your function block:In FB’s implementation.
a. In FB’s implementation. The <GUID> is the GUID specified in the previous step, and <Library ID> is the text in the parentheses in Class Factory.
FUNCTION_BLOCK FB_CppDynamicLink
VAR_OUTPUT
    // this does not have to be an array
    ipInterface  : ARRAY [1..5] OF CppInterface;
    numInterfaces : INT := 1;
END_VAR
VAR
    objName : STRING;
    classId : CLSID := STRING_TO_GUID('<GUID>');
    sLibraryId  : STRING := '<Class ID>';
    classIdVersioned : CLSID;
    iid : IID := TC_GLOBAL_IID_LIST.IID_<InterfaceName>;
    hrInit  : HRESULT;
END_VAR
b.FB_Init() – This code will create the C++ instance upon the function block’s initialization. This code can also be adapted to create additional instances during runtime.
[Declaration]
METHOD FB_init : BOOL
VAR_INPUT
    bInitRetains : BOOL; // if TRUE, the retain variables are initialized (warm start / cold start)
    bInCopyCode : BOOL;  // if TRUE, the instance afterwards gets moved into the copy code (online change)

    sObjName    : STRING;
    eObjState   : TCOM_STATE;
END_VAR
[Implementation]
IF NOT bInCopyCode THEN
    objName := sObjName;
    F_GetClassIdVersioned(sLibraryId := sLibraryId, clsId := classId, clsIdVersioned:=classIdVersioned);
    hrInit := FW_ObjMgr_CreateAndInitInstance(  clsId   := classIdVersioned,
                                                iid     := iid,
                                                pipUnk  := ADR(ipInterface) + SIZEOF(ipInterface[1])*(numInterfaces-1),
                                                objId   := OTCID_CreateNewId,
                                                parentId:= TwinCAT_SystemInfoVarList._AppInfo.ObjId,
                                                name    := sObjName,
                                                state   := eObjState,
                                                pInitData:= 0);
END_IF
c.FB_Exit()
[Declaration]
METHOD FB_exit : BOOL
VAR_INPUT
    bInCopyCode : BOOL; // if TRUE, the exit method is called for exiting an instance that is copied afterwards (online change).
END_VAR
VAR
    i : INT;
END_VAR
[Implementation]
IF NOT bInCopyCode THEN
    FOR i := 1 TO 5 DO
        IF ipInterface[i] <> 0 THEN
            FW_ObjMgr_DeleteInstance(ADR(ipInterface) + SIZEOF(ipInterface[1])*(numInterfaces-1));
        END_IF
    END_FOR
END_IF
6. Add all function block methods to call the C++ methods as desired. The example at the bottom of the article shows how an internal C++ variable can be modified and accessed from the structured text.
7. Once the proxy function block is made, create an instance of the FB in MAIN or any other program. Any of the proxy function block's methods can be called from that program.
Back to Table of Contents
- While doable in C++ real time code, it may be easier to do any file IO (Reading/Writing from CSV) within the structured text and passing the read data to the C++ through a method call.
- TwinCAT had difficulty passing in 2D array pointers from Structured Text to C++. Because of this, I found the best way was to split the 2D array within the structured text into multiple 1D arrays that are passed in, and a Boolean to flag when it is the last row in the 2D array.
- To debug the C++, Follow these steps:
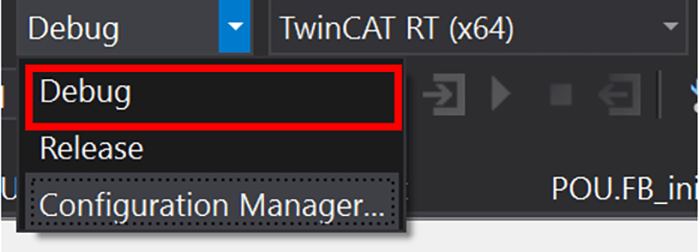
a. Build the C++ project in Debug instead of Release.
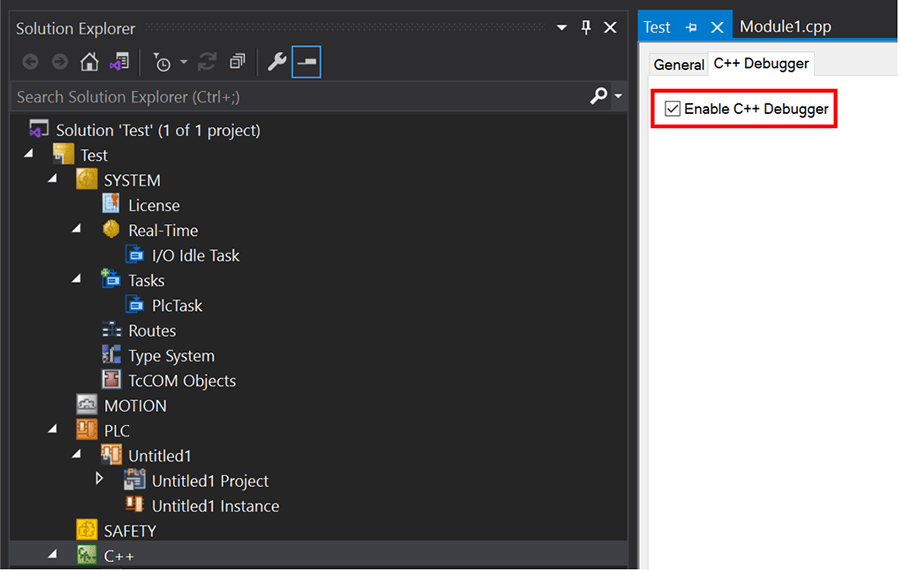
b. In the C++ Node settings, select the Enable C++ Debugger checkbox.
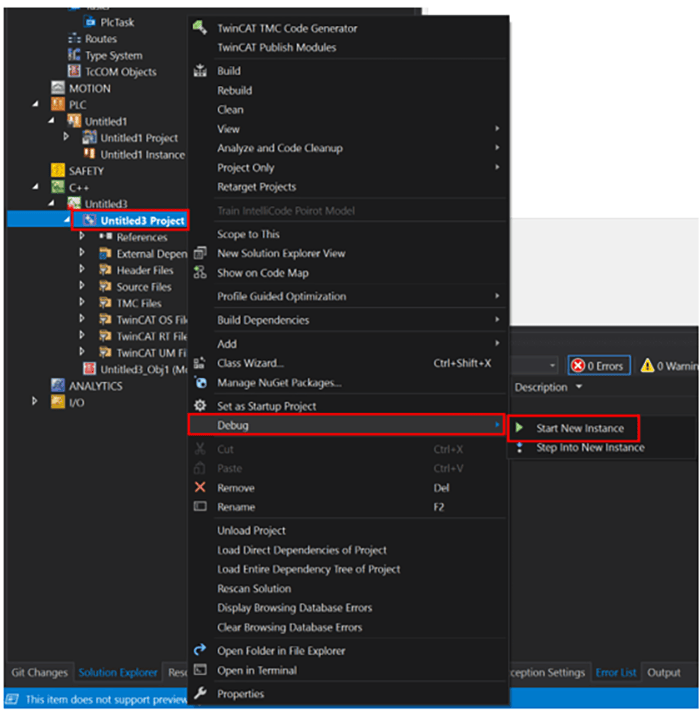
c. Right click your C++ project, go to Debug and click “Start New Instance”.
d. The C++ Debugger should start if you are running the C++ code. Keep in mind that the step controls for C++ debugger is different from the Structured Text step controls and PLC controls. These are the specific controls for debugging the C++ :

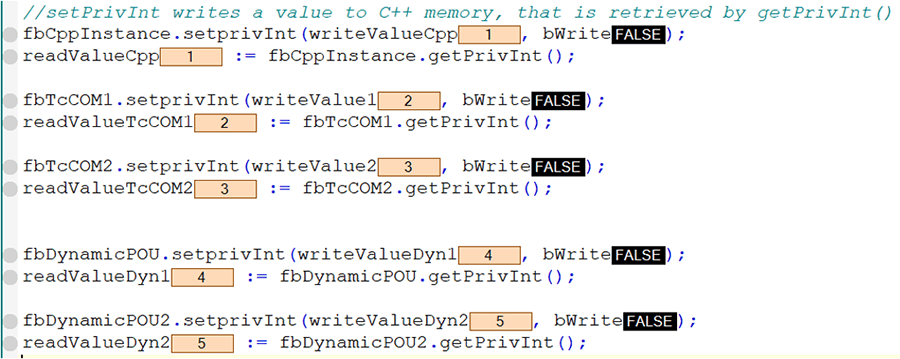
4. Running multiple instances of the C++ Module are allowed and will have separate memory from one another. This can be done by:
a. Creating multiple TcCOM objects and FB instances as described in Section B. Once all new FB instances are made, select the correct OID for each instance in the Symbol Initialization page. (Step 7 of Part B) Note: Both TcCOM objects are C++ project Instances are allowed.

Figure 1: Object 1 and 2 are TcCOM objects, while Untitled3_Obj1 is a C++ Project instance.
b. Creating multiple instances of the dynamic function block as described in Section C. Because the function block dynamically creates the C++ instances, the oidInstances do not need to be set. The sObjName can be modified however, it is not required. Both instances will be unique.
c. A mix of dynamic and static instances.
Learn more about our Beckhoff and TwinCAT 3 programming expertise and contact us for your next project.