Iconics’ GENESIS64 software is a powerful SCADA platform built to take advantage of modern technologies. If you are still using the GENESIS32 platform, it is a perfect time to migrate your system!
While the provided migration tools are very helpful to make the process as painless as possible, there are still some things that can accidentally trip you up. Here are some tips to keep in mind when performing a conversion to GENESIS64.
Tip 1: Remember to include all of your data
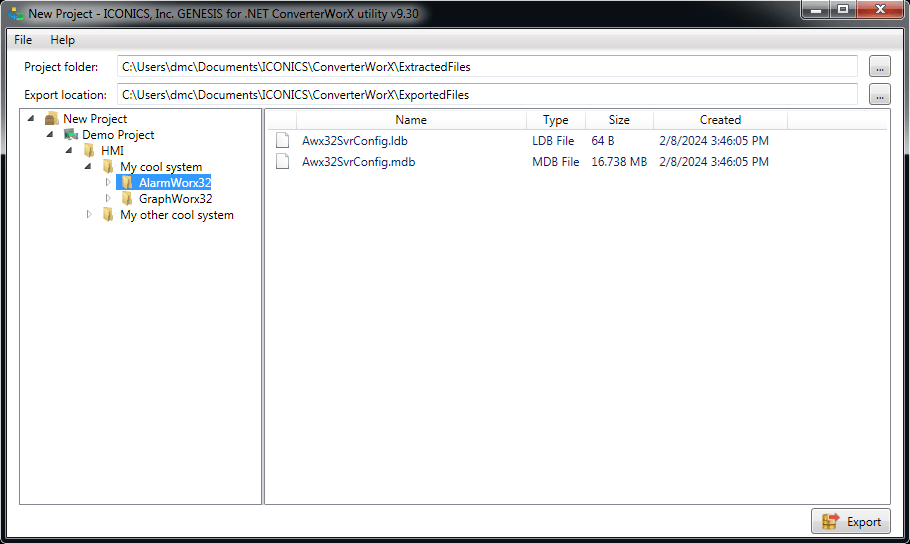
When using the GENESIS32 Exporter tool to export your current data, you need to make sure that everything you want to migrate is included in your export project. GENESIS32 was designed as a very modular system: which means there are multiple components that all need to be included and no centralized place to manage them.
While it is easy to remember all your GraphWorX files, you also need to include files such as your AlarmWorX server database. The exporter tool will convert them into an XML format that allows them to be easily imported into GENESIS64.
If you do not have access to the database files, you can also work with a CSV export. These will not be automatically converted for you, but you can get them to work with GENESIS64 through a little manipulation. If you do so, avoid using Excel to modify the CSV file, as it is possible for the format to get altered in a way that makes it incompatible.
Tip 2: Set the appropriate options when importing
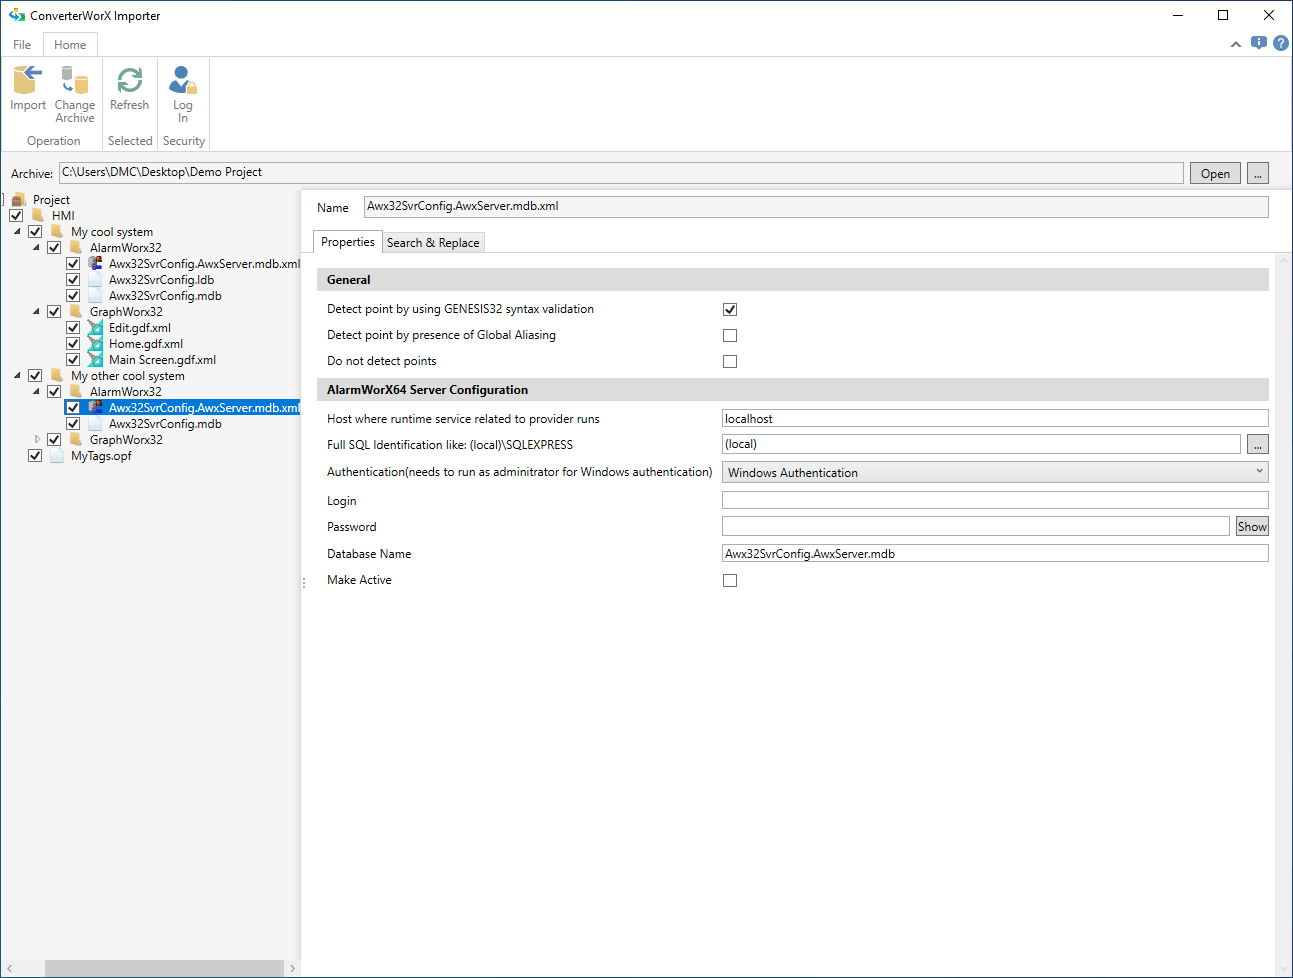
In the ConverterWorX Importer utility of GENESIS64, there are many options available to customize how objects are migrated. While the defaults are reasonable, it is a good idea to go through and make sure the options that make sense for your application are checked. The options that are shown are context-sensitive, so, if you want to modify the options for AlarmWorX import, you will need to select an AlarmWorX object.
Here are a few settings that I often change:
Translate OPC DA tagnames to OPC UA tagnames
Chances are, if you are converting from GENESIS32, your tags are using OPC DA. If you plan to continue using OPC DA in your new GENESIS64 application, make sure to uncheck this box; however, you will still have to go through and append “.Value” to your OPC DA tags to make them resolve correctly (hint: you can open your .gdfx file in a text editor and do this a bit faster).
Translate object name to valid Gwx64 name
It is a good idea to check this option to make sure your imported objects do not end up with an invalid name.
Disable using classic border from Gen32
The Classic Border object was a useful way to organize objects in GENESIS32; however, I find that grouping is much simpler in GENESIS64, and I prefer to remove Classic Border objects by checking this box.
Convert ActiveX Controls
You have the option to either try to convert any ActiveX controls (such as alarm viewers, grid viewers, etc.) to the .NET equivalent used in GENESIS64, or to replace them with placeholders.
Replacing with placeholders will place a red rectangle with text indicating what type of control it is a placeholder for. The placeholder option is good if you plan to revise the controls as part of the migration; however, if you are planning to keep everything as similar as possible, the .NET controls will do a lot of the work for you.
In my experience, there is sometimes a little cleaning up of the replaced controls required, but it still saves more time than configuring it from scratch. No matter which approach, I always recommend looking at your GENESIS32 and GENESIS64 configurations for these controls side by side, so you can verify that everything will be as similar as possible.
Once you have your options set the way you want, go ahead and start the import, but read the next tip before you call it a day.
Tip 3: Save your conversion log
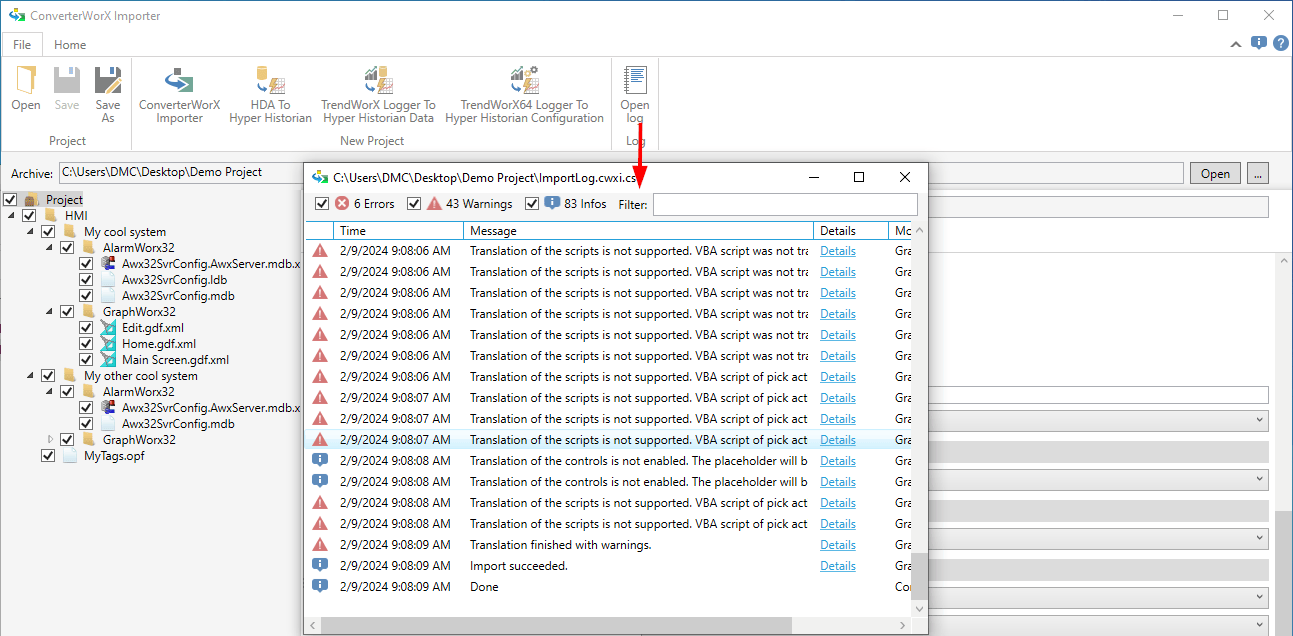
The log generated by ConverterWorX is very helpful. Whenever you are doing an import, you should always review the log at the end and keep an eye out for any errors or warnings. Anything that could not be converted (such as scripts) will be noted. This makes the log a great reference for making sure you go through and migrate everything manually.
There is a handy option to save the log as a CSV file for later reference. I like to put the log in version control with the other files so that I can easily pull it up when working through the migration process. You can even open the log in ConverterWorX to get the nice filtering options that it has.
Tip 4: Rewrite your scripts
One of the biggest challenges of migrating to GENESIS64 is that there is no automatic migration of scripts. GENESIS32 used two languages for scripting: VBScript and VBA. GENESIS64, on the other hand, uses JScript .NET. The syntax and structure of these languages are quite different, although VBScript is a little closer and can sometimes be quickly adapted with a little find/replace magic. Most of the time, though, it makes sense to rewrite the scripts from scratch.
While JScript.NET is not a very prevalent language, it shares many similarities with other .NET languages such as C#. The documentation from Microsoft can be found here, and Iconics has some additional documentation and examples on their site, including the API documentation for the Iconics-specific libraries. The API documentation can also be referenced from within the code editor.
While it would be impossible to cover every aspect of scripting without writing a medium-sized book, here are a few tips that I use in many projects:
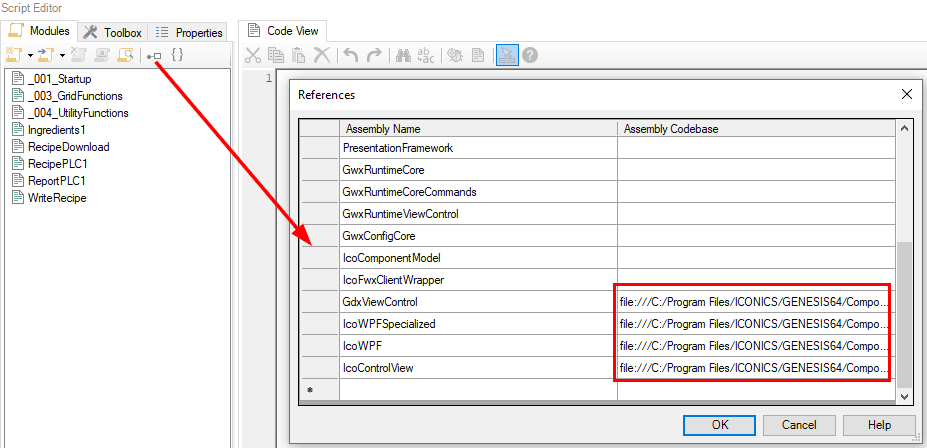
Adding References
Any other .NET-compatible code can be used inside your scripts if they are compiled into a DLL file. Iconics includes several for you to use that are required if you want to access libraries such as those for working with grid controls. You can find these in the GENESIS64 installation folder, inside the Components sub-folder.
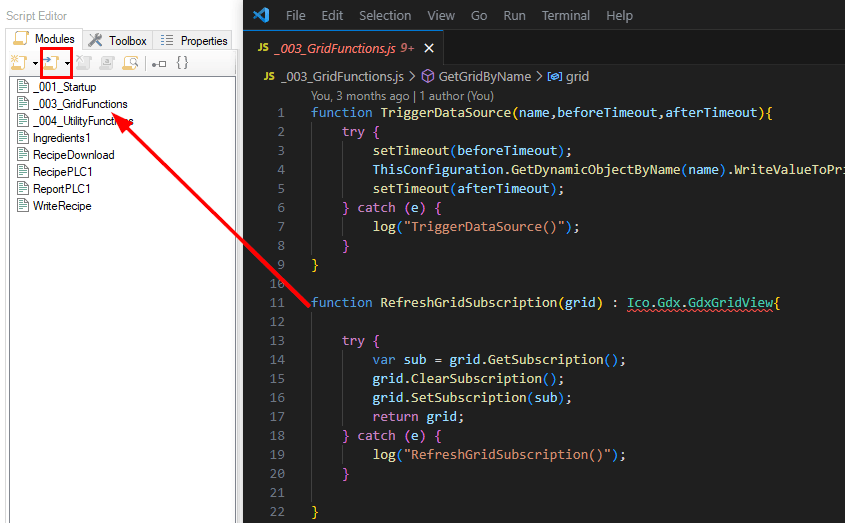
Save Scripts in JS Files
You can save your developed scripts in files that allow them to be reused later. This can be helpful for developing a library of utility functions that get used on multiple projects. The Import function allows these scripts to be imported back into Iconics. Unfortunately, there is no Export function, so you will need to copy/paste your script into a text editor and save it as a .js file.
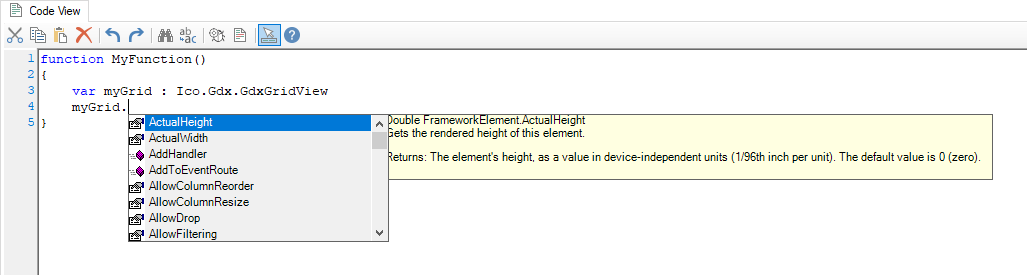
Enable IntelliSense
The IntelliSense feature supports auto-completion of functions and shows helpful documentation. It can be enabled from the toolbar at the top of the script editor. Sometimes it is a little buggy and will not show up properly, but usually that is due to a syntax error in the script causing it to be interpreted incorrectly.
Tip 5: Throw away your scripts
The easiest way to write scripts is to not have to! GENESIS64 has more powerful out of the box functionality than GENESIS32, and you can often avoid writing scripts by just taking advantage of its features. Here are a few things that can be replicated without using scripts:
1. Writing values to a SQL database. You can instead create a Data Manipulator in Workbench, and link that to a button or other Pick action.
2. Manipulating properties of screen objects. Using the new localsim:property:propertyPath syntax, simple properties such as opacity can be modified from any dynamic. See the Set Object Properties Without Scripting section of the documentation for details.
3. Modifying aliases. The Set Local Aliases and Set Global Aliases commands for Pick actions support this natively. As a bonus, the built-in Data Explorer allows you to just pick the alias(es) you want to modify, and GraphWorX will take care of the rest.
Tip 6: Minimize expressions
To be clear, there is nothing inherently wrong with expressions. They are a handy way to parse and manipulate data in a single data point; however, the syntax for expressions can be overly verbose, and they are more difficult to troubleshoot. I try to avoid using them when I can, and GENESIS64 includes some new tools that can replace traditional expressions. Let’s say I have an object that I want to hide when a tag is between two values. With an expression, the data source of my Hide animation looks like this:
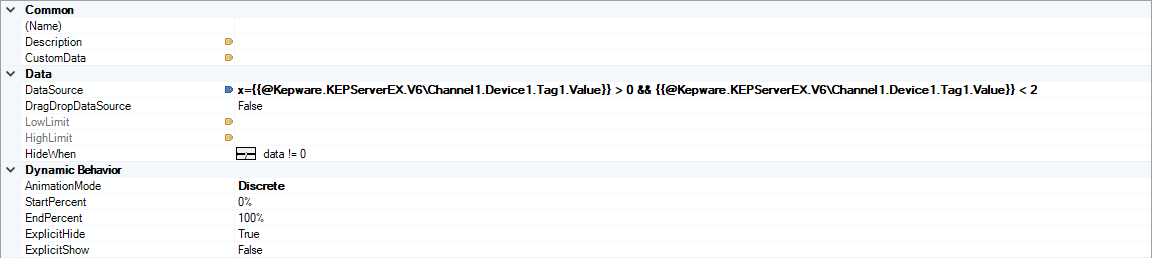
Hope you have a big enough monitor, otherwise scrolling through the expression is even more tedious! Let’s replace it using the new range functionality of animations.
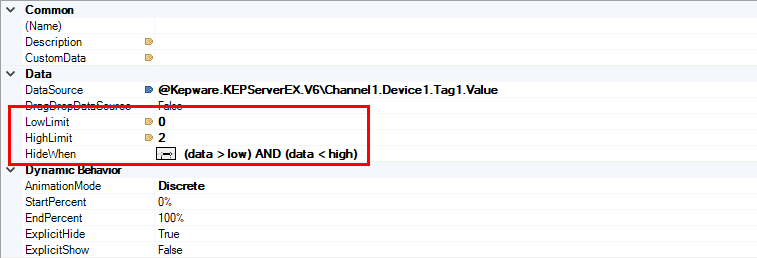
Now the LowLimit and HighLimit properties work as my lower and upper bounds on the data source. These can even be linked to other tags. It makes the dynamic much more readable, and the error messages you get at runtime will be much clearer.
Tip 7: Take advantage of Smart Symbols
One of the best features introduced in GENESIS64 is Smart Symbols. Smart Symbols allow you to create reusable graphics that can be embedded throughout your project. If you are used to creating symbols in GENESIS32, Smart Symbols will be intuitive and make your life even easier.
I’ve previously written about how to create and use Smart Symbols, so check that out when you’re getting started with your migration. Although it will take extra time, creating Smart Symbols will pay dividends when it comes time to expand or update your system in the future.
If you follow these tips during your migration, you will end up with a quick and easy process, as well as a GENESIS64 system that takes advantage of its new features and technologies. If you run into any problems along the way, do not hesitate to reach out; DMC provides services for both GENESIS32 and GENESIS64 platforms.
Learn more about DMC’s Iconics Programming expertise and contact us today for your next project.