Rockwell's Application Code Manager (ACM) can be used with PlantPAx to rapidly generate Control Module, Equipment Module, and Phase configuration that adheres to standard templates and best practices. Here's a quick start guide on setting up your first PlantPAx project in ACM.
Creating the Base Project
- Go to PCDC for Rockwell and download the Version 5 Library of PlantPAx
- Note – PlantPAx AOIs and instruction sets are now baked into the firmware of the P controllers from Rockwell and do not require downloading, but the PCDC still allows you to download some ancillary AOIs, configuration utilities, and the application code manager project.
- Open Application Code Manager (ACM).
- Create a new test project (File > New > Project)
- From our Download – we have already installed the PlantPAx library – we will go ahead and open the base project provided from Rockwell by selecting it and clicking Next>>
- This is what gives definition to how this project will be created.
- Here is where we can select how we would like our control strategies to be implemented.
- We are going to use Function Block (FB) diagrams here
- Give the base project a Name at the top of the Object Configuration Wizard
- Click Finish
Importing Base PlantPAx Definitions
Now we have our base project created! This is really what is going to give us that backend for generating our .ACD file later as well as our HMI displays.
- Import some of the base PlantPAx definitions (do that in order)
- Add the Historian
- System View > Project > Historian > ScanClass > Add
- Select the process tab by clicking the + and selecting the item in the line below.
- Click Next > Finish
- This imports the base definition.
- Import the Alarm definition.
- System View > Project > HMI > Alarms > Add
- Select the process tab by clicking the + and selecting the logical organizer item in one of the lines below.
- Click Next > Finish
- Import the HMI
- System View > Project > HMI > Displays > Add
- Select the process tab by clicking the + and selecting the item in the line below.
- Click Next > Next > Finish
Additional Definitions
Once all of these are imported, we can go through and set up some additional definitions.
- Add a Display
- System View > Project > HMI > Displays
- Click on the project that now shows in as an item below once you click on Displays
- Click on Displays in the center rectangular module to the right of Parameters
- Right click on the white space of the module > Add New
- Rename the display’s Name
- Create a Display Title
Now, we have a Display for some of our objects to reference to autogenerate some of their HMI corresponding devices.
- Now that definitions are set up, we want to drag in our controller
- Go to Registered Libraries, expand the dropdown
- Expand the Process Library
- Expand Controller
- Expand ControlLogix
- Click and drag the Process Control version from the upper right module to the lower left Controller Preview module. Place it in the Controllers folder.
- This will open an Object Configuration Wizard tab.
This gives us all the configuration options available with this controller definition.
- Give it a Name.
- Give it a Description.
Parameters > 01 - Controller
Customize the information about this controller by clicking into the line items and modifying them.
- What slot it is in
- The size of the back plane
- The version
- The specific ProcessorType
- Enable the PlantPAxTaskingModel
- Click the dropdown in the right column of the line > True
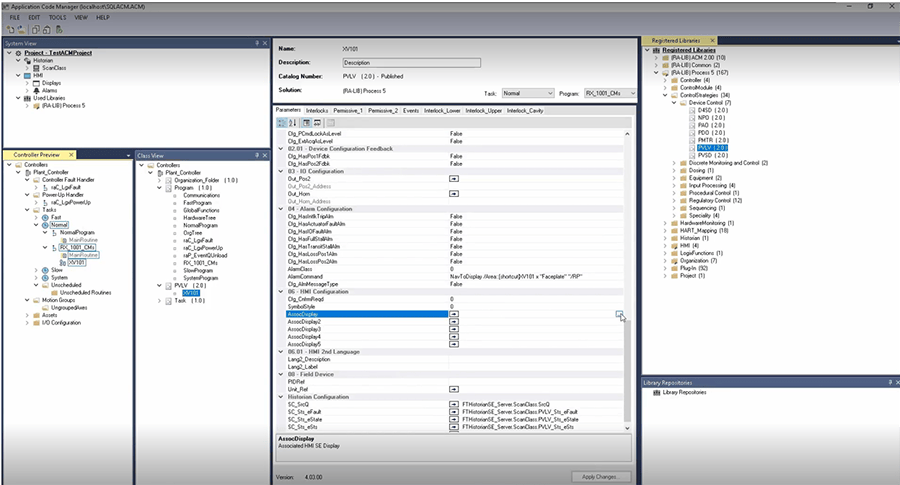
Parameters > 01 – HMI
Set up definitions on how the FactoryTalk SE will be integrated with it.
- Give it an Area
- Set the Path to [Plant_Controller}
Other Items
You can configure any of the rest of the items, or you can leave them as the defaults.
- Click Finish
You’ll see that the Controller has now been dropped into the project as well. This has created our base tasking structure, as we enabled the PlantPAx tasking model. We have the Fast, Normal, Slow, and System tasks here with some of the base program definitions already laid out to do some of the backend, or the system level, functions with PlantPAx.
The next thing we’ll do is drop in some of our organizational folders.
- Expand Organization in the Recent Libraries module on the right.
- Expand Folder
- Drag the Organization_Folder to the Class View module and into the Plant_Controller folder.
- This will open an Object Configuration Wizard tab.
- Name the top-level folder.
- In the example, we named it Plant.
- Add a Description
- In the example, we named it Plant.
- Next > Finish
This creates an Organization_Folder with our new subfolder.
- Create a Bioreactor suite.
- Double click on Organization_Folder > Add New Instances
- Make the Name and Description say BIORX
- Next > Finish
- Create a Reactor within that suite.
- Double click on Organization_Folder > Add New Instances
- Make the Name and Description say RX_1001
- Next > Finish
We can have ACM build out that hierarchy now.
- Under Class View, select Plant > ChildFolders
- Add a ChildFolder by right clicking on the white space of the module > Add New
- Click the white space in the line item under ChildFolderName
- Click the … > Project > Controllers > Plant Controllers > Organization_Folder > BIORX > Finish
- This links it to the bioreactor folder.
- Under Class View, select BIORX (When asked to Sav Changes to Plant ? select Yes)
- BIORX > ChildFolders
- Add a ChildFolder by right clicking on the white space of the module > Add New
- Click the white space in the line item under ChildFolderName
- Click the … > Project > Controllers > Plant Controllers > Organization_Folder > RX_1001 > Finish
- This links our reactor instance to our bioreactor suite
- Click Apply Changes
Now, our folder hierarchy is set!
Next, we will drop in some example devices as well.
- Open the ControlStrategies folder under the Registered Libraries module on the far right.
- Registered Libraries > ControlStrategies > Device Control
- Grab a valve and drag it into the Plant_Controller folder under the Class View module on the left.
- Class View > Controllers > Plant_Controller
Now that we have created our valve, we will go ahead and assign our control module program to our bioreactor.
- Class View > Controllers > Plant_Controller > Organization Folder > RX_1001
- Go to the center module and click ChildFolders
- Add a ChildFolder by right clicking on the white space of the module > Add New
- Click the white space in the line item under ChildFolderName
- Click the … > Project > Controllers > Plant_Controller > Program > RX_1001_CMs > Finish
- Click Apply Changes
The last three steps:
- How to link this device to a display in FactoryTalk SE
- We can now browse to the display we made at the beginning of this tutorial by finding it in Parameters and clicking on the … on that item’s line.
Select the RX_1001 as our associated display.
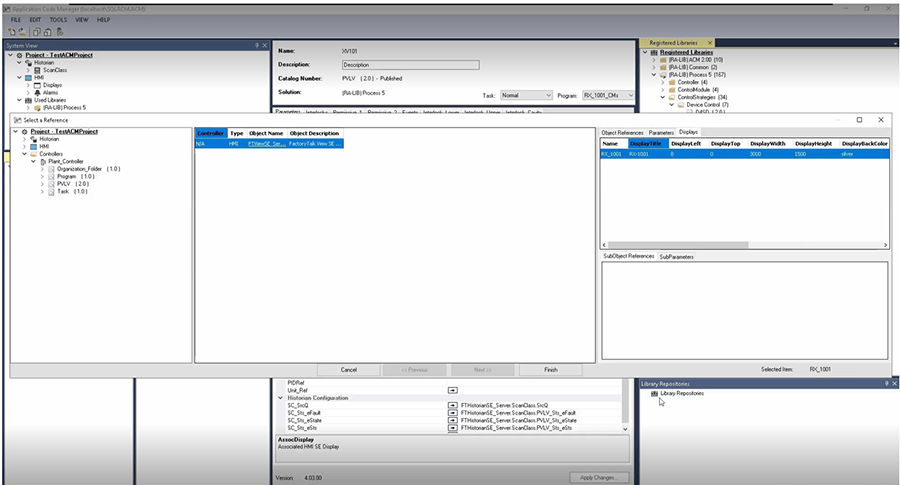
- Click Finish
- This brings in that pathway and makes that link on the backend.
Now, we can generate our ACD as well as our FactoryTalk USC configuration with this display and this valve already instance on it.
Generate Our ACD
This is our controller configuration.
- Class View > Controllers and right click on Plant_Controller > Generate Controller
- Check Create ACD
- . . . > Desktop > OK > Generate
This will generate all our configuration as we just defined. It goes fairly quickly because we only have a single device here. It can take a considerable amount of time with a much larger configuration, so be prepared to generate the ACD and maybe go to lunch if you have a larger project.
Click Close once finished.
Now, we can go and open that ACD.
File Explorer > Desktop >Plant_Controller.ACD
Now that our project is open, we can see we have our PlantPAx project module defined on the left.
If you click the Logical Organizer on the bottom right, you can expand the following folders: Plant > BIORX > RX_1001 > RX_1001_CMs and click on the valve XV101
You will then see the valve created as defined in ACM. Now we are done creating our controller configuration!
Generate Our HMI Display
Next, we will go ahead and generate our HMI display information.
- Go back to ACM
- System View > Project > HMI > Displays > FTViewSE_Server
- Right click on FTViewSE_Server > Generate Displays > Generate RX_1001_display > Save > OK
- Go to our sample project we already have set up in FactoryTalk View Studio
- We have a blank template Display for our RX_1001
- You can view this by clicking on Explorer > Network > PlantPAx > HMI Area > PlantPAxDemoSE > Graphics > Displays > RX_1001
- We will now import our ACM configuration.
- Do so by clicking Explorer > Network > PlantPAx > HMI Area > PlantPAxDemoSE > Graphics
- Right click on Displays > Import and Export… > Import graphic information into displays > Next > No > Next > Single display import file > Select the single display import file: … > RX_1001.xml > Select the display to import to: … > Displays > Process Graphics > RX_1001 > Finish > X (close the pop up window)
- By clicking Explorer > Network > PlantPAx > HMI Area > PlantPAxDemoSE > Graphics > Displays > RX_1001, you can see that it instance our valve that we created in ACM.
- Right click on the instance > Global Object Parameter Values
That is all we are going to demonstrate for now. We will follow up with some additional ACM videos getting to some of the more advanced configuration as well.
Read More About ACM
Learn more about DMC’s Process Automation solutions and ACM as well as our partnership with Rockwell Automation and contact us today for your next project!
]